
I’ve been dreaming about designing a bag that combines classic granny square charm with a modern, slouchy silhouette. Something that feels retro but looks fresh. Something practical enough for everyday errands but pretty enough to get compliments at the farmer’s market.
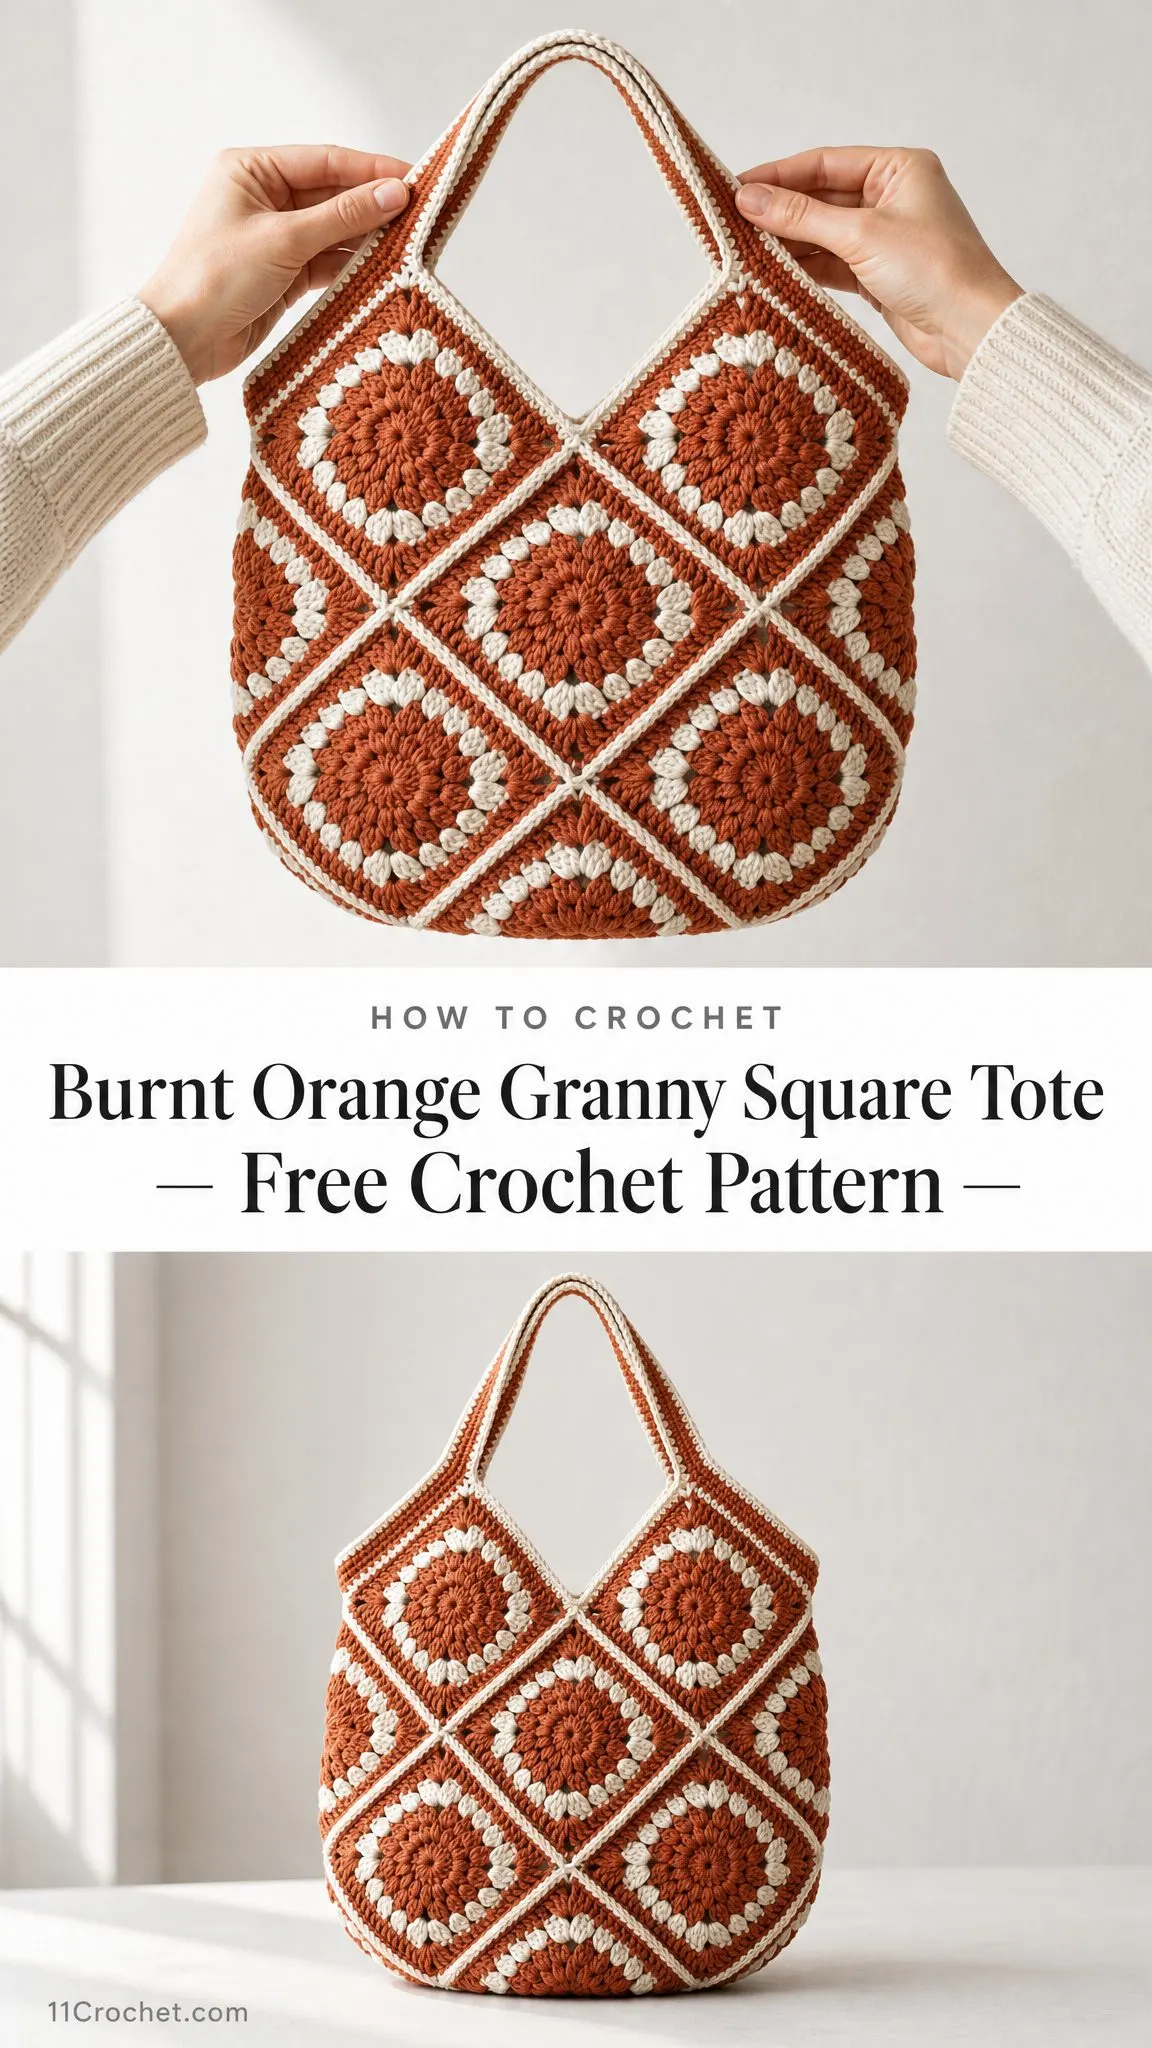
This Burnt Orange Granny Square Tote checks every single box. The sunburst motifs create this gorgeous diamond lattice when you join the squares together, and the terracotta and cream color combination feels perfectly on trend without being trendy in a way that will look dated next year.
I am SO pleased with how it turned out. The construction is straightforward, the rhythm of making identical squares is meditative, and the finished bag has that satisfying weight and drape that only cotton can give you. If you’re a confident beginner ready to tackle your first garment project, this tote is calling your name.
About This Burnt Orange Granny Square Tote Pattern
This slouchy shoulder bag is built from 18 identical sunburst granny squares arranged in a 3×3 grid for the front and another 3×3 grid for the back. The magic happens when you join them. The cream corners line up to create a continuous diamond lattice pattern that looks far more complicated than it actually is.
The finished tote measures approximately 14 inches wide by 14 inches tall, not including the strap. The strap drop is about 9 inches, which makes it comfortable for carrying on your shoulder. The soft, slouchy shape develops naturally once the bag is filled with your everyday essentials.
Skill level: Confident beginner. If you can work double crochet (dc), single crochet (sc), and have made at least one granny square before, you can absolutely make this bag.
Materials You’ll Need
Gather these supplies before you start:
Yarn:
You’ll want a smooth worsted weight cotton yarn for this project. Cotton shows stitch definition beautifully and gives the bag structure. Some great options include Lily Sugar’n Cream in solids, Paintbox Cotton Aran, or Scheepjes Catona held to gauge.
Tools:
Optional additions:
Quick tip: Cotton has very little stretch compared to acrylic, so keep a relaxed tension while you work. This helps the puff stitches in the center of each square stay plump and even rather than tight and flat.
Gauge and Finished Measurements
Gauge: One completed Sunburst Square should measure 5 inches by 5 inches (12.5 cm by 12.5 cm) with a 5.0 mm hook.
Here’s the thing about gauge for this project. Exact gauge isn’t critical, but consistent squares absolutely are. If your first square measures 5 inches and your eighteenth square measures 4.5 inches, you’ll have trouble joining them neatly. Make a test square, measure it, and try to keep that same tension throughout.
Finished size: Approximately 14 inches wide by 14 inches tall (35.5 cm by 35.5 cm), excluding the strap. Strap drop is approximately 9 inches (23 cm).
Abbreviations and Special Stitches
This pattern is written in US crochet terms. If you typically follow UK patterns, read sc as double crochet (dc), dc as treble (tr), and hdc as half treble (htr).
Standard abbreviations:
Special Stitches:
Puff Stitch (puff): This creates the raised "petals" of the sunburst center. Here’s how to work it: [Yarn over, insert hook in stitch or space, yarn over and pull up a loose loop] 3 times in the same place. You’ll have 7 loops on your hook. Yarn over and draw through all 7 loops, then chain 1 to close the puff.
The key word here is loose. If you pull those loops too tight, your puff will be skinny and sad. Let them breathe a little.
Beginning Cluster (beg-cl): Chain 2, then work one fewer pull-up than a full puff. This stands in for the first puff at the beginning of a round.
Pattern Notes Before You Begin
A few things to keep in mind as you work:
How to Make the Sunburst Square (Make 18)
Each square begins with a burnt-orange center that blooms into a puff sunburst, then gets framed in cream. Work all 18 squares exactly the same way.
Round 1: With CA, make a magic ring. Ch 3 (counts as dc), work 11 dc in ring. Join with sl st to top of beginning ch-3. (12 dc)
Round 2: Ch 3, dc in same st, 2 dc in each st around. Join to top of beginning ch-3. (24 dc)
Round 3: Ch 2, puff in same st, ch 1; skip next st, puff in next st, ch 1; repeat from around. Join to top of first puff. (12 puffs)
Checkpoint: After Round 3, you should have a tidy ring of 12 raised petals with a ch-1 space after each one. This is your sunburst. If you count 12 puffs and 12 ch-1 spaces, you’re right on track.
Change to Cream
Fasten off CA or carry it loosely if you prefer. The next rounds transform the circle into a square using four corners placed evenly around the sunburst.
Round 4: Join CB in any ch-1 sp. Ch 3, (2 dc, ch 2, 3 dc) in same sp, this is your first corner; dc in next 2 ch-1 sps, (3 dc, ch 2, 3 dc) in next ch-1 sp; repeat from twice, dc in last 2 ch-1 sps. Join. (32 dc, 4 corner spaces)
Round 5: Ch 3, dc in each dc to first corner sp, (2 dc, ch 2, 2 dc) in each ch-2 corner sp, dc in each dc around. Join to top of beginning ch-3. Fasten off, leaving a long tail for joining. (48 dc, 4 corner spaces)
Each finished side now has 12 stitches (10 dc plus a half-corner at each end), so your squares will meet evenly when joined.
Weave as you go: I highly recommend weaving in the CA center tail of each square before joining. It becomes much harder to reach once the panel is assembled. Leave the CB tail long because you’ll use it for sewing the squares together.
If your motifs curl at all, block them lightly to 5 inches square. Cotton responds beautifully to a gentle steam and pin.
Joining the Squares
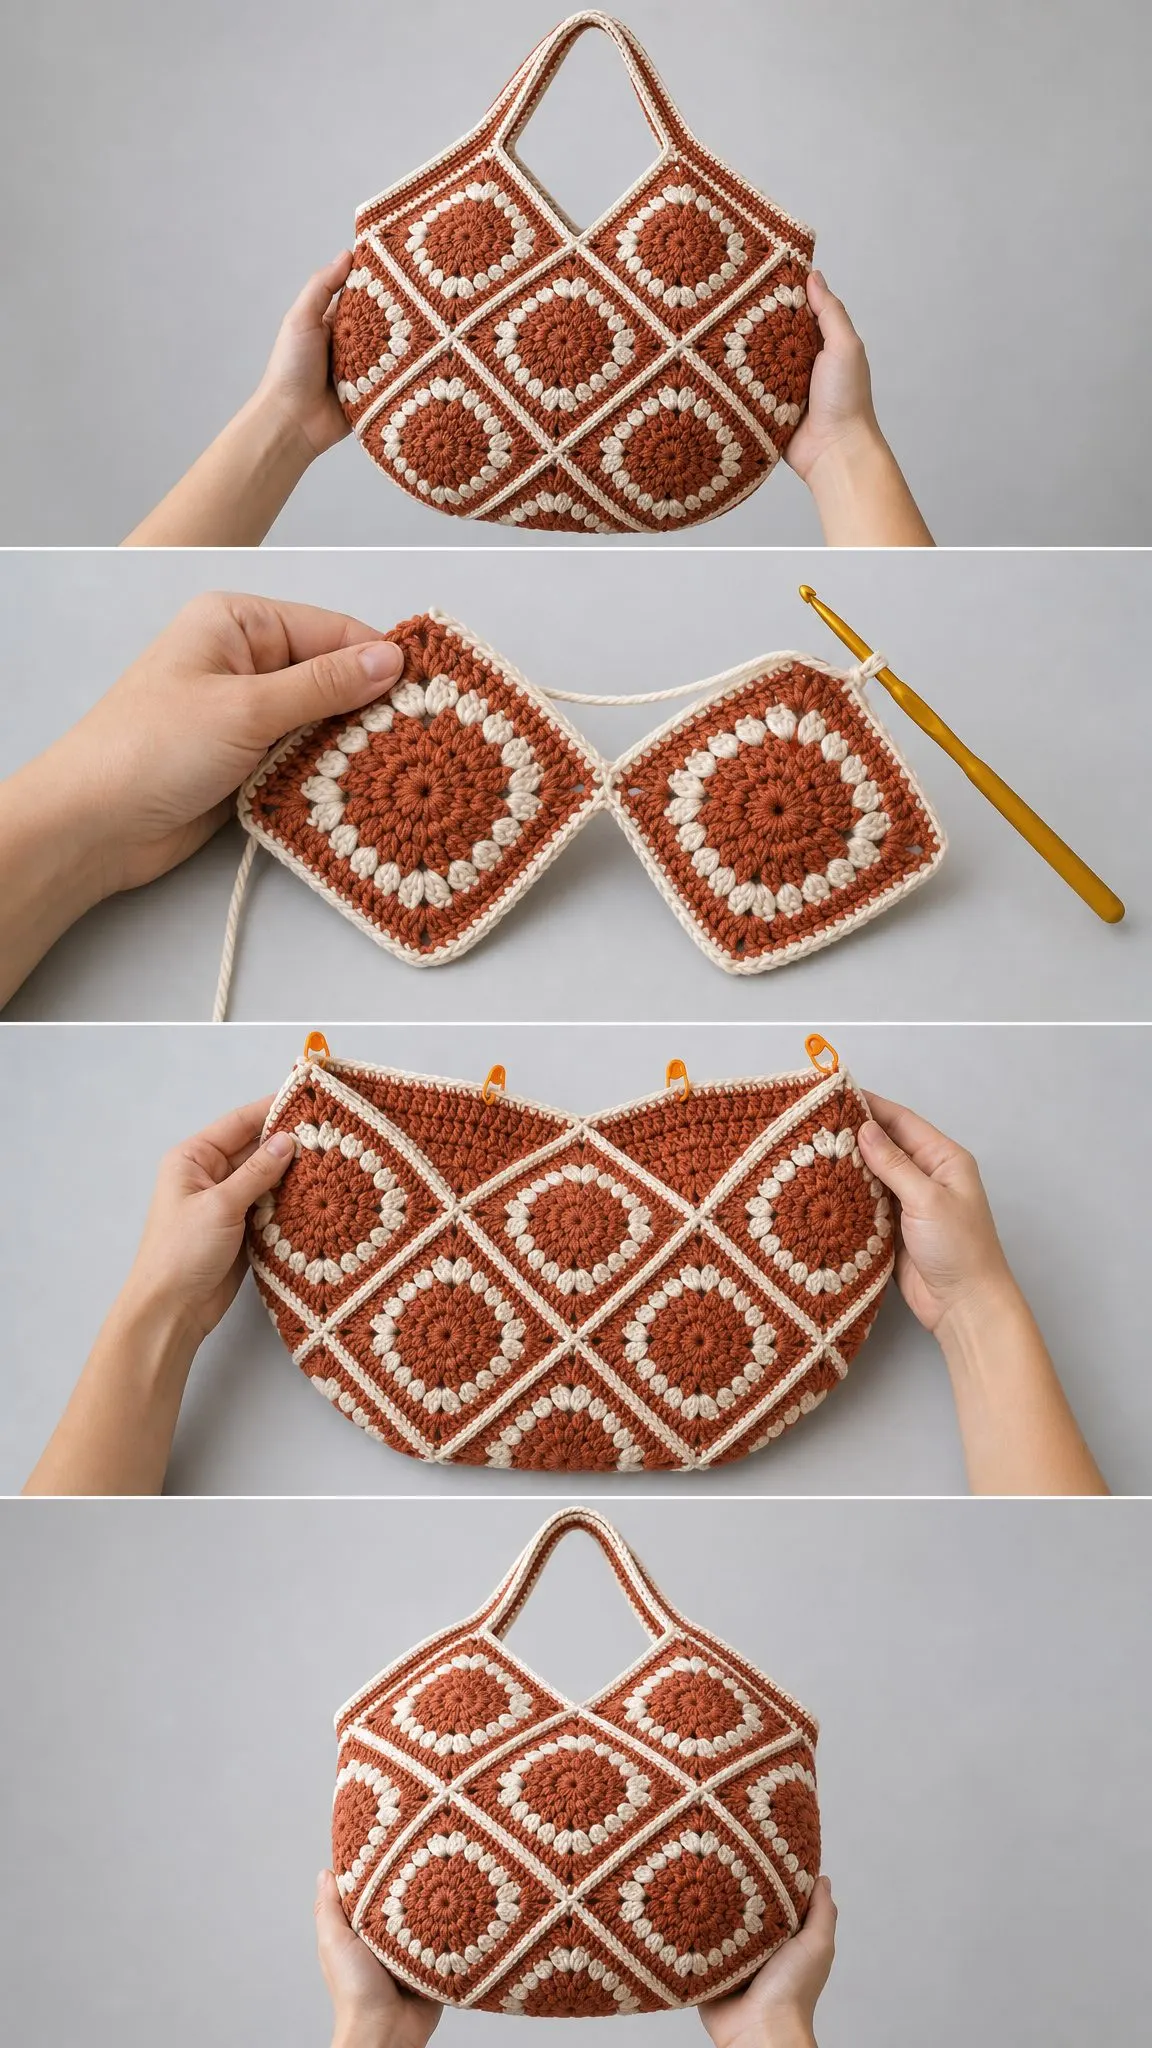
Arrange your 18 squares into two panels of 3 across by 3 down. One panel becomes the front, one becomes the back. Make sure all squares face the same way so the sunbursts align properly.
Joining Method (Whip Stitch):
1. Hold two squares with right sides together, edges matched stitch-for-stitch (12 stitches)
2. Using CB and your tapestry needle, whip stitch through the back loops only for a flat seam
3. Work from corner ch-2 space to corner ch-2 space
4. Join all squares in each row first, then join the rows together
Prefer to crochet your joins? Hold squares wrong sides together and slip stitch or single crochet through both back loops across each 12-stitch edge. Just keep the same method throughout so every seam matches.
Result: Two flat 3×3 panels, each approximately 15 inches (38 cm) square before seam take-up. The cream corners should run in clean diagonal lines, forming that beautiful diamond lattice.
Shaping and Seaming the Tote
Now we turn those flat panels into a bag.
Place the front and back panels with right sides together, edges aligned.
Seam 1: Whip stitch the two side edges together from the bottom corner up, stopping about one square-height (5 inches / 12.5 cm) below the top on each side. This leaves the upper sides open for the shoulder opening. (2 side seams)
Seam 2: Whip stitch the full bottom edge closed across all three squares. (1 bottom seam)
Turn the tote right side out. The square base naturally rounds into the soft, slouchy shape shown in the photos once the bag is filled.
Top Shaping
The open upper sides form a gentle V at the center front and back. To finish this edge neatly:
Edge Round: With CB, work 1 round of sc evenly around the entire top opening, working 1 sc per stitch and 1 sc per row-end. At each inner V point, work sc2tog to keep it from gaping. Join with sl st. (approximately 132 sc)
Depth tip: For a roomier base, you can seam the bottom with a 2-square-wide gusset. See the sizing notes at the end of this pattern.
The Strap and Top Edging
The wide single strap is worked as a long flat band in CA, then edged in CB to echo the body of the bag.
Row 1: With CA, ch 13. Sc in 2nd ch from hook and in each ch across. Turn. (12 sc)
Rows 2-90: Ch 1, sc in each st across. Turn. Repeat until band measures approximately 30 inches (76 cm), or your preferred length. Do not fasten off. (12 sc)
Edging: Ch 1, sc evenly down the long edge; at the end, switch to CB and sc back up the opposite long edge. Fasten off. (2 edged sides)
Attaching the Strap:
1. Pin one strap end to the inside top edge at the center of the front opening, spanning the middle square
2. Whip stitch firmly through both layers, reinforcing the corners
3. Attach the other end to the back opening center, making sure the strap is not twisted
Strength matters: Go around each attachment point twice. A loaded cotton tote puts real tension on the strap join, so take your time here.
Finishing Your Tote
Almost done! These final steps make the difference between a homemade bag and a professional-looking finished piece.
1. Weave in all remaining ends on the wrong side, splitting plies for a secure, invisible finish
2. Turn the bag inside out and check every seam; reinforce any loose corner joins
3. Block the finished tote by lightly steaming and gently shaping the body, then let it dry flat
Optional Lining:
Cut a fabric panel to the flattened bag size plus a 1/2 inch (1.3 cm) seam allowance on all sides. Sew it into a pouch, press the top edge under, and hand-stitch it just below the cream top round. Add a magnetic snap or short zipper at the center top if you want a closure.
Quality check: Hold the bag up to a window. Even daylight through the motifs means even tension. Tug gently on the strap joins and the bottom seam. Everything should feel firm and secure.
Care Instructions
Your finished tote will last for years with proper care.
Washing: Hand wash cool with mild detergent. Cotton can be machine washed on gentle in a mesh bag, but hand washing best preserves the motif shape.
Drying: Do not wring. Press out water in a towel, reshape, and dry flat away from direct heat and sunlight.
Storage: Store stuffed lightly with tissue to hold the rounded shape. Avoid hanging by the strap long-term.
Pilling: Trim any pills gently with a fabric shaver. Never pull them.
Cotton may relax and soften with use. That gentle slouch is part of the charm of this tote.
Make It Your Size
Want something smaller or larger? Here’s how to adjust.
Smaller (Day Pouch): Work panels of 2×2 squares (8 total). Finished approximately 9 inches (23 cm). Shorten the strap to around 22 inches (56 cm) for a crossbody feel.
Larger (Market Tote): Work panels of 4×3 squares (24 total) for approximately 19 inches (48 cm) wide. Add an extra cream edging round at the top for stability under load.
Deeper Base: Insert a gusset by making 3 extra squares in a single row and seaming them between the front and back panels along the sides and bottom for a boxier, free-standing bag.
Quick math: Each square adds about 5 inches (12.5 cm) to a dimension. Decide your target width and height, divide by 5, and round to whole squares. Budget approximately 28 yards of CA and 20 yards of CB per square.
You Did It!
Thank you so much for choosing this pattern for your next project. I really hope you love making this Burnt Orange Granny Square Tote as much as I loved designing it. There’s something incredibly satisfying about watching those sunburst squares stack up and then come together into a finished bag you’ll actually use.
If you make this tote, I would absolutely love to see it! Share your photos on Instagram or Facebook and tag me so I can celebrate your finished project with you.
Don’t forget to save this pattern to your Pinterest boards so you can find it easily when you’re ready to cast on. And if you have any questions or just want to share how yours turned out, drop a comment below. Happy crocheting!
