
I don’t know about you, but I have been dreaming about a crochet dress that actually looks like something I would wear outside the house. You know the kind I mean. Structured enough to flatter, soft enough to feel special, and interesting enough to keep me hooked through the entire project.
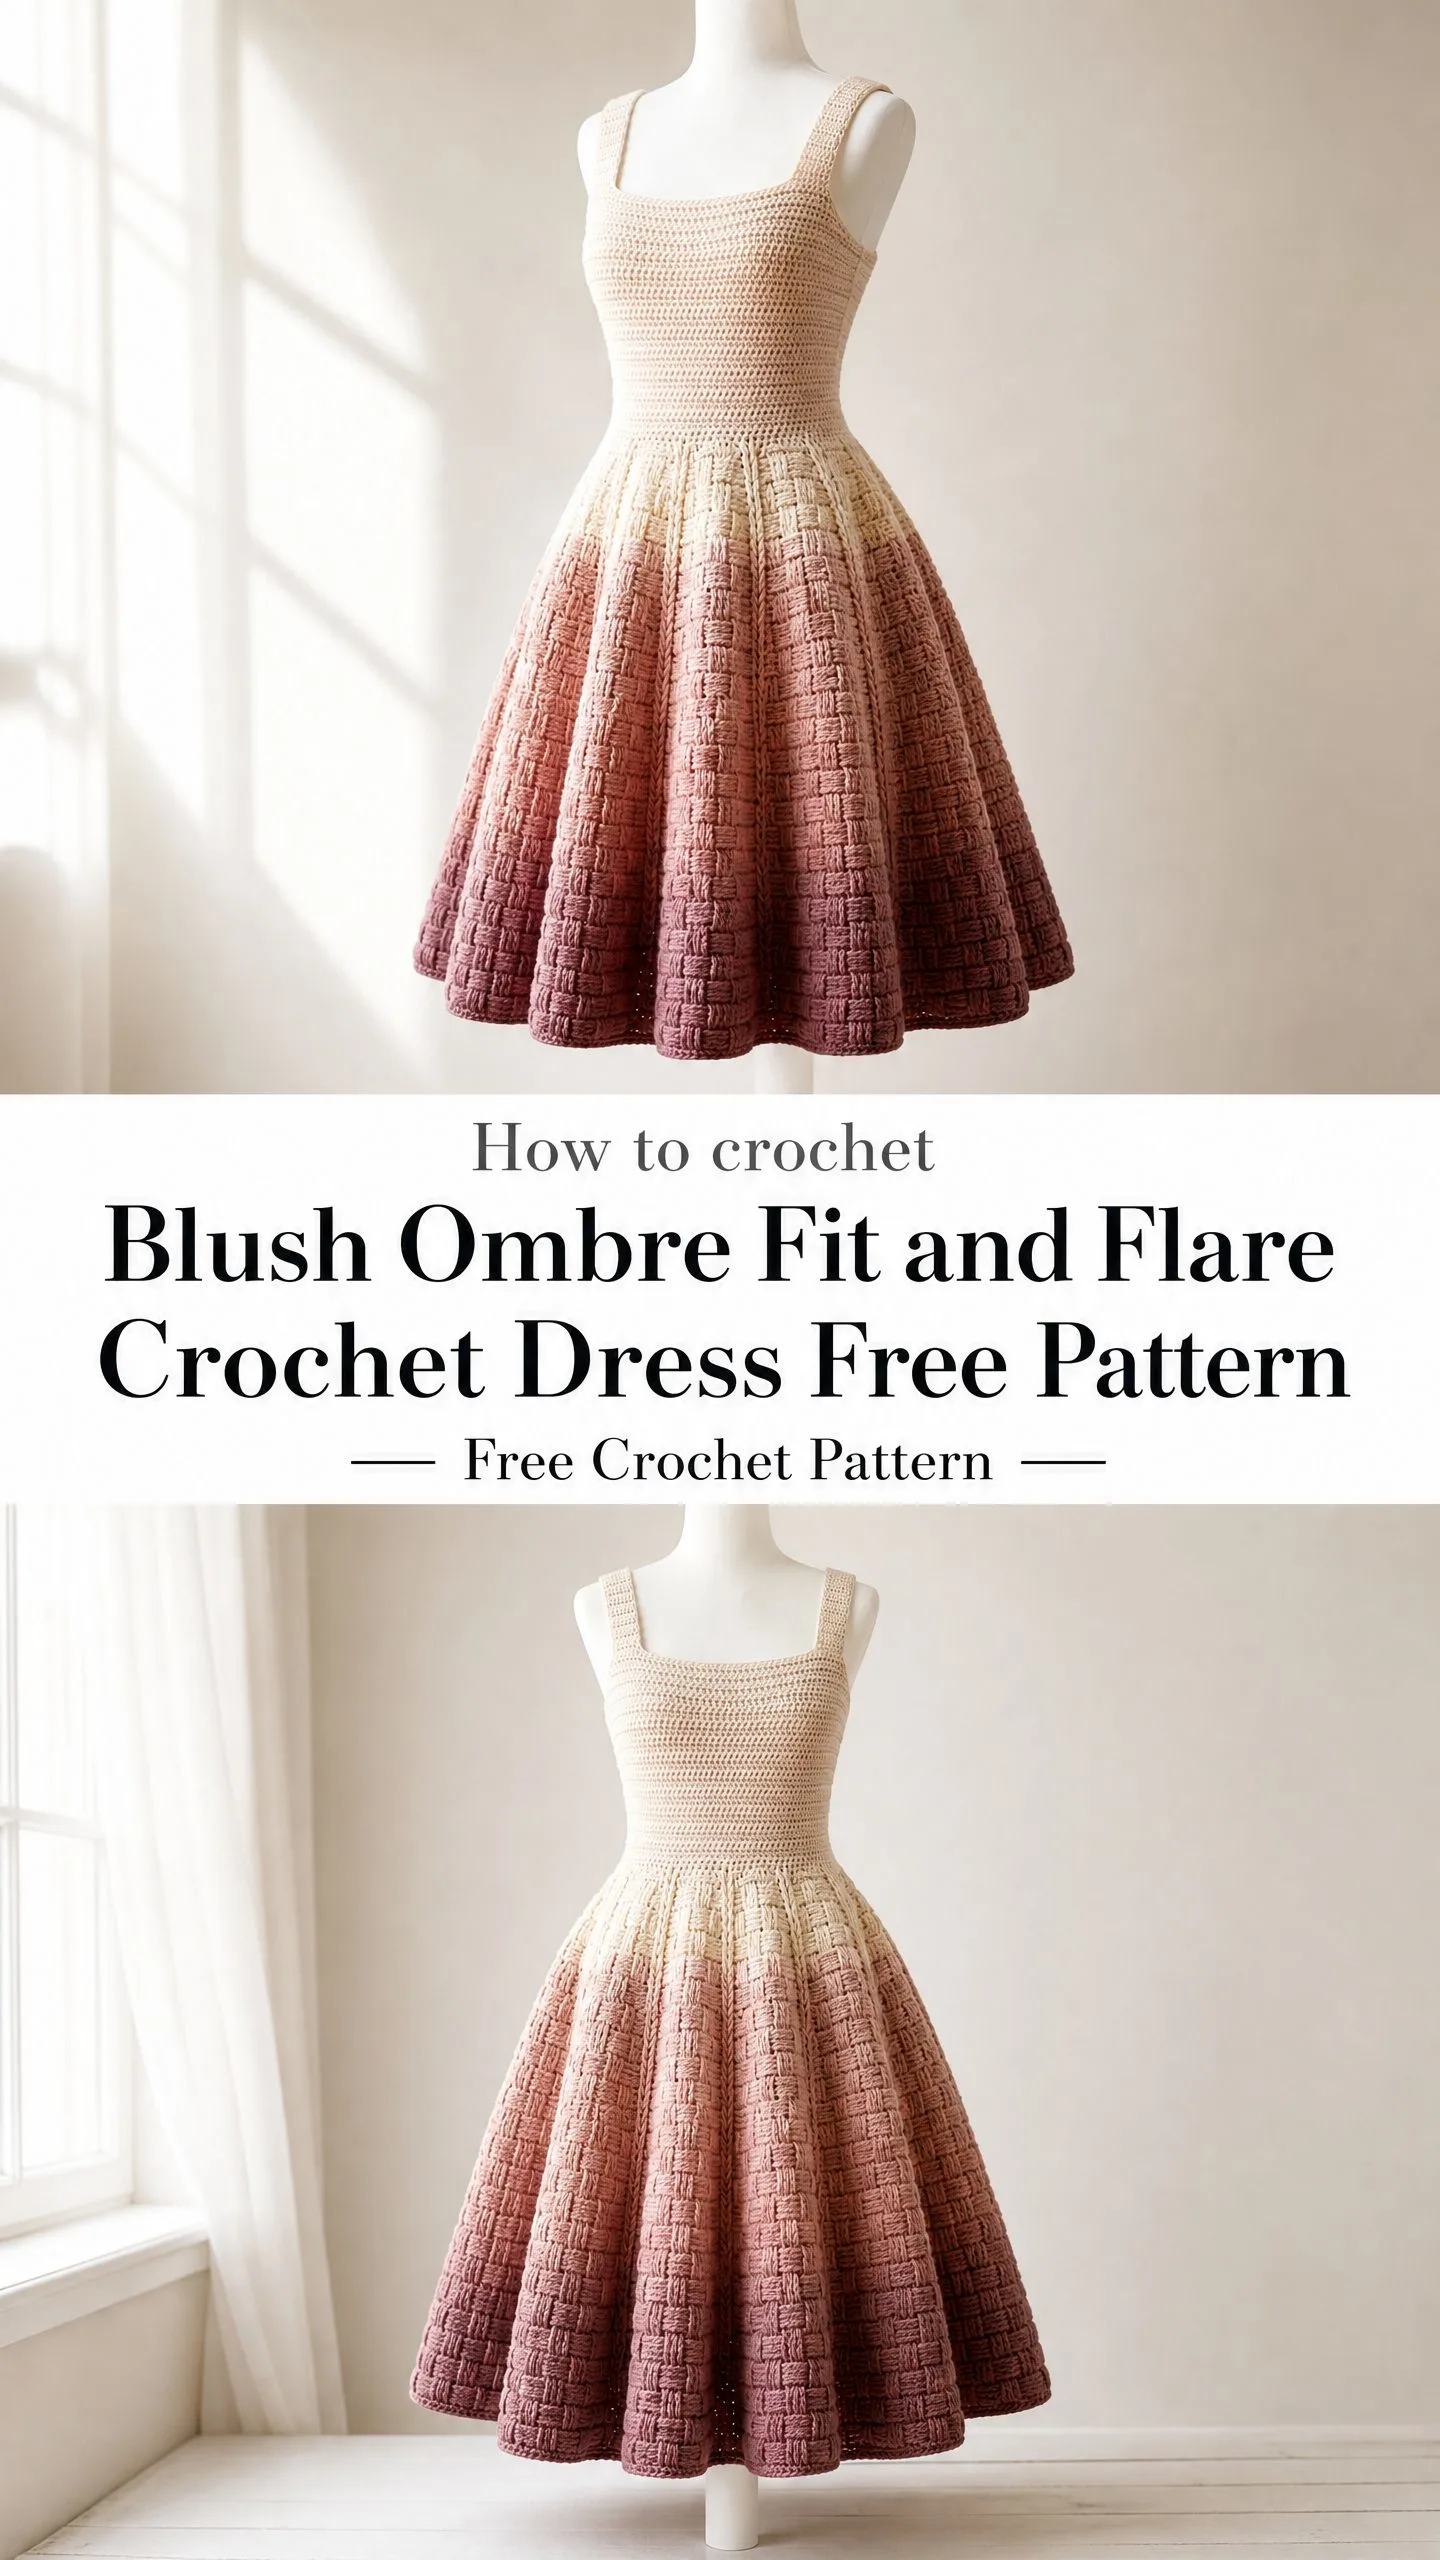
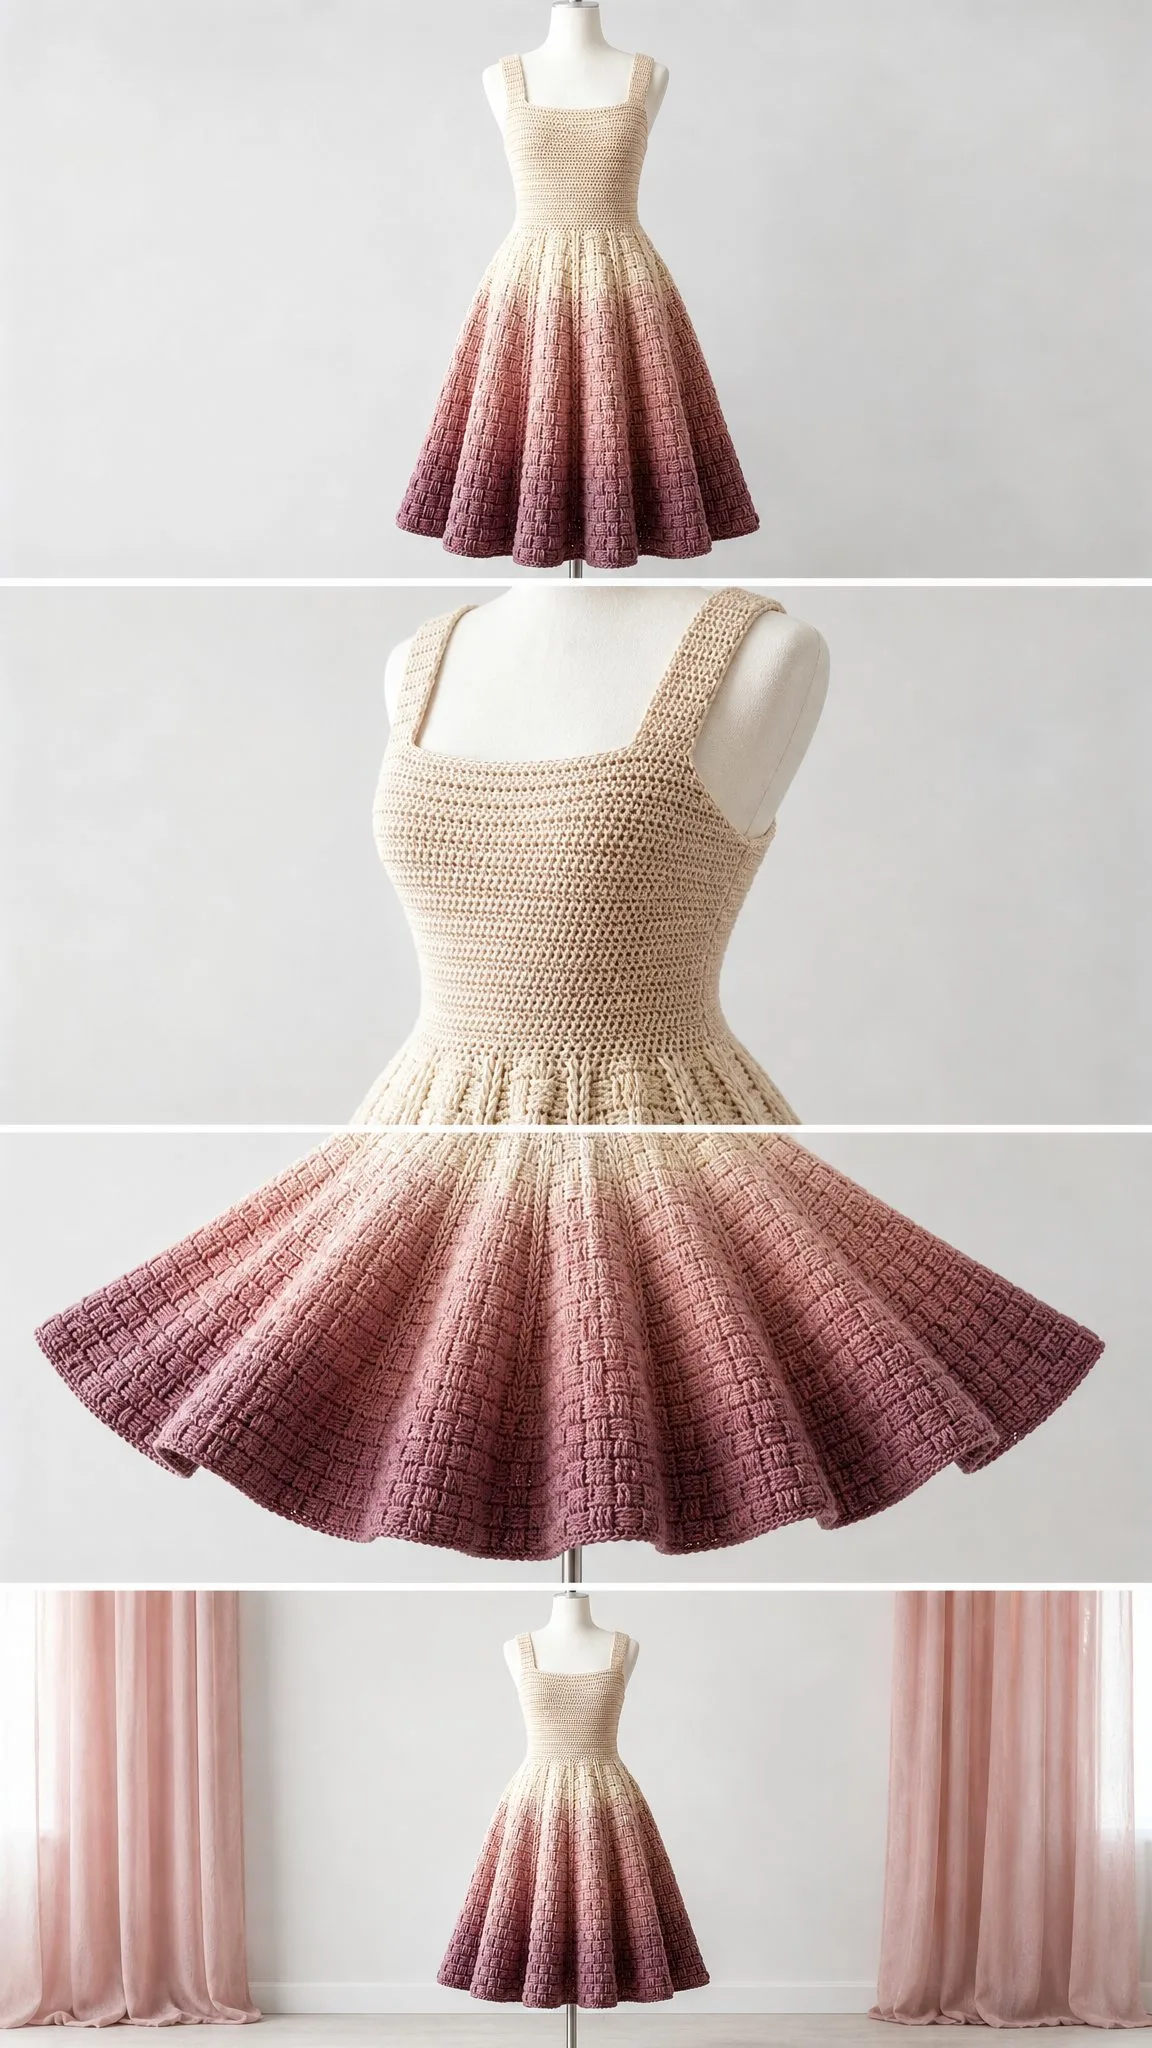
This dress is exactly that. A fitted bodice flows into a dramatically flared skirt with a gorgeous basket weave texture. The ombre fade from cream to dusty rose to deep mauve happens so gradually that it looks professionally dip-dyed. And yes, it has pockets. Just kidding, it doesn’t. But it does have wide square-cut shoulder straps that sit beautifully and an invisible zipper closure that makes it actually wearable.
If you have been wanting to tackle a garment project that feels ambitious but totally achievable, this is your sign. The construction is logical, the shaping makes sense, and I am walking you through every single round.
About This Crochet Dress Pattern
This fit and flare crochet dress is worked seamlessly from the top down. You will start with the straps, build the bodice in single crochet with waist shaping, then launch into a show-stopping skirt worked in a raised basket weave stitch pattern.
The ombre color transition is where the magic happens. Instead of harsh color changes, you will hold two yarns together for several rounds before dropping the old color. This creates a soft heathered blend zone that mimics professional gradient dyeing.
Skill level: Advanced beginner to intermediate. If you are comfortable with single crochet and willing to learn front post and back post double crochet, you can absolutely make this dress. The bodice is straightforward, and the basket weave becomes rhythmic once you get the hang of it.
Time estimate: Approximately 40 to 60 hours depending on your speed and experience. This is a project to savor, not rush.
Finished Measurements
This pattern is written for size Small/Medium.
Size customization tips are included at the end of the pattern.
Materials Needed
Yarn
You will need three colors of DK weight yarn for the ombre effect:
Total yardage: approximately 1500 yards (1372 meters)
Yarn suggestions:
Option 1: Lion Brand Pound of Love in Vintage White, Dusty Pink, and a custom-dyed mauve. This is 100 percent acrylic with excellent stitch definition and is machine washable.
Option 2: Paintbox Yarns Simply DK in Champagne White, Blush Pink, and Dusty Rose. Great color consistency across dye lots.
Option 3: WeCrochet Swish DK in Bare, Gosling, and Cranberry. Superwash merino wool that blocks beautifully with slight stretch for fit.
Substitution note: Use any smooth DK weight yarn with good stitch definition. Avoid fuzzy or bouclé yarns because they will obscure the basket weave pattern in the skirt.
Hooks
Additional Supplies
Gauge
Bodice gauge (US E-4 hook, single crochet in the round):
20 sc = 4 inches (10 cm)
22 rows = 4 inches (10 cm)
Skirt gauge (US F-5 hook, basket weave pattern in the round):
18 sts = 4 inches (10 cm)
12 rounds = 4 inches (10 cm)
Gauge is mandatory for a fitted garment. Work a gauge swatch of at least 6 by 6 inches in each stitch pattern, block the swatch, then measure. Adjust hook size as needed.
Abbreviations and Stitch Definitions
Let me walk you through every abbreviation you will encounter. I am defining each one in plain English so nothing catches you off guard.
ch: chain. Wrap yarn over hook, pull through loop on hook.
sc: single crochet. Insert hook into stitch, yarn over, pull up a loop (2 loops on hook), yarn over, pull through both loops.
dc: double crochet. Yarn over, insert hook into stitch, yarn over, pull up a loop (3 loops on hook), yarn over, pull through 2 loops, yarn over, pull through remaining 2 loops.
sl st: slip stitch. Insert hook into stitch, yarn over, pull through both the stitch and the loop on your hook in one motion.
inc: increase. Work 2 single crochet stitches into the same stitch.
sc2tog: single crochet two together (decrease). Insert hook into next stitch, yarn over, pull up a loop. Without completing the stitch, insert hook into the following stitch, yarn over, pull up a loop. Yarn over and pull through all three loops on hook. One decrease made.
FPdc: front post double crochet. Yarn over. Insert hook from front to back to front around the post (the vertical bar) of the indicated stitch in the round below. Yarn over and pull up a loop. Yarn over and pull through two loops. Yarn over and pull through remaining two loops. This stitch raises toward the right side of the fabric.
BPdc: back post double crochet. Yarn over. Insert hook from back to front to back around the post of the indicated stitch in the round below. Complete as a regular double crochet. This stitch recesses away from the right side of the fabric.
RS: right side (the outer-facing side of the dress)
WS: wrong side
rnd: round
st(s): stitch(es)
rep: repeat
Special Techniques
Basket Weave Unit
The basket weave is worked over groups of 4 stitches. Two consecutive FPdc followed by two consecutive BPdc form one unit. On alternating groups of rounds, the post directions swap. What was FPdc becomes BPdc and vice versa. This creates that gorgeous woven block appearance. Each block set is 4 rounds tall and 4 stitches wide.
Ombre Blending Method
Here is how you achieve that soft gradient fade. When transitioning colors, hold the new color yarn together with the current working yarn for 4 rounds. This creates a heathered transition zone. After 4 rounds of held-together blending, drop the old color and continue with the new color alone.
This method avoids harsh color lines and mimics a dip-dyed appearance. It takes a little yarn management, but the result is absolutely worth it.
Pattern Notes Before You Begin
1. The dress is worked top down and in the round except for the straps, which are worked flat.
2. The back seam is left open throughout construction to allow zipper insertion.
3. The basket weave pattern requires a stitch count divisible by 4. All increase rounds in the skirt maintain this divisibility.
4. Place a stitch marker at the beginning of each round and move it up as you work.
5. When working the basket weave, each FPdc and BPdc counts as one stitch and replaces one stitch from the previous round.
6. The turning chain at the start of each flat row counts as one sc throughout the strap and back opening sections.
7. Read all instructions before beginning. Trust me on this one.
Step by Step Crochet Dress Instructions
Straps (Make 2)
Using Yarn A and US E-4 hook, ch 13.
Row 1 (RS): Sc in 2nd ch from hook and in each ch across. Turn. (12 sc)
Row 2: Ch 1, sc in each st across. Turn. (12 sc)
Repeat Row 2 until strap measures 10 inches (25.5 cm) from foundation chain.
Fasten off, leaving an 8-inch tail for seaming. Set aside.
Bodice Front
Using Yarn A and US E-4 hook, ch 91.
Row 1 (RS): Sc in 2nd ch from hook and in each ch across. Turn. (90 sc)
Row 2: Ch 1, sc in each st across. Turn. (90 sc)
Row 3: Ch 1, sc in each st across. Turn. (90 sc)
Row 4: Ch 1, sc2tog, sc in each st to last 2 sts, sc2tog. Turn. (88 sc)
Row 5: Ch 1, sc in each st across. Turn. (88 sc)
Row 6: Ch 1, sc2tog, sc in each st to last 2 sts, sc2tog. Turn. (86 sc)
Row 7: Ch 1, sc in each st across. Turn. (86 sc)
Row 8: Ch 1, sc2tog, sc in each st to last 2 sts, sc2tog. Turn. (84 sc)
Row 9: Ch 1, sc in each st across. Turn. (84 sc)
Row 10: Ch 1, sc2tog, sc in each st to last 2 sts, sc2tog. Turn. (82 sc)
Row 11: Ch 1, sc in each st across. Turn. (82 sc)
Row 12: Ch 1, sc2tog, sc in each st to last 2 sts, sc2tog. Turn. (80 sc)
Row 13: Ch 1, sc in each st across. Turn. (80 sc)
Row 14: Ch 1, sc in each st across. Turn. (80 sc)
Row 15: Ch 1, sc in each st across. Turn. (80 sc)
Now you begin increasing back out for the hip.
Row 16: Ch 1, inc in first st, sc in each st to last st, inc in last st. Turn. (82 sc)
Row 17: Ch 1, sc in each st across. Turn. (82 sc)
Row 18: Ch 1, inc in first st, sc in each st to last st, inc in last st. Turn. (84 sc)
Row 19: Ch 1, sc in each st across. Turn. (84 sc)
Row 20: Ch 1, inc in first st, sc in each st to last st, inc in last st. Turn. (86 sc)
Row 21: Ch 1, sc in each st across. Turn. (86 sc)
Row 22: Ch 1, inc in first st, sc in each st to last st, inc in last st. Turn. (88 sc)
Row 23: Ch 1, sc in each st across. Turn. (88 sc)
Row 24: Ch 1, inc in first st, sc in each st to last st, inc in last st. Turn. (90 sc)
Row 25: Ch 1, sc in each st across. Turn. (90 sc)
Do not fasten off. Set aside front panel.
Bodice Back (Left Half)
The back is worked as two separate panels to allow for the zipper opening.
Using Yarn A and US E-4 hook, ch 46.
Row 1 (RS): Sc in 2nd ch from hook and in each ch across. Turn. (45 sc)
Row 2: Ch 1, sc in each st across. Turn. (45 sc)
Row 3: Ch 1, sc in each st across. Turn. (45 sc)
Row 4: Ch 1, sc in each st to last 2 sts, sc2tog. Turn. (44 sc)
Row 5: Ch 1, sc in each st across. Turn. (44 sc)
Row 6: Ch 1, sc in each st to last 2 sts, sc2tog. Turn. (43 sc)
Row 7: Ch 1, sc in each st across. Turn. (43 sc)
Row 8: Ch 1, sc in each st to last 2 sts, sc2tog. Turn. (42 sc)
Row 9: Ch 1, sc in each st across. Turn. (42 sc)
Row 10: Ch 1, sc in each st to last 2 sts, sc2tog. Turn. (41 sc)
Row 11: Ch 1, sc in each st across. Turn. (41 sc)
Row 12: Ch 1, sc in each st to last 2 sts, sc2tog. Turn. (40 sc)
Row 13: Ch 1, sc in each st across. Turn. (40 sc)
Row 14: Ch 1, sc in each st across. Turn. (40 sc)
Row 15: Ch 1, sc in each st across. Turn. (40 sc)
Row 16: Ch 1, sc in each st to last st, inc in last st. Turn. (41 sc)
Row 17: Ch 1, sc in each st across. Turn. (41 sc)
Row 18: Ch 1, sc in each st to last st, inc in last st. Turn. (42 sc)
Row 19: Ch 1, sc in each st across. Turn. (42 sc)
Row 20: Ch 1, sc in each st to last st, inc in last st. Turn. (43 sc)
Row 21: Ch 1, sc in each st across. Turn. (43 sc)
Row 22: Ch 1, sc in each st to last st, inc in last st. Turn. (44 sc)
Row 23: Ch 1, sc in each st across. Turn. (44 sc)
Row 24: Ch 1, sc in each st to last st, inc in last st. Turn. (45 sc)
Row 25: Ch 1, sc in each st across. Turn. (45 sc)
Do not fasten off. Set aside left back panel.
Bodice Back (Right Half)
Work identically to Left Back Panel but mirror the shaping. All decreases are sc2tog at the beginning of right-side rows, and all increases are at the beginning of right-side rows. The zipper edge remains straight.
Using Yarn A and US E-4 hook, ch 46.
Row 1 (RS): Sc in 2nd ch from hook and in each ch across. Turn. (45 sc)
Row 2: Ch 1, sc in each st across. Turn. (45 sc)
Row 3: Ch 1, sc in each st across. Turn. (45 sc)
Row 4: Ch 1, sc2tog, sc in each st across. Turn. (44 sc)
Row 5: Ch 1, sc in each st across. Turn. (44 sc)
Row 6: Ch 1, sc2tog, sc in each st across. Turn. (43 sc)
Row 7: Ch 1, sc in each st across. Turn. (43 sc)
Row 8: Ch 1, sc2tog, sc in each st across. Turn. (42 sc)
Row 9: Ch 1, sc in each st across. Turn. (42 sc)
Row 10: Ch 1, sc2tog, sc in each st across. Turn. (41 sc)
Row 11: Ch 1, sc in each st across. Turn. (41 sc)
Row 12: Ch 1, sc2tog, sc in each st across. Turn. (40 sc)
Row 13: Ch 1, sc in each st across. Turn. (40 sc)
Row 14: Ch 1, sc in each st across. Turn. (40 sc)
Row 15: Ch 1, sc in each st across. Turn. (40 sc)
Row 16: Ch 1, inc in first st, sc in each st across. Turn. (41 sc)
Row 17: Ch 1, sc in each st across. Turn. (41 sc)
Row 18: Ch 1, inc in first st, sc in each st across. Turn. (42 sc)
Row 19: Ch 1, sc in each st across. Turn. (42 sc)
Row 20: Ch 1, inc in first st, sc in each st across. Turn. (43 sc)
Row 21: Ch 1, sc in each st across. Turn. (43 sc)
Row 22: Ch 1, inc in first st, sc in each st across. Turn. (44 sc)
Row 23: Ch 1, sc in each st across. Turn. (44 sc)
Row 24: Ch 1, inc in first st, sc in each st across. Turn. (45 sc)
Row 25: Ch 1, sc in each st across. (45 sc)
Do not fasten off.
Joining the Bodice and Straps
After completing all bodice pieces and both straps, join them into one continuous tube.
Strap Placement: Seam the short ends of each strap to the top corners of the front bodice panel and to the corresponding top corners of the back panels using mattress stitch or whipstitch. Each strap connects one front corner to one back corner. The straps are approximately 1.5 inches wide on each shoulder.
Side Seam Assembly: Close the side seams using mattress stitch. Join right edge of right back to right edge of front. Join left edge of left back to left edge of front.
Once side seams are closed, you have a bodice tube. The back opening should measure approximately 14 inches (35.5 cm) tall from strap top to bottom of bodice.
The total stitch count around the bodice hem is: 90 sts front plus 45 sts left back plus 45 sts right back = 180 sc around.
Checkpoint: After joining the bodice, the tube should measure approximately 11.5 inches (29 cm) from the top of the straps to the current working row, and approximately 25 to 26 inches (63.5 to 66 cm) in circumference at the lower edge.
Waist Transition Rounds
These rounds define the waist and prepare for the skirt launch.
With Yarn A and US E-4 hook, join yarn at back right opening edge at the bottom of the bodice. Work in joined rounds, placing a stitch marker at the start of each round.
Rnd 1: Sc in each st around. (180 sc)
Rnd 2: Sc in each st around. (180 sc)
Rnd 3: Sc in each st around. (180 sc)
Rnd 4: Sc in each st around. (180 sc)
Rnd 5: Sc in each st around. (180 sc)
Checkpoint: The full bodice from strap tops to waist transition should measure approximately 14 inches (35.5 cm).
Hip Increase Rounds
Switch to US F-5 (3.75 mm) hook.
These rounds transition from waist to hip and launch the skirt.
Increase Rnd 1: Sc in each of first 18 sts, inc in next st, rep (sc in each of next 18 sts, inc in next st) around. Work 2 additional single increases spaced approximately 90 sts apart. (192 sc)
Increase Rnd 2: Sc in each of first 23 sts, inc in next st, rep (sc in each of next 23 sts, inc in next st) 7 times. (200 sc)
Increase Rnd 3: Sc in each of first 24 sts, inc in next st, rep (sc in each of next 24 sts, inc in next st) 7 times. (208 sc)
Work 2 plain sc rounds without increases. (208 sc each)
Checkpoint: At the top of the skirt, the circumference should measure approximately 46 inches (117 cm).
Skirt Basket Weave Pattern
The skirt is worked in an ongoing basket weave using FPdc and BPdc.
Skirt Foundation Rnd (Transition to dc fabric):
Ch 2 (does not count as stitch), work 1 dc in each st around, sl st to first dc to join. (208 dc)
Basket Weave Block A (Rounds 1 through 4)
Work 2 FPdc followed by 2 BPdc across all 52 groups per round.
Rnd 1 of Block A: Ch 2 (does not count as st), work (FPdc in next st, FPdc in next st, BPdc in next st, BPdc in next st) 52 times, sl st to first FPdc to join. (208 sts)
Rnd 2 of Block A: Ch 2, work (FPdc in next FPdc, FPdc in next FPdc, BPdc in next BPdc, BPdc in next BPdc) 52 times, sl st to join. (208 sts)
Rnd 3 of Block A: Rep Rnd 2 of Block A. (208 sts)
Rnd 4 of Block A: Rep Rnd 2 of Block A. (208 sts)
Basket Weave Block B (Rounds 5 through 8)
The FPdc and BPdc positions swap.
Rnd 1 of Block B: Ch 2, work (BPdc in next FPdc, BPdc in next FPdc, FPdc in next BPdc, FPdc in next BPdc) 52 times, sl st to join. (208 sts)
Rnd 2 of Block B: Ch 2, work (BPdc in next BPdc, BPdc in next BPdc, FPdc in next FPdc, FPdc in next FPdc) 52 times, sl st to join. (208 sts)
Rnd 3 of Block B: Rep Rnd 2 of Block B. (208 sts)
Rnd 4 of Block B: Rep Rnd 2 of Block B. (208 sts)
Full Skirt Instructions with Color Transitions
Color Transition Schedule
Skirt Round by Round
Skirt Foundation Rnd: With Yarn A, ch 2, dc in each st around, sl st to join. (208 dc)
Skirt Rnds 1 through 4 (Block A, Yarn A): Work Block A rounds. (208 sts each rnd)
Skirt Rnds 5 through 8 (Block B, Yarn A): Work Block B rounds. End of Rnd 8: work increase round, adding 16 increases as (13 dc in pattern, inc) 16 times. (224 sts)
Skirt Rnds 9 through 12 (Block A, Yarn A plus Yarn B held together): Join Yarn B alongside Yarn A at start of Rnd 9. Work Block A rounds with both yarns held. (224 sts each rnd)
Skirt Rnds 13 through 16 (Block B, Yarn B only): Drop Yarn A at start of Rnd 13. Work Block B rounds with Yarn B only. End of Rnd 16: work increase round, (14 dc in pattern, inc) 16 times. (240 sts)
Skirt Rnds 17 through 20 (Block A, Yarn B): Work Block A rounds. (240 sts each rnd)
Skirt Rnds 21 through 24 (Block B, Yarn B plus Yarn C held together): Join Yarn C alongside Yarn B at start of Rnd 21. Work Block B rounds with both yarns held. End of Rnd 24: work increase round, (15 dc in pattern, inc) 16 times. (256 sts)
Skirt Rnds 25 through 28 (Block A, Yarn C only): Drop Yarn B at start of Rnd 25. Work Block A rounds. (256 sts each rnd)
Skirt Rnds 29 through 32 (Block B, Yarn C): Work Block B rounds. End of Rnd 32: work increase round, (16 dc in pattern, inc) 16 times. (272 sts)
Skirt Rnds 33 through 36 (Block A, Yarn C): Work Block A rounds. (272 sts each rnd)
Skirt Rnds 37 through 40 (Block B, Yarn C): Work Block B rounds. (272 sts each rnd)
Skirt Rnds 41 through 44 (Block A, Yarn C): Work Block A rounds. (272 sts each rnd)
Skirt Rnds 45 through 48 (Block B, Yarn C): Work Block B rounds. (272 sts each rnd)
Skirt Rnds 49 through 52 (Block A, Yarn C): Work Block A rounds. (272 sts each rnd)
Skirt Rnds 53 through 56 (Block B, Yarn C): Work Block B rounds. (272 sts each rnd)
Total skirt rounds: 56 basket weave rounds plus the foundation dc round.
Fasten off and weave in ends.
Finishing Your Crochet Dress
Blocking
Wet block your dress before installing the zipper. Soak the dress in lukewarm water for 15 to 20 minutes, gently squeeze out excess water (do not wring), and lay flat on a blocking mat. Pin the bodice to measurements and fan out the skirt to show off that gorgeous flare. Allow to dry completely.
Zipper Installation
Pin the 18-inch invisible zipper to the back opening edges, right sides together. Using a sewing needle and thread in a matching color, hand-stitch the zipper tape to the crochet fabric with small whipstitches. Take your time here. A well-installed zipper makes all the difference in how professional the finished dress looks.
Weaving Ends
You will have quite a few ends from the color transitions. Weave each end into stitches of the same color for at least 2 inches, then trim close to the fabric.
Tips for Success
Take your gauge seriously. This is a fitted garment. If your gauge is off, the dress will not fit properly. Swatch, block, measure, adjust.
Mark your rounds. With 56 rounds of basket weave and color transitions happening, you need to know where you are. Use stitch markers and keep notes.
Practice the basket weave first. If you have never worked FPdc and BPdc before, make a small practice swatch before starting the skirt. Once you understand how the posts work, the pattern becomes rhythmic and almost meditative.
Manage your yarn carefully during ombre sections. Keep both balls of yarn untangled and at similar tension when holding them together. Some crocheters find it helpful to put each ball in a separate bowl.
You Did It
This crochet dress pattern is a labor of love, and if you have made it all the way through, you should be incredibly proud. The fitted bodice, the dramatic flare, the soft ombre fade. This is a showstopper of a garment, and you made it with your own two hands.
Thank you so much for trusting me with your time and your yarn stash. I would absolutely love to see your finished dress. Tag me on Instagram or share a photo in my Facebook group. Nothing makes my day like seeing your creations come to life.
If this pattern is calling your name, go ahead and save it to your Pinterest boards so you can find it when you are ready to start. And if you make this beautiful dress, please leave a comment below. I want to hear all about your color choices, your timeline, and how amazing you feel when you put it on.
