I know what you’re thinking. Layered roses, lace doilies, surface crochet, and a perfectly fitted cover? That sounds intimidating. But here’s the truth: this project looks far more complicated than it actually is. The body is simple back and forth crochet using moss stitch. That’s it. The magic happens when you add the decorative elements one at a time. If you can single crochet and double crochet, you can absolutely make this stunning book cover. Whether you’re an intermediate crocheter ready to level up or a confident beginner looking for a beautiful challenge, I promise this pattern breaks down into manageable pieces.
Get the Ad-Free PDF Pattern
You can find the free pattern below, or you can purchase the ad-free printable PDF from my shop.
Get the Printable PDF →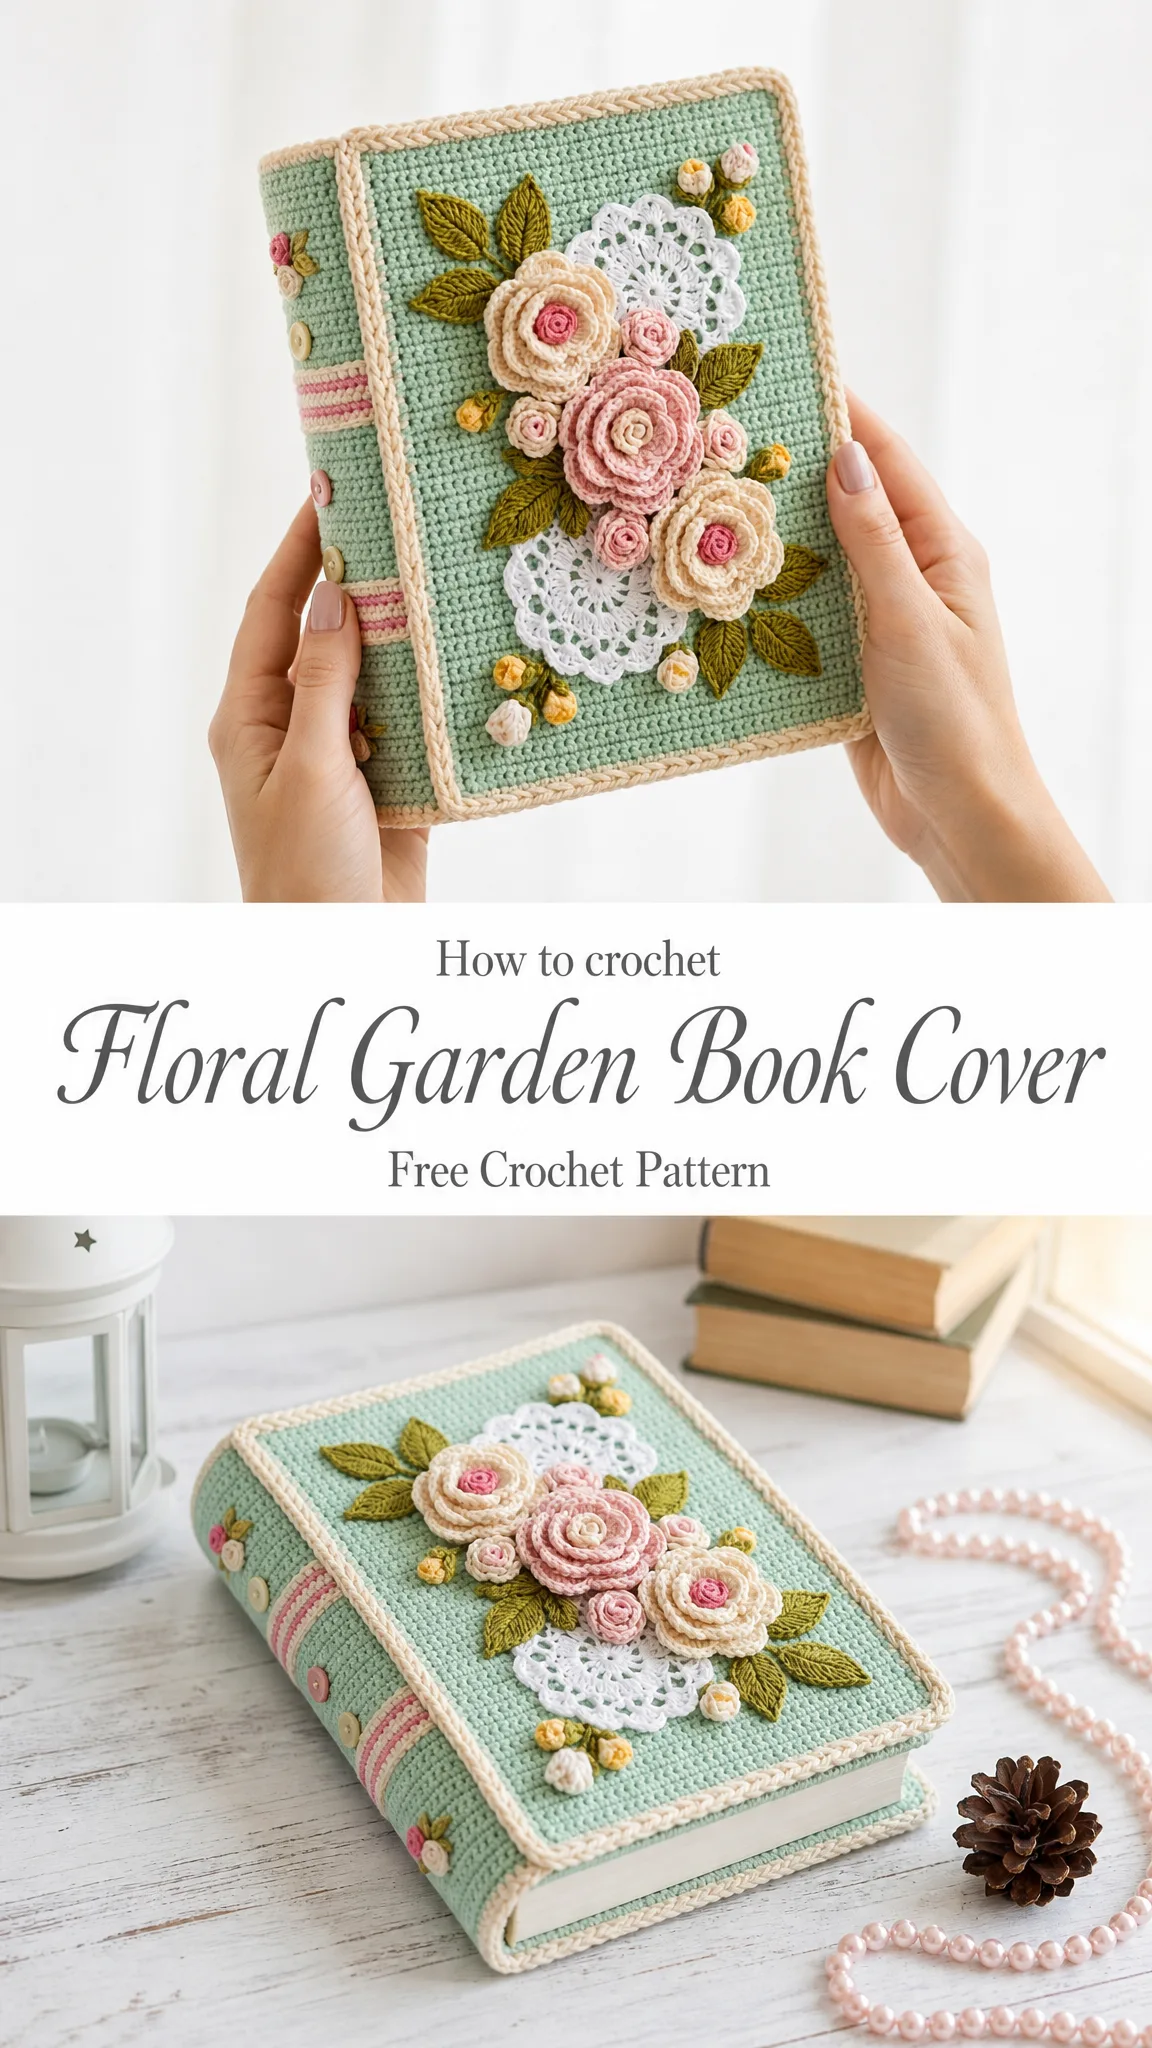
About This Floral Garden Book Cover Crochet Pattern
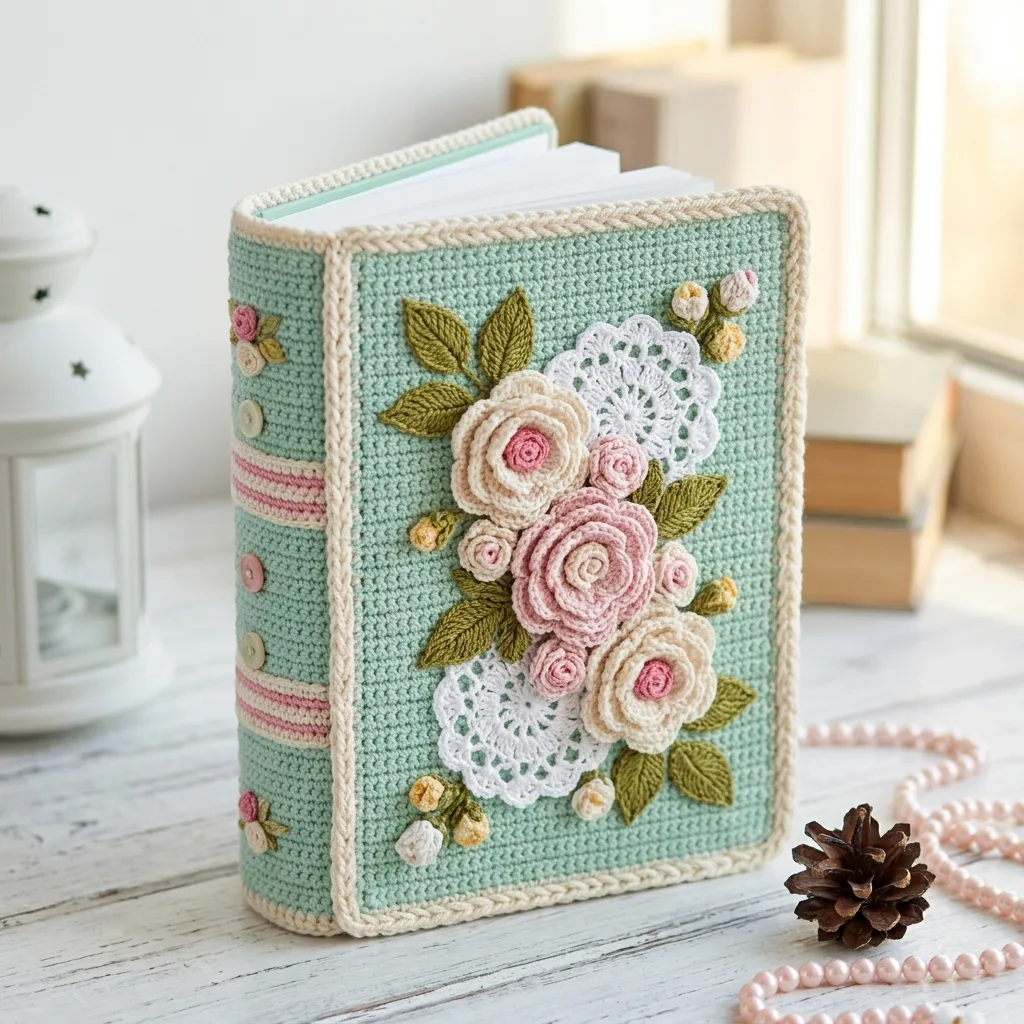
This romantic crochet book jacket features a mint textured cover, cream rope edging, layered roses, lace doilies, leafy sprays, buttoned spine details, and fold in flaps. The finished size fits a standard paperback or small journal approximately 6 x 8 inches (15 x 20.5 cm) with a 1.5 inch (4 cm) spine.
The construction method is straightforward. You work one flat textured rectangle, fold the inner flaps, seam the top and bottom edges, add rope edging, then sew on doilies, roses, leaves, buds, buttons, and spine stripes. The premium finish comes from neat fold seams, surface crochet, 3D floral motifs, lace doily rounds, and careful placement.
Skill level: Intermediate
Time estimate: 8 to 12 relaxed hours including motif making and finishing
Materials You’ll Need
Before you begin, gather all your supplies. Having everything ready makes the process so much more enjoyable.
Yarn (DK weight cotton or cotton blend):
Hook: US E-4 / 3.5 mm
Extras: 5 small buttons, tapestry needle, stitch markers, pins, ruler, removable clips
Yarn suggestions: Try Paintbox Yarns Cotton DK, Scheepjes Catona held at DK-like tension, or Lion Brand 24/7 Cotton DK. Substitute any smooth DK yarn that gives a firm fabric at gauge. Choose cotton or a cotton blend for crisp stitches and durable edges.
Gauge and Finished Size
Getting gauge right matters for this project since the cover needs to fit your book snugly.
Gauge: 18 stitches and 20 rows = 4 inches / 10 cm in moss stitch, lightly blocked
Body rectangle: 17.5 inches wide x 8.25 inches tall / 44.5 x 21 cm before folding
Fold map: 2 inch flap, 6 inch back cover, 1.5 inch spine, 6 inch front cover, 2 inch flap
Match gauge before starting so the cover fits your book cleanly.
Abbreviations and Stitch Guide
This pattern uses US crochet terms throughout. If you’re familiar with UK terms, remember that US single crochet (sc) equals UK double crochet (dc), and US double crochet (dc) equals UK treble (tr).
Standard abbreviations:
Special Stitches Explained
Don’t let these special techniques scare you. I’ll walk you through each one.
Moss stitch: Row 1 is single crochet. Next rows: sc in first stitch, then ch 1, skip next stitch or chain space, sc in next sc across. The chain space counts as one pattern position. This creates a lovely textured fabric that’s reversible.
Crab stitch: Work single crochet from left to right (the opposite direction you normally work). Insert hook in the stitch to the right, yarn over, pull up a loop, yarn over, pull through both loops. It feels awkward at first but creates a beautiful braided edge.
Surface slip stitch: Hold yarn behind the fabric, insert hook from front to back, pull up a loop, then pull it through the loop on hook. Keep stitches loose. This technique lets you add color stripes without cutting and rejoining.
Picot: Ch 3, sl st in the first chain made. Creates a decorative bump.
Rolled rose: Crochet a petal strip, roll from the smaller petal end, and stitch through the base layers to secure. The magic happens as you roll!
Left-handed note: Left-handed makers can follow the same counts. Motif placement may mirror naturally. Place the flower spray diagonally from upper left to lower right on the front panel for the same visual balance.
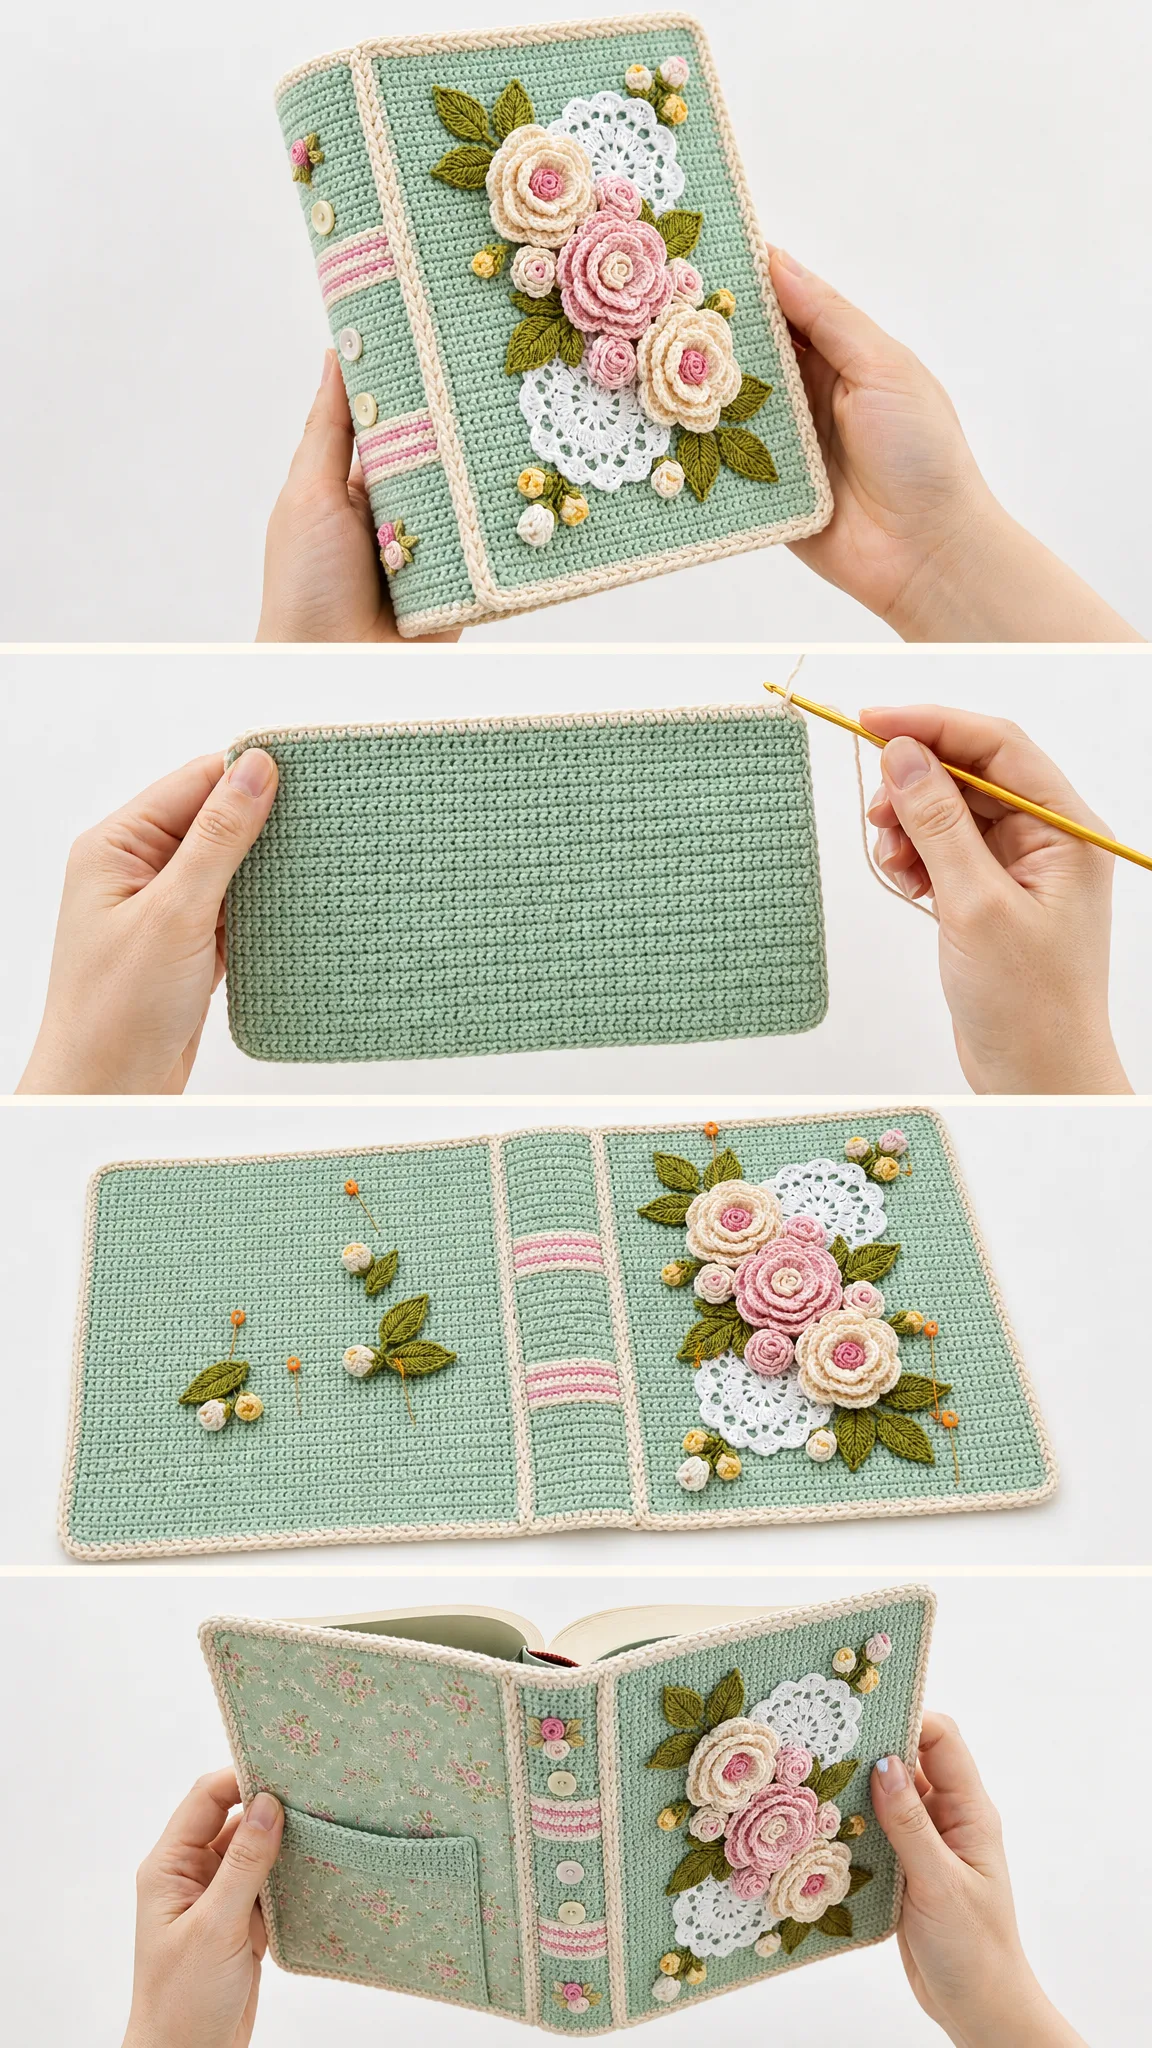
Book Cover Body Instructions
Now let’s start crocheting! The body is the foundation of everything.
With mint, ch 80.
Row 1: Sc in 2nd ch from hook and each ch across. Turn. (79 sc)
Rows 2-41: Ch 1, sc in first st, *ch 1, sk next st or ch-sp, sc in next sc; rep from * across. Turn. (79 pattern positions)
Checkpoint: Piece should measure about 17.5 x 8.25 inches / 44.5 x 21 cm.
Fold Map Reference
Understanding the sections helps when you’re assembling:
| Section | Positions | Width |
|---|---|---|
| Left inner flap | 1-9 | 2 in / 5 cm |
| Back cover | 10-36 | 6 in / 15 cm |
| Spine | 37-43 | 1.5 in / 4 cm |
| Front cover | 44-70 | 6 in / 15 cm |
| Right inner flap | 71-79 | 2 in / 5 cm |
Fold flaps to the wrong side along the section edges. Clip in place. Join mint at the top left corner and seam the flap layers across 9 stitches with slip stitches through both layers. Repeat along the bottom edge of each flap. Leave the center cover and spine open for the book.
Size Customization
Want to fit a different book? Here’s how to adjust. Measure your opened book: front cover width + spine + back cover width + two 2 inch / 5 cm flaps. Multiply total width by 4.5 stitches per inch, then choose an odd stitch count. For height, multiply book height by 5 rows per inch and add 1 to 2 rows for ease.
Spine Details and Rope Edging
This section adds those gorgeous decorative stripes and the professional looking border.
Surface Stripes
On the spine section only, work cream surface slip stitch across all 7 spine positions on Rows 12, 13, 29, and 30. Work blush pink surface slip stitch across Rows 14, 15, 31, and 32.
Buttons
Sew 5 buttons centered on the spine at Rows 6, 13, 20, 28, and 35. Add tiny flower accents near Rows 4, 18, and 38 if desired.
Outer Border
Rnd 1: With cream and RS facing, join in any corner. Work sc evenly around: 79 sts across top, 41 sts down side, 79 sts across bottom, 41 sts up side, placing 3 sc in each corner. Sl st to first sc. (248 sc)
Rnd 2: Work crab stitch in each st around, keeping corners relaxed. Fasten off. (248 crab sts)
Checkpoint: Edge should sit flat without rippling. If it pulls in, use a larger hook for Round 2.
Lace Doilies and Roses
These elements transform a simple cover into something truly special.
White Doilies (Make 2)
Rnd 1: In MR, ch 3 (counts as dc), 15 dc in ring. Join. (16 dc)
Rnd 2: Ch 3, dc in same st, ch 1, *2 dc in next st, ch 1; rep from * around. Join. (32 dc + 16 ch-sps)
Rnd 3: Sl st to first ch-sp, ch 1, sc in same sp, ch 5, *sc in next ch-sp, ch 5; rep from * around. Join. (16 loops)
Rnd 4: In each ch-5 loop work (sc, hdc, 3 dc, hdc, sc). Join and fasten off. (16 scallops)
Large Roses (Make 2 cream, 1 blush)
Ch 51.
Row 1: Sc in 2nd ch from hook and each ch across. Turn. (50 sc)
Row 2: Ch 2, work 5 dc in each of first 10 sts, 4 dc in each of next 20 sts, 3 dc in each of last 20 sts. Fasten off, leaving a long tail. (190 dc)
Small Roses (Make 5 blush)
Ch 31.
Row 1: Sc in 2nd ch from hook and each ch across. Turn. (30 sc)
Row 2: Ch 2, work 4 dc in each of first 10 sts, 3 dc in each of last 20 sts. Fasten off, leaving a long tail. (100 dc)
Roll each strip from the smaller petal end. Stitch through the base several times to secure the spiral.
Leaves, Buds, and Placement
Olive Leaves (Make 12)
Ch 10. Working in the back bump: sc in 2nd ch, hdc in next ch, dc in next 5 ch, hdc in next ch, 3 sc in last ch. Rotate to work along the opposite side of the chain: hdc in next st, dc in next 5 sts, hdc in next st, sc in last st. Sl st to first sc and fasten off. (20 sts around)
Optional vein: With a tapestry needle, stitch a straight line from base to tip using the yarn tail.
Small Buds (Make 8)
Rnd 1: In MR, ch 1, 6 sc in ring. Join. (6 sc)
Rnd 2: Ch 1, 2 sc in each st around. Join. (12 sc)
Rnd 3: Ch 1, sc2tog around. Join and fasten off, leaving tail. (6 sts)
Pull tail through remaining stitches and close.
Front Floral Spray Arrangement
Pin one doily high right and one doily low left on the front cover. Place the blush large rose in the center, cream large roses at upper left and lower right, small roses between them, and leaves radiating outward. Add buds at the top right, lower left, and lower right. Sew pieces securely through the motif bases only so the petals stay dimensional.
Back Accent
Use one small doily style accent or a partial doily look by sewing a small rose, 2 leaves, and 2 buds near the lower outside corner of the back panel.
Finishing and Blocking Your Book Cover
1. Weave in all ends on the wrong side. Use duplicate stitch style weaving so ends do not show through the front.
2. Steam lightly from above or wet block flat to measurements. Do not flatten the roses completely.
3. Insert the book covers into the flaps. Check that the spine is centered and the front motifs sit clear of the book opening edge.
4. Add a final tacking stitch under any flower or leaf that catches when the book is opened.
Troubleshooting Common Issues
| Issue | Fix |
|---|---|
| Cover is too loose | Remove 2 to 4 body stitches from the total width or make deeper flaps |
| Cover will not close | Add 2 to 4 body stitches or block wider before edging |
| Border ripples | Use fewer side edge stitches or go down a hook size for Round 1 |
| Border pulls inward | Use a larger hook for the crab stitch round |
| Flowers droop | Stitch through more base layers and add one hidden tack near a leaf or doily |
Care Instructions
Spot clean when possible. For a full wash, remove the book, hand wash in cool water, roll in a towel, reshape, and dry flat. Keep buttons and motifs supported while drying.
Final Thoughts on This Floral Garden Book Cover Crochet Pattern
You did it! Or you’re about to do it, and I’m so excited for you. This floral garden book cover combines simple techniques with stunning results. The moss stitch body works up quickly, and adding each decorative element is like opening a gift. Take your time with the flower placement, enjoy the process, and don’t stress about perfection. Handmade means unique.
Thank you so much for choosing this pattern. I truly hope you love making it as much as I loved designing it. If you create one, I’d be absolutely thrilled to see your finished project! Share your photos on Instagram or our Facebook group and tag me so I can celebrate your beautiful work.
If this pattern brought you joy, I’d love it if you saved it to your Pinterest boards so you can find it easily later and so other crocheters can discover it too. And please drop a comment below when you make yours. I read every single one, and hearing about your projects makes my day!
Want a Quick & Easy Printable Version?
Get a clean, beautifully formatted PDF of this pattern — easy to follow step by step, ready to print or save on any device. No scrolling, no distractions, just the pattern.
Get the Printable PDF →