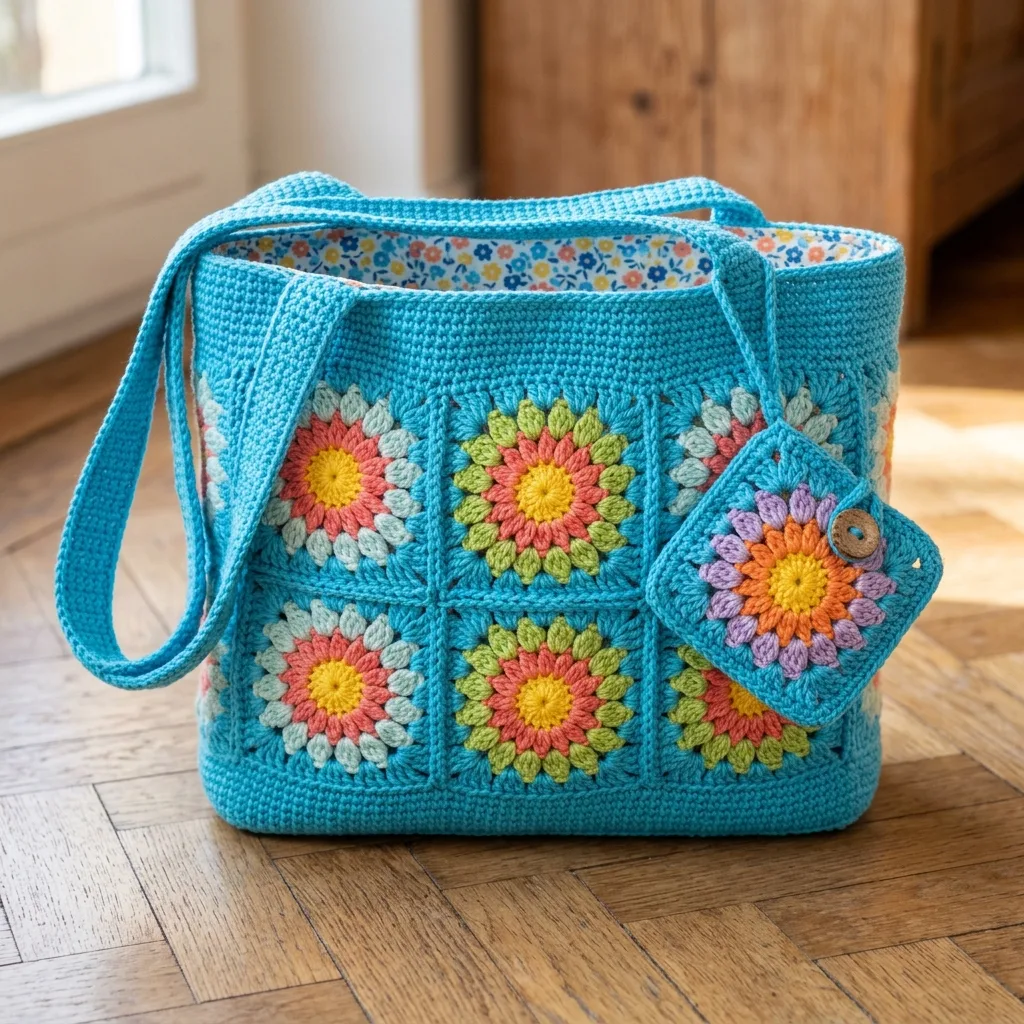
A sturdy, cheerful tote bag is one of those projects that checks every box. This Colorful Granny Square Tote Bag crochet pattern gives you a practical shoulder bag with a firm base, twin straps that won’t stretch out, and a fun floral motif that uses up leftover yarn beautifully. The construction uses single crochet (sc) for the base and straps, double crochet (dc) clusters for the granny squares, and a special puff petal stitch that creates those gorgeous textured flowers. It works up at a nice pace, makes a fantastic gift, and doubles as a great project bag for your other works in progress.
Get the Ad-Free PDF Pattern
You can find the free pattern below, or you can purchase the ad-free printable PDF from my shop.
Get the Printable PDF →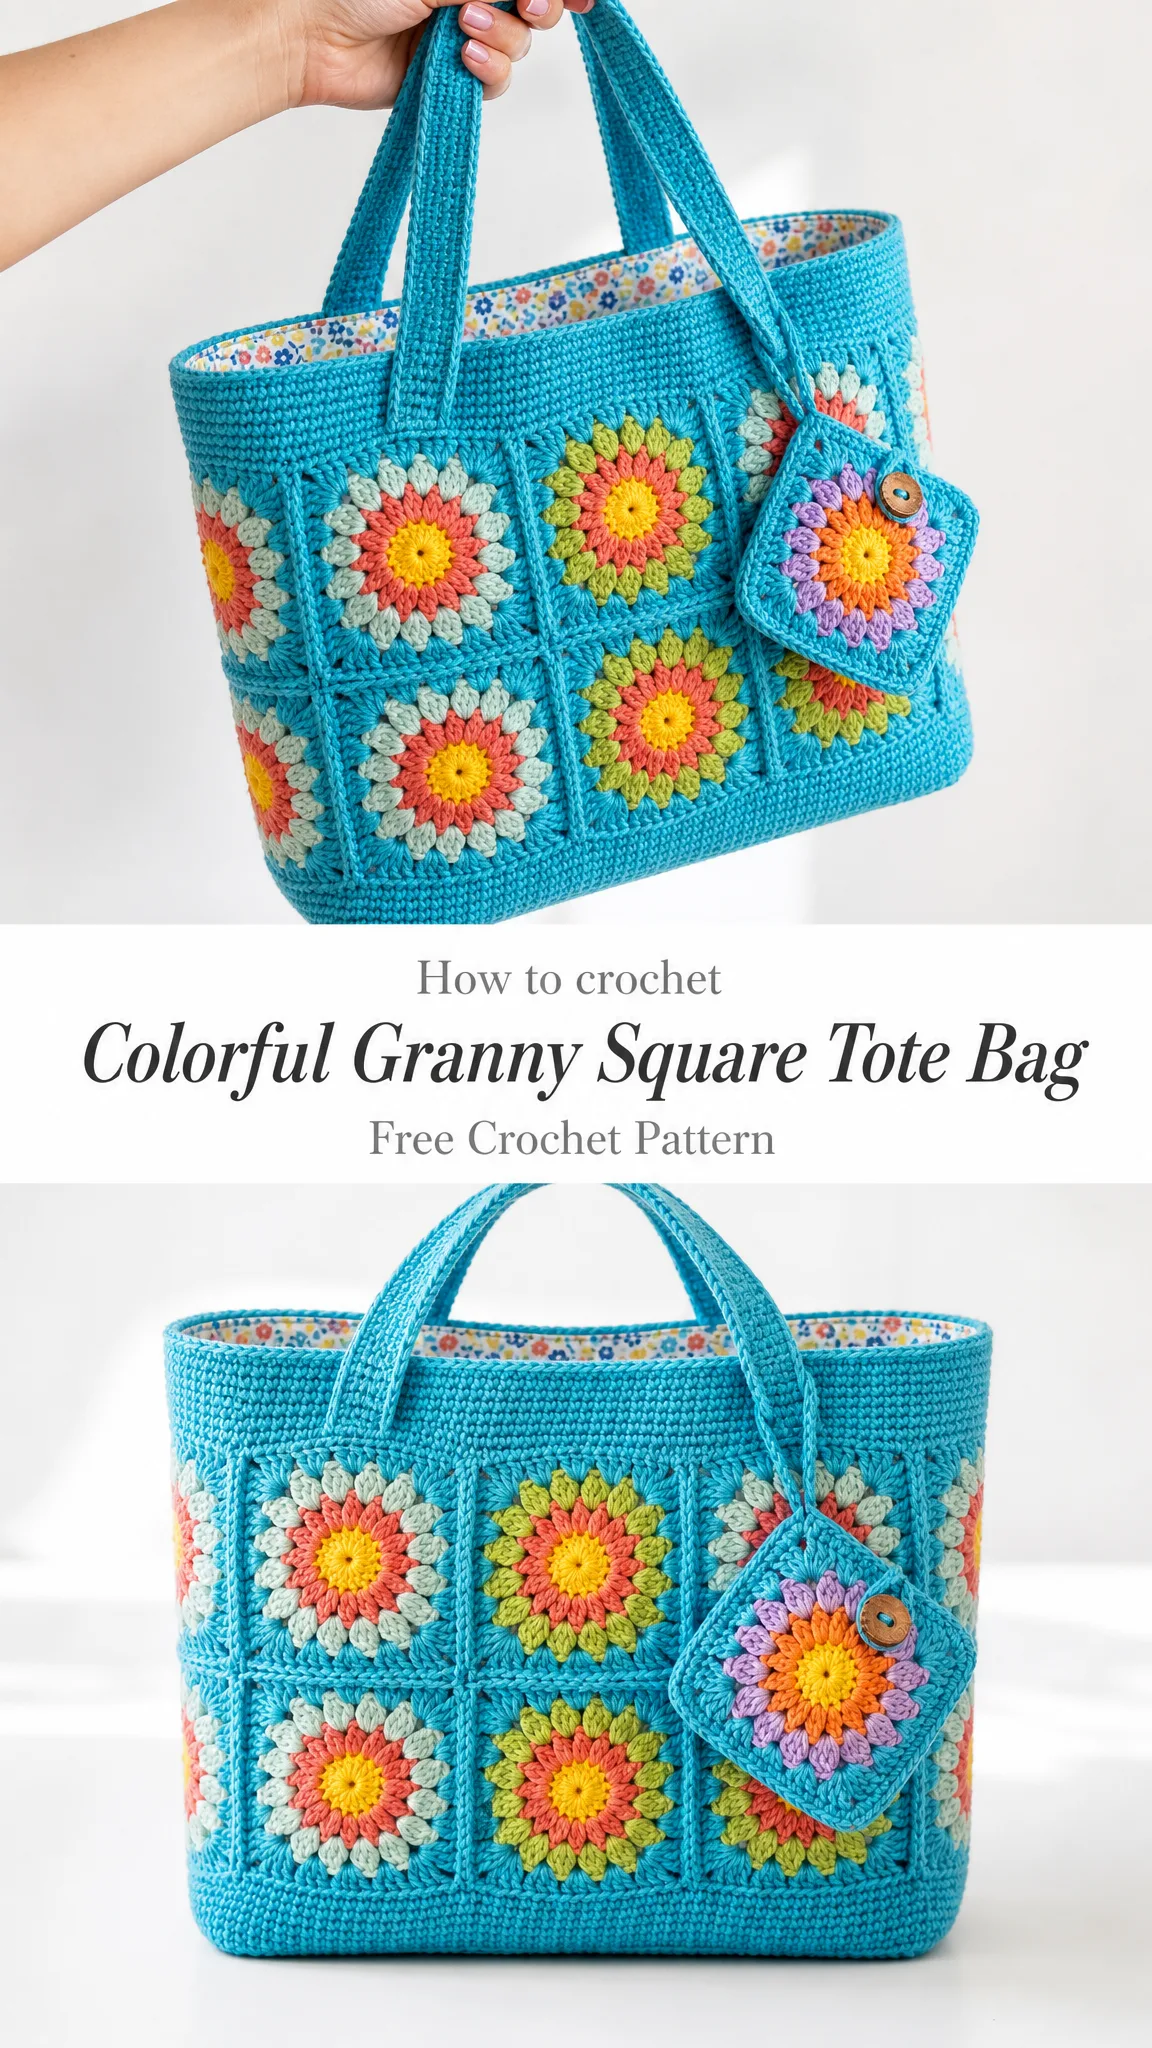
Why You’ll Love This Crochet Tote Bag Pattern
This tote stands out from basic market bags because of its structured rectangular shape. The firm single crochet base prevents that saggy bottom problem, and the top band adds stability around the opening. Each floral granny square measures 4 inches across after blocking, making the math predictable and the joining straightforward.
The puff petal stitch in the flower centers creates dimensional petals that pop off the fabric. The 3-dc cluster stitch in the outer ring adds another layer of texture. Both techniques sound fancy but break down into simple, repetitive motions once you get the rhythm.
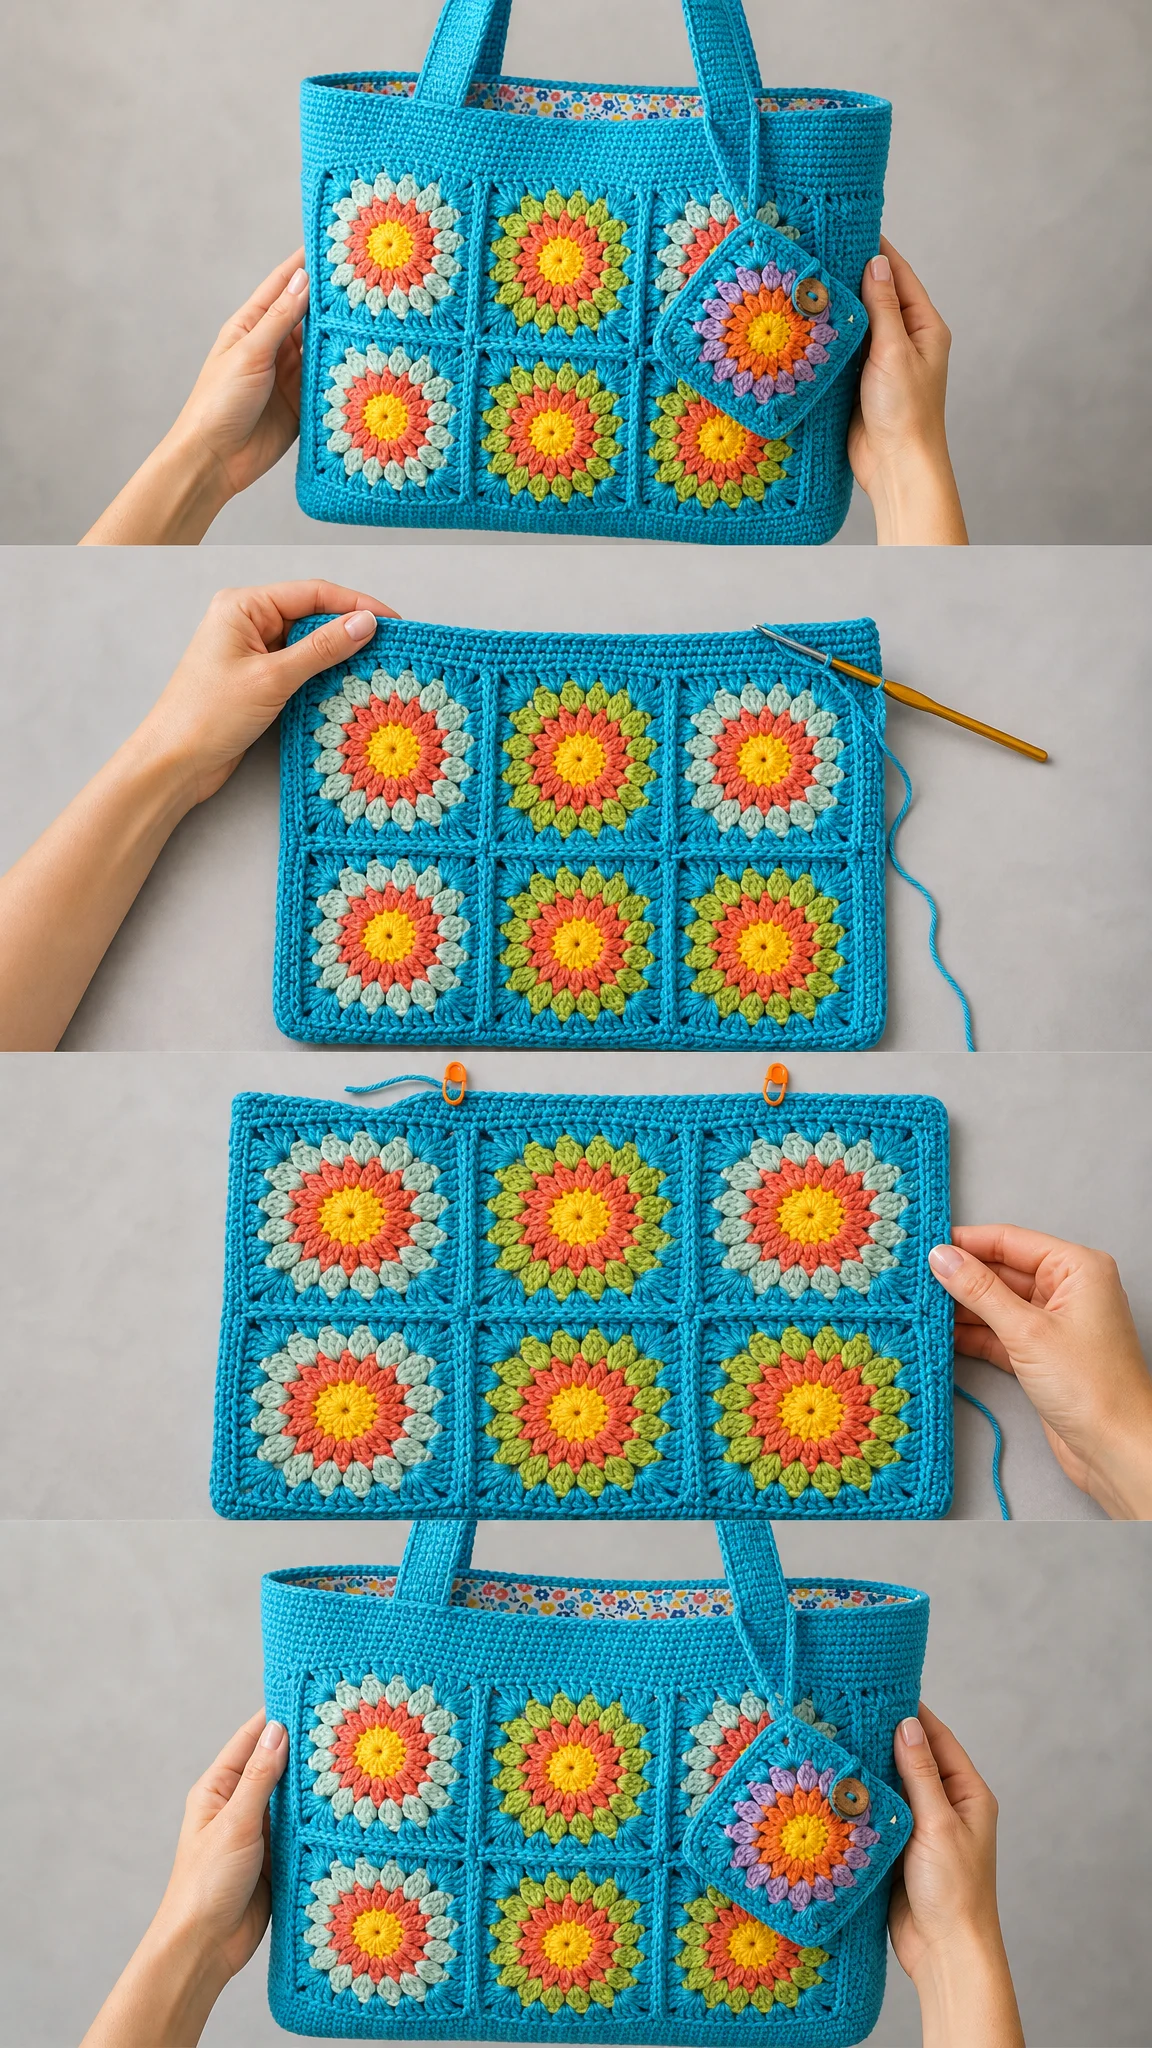
You’ll make 16 large squares total, plus one mini charm square that clips onto the strap with a button detail. The color possibilities are endless. Use bright rainbow tones like the teal, coral, yellow, and mint in the original, or customize with your favorite color palette.
Materials You’ll Need
Gather these supplies before starting your granny square tote:
Yarn:
Recommended yarns:
Choose a smooth cotton or cotton blend that creates firm fabric. Avoid very soft drapey yarn unless you plan to add a lining and base insert.
Hook:
Notions:
Gauge
Getting gauge right matters for this project because all 16 squares need to match.
Motif gauge: One blocked square measures 4 inches / 10 cm across, with the final single crochet (sc) border measuring 15 sc per side.
Body gauge in sc: 15 stitches and 16 rows equals 4 inches / 10 cm.
Make and block one square before beginning the full project. After blocking, each large square should be 4 inches / 10 cm. A joined front or back panel should measure about 12 inches / 30.5 cm wide by 8 inches / 20.5 cm tall before the top band.
Finished Size
The completed tote measures approximately:
Skill Level
This pattern suits adventurous beginners to intermediate crocheters. You’ll work motifs, color changes, seaming, simple shaping, and sturdy strap finishing. If you’ve made a basic granny square before, you can handle this.
Abbreviations and Special Stitches
Standard abbreviations:
Special stitches:
Puff petal: Yarn over, insert hook in indicated stitch or space, yarn over and pull up a loop. Repeat this three times in the same place (you’ll have 7 loops on your hook). Yarn over and pull through all loops on hook. Chain 1 to close the puff.
3-dc cluster: Yarn over, insert hook in space, yarn over and pull up loop, yarn over and pull through 2 loops. Repeat twice more in the same space (you’ll have 4 loops on your hook). Yarn over and pull through all loops on hook.
Invisible join: Cut yarn, pull tail through last stitch. Thread tail on needle, insert under both loops of first stitch, then back through center of last stitch. Weave in.
Note for UK crocheters: This pattern uses US terms. US sc equals UK dc. US dc equals UK tr.
Left handed crocheters: Work the rounds in the opposite direction. Keep corner placement and stitch counts the same. Mirror the strap and charm placement to your preferred side.
Large Floral Granny Square Pattern
Make 16 large squares total: 6 for the front panel, 6 for the back panel, 2 for the right side, and 2 for the left side.
Use yellow for the center, coral/orange/pink for the petals, mint/green/cream for the outer petals, and teal for the square frame.
Round 1: With center color, make a magic ring. Chain 2. Work 12 dc into the ring. Join to first dc with a slip stitch. (12 dc)
Round 2: Join petal color in any stitch. Chain 1. Work a puff petal in each dc around. Join with a slip stitch. (12 puff petals and 12 chain 1 closures)
Round 3: Join outer petal color in any chain 1 closure space. Chain 2. Work a 3-dc cluster in the same space, chain 2. Repeat in each closure space around. Join. (12 clusters and 12 chain 2 spaces)
Round 4: Join teal in any chain 2 space. Chain 3, work 2 dc, chain 2, 3 dc all in the same space for the first corner. *Work 3 dc in each of the next 2 chain 2 spaces. Work (3 dc, chain 2, 3 dc) in the next space for a corner.* Repeat from * to * three more times, omitting the final corner since you already made it. Join. (48 dc and 4 corner chain 2 spaces)
Round 5: Chain 1. Work 1 sc in each dc around. Work 3 sc in each corner chain 2 space. Join invisibly. (60 sc total, with 15 sc per side)
Color placement tip: Alternate your petal colors from square to square so no two identical flowers sit side by side. Keep the final square frame teal for a unified grid appearance.
Mini Charm Square
Work Rounds 1 through 4 of the large square using a 3.75 mm hook for a smaller finished size.
Add one sc border: Work sc in each dc and 3 sc in each corner space around. Sew a button to the upper corner. Add a chain 12 loop to the opposite corner and attach to one of your straps.
Joining the Panels
Block all 16 squares before joining. This makes seaming much easier and ensures even sizing.
With right sides facing, join squares using mattress stitch or a flat slip stitch join through inner loops only. Keep seams neat and flexible.
Panel layout:
| Panel | Layout | Edge Count |
|---|---|---|
| Front | 3 squares wide x 2 squares tall | 45 sc across top and bottom, 30 sc tall at each side |
| Back | 3 squares wide x 2 squares tall | 45 sc across top and bottom, 30 sc tall at each side |
| Right side | 1 square wide x 2 squares tall | 15 sc across, 30 sc tall |
| Left side | 1 square wide x 2 squares tall | 15 sc across, 30 sc tall |
Base Rectangle
The firm base gives this tote its structured shape.
With teal, chain 46.
Row 1: Sc in the 2nd chain from hook and in each chain across. Chain 1, turn. (45 sc)
Rows 2 through 12: Sc in each stitch across. Chain 1, turn after Rows 2 through 11 only. (45 sc each row)
The base should measure approximately 12 inches x 4 inches / 30.5 x 10 cm. Do not fasten off if you plan to use crochet joining for assembly.
Assembling the Body
Sew or sc join the side panels between the front and back panels to form a tube shape.
Then attach the base to the lower edge, matching:
Ease evenly at the corners. The base sits flat on the bottom while the granny square panels form the walls.
Top Band
The top band adds structure and prevents the opening from stretching out.
Join teal at any side seam around the upper opening.
Round 1: Chain 1. Sc evenly around: 45 sc across front, 15 sc across side, 45 sc across back, 15 sc across side. Join. (120 sc)
Rounds 2 through 10: Chain 1. Sc in each stitch around. Join each round. (120 sc each round)
Round 11 (optional firming edge): Slip stitch loosely in each stitch around. Fasten off. (120 slip stitches)
The top band adds about 2.25 to 2.5 inches / 5.5 to 6.5 cm in height. Your total bag body should be about 10.5 inches / 26.5 cm tall.
Two Straps
Make 2 identical straps.
With teal, chain 8.
Row 1: Sc in the 2nd chain from hook and each chain across. Chain 1, turn. (7 sc)
Rows 2 through 104: Sc in the back loop only (BLO) of each stitch across. Chain 1, turn after each row except the final row. (7 sc each row)
Working in BLO creates a ribbed texture that helps prevent stretching.
Edging: Sc evenly around the entire strap: 104 stitches along each long edge and 7 stitches at each short end. Join and fasten off. (222 sc total)
The finished strap length is approximately 26 inches / 66 cm before sewing.
Attaching the straps: Sew each strap end 2 inches / 5 cm down inside the bag using a boxed X seam for security. Place straps about 2.25 inches / 5.5 cm in from each side seam on both the front and back panels.
Finishing Your Tote
Weave in ends: Work on the wrong side, changing direction at least once for security. Cotton yarn can work loose over time, so secure those ends well.
Block the finished tote: Steam block or wet block gently over a towel, shaping the corners square.
Optional lining: Sew a simple rectangle lining measuring 12 inches x 10 inches x 4 inches / 30.5 x 25.5 x 10 cm from quilting cotton. Hand stitch it just below the top band. A lining protects small items from poking through the granny square openings.
Optional closure: Sew a magnetic snap to the lining, or add a chain loop and button at the center top.
Care Instructions
Hand wash cool or machine wash on gentle cycle inside a mesh bag if your yarn label allows. Lay flat to dry over a towel and reshape while damp. Cotton tends to relax when wet, so blocking after washing helps maintain the shape.
Troubleshooting Common Issues
Square is too small: Go up a hook size or loosen your tension. Block to 4 inches / 10 cm.
Square is too large: Go down a hook size or tighten the final teal rounds.
Top edge flares: Use the stated 120 sc count and work the top band firmly. Add the optional slip stitch edge.
Straps stretch: Use cotton yarn, work BLO rows firmly, and sew ends down with a boxed X seam.
Bag collapses: Add fabric lining or a plastic canvas/cardboard base insert covered with fabric.
Size Customization
For a wider tote, add one square to the width of front and back panels. Then add 15 sc per added square to the top band count and base width.
For a deeper tote, add one square to each side panel or work a deeper base rectangle.
Keep each added square as a 15 sc edge unit to maintain the math.
Why Cotton Works Best for This Project
Cotton yarn holds its shape under weight, which matters when you’re carrying books, groceries, or project supplies. It also washes beautifully and gets softer over time without losing structure.
Acrylic will work in a pinch, but expect more stretch in the straps and potential sagging in the body. If you do use acrylic, definitely add a fabric lining and consider reinforcing the straps by sewing ribbon along the inside.
Making This Pattern Your Own
The color combinations for this granny square tote are truly endless. Try:
The key is keeping your frame color consistent across all squares so the joined panels look intentional and cohesive.
I hope you enjoy making this Colorful Granny Square Tote Bag crochet pattern as much as I enjoyed putting together these instructions. It’s one of those projects that looks impressive but breaks down into manageable, repetitive steps.
If you’re planning to make this tote, save this pattern to your Pinterest boards so you can find it easily when you’re ready to start. And please leave a comment below if you give it a try. I’d love to see your color combinations and finished bags!
Want a Quick & Easy Printable Version?
Get a clean, beautifully formatted PDF of this pattern — easy to follow step by step, ready to print or save on any device. No scrolling, no distractions, just the pattern.
Get the Printable PDF →