
Looking for a statement piece that will have everyone asking where you bought it? Maybe you’ve been scrolling through elegant summer dresses and thinking, "I could never make something like that." Well, here’s the thing: you absolutely can.
Get the Ad-Free PDF Pattern
Scroll down for the full pattern, or get the ad-free printable PDF from the shop.
Get the Printable PDF →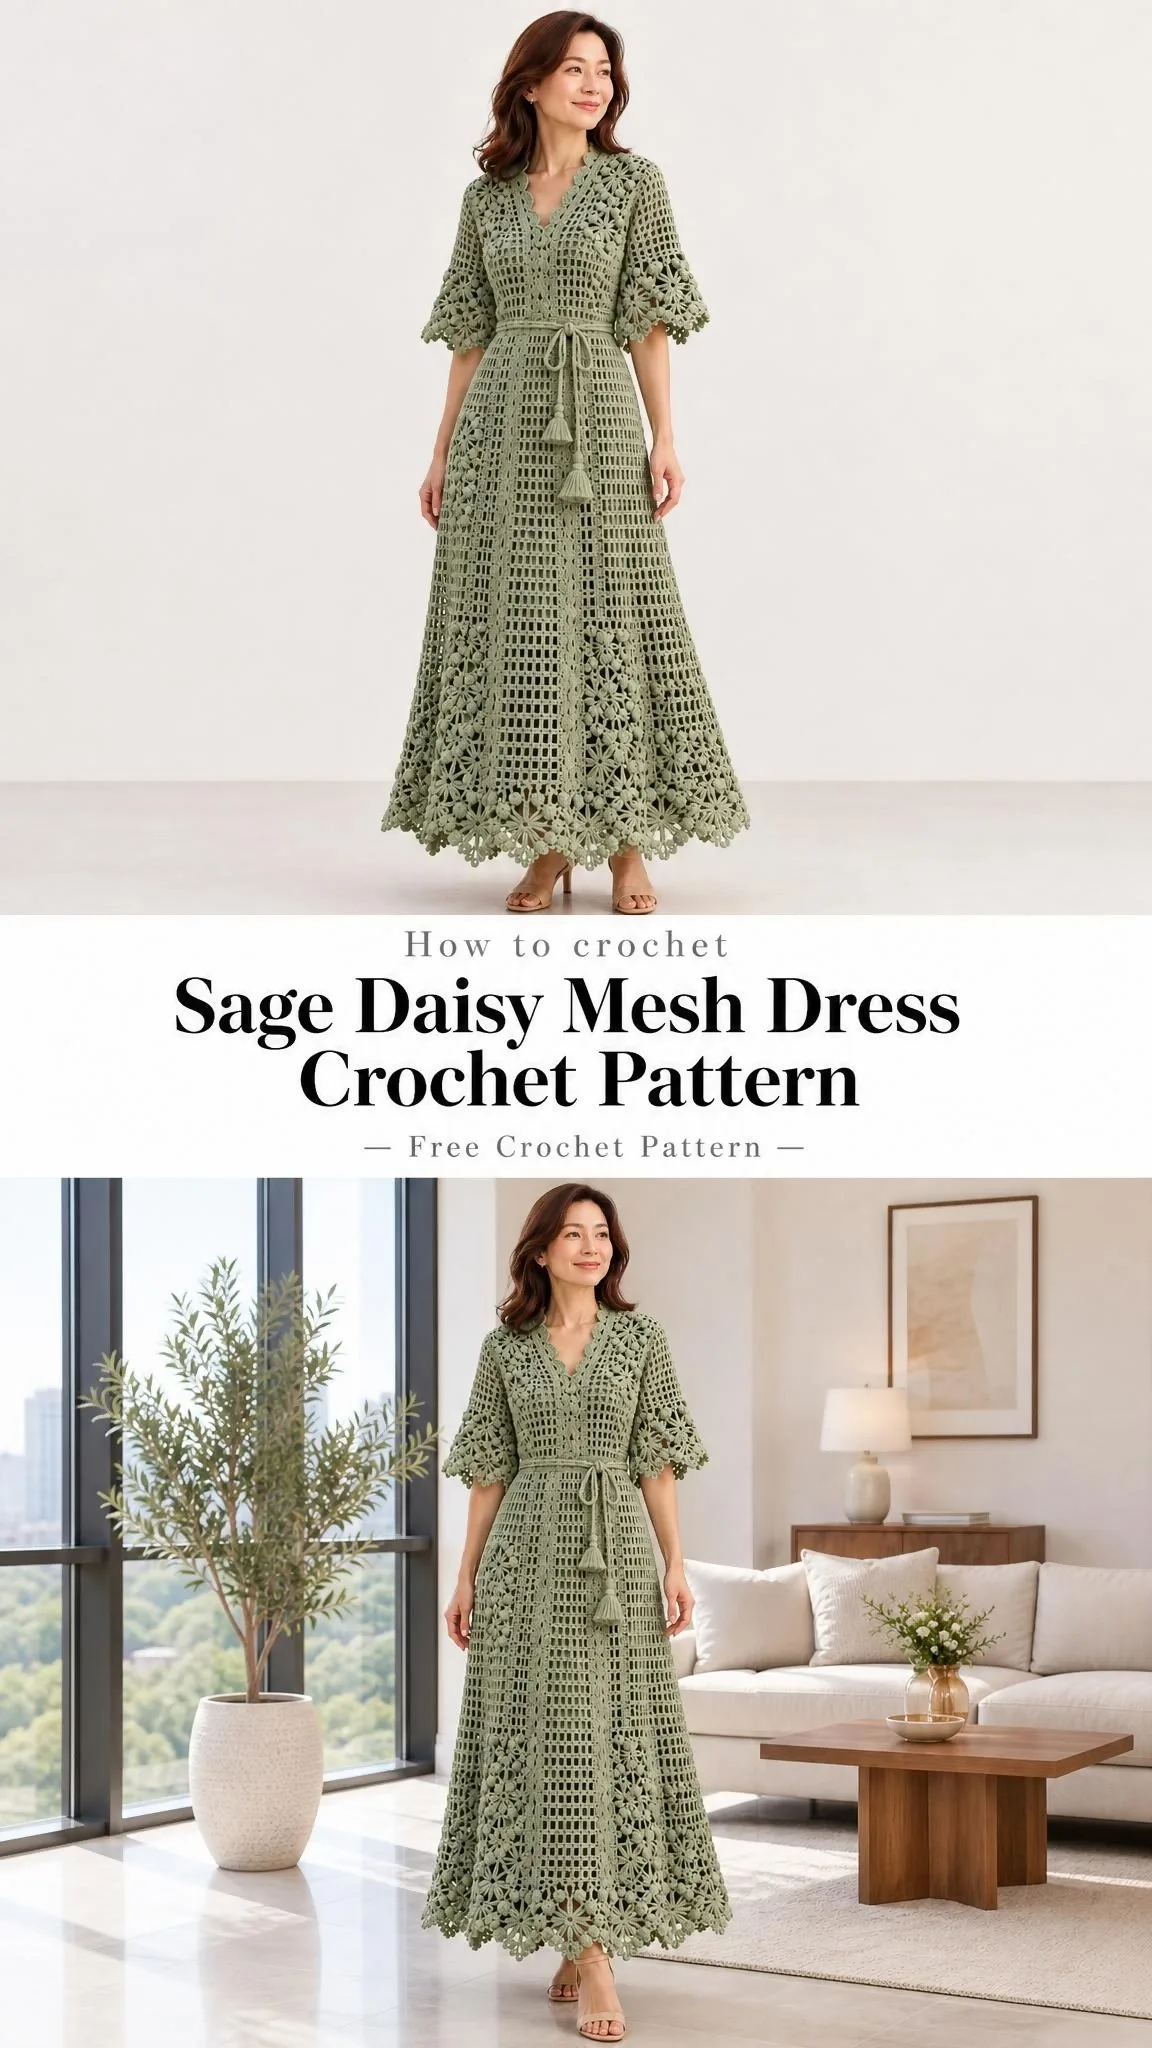
This Sage Daisy Mesh Dress is the kind of project that looks like it belongs in a boutique window but comes together through straightforward techniques you probably already know. The filet mesh creates that gorgeous open texture, while the appliqué daisies add romantic charm without complicated colorwork. It’s a dress that earns compliments and sparks conversations.
The A-line silhouette flatters beautifully, the removable tie cinches at the waist for a fitted look, and those elbow-length sleeves with daisy borders? Pure elegance. If you’ve been waiting for the right project to showcase your skills, this is it.
Why This Design Works
The Sage Daisy Mesh Dress combines several smart construction choices that make it both beautiful and buildable. Two flat bodice panels join to a two-panel skirt that gradually widens at two level changes. This means you’re never wrestling with complicated shaping or confusing increases mid-row.
The filet mesh technique creates an open, breathable fabric perfect for warm weather. Each mesh space contains one chain, and each vertical grid line has one double crochet (dc). Two mesh spaces make one 4-stitch span, which keeps the math simple once you understand the system.
Those stunning daisy appliqués? They’re worked separately and sewn on afterward. No tricky joins while you’re building the main fabric. This approach gives you complete control over placement and lets you adjust the floral density to your preference.
Skill Level and Who This Pattern Suits
This pattern works best for intermediate crocheters who are comfortable with basic stitches and ready to tackle a garment project. If you’ve made blankets, scarves, or simple tops before, you have the foundation you need.
The stitches themselves are straightforward: chains, single crochet, double crochet, and slip stitches. The challenge comes from managing a larger project, following shaping instructions, and assembling multiple pieces. Take it section by section, and you’ll do great.
Materials and Tools You’ll Need
Yarn: Smooth sport-weight cotton or cotton blend, approximately 300 meters per 100 grams. Allow 850 grams / 2550 meters total, including swatching and a finishing reserve. Use one consistent yarn weight throughout.
Color: Soft sage green. Use all 850 grams in the main color.
Hooks:
- 3.5 mm crochet hook, or size that achieves blocked gauge
- 3 mm hook for firm edgings and waist tie
Notions:
- Tapestry needle
- Scissors
- 12 removable markers
- Tape measure
- Blocking mats and rustproof pins
- Optional: 6 mm clear elastic, cut to comfortable waist plus 2 cm overlap
- Matching sewing thread and needle
Important note: For modest wear, use a separate opaque slip with a neckline at least as high as the dress and a hem reaching the crochet hem. Do not rely on open lace for coverage.
Finished Measurements
| Measurement | Worked Sample |
|---|---|
| Bust / upper waist | 100 cm / 100 cm |
| Suggested body bust | 88-94 cm |
| Waist, with removable tie | 80-94 cm |
| Hip / hem circumference | 120 cm / about 140 cm |
| Shoulder to waist | 40 cm |
| Waist to hem | 85 cm |
| Upper arm circumference | 40 cm before edging |
Check bust, hips, armhole depth, and shoulder-to-waist length before starting. The waist tie creates the fitted appearance. The untied opening must pass comfortably over the bust. Garment dimensions are after blocking, before wear stretch.
Gauge
Foundation and dense trim: 20 sc and 24 sc rows = 10 x 10 cm
Mesh gauge: 14 rows = 10 cm high
The lace must block to 5 cm per ten-stitch repeat. Filet mesh must block to 10 spaces across 10 cm.
Swatch instructions: Chain 42, work 41 single crochet (sc), then 20 filet spaces and at least 18 mesh rows. One flower should block to about 5 cm across with the 3 mm hook.
If the swatch is too wide, use a smaller hook. If too narrow, use a larger hook. Adjust row count separately for height. All length-based stops take priority over sample row estimates.
Pro tip: Hang the blocked swatch for 24 hours and note growth before choosing the final dress length. Cotton tends to stretch vertically over time.
Abbreviations and Special Stitches
US terminology throughout:
- ch = chain
- st/sts = stitch/stitches
- sl st = slip stitch
- sc = single crochet (insert hook, yarn over, pull through, yarn over, pull through both loops)
- hdc = half double crochet
- dc = double crochet (yarn over, insert hook, yarn over, pull through, yarn over, pull through two loops, yarn over, pull through remaining two loops)
- tr = treble crochet
- sp = space
- RS/WS = right side/wrong side
- rep = repeat
A number after a stitch means work that many stitches. Brackets enclose instructions to repeat.
Special Stitches:
sc2tog: Insert hook into next stitch and draw up a loop, repeat in following stitch, yarn over and draw through all three loops. This creates a decrease.
Picot: Ch 3, sl st in the third chain from hook. Creates a small decorative bump.
Fan (F): [dc, ch 1] four times, then dc, all in the same stitch. The fan contains 5 dc and four ch-1 spaces.
Joining seam: With RS together, pass a tapestry needle under corresponding edge loops on both pieces, one pair at a time, without pulling tight.
Weaving in ends: Weave a yarn end back and forth through dense stitches for at least 5 cm, reversing direction twice.
Pattern Notes Before You Begin
Work flat, turning at the end of every row unless instructed to work a round. Ch 1 for sc and ch 2 for dc do not count as stitches. Work the first actual stitch in the first stitch. Join rounds with sl st to the first actual stitch. Joining sl sts do not count. Keep a marker in each edge stitch.
The sample uses 101 foundation stitches per bodice panel and 10 lace repeats. In the shared instructions, n means the number of repeats in the current piece or skirt level. The extra stitch closes the final repeat and forms the seam edge.
Counts given for lace rows distinguish stitches, arches, and motifs. Do not treat chain spaces as single stitches unless instructed.
Block sections before assembly and compare each checkpoint before proceeding.
Construction Overview
- Make and block the swatch
- Make front and back bodice from waist upward
- Add shoulder sections
- Make two skirt panels, widening at two level changes
- Make sleeves
- Block, seam, add waist tie and trim, then finish
Shared Lace Rows
These instructions apply to all mesh sections of the dress.
Foundation: Ch (10 x number of repeats + 2). Sc in second ch from hook and each ch across. Turn. [10 x repeats + 1 sc]
Setup Row: Ch 2, dc in first sc; [ch 1, skip 1 sc, dc in next sc] across. Turn. [5n spaces, 5n+1 dc]
Repeat Row: Ch 2, dc in first dc; [ch 1, dc in next dc] across, skipping all ch-1 spaces. Turn. [5n spaces, 5n+1 dc]
Conversion Row: Ch 1, sc in first dc; [sc in ch-1 space, sc in next dc] across. Turn. [10n+1 sc]
Bodice Front Instructions
Ch 102 and work 101 sc, then mesh over all stitches until the panel is 22 cm tall, about 30 mesh rows. [50 spaces, 51 dc]
V-neck split, first shoulder: Ch 2, dc in first dc; [ch 1, dc in next dc] 24 times. Leave center dc and all remaining spaces unworked. Turn. [24 spaces, 25 dc]
Neck decrease row (worked from neck toward armhole): Sl st across first dc, ch-1 space and next dc; ch 2, dc in that same dc; work mesh to armhole edge. Turn. [one space fewer]
Return row (armhole toward neck): Ch 2, dc in first dc; work mesh in every space to last dc. Turn. [same space count]
Repeat the neck-decrease and return rows 9 times in total, counting the first pair. [15 spaces, 16 dc]
Work straight on these 15 spaces until total bodice height reaches 40 cm, about 7 more mesh rows. Fasten off. [15 spaces, 16 dc]
Second shoulder: With RS facing, attach yarn in the dc immediately beyond the unused center dc. Work 24 spaces toward the other armhole. Mirror the shaping so all decreases are at the neck edge: on an armhole-to-neck decrease row, stop one space before the neck. Work nine decreases and finish at the same height. [15 spaces, 16 dc]
Bodice Back Instructions
Ch 102, work 101 sc, then 50 mesh spaces to 40 cm total height, about 55 mesh rows. Convert to 101 sc. Mark the outer 31 sc at each side for shoulder seams. Leave the middle 39 sc for the back neck. [101 sc]
Two Skirt Panels
Make two identical panels from waist downward.
Target level heights (including dense transition rows and final edging allowance):
- Upper: 23.8 cm
- Middle: 28.9 cm
- Lower: 32.3 cm
Reserve 2 cm of the final level for the hem. For floral hems, reserve 5 cm. Total finished skirt length is 85 cm.
Upper level foundation: Ch 102; sc in second ch and across. Work shared lace over 10 repeats to upper-level height, ending on a conversion-ready row. Convert if required. [101 sc / 10 repeats]
Increase row 1: Ch 1, sc in first sc; [sc in next 4 sc, 2 sc in next sc] 20 times. Turn. [121 sc]
Middle level: Restart the lace setup with 12 repeats. Work to middle-level height, ending on a conversion-ready row. Convert if required. [121 sc / 12 repeats]
Increase row 2: Ch 1, sc in first sc; [sc in next 5 sc, 2 sc in next sc] 20 times. Turn. [141 sc]
Lower level: Restart the lace setup with 14 repeats. Work to lower-level height less the hem allowance. Finish on a conversion-ready row. Convert if required. [141 sc / 14 repeats]
Block both panels to equal level heights before joining. Level joins are narrow structural bands, not added ruffles. If the skirt reaches the desired length early, shorten the lower level. Do not remove the hip-width increase.
Sleeve Instructions
Make two sleeves from upper arm toward cuff.
Ch 82, work 81 sc, then shared lace with n=8. Work to 25 cm including 2 cm cuff allowance (5 cm with flowers). The foundation edge measures 40 cm and fits the two 20 cm armhole edges.
Continue without increasing to 25 cm less cuff allowance. Convert for cuff trim. [81 sc / 8 repeats]
Assembly
You’ll need: Main color yarn, tapestry needle, and removable markers. Use the 3 mm hook only if you prefer slip-stitch seams. Keep them loose enough to lie flat. Pre-block all pieces to the schematic measurements.
Pass 1: Join front and back shoulders, matching one front stitch/space to its back counterpart. [2 shoulders]
Pass 2: Seam bodice sides from waist upward for 20 cm, leaving the upper 20 cm on each full-height panel open for armholes. [2 side seams; 2 armholes of 40 cm perimeter]
Pass 3: Fold each sleeve lengthwise and seam its long edges. Join each 40 cm sleeve foundation around one armhole, placing the sleeve seam at the underarm and distributing the edge evenly. [2 sleeves attached]
Pass 4: Seam the two skirt panels along both long edges, matching both widening bands exactly. Keep hem level. [2 skirt seams]
Pass 5: Join skirt upper edge to bodice foundation with RS together. Match 101 stitches to 101 stitches on each panel, aligning side seams. Do not cinch this seam. [202 stitch pairs joined]
Checkpoint: Untied bust and waist approximately 100 cm. Hip 120 cm. Hem 140 cm. Skirt length including planned trim 85 cm. Both armholes are even, side seams hang vertically, and the dress passes over the bust without forcing the yarn.
Edgings and Details
You’ll need: 3 mm hook, main color yarn, tapestry needle, tape measure, and markers. Optional soft waist elastic and matching sewing thread.
Waist Edging and Tie
Waist round 1: With RS facing, work 100 sc evenly over the front waist seam and 100 sc over the back. Join. Do not turn. [200 sc]
Waist round 2: Ch 1, sc in every sc. Join. [200 sc]
Waist round 3: Ch 1, sc in first 2 sc; [ch 2, skip 2 sc, sc in next 2 sc] 49 times; ch 2, skip last 2 sc; join. [100 sc, 50 eyelets]
Waist round 4: Ch 1, sc in each sc and 2 sc in each ch-2 space. Join. [200 sc]
Waist round 5: Ch 1, sc in every sc. Join and fasten off. [200 sc]
Tie Row 1: Ch 301; sl st in second ch from hook and every ch across. Fasten off. Block to approximately 150 cm. Add or remove chains to achieve this length. [300 sl sts for sample]
Tie pass 2: Weave through all waist eyelets, bringing both ends out at center front. Tie a bow without distorting the mesh. [50 eyelets threaded]
If using waist elastic, measure a comfortable loop on the wearer, overlap ends by 2 cm and sew securely. Tack inside the waistband at side seams and center back. Keep the crochet waistband stretchy enough to pass over the bust.
Neckline Edging
Neck round 1: Sc evenly around the neck edge at 2 sc per cm, putting 3 sc in each square corner or sc2tog at the bottom of a V. Adjust by at most 2 stitches to a multiple of 6. Record the resulting number as E. Join. [E sc, E divisible by 6]
Neck round 2: Ch 1, sc in every sc, repeating the V decrease at the point. Join and fasten off. Record the final count. [E-1 sc with one V decrease]
Hem Edging
Hem round 1: Work 140 sc across each skirt panel, omitting the seam-edge surplus stitch from each panel. Join. [280 sc]
Hem round 2: Ch 1, sc in each sc. Join and fasten off. [280 sc]
Cuff Edging (Each Sleeve)
Cuff round 1: Sc evenly around the converted sleeve edge, omitting the surplus seam-edge stitch. Join. [80 sc per cuff]
Cuff round 2: Sc in every sc. Join and fasten off. [80 sc per cuff]
Flower Appliqués
Continue with the 3 mm hook. Make 28 flowers for the hem, 12 for the neckline, and 8 per cuff. When the design calls for vertical floral bands, add two strips of 10 flowers each.
Flowers are sewn over the mesh, not structural joining motifs.
Flower round 1: Ch 4 and join to a ring. Ch 1, 8 sc in ring; join. Leave a 15 cm starting tail for securing. [8 sc]
Flower round 2: [Ch 3, sl st in next sc] 8 times. [8 petal arches]
Flower round 3: In each arch work [sc, hdc, 3 dc, hdc, sc]. Join and fasten off, leaving 25 cm sewing tail. [8 petals, 56 sts]
Flower joining pass: Distribute the hem flowers every 10 hem stitches and sew center plus at least 3 petal tips of each flower to the underlying mesh. Sew neckline and cuff flowers at measured equal intervals. Keep the neck opening unobstructed. [28 hem flowers; 12 neck flowers; sleeve flowers as above]
Vertical bands: Position one line of 10 flowers down each front quarter, starting below waist and spacing evenly to the hem border. Tack centers and petal tips without gathering the fabric. [20 added flowers]
Checkpoint: Waist tie slides through all 50 eyelets. Neck and armhole edges lie flat. Hem repeats are evenly spaced. Count both cuffs and compare. Sewn motifs must not pull the grid out of square, and the final length must agree with the schematic.
Finishing Your Sage Daisy Mesh Dress
Pass 1: Inspect every seam, tie end, and appliqué attachment. Weave all yarn tails through dense stitches in three directions. Trim only after secure anchoring. [0 loose ends]
Pass 2: Soak according to yarn label, press out water in towels without wringing, and lay flat to schematic dimensions. Pin lace points without forcing the openings. [1 complete dress blocked]
Pass 3: Dry completely, remove pins, rest flat overnight, then hang briefly to check length. Adjust tie and confirm the opaque slip reaches the hem for worn styling. [1 finished dress]
Final checkpoint: Confirm bust about 100 cm, skirt 85 cm, and total shoulder-to-hem approximately 125 cm. Allow small differences from lace blocking.
Size Adjustments
Add or remove ten foundation stitches per panel to change finished circumference by 10 cm. Keep the same two extra repeats at each skirt widening. Recalculate neckline and shoulder counts symmetrically and keep at least 4 cm positive bust ease.
For a hip above 112 cm, increase the middle and lower panel widths before starting. This is an adjustment method, not a graded size range.
Care Instructions
Follow the yarn label. Hand wash cool with mild detergent if the yarn permits. Support the wet garment fully, reshape, and dry flat. Do not hang for storage: long crochet dresses can grow under their own weight. Keep away from direct heat and snagging jewelry.
This is an adult garment. Secure all appliqués. Keep the waist cord tied and away from machinery. Check that long hems do not trail or cause trips. Stop wearing if a strap, seam, or neckline becomes overstretched.
Final Thoughts on This Crochet Dress Pattern
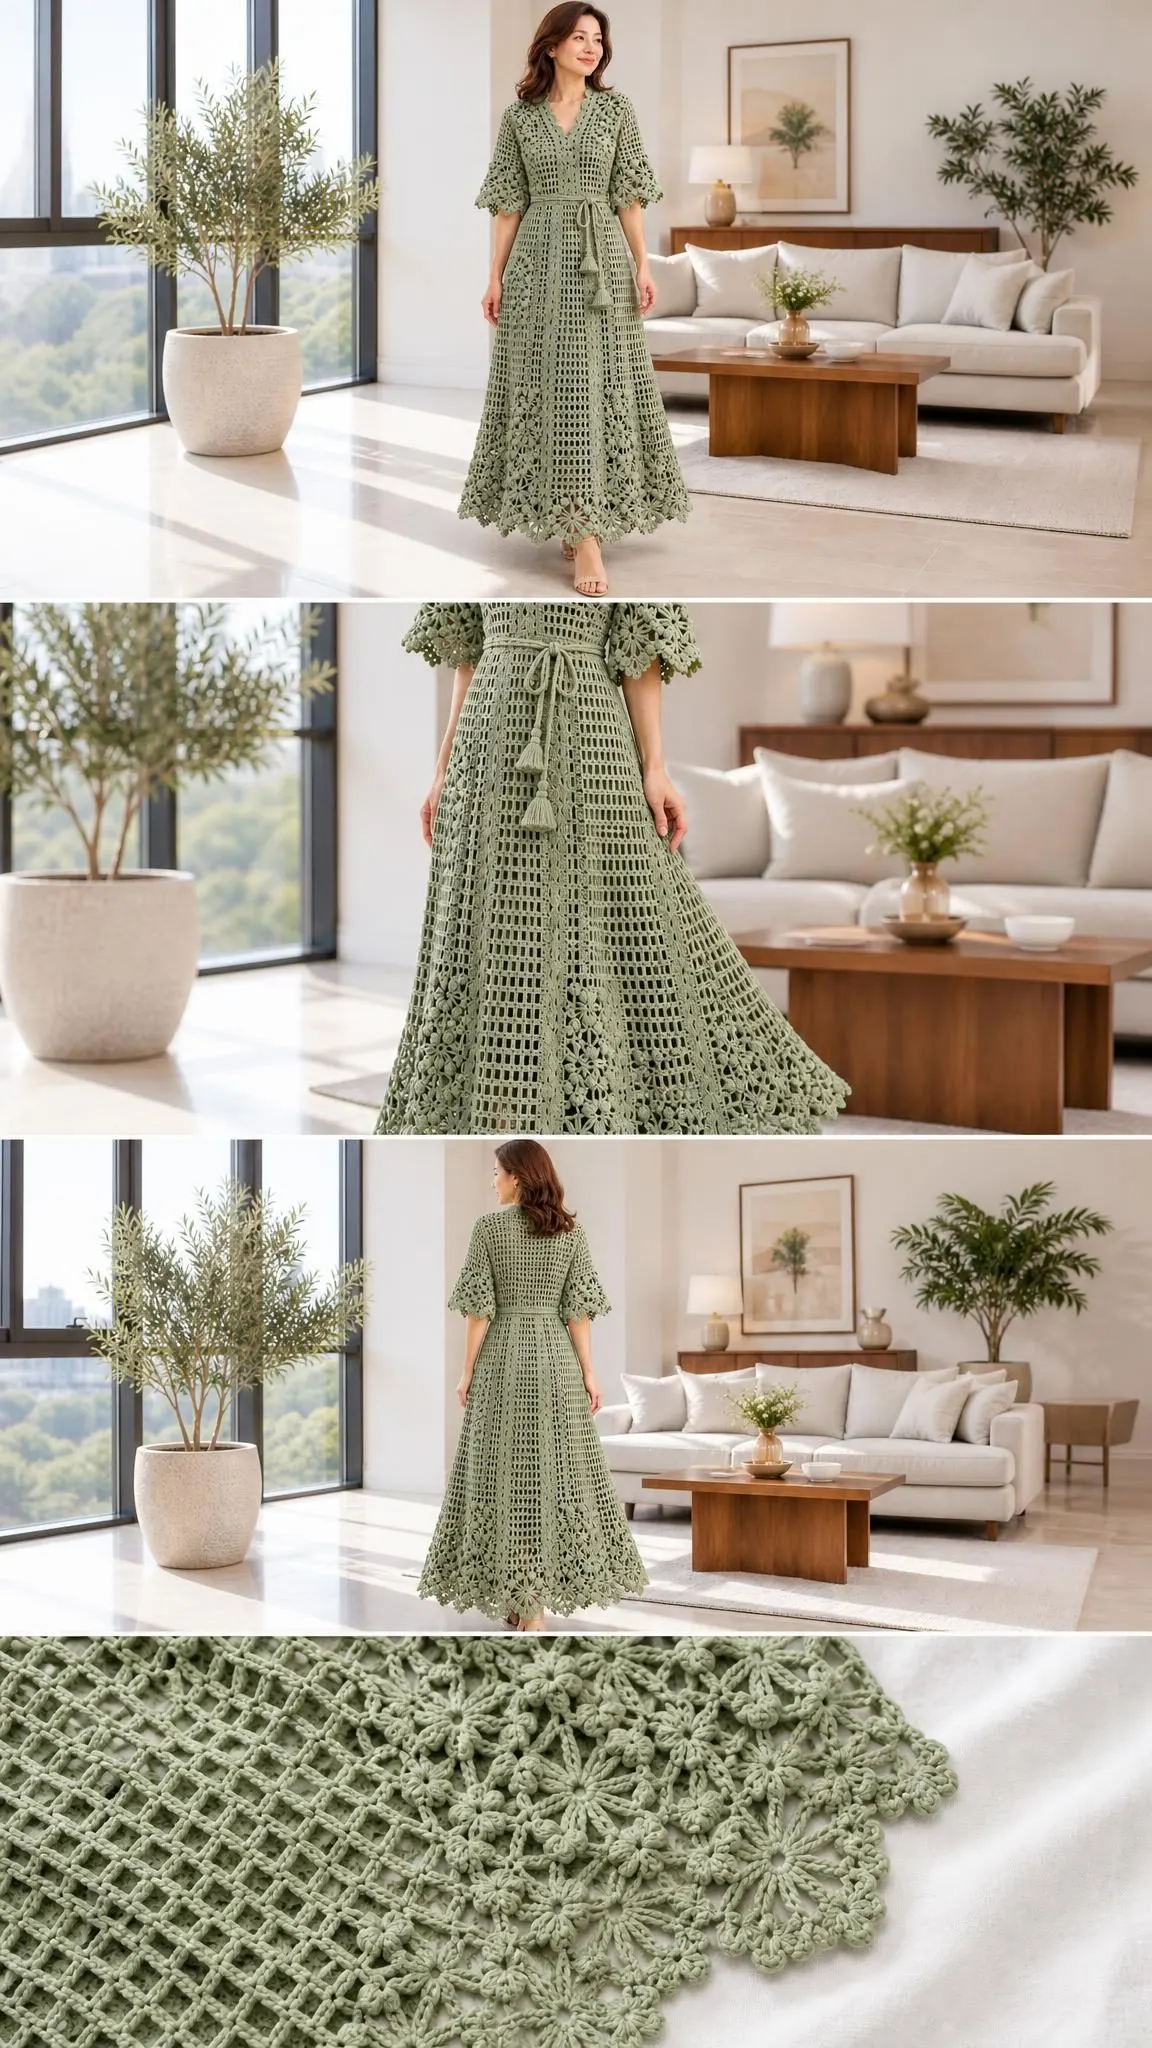
The Sage Daisy Mesh Dress is the kind of project that transforms your making skills into wearable art. The combination of open filet mesh, romantic daisy appliqués, and that beautiful A-line silhouette creates something truly special. Every section builds logically on the last, and those checkpoints along the way keep you on track.
Whether you’re making this for a special occasion, a summer wardrobe staple, or simply because you deserve something beautiful, this dress delivers. The sage green is timeless, the construction is solid, and the finished piece is absolutely stunning.
Thank you so much for choosing this pattern. If you make this dress, please share your photos on Instagram or Facebook. Seeing your creations is the best part of designing, and your version might inspire someone else to pick up their hook and start.
Save this Sage Daisy Mesh Dress pattern to your Pinterest boards so you can find it when you’re ready to begin. And if you make it, drop a comment below. Your fellow crocheters would love to hear how it went!
Want a Quick & Easy Printable Version?
Get a clean, beautifully formatted PDF of this pattern — easy to follow step by step, ready to print or save on any device. No scrolling, no distractions, just the pattern.
Get the Printable PDF →