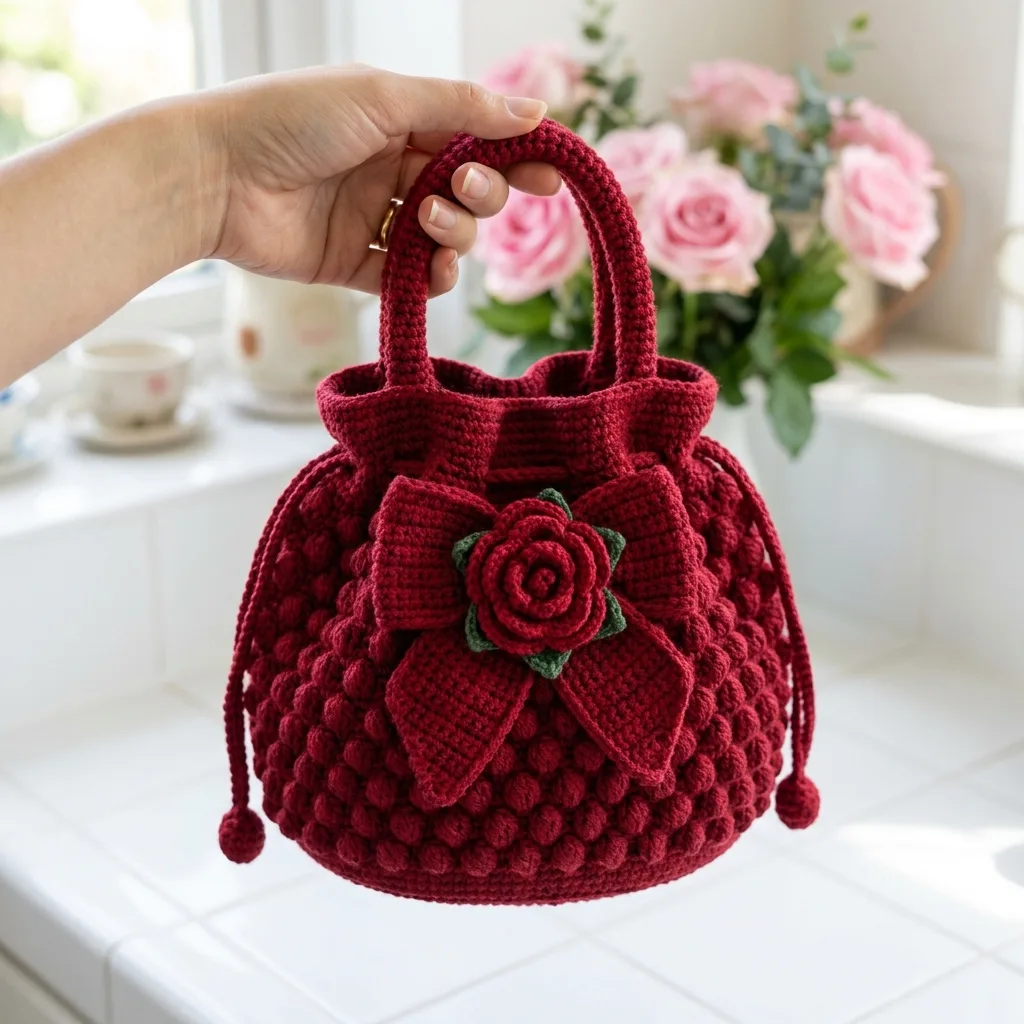
I set out to design a handbag that felt romantic, structured, and a little fancy without being fussy. Something with gorgeous texture, a drawstring closure that actually works, and a statement bow that would make people stop and ask "did you make that?" After testing different bobble placements, handle lengths, and rose sizes, I am SO pleased with how this Red Rose Bow Handbag turned out! The bobble texture is plush but not overwhelming, the handles stand up beautifully, and that layered rose sits perfectly in the center of the bow. This one feels special.
Get the Ad-Free PDF Pattern
You can find the free pattern below, or you can purchase the ad-free printable PDF from my shop.
Get the Printable PDF →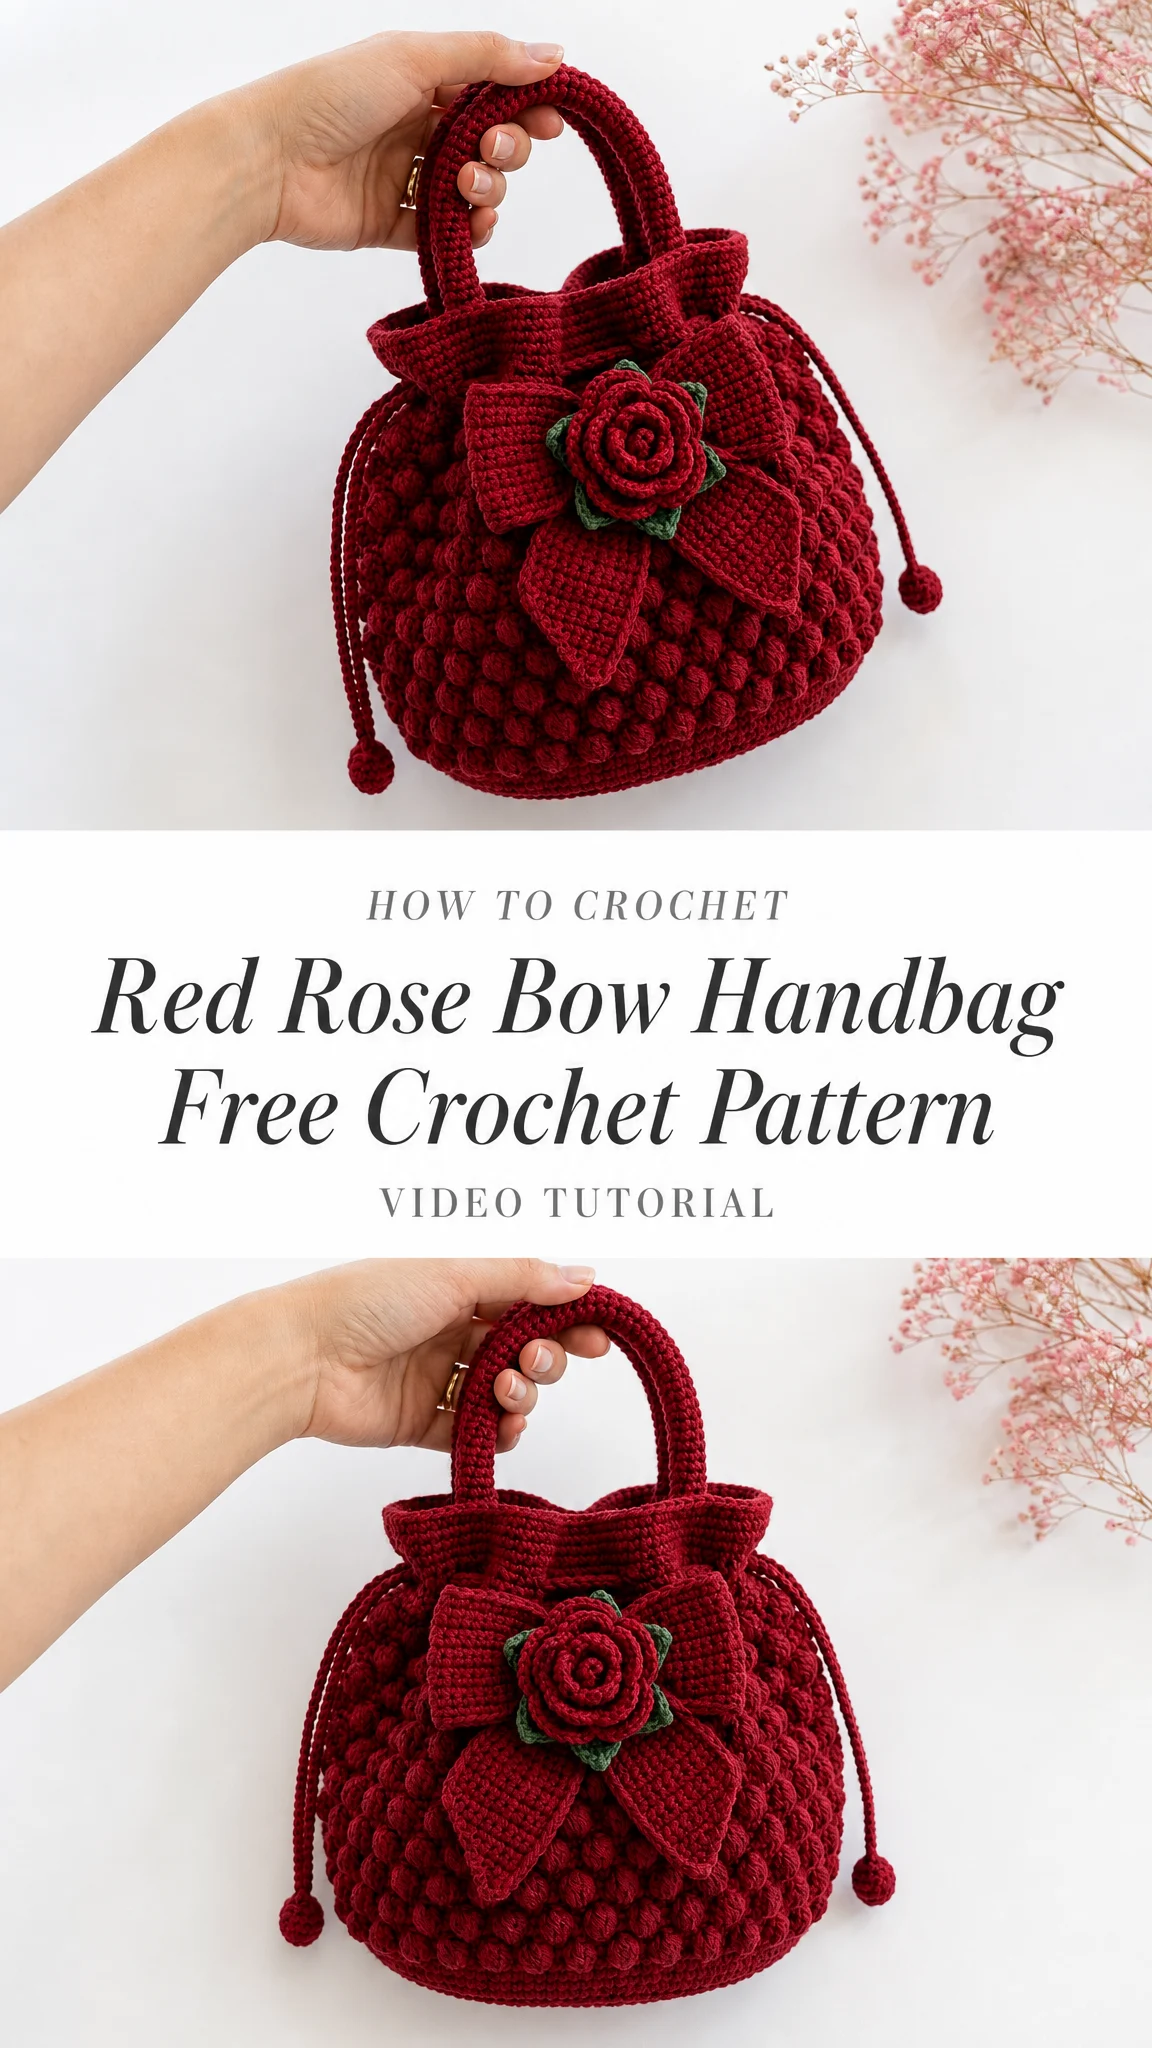
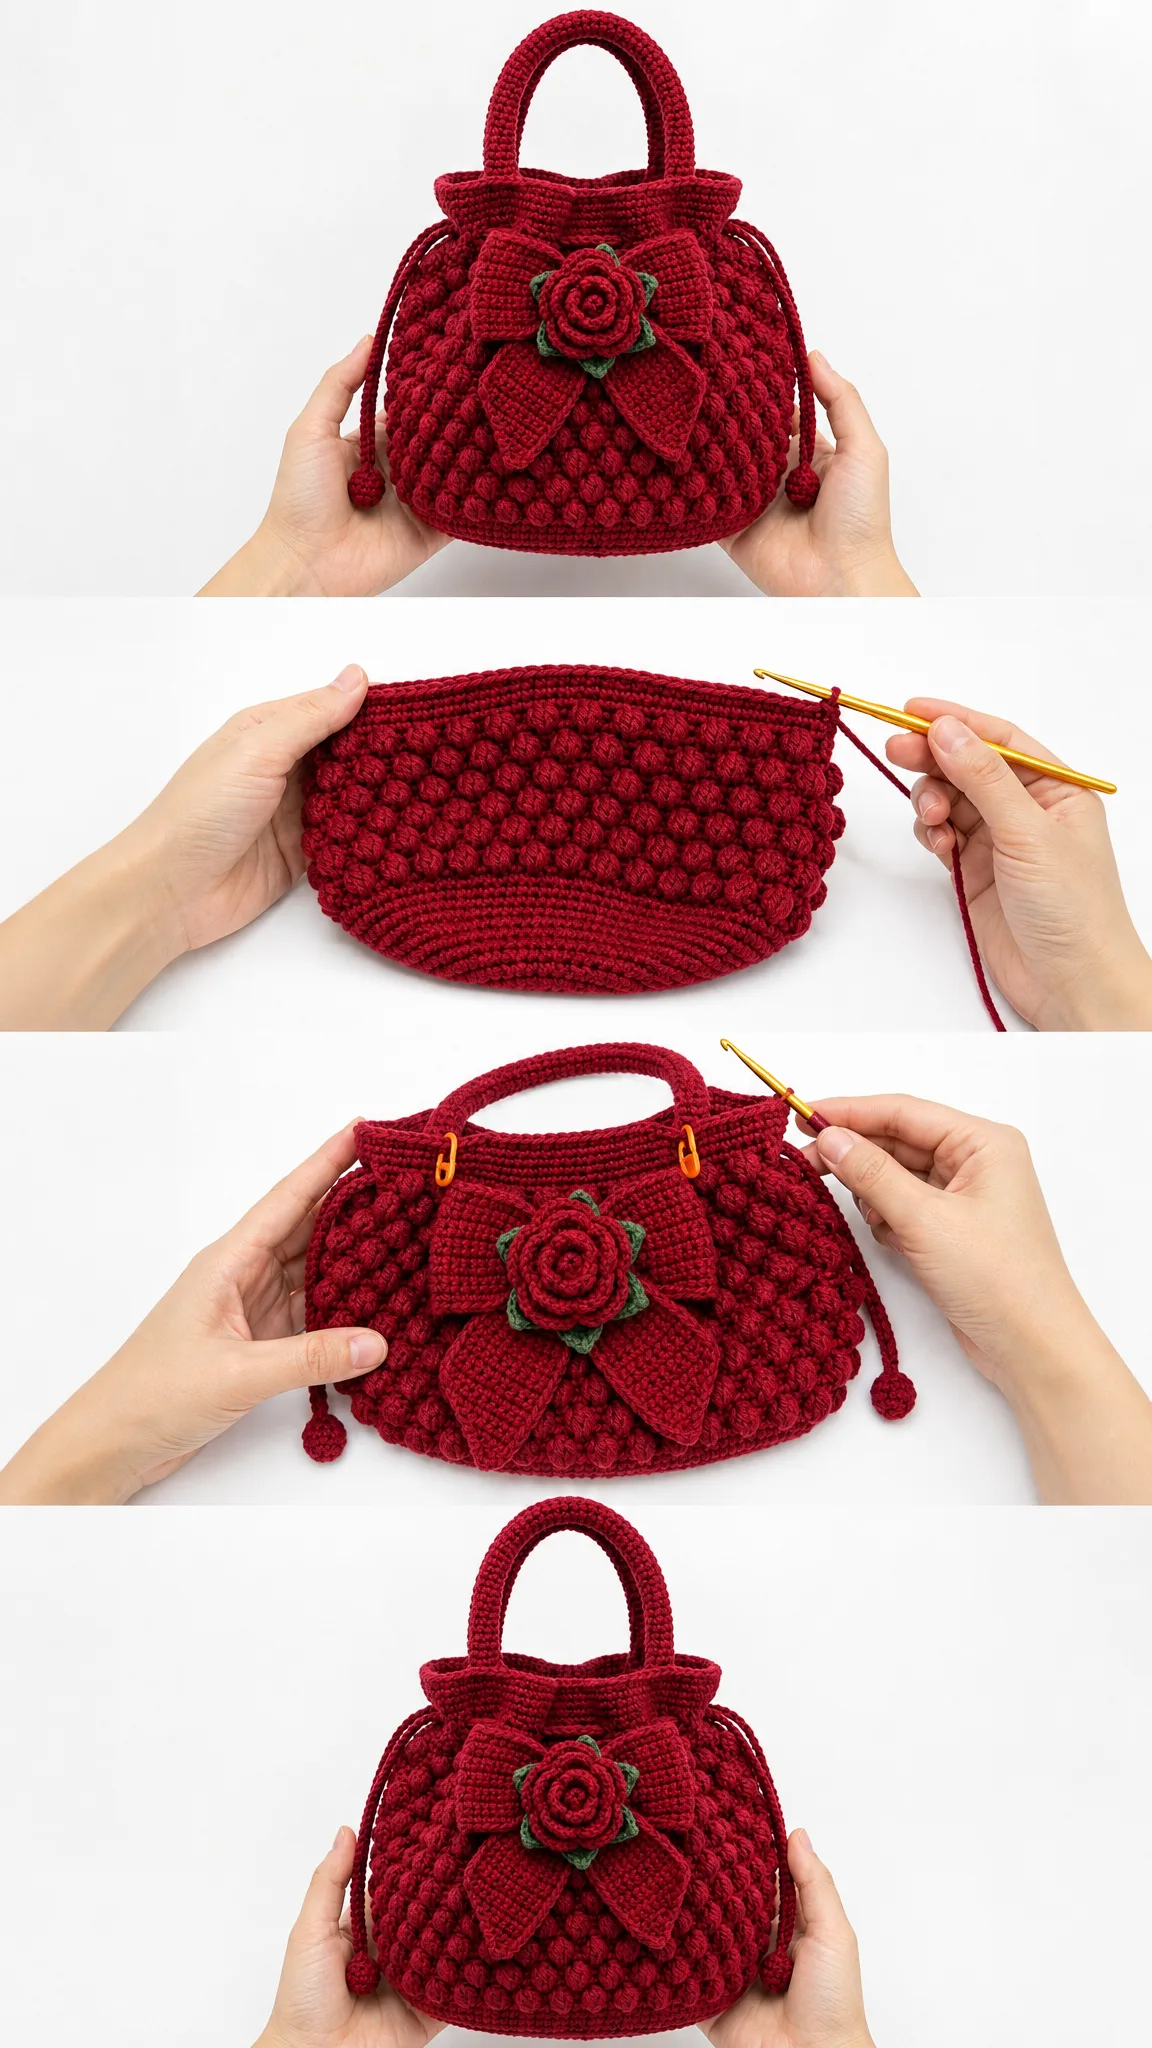
This soft bucket bag brings together so many satisfying techniques in one project. You will work in joined rounds from the bottom up, create rows of puffy bobbles, shape a drawstring casing, craft tubular handles, and finish with a dimensional bow and rose appliqué. The result is a bag that looks far more complicated than it actually is. If you can single crochet, work a bobble stitch, and sew pieces together neatly, you can absolutely make this.
About This Red Rose Bow Handbag Crochet Pattern
This handbag is a confident intermediate project. You will need to be comfortable working in joined rounds, maintaining stitch counts across textured rounds, and assembling multiple pieces at the end. The bobble stitch creates that gorgeous bumpy texture you see covering the body. The bag starts with a flat circular base, turns upward into the textured body, tapers slightly at the top, and finishes with a smooth band and eyelet casing for the drawstrings.
Finished size: approximately 7.25 inches (18.5 cm) diameter at the base, 8 inches (20 cm) tall to the top edge, and 13 inches (33 cm) tall including handles. The top opening after gathering measures about 4 to 5 inches (10 to 13 cm).
Time estimate: 8 to 12 relaxed hours depending on your pace.
Materials You Will Need
Gather these supplies before you begin:
Yarn:
Recommended yarns:
Hook:
Notions:
Substitution note: Choose a firm worsted cotton or cotton blend. Soft acrylic can work, but the bag will be less structured and may need lining for support.
Gauge
18 single crochet (sc) and 20 rounds equals 4 inches (10 cm) in firm single crochet after blocking.
Bobble body gauge: 8 bobbles across and 8 bobble rows equals approximately 4 inches (10 cm).
Please swatch and match gauge before starting. This ensures your bag will be the correct size and the base will lie flat.
Abbreviations and Stitch Guide
Here are all the abbreviations used in this pattern with their definitions:
UK crocheters note: US sc equals UK dc. US dc equals UK tr.
Special Stitches
Bobble stitch: [Yarn over, insert hook in stitch, yarn over and pull up a loop, yarn over and pull through 2 loops] 5 times in the same stitch, yarn over and pull through all 6 loops on hook, chain 1 to close. The closing chain does not count as a separate stitch.
This creates a puffy ball that pops out on the right side of your work. The bobbles naturally push to the opposite side of where you are working, so they will face outward on your bag.
Invisible join: Cut yarn, pull tail through last stitch, thread needle, insert under both loops of first stitch, then back down into the last stitch. Weave in the end.
This creates a seamless join that hides where your round begins and ends.
Important Pattern Notes
Read these before you start:
Left handed note: Work the same instructions in the opposite direction. Placement points are mirrored. Keep the bow centered on the front and the drawstring exits at both sides.
Step by Step Instructions
Part 1: Circular Base
Start with your deep red yarn and 4.0 mm hook.
Round 1: Work 8 sc in a magic ring; join with sl st. (8 sc)
Round 2: Ch 1, inc in each st around; join. (16 sc)
Round 3: Ch 1, [sc in next st, inc in next st] 8 times; join. (24 sc)
Round 4: Ch 1, [sc in next 2 sts, inc] 8 times; join. (32 sc)
Round 5: Ch 1, [sc in next 3 sts, inc] 8 times; join. (40 sc)
Round 6: Ch 1, [sc in next 4 sts, inc] 8 times; join. (48 sc)
Round 7: Ch 1, [sc in next 5 sts, inc] 8 times; join. (56 sc)
Round 8: Ch 1, [sc in next 6 sts, inc] 8 times; join. (64 sc)
Round 9: Ch 1, [sc in next 7 sts, inc] 8 times; join. (72 sc)
Round 10: Ch 1, [sc in next 8 sts, inc] 8 times; join. (80 sc)
Round 11: Ch 1, [sc in next 9 sts, inc] 8 times; join. (88 sc)
Round 12: Ch 1, [sc in next 10 sts, inc] 8 times; join. (96 sc)
Round 13: Ch 1, [sc in next 11 sts, inc] 8 times; join. (104 sc)
Checkpoint: Your base should measure about 7.25 inches (18.5 cm) across and lie flat. If it cups (curves upward like a bowl), loosen your tension or go up a hook size. If it waves or ruffles, go down a hook size.
Part 2: Turn Up and Bobble Body
Now we turn the work upward and begin the textured body.
Round 14: Ch 1, sc in the back loop only (BLO) in each st around; join. (104 sc)
Working in the back loop only creates a sharp edge where the base meets the body. This is what makes the bag stand upright.
Round 15: Ch 1, [bobble in next st, sc in next st] 52 times; join. (52 bobbles, 52 sc)
Round 16: Ch 1, sc in each st around; join. (104 sc)
Rounds 17 through 34: Repeat Rounds 15 and 16 nine more times. You will have 10 bobble rounds total. Each round has 104 stitches.
Round 35: Ch 1, [sc in next 11 sts, sc2tog] 8 times; join. (96 sc)
Round 36: Ch 1, sc in each st around; join. (96 sc)
Round 37: Ch 1, [sc in next 10 sts, sc2tog] 8 times; join. (88 sc)
Round 38: Ch 1, sc in each st around; join. (88 sc)
Checkpoint: The body should measure about 6.5 inches (16.5 cm) from the base turn up to the start of the smooth top band. Your bobbles should sit in straight vertical columns. If they lean or spiral, make sure you are keeping the sc after each bobble snug.
Part 3: Top Band and Drawstring Casing
Rounds 39 through 42: Ch 1, sc in each st around; join. (88 sc)
Round 43 (eyelet round): Ch 1, [sc in next 6 sts, ch 2, skip next 2 sts] 11 times; join. (66 sc, 11 ch-2 spaces)
These chain 2 spaces create the holes where your drawstrings will thread through.
Round 44: Ch 1, [sc in next 6 sts, 2 sc in next ch-2 sp] 11 times; join. (88 sc)
Rounds 45 through 46: Ch 1, sc in each st around; join. (88 sc)
Finish with an invisible join and weave in ends.
Checkpoint: The top edge should measure about 19.5 inches (49.5 cm) around before the cord is tightened.
Part 4: Drawstrings
Make 2.
Ch 145, sl st in the 2nd ch from hook and in each ch across. Fasten off.
Each cord should measure about 34 to 36 inches (86 to 91 cm) after relaxing.
Threading instructions: Thread one cord through the eyelets from left to right and back to the left. Thread the second cord from right to left and back to the right. This creates a cinching effect when you pull both cords.
Add a small pom at each end or knot securely to prevent the ends from slipping through.
Part 5: Handles
Make 2.
Ch 9, join with sl st to form a ring without twisting.
Handle tube Round 1: Ch 1, sc in each ch around; join. (9 sc)
Handle tube Round 2: Ch 1, sc in each st around; join. (9 sc)
Handle tube Round 3: Ch 1, sc in each st around; join. (9 sc)
Handle tube Round 4: Ch 1, sc in each st around; join. (9 sc)
Continue in joined rounds until the handle measures 13 inches (33 cm). Fasten off leaving a long tail for sewing.
Optional: Insert a piece of cord inside the handle tube before sewing for extra structure and to prevent stretching.
Sew handle ends to the inside top band with ends about 2.25 inches (5.5 cm) apart on the front. Repeat on the back. Sew through several rounds for strength.
Part 6: Side Cord Tabs
Make 2.
Ch 11, sc in 2nd ch from hook and across. (10 sc)
Sew one tab vertically at each side seam area over the drawstring exit. This stabilizes the cords and adds a nice finishing detail.
Part 7: Bow Loops
Make 2 rectangles.
Ch 17.
Row 1: Sc in 2nd ch from hook and across; turn. (16 sc)
Rows 2 through 10: Ch 1, sc in each st across; turn. (16 sc)
Fasten off, leaving a sewing tail. Pinch the center of each rectangle to form a loop shape.
Part 8: Bow Tails
Make 2.
Ch 13.
Row 1: Sc in 2nd ch from hook and across; turn. (12 sc)
Rows 2 through 8: Ch 1, sc in each st across; turn. (12 sc)
Row 9: Ch 1, sc2tog, sc in next 8 sts, sc2tog; turn. (10 sc)
Row 10: Ch 1, sc in each st across; turn. (10 sc)
Row 11: Ch 1, sc2tog, sc in next 6 sts, sc2tog; turn. (8 sc)
Row 12: Ch 1, sc in each st across. (8 sc)
Fasten off. Sew tails under the bow loops, angled downward.
Part 9: Bow Center Wrap
Ch 7.
Row 1: Sc in 2nd ch from hook and across; turn. (6 sc)
Rows 2 through 12: Ch 1, sc in each st across. (6 sc)
Wrap this piece around the bow center and sew closed at the back.
Part 10: Layered Rose
With red yarn, ch 51.
Row 1: Sc in 2nd ch from hook and across; turn. (50 sc)
Row 2: [sc in next st, hdc in next st, 3 dc in next st, hdc in next st, sc in next st] 10 times.
Fasten off leaving a long tail. Spiral the piece from one end to form a rose shape. Stitch through the base to secure the spiral in place.
Part 11: Leaves
Make 6 with green yarn.
Ch 9. Working in the back bumps of the chain: sl st in 2nd ch, sc, hdc, dc in next 2 ch, hdc, sc, sl st in last ch. Rotate and work the same sequence along the opposite side. Fasten off.
Arrange leaves behind the rose.
Assembly and Finishing
Now bring all your pieces together:
1. Position the bow on the front of the bag with its top edge just below the smooth top band. Sew securely through the back of the bow, not through the visible front texture.
2. Attach the rose to the center of the bow. Tuck and stitch the green leaves evenly around the rose.
3. Weave in all remaining ends throughout the bag.
4. Add lining if desired. A simple circular base pouch lining keeps small items from catching on the bobbles inside.
5. Steam lightly from a distance. Shape the base flat, puff the bobbles with your fingers, and avoid pressing the rose flat.
Size Customization Tips
Want to adjust the size? Here is how:
Troubleshooting Common Issues
Base cups upward: Your increases are too tight or your hook is too small. Rework with relaxed tension.
Base waves or ruffles: Your stitches are too loose for the increase rate. Go down a hook size or block gently.
Bobbles lean or spiral: Keep the sc after each bobble snug and place a marker at the start of every round.
Top does not gather well: Use a firmer cord and make sure both drawstrings are threaded in opposite directions.
Handles stretch over time: Add internal cord or sew a fabric reinforcement strip behind the attachment points.
Care Instructions
Spot clean with cool water and mild soap. Reshape while damp and dry flat. If fully washing, remove heavy items first, place the bag in a mesh laundry bag, and use a gentle cycle only if your yarn label allows. Do not tumble dry.
You Did It!
This Red Rose Bow Handbag crochet pattern brings together texture, structure, and romantic details in one beautiful project. Every time you pick it up, you will feel proud knowing you made something this gorgeous with your own hands. The bobbles, the bow, the rose, the handles that stand up just right. It is all you.
Thank you so much for choosing this pattern. I would absolutely love to see your finished handbag! If you make one, please save this pattern to your Pinterest boards so you can find it again later. And drop a comment below to let me know how yours turned out. Happy crocheting!
Want a Quick & Easy Printable Version?
Get a clean, beautifully formatted PDF of this pattern — easy to follow step by step, ready to print or save on any device. No scrolling, no distractions, just the pattern.
Get the Printable PDF →