
Go dig through your stash right now. I know you have that beautiful mercerized cotton you have been saving for something special. Maybe some metallic thread tucked away in a drawer. This layered floral placemat is exactly the kind of project that deserves your best yarn.
Get the Ad-Free PDF Pattern
You can find the free pattern below, or you can purchase the ad-free printable PDF from my shop.
Get the Printable PDF →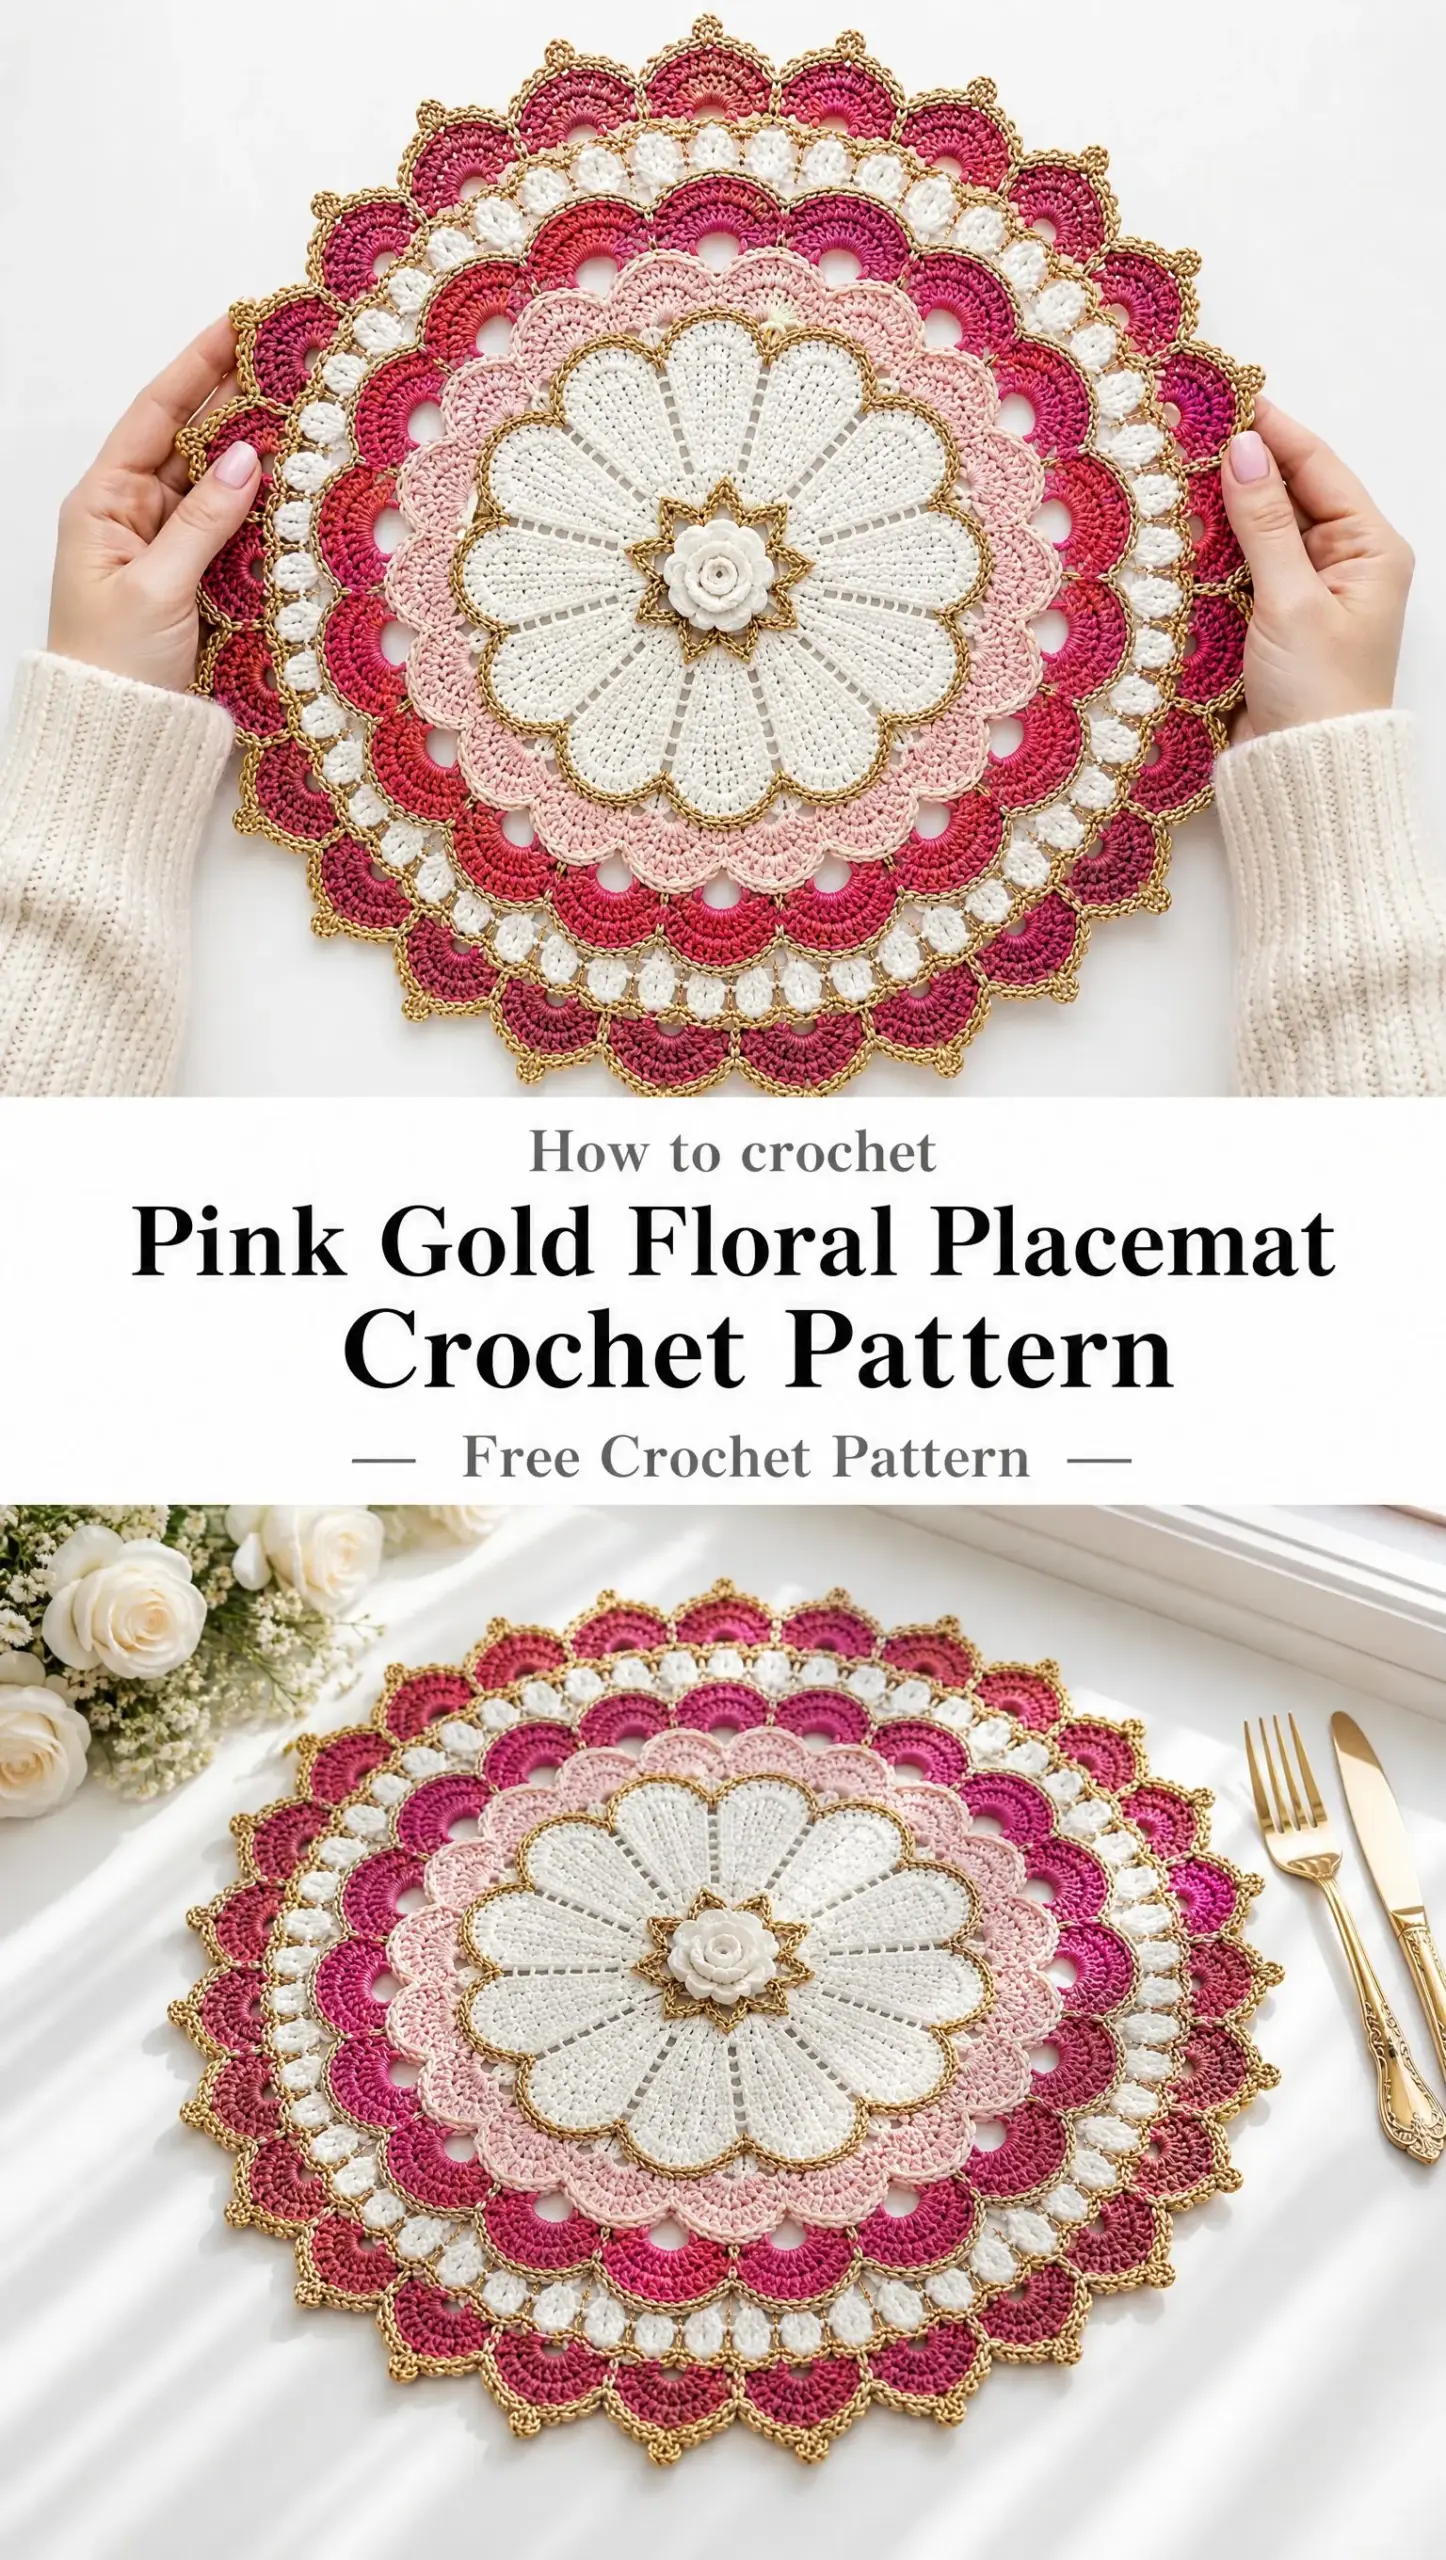
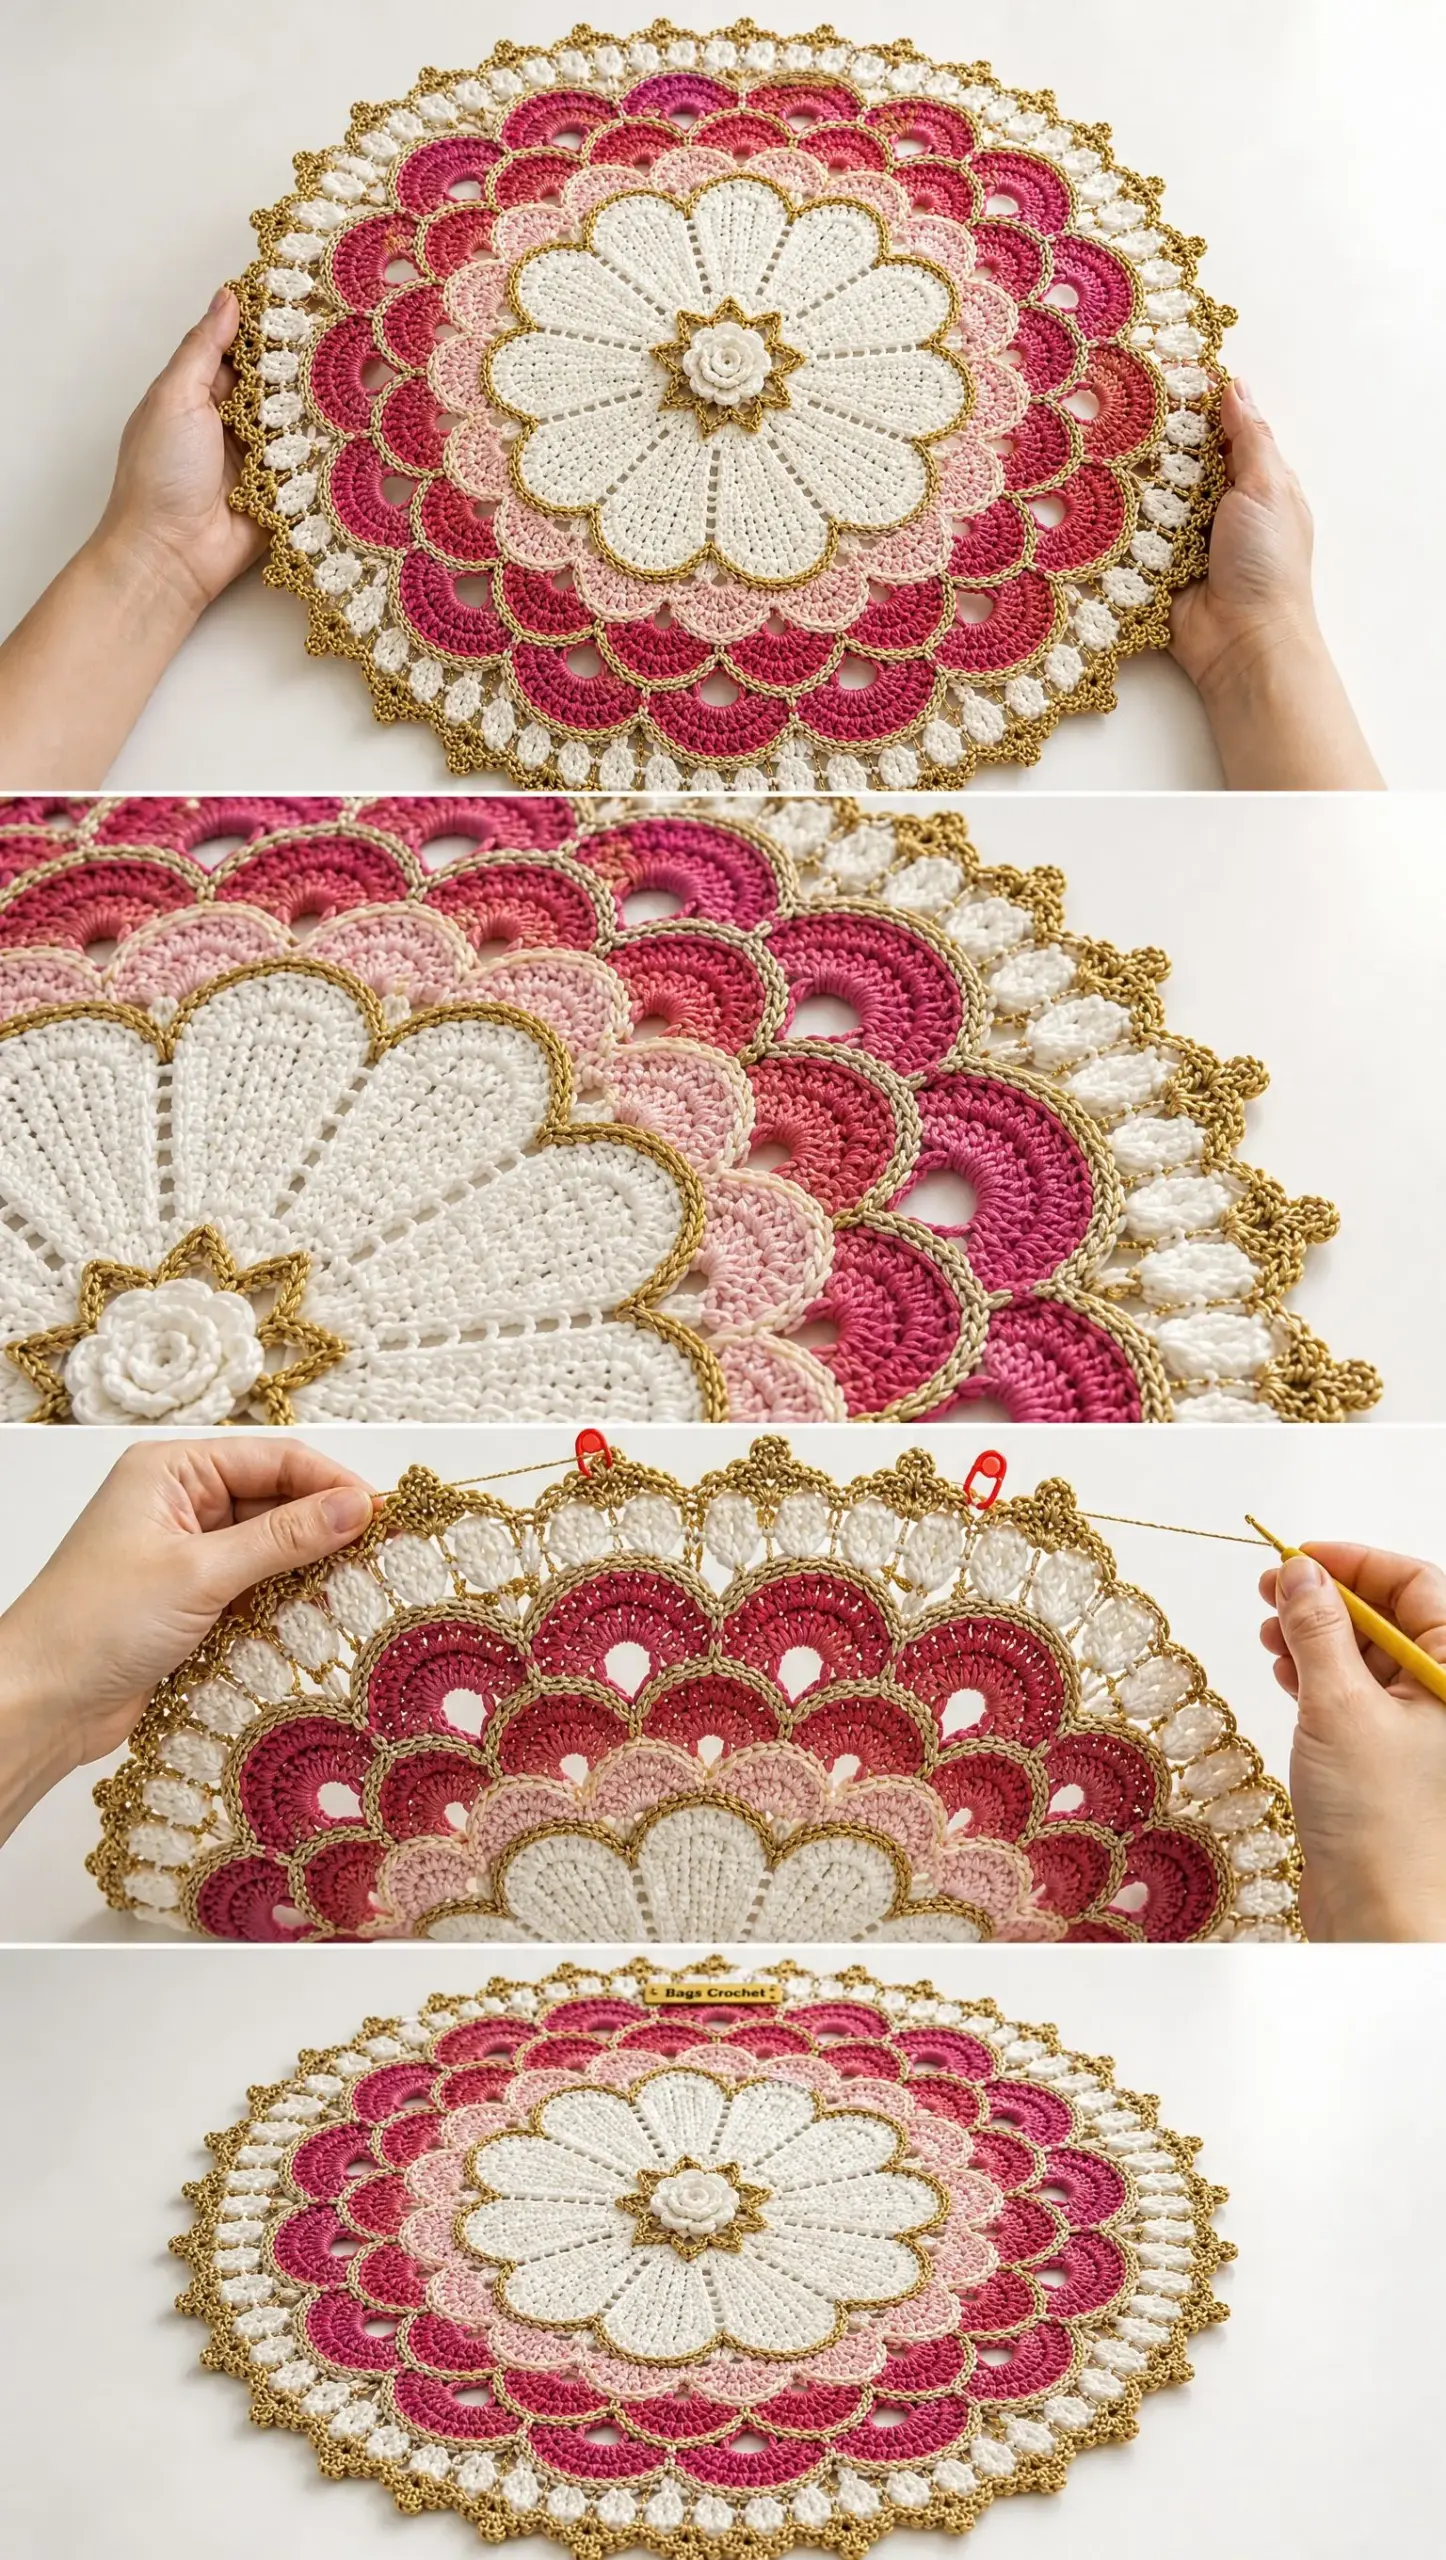
The construction here is genuinely fascinating. You will work from the center outward in joined rounds, building up 12 radial sections that create those gorgeous petal wedges. Then comes the fun part: surface slip stitches in gold that outline each layer like delicate piping. It looks incredibly intricate, but once you understand the rhythm, each round builds logically on the last.
I will be honest with you. This is an advanced intermediate project. The rounds themselves are repetitive and manageable. But the layered fans, post-style shaping, metallic thread work, and careful blocking all require patience and some experience. If you have made doilies or mandalas before, you are ready for this. If you are newer to crochet, maybe bookmark this one as a goal project and work up to it.
Pattern at a Glance
Before we dive in, here is everything you need to know about what you are making.
Skill Level: Advanced intermediate
Finished Size: Approximately 19 to 20 inches (48 to 51 cm) diameter after blocking
Working Time: About 12 to 16 hours, depending on your speed and comfort with metallic thread
Construction: Worked flat from the center outward in joined rounds. The tiny rosette is worked separately and sewn on last.
Gauge: After Round 6, approximately 6 inches (15 cm) across. Exact gauge is less important than maintaining a flat circle.
Materials You Will Need
Gather these supplies before you start. Having everything ready makes the project flow so much smoother.
Yarn:
Hooks:
Notions:
A Note on Yarn Substitutions: Choose a smooth, tightly spun cotton with good stitch definition. Mercerized cotton gives the slight sheen you see in the sample. If substituting yarn, keep all cotton colors within the same weight and test the gold thread beside them. A very stiff metallic thread may need a larger hook or looser tension.
Abbreviations and Special Stitches
Let me walk you through every stitch abbreviation you will encounter. I am defining each one so you never have to guess.
ch = chain (yarn over, pull through loop on hook)
sl st = slip stitch (insert hook, yarn over, pull through both loops at once)
sc = single crochet (insert hook, yarn over, pull up loop, yarn over, pull through both loops)
hdc = half double crochet (yarn over, insert hook, yarn over, pull up loop, yarn over, pull through all three loops)
dc = double crochet (yarn over, insert hook, yarn over, pull up loop, yarn over, pull through two loops, yarn over, pull through remaining two loops)
tr = treble crochet (yarn over twice, insert hook, yarn over, pull up loop, then yarn over and pull through two loops three times)
sp = space
rep = repeat
st/sts = stitch/stitches
MR = magic ring
RS = right side
yo = yarn over
Special Stitches Explained
Shell fan: Work 7 dc (double crochet) in the same stitch or chain space. This creates a fan-shaped cluster of stitches.
Arch fan: Work (3 dc, ch 3, 3 dc) in the same chain space. The ch-3 creates the open oval at the crown.
Upright cluster: Work [dc2tog] into the same space, ch 2, then [dc2tog] in the same space again. The dc2tog means double crochet two together, where you start two dc stitches but join them at the top.
Picot: Chain 3, then slip stitch in the first chain. This creates a small decorative point.
Surface gold outline: With right side facing, slip stitch evenly along the selected curved edge, keeping the metallic thread relaxed so the fabric remains flat.
Before You Begin Crocheting
A few important tips that will save you frustration later.
Mark the beginning of every round even though rounds are joined. This prevents accidental drift where your starting point slowly shifts around the circle.
The pattern is built on 12 radial sections. When a round says "in each section," repeat the instruction 12 times.
If the work cups (curls up like a bowl), add a slightly taller chain space or relax your tension. If it ripples (waves around the edges), reduce the height of the next chain spaces or work the gold outline more loosely.
For left-handed crocheters, work the same stitch counts in the opposite direction. Placement and repeat counts do not change.
Part 1: Raised Center Rosette
Use white cotton. Make this separately and set it aside until finishing. This little rose sits in the very center of your placemat.
Rosette R1: Make a magic ring. Ch 1, work 6 sc in ring. Join with sl st. (6 sc)
Rosette R2: Ch 1. Work 2 sc in each st around. Join. (12 sc)
Rosette R3: Sl st in next st, 5 dc in next st, sl st in next st. Rep from 4 times total, distributing evenly to form 4 rounded inner petals. Fasten off.
Rosette R4: Join white to any unused back loop from R2. *Ch 4, sl st in next available back loop. Rep around to make 6 loops. In each loop work (sc, hdc, 4 dc, hdc, sc). Join and fasten off. Shape the petals into a compact rose.
Set this aside. You will attach it at the very end.
Part 2: Gold Star Foundation
With metallic gold, make a magic ring. This star sits beneath the rosette and becomes the visual center of the placemat.
R1: Ch 1, 8 sc in ring. Join. (8 sc)
R2: Ch 5, sl st in 2nd ch from hook, sc in next ch, hdc in next ch, dc in next ch, sl st in next sc from R1. Rep from around. (8 points)
R3: Working behind the points, join gold in any R1 sc. Ch 3 (counts as dc), 2 dc in same st, then 3 dc in each remaining R1 sc. Join. (24 dc)
Part 3: White Radial Flower Center
Switch to white cotton. The next rounds create 12 petal wedges separated by eyelet lines. This is where your placemat really starts to take shape.
R4: Join white in any gold dc. Ch 3, dc in same st, dc in next st, 2 dc in next st. Rep from around. Join. (36 dc)
R5: Ch 3, dc in next st, ch 1, skip 1 st, dc in next 2 sts, ch 1, skip 1 st. Rep from around. Join. (12 ch-1 eyelets, 24 dc)
R6: Sl st to first ch-1 sp. Ch 3, 5 dc in same sp. *Ch 1, 6 dc in next ch-1 sp. Rep around. Ch 1, join. (12 wedges of 6 dc)
R7: Ch 3, dc in same st, dc in next 4 sts, 2 dc in last dc of wedge, ch 1. *2 dc in first dc of next wedge, dc in next 4, 2 dc in last, ch 1. Rep around. Join. (12 wedges of 8 dc)
R8: For each wedge: ch 3, dc in same st, dc in next 6 sts, 2 dc in last st, ch 1. Rep around. Join. (12 wedges of 10 dc)
R9: For each wedge: ch 3, dc in same st, dc in next 8 sts, 2 dc in last st, ch 2. Rep around. Join. (12 wedges of 12 dc; 12 ch-2 eyelets)
R10: *Sc in first dc of wedge, hdc in next, dc in next 2, tr in next 4, dc in next 2, hdc in next, sc in last dc, ch 2. Rep around. Join. This rounds the tips into 12 soft scalloped lobes.
Gold Outline 1: White Flower Lobes
With gold and the smaller hook, surface sl st around the outer curved edge of each white lobe. Work 1 sl st per visible stitch and 2 sl sts around each ch-2 valley. Keep the line fine and relaxed. Fasten off and weave in on the wrong side.
Part 4: Blush Shell-Fan Ring
Join blush pink in any ch-2 valley between white lobes. This soft pink layer adds such beautiful dimension.
R11: Ch 1, sc in same valley, ch 3, sc in next valley. Repeat around. (12 ch-3 arches)
R12: Sl st into first ch-3 arch. Ch 3 and work 6 dc in same arch. *7 dc in next arch. Rep around. Join. (12 blush shell fans)
R13: Sl st across to center dc of first fan. Ch 1, sc in center dc, ch 4, sc in center dc of next fan. Rep around. Join. (12 ch-4 arches)
Outline the rounded top of each blush shell with a relaxed row of gold surface slip stitches. Do not outline the valleys.
Part 5: First Fuchsia Arch-Fan Ring
R14: Join fuchsia in any ch-4 arch. Work (3 dc, ch 3, 3 dc) in each arch around. Join. (12 arch fans)
R15: Sl st to first ch-3 sp. Work (sc, ch 5, sc) in each ch-3 sp around. Join. (12 ch-5 arches)
R16: In each ch-5 arch work (4 dc, ch 3, 4 dc). Join. (12 larger arch fans)
Outline the outer curve of each fuchsia fan with gold surface slip stitches, leaving the ch-3 oval open and clearly visible.
Part 6: Second Staggered Fuchsia Arch-Fan Ring
This ring sits between the fans below to create the layered, staggered lace effect. It is what gives this placemat that stunning dimensional look.
R17: With fuchsia, join in the valley between any two fans of R16. Ch 1, sc in valley, ch 6, sc in next valley. Rep around. (12 ch-6 arches)
R18: In each ch-6 arch work (5 dc, ch 3, 5 dc). Join. (12 arch fans)
R19: Sl st to first ch-3 sp. Work (sc, ch 6, sc) in each ch-3 sp around. Join. (12 ch-6 arches)
R20: In each ch-6 arch work (5 dc, ch 3, 5 dc). Join and fasten off. (12 arch fans)
Add a gold surface-slip-stitch outline to the curved crown of every R18 and R20 fan. Keep the gold stitches narrower than the cotton stitches so the outline reads as piping rather than a heavy border.
Part 7: White Upright Cluster Ring
Join white in any ch-3 space from R20.
R21: Ch 1, sc in same sp, ch 5, sc in next ch-3 sp. Rep around. Join. (12 ch-5 arches)
R22: In each ch-5 arch work [dc2tog, ch 2, dc2tog, ch 2, dc2tog]. This forms three upright white clusters per arch. Join. (36 clusters)
R23: Sl st to first ch-2 sp. Ch 1, sc in that sp, ch 3, sc in the second ch-2 sp of the same group, ch 3, sc in the gap between this group and the next, ch 3. Repeat this 3-space sequence around. Join. (36 ch-3 spaces) The edge should lie flat and form an even white crown.
Part 8: Gold Scalloped Picot Edge
Join metallic gold in any ch-3 space of R23. Use the smaller hook if needed.
R24: In each of the 36 ch-3 spaces work 5 sc. Join. (180 sc) Do not tighten the gold. This round stabilizes the edge.
R25: *Sl st in next 2 sc, (sc, picot, sc) in next sc, sl st in next 2 sc. Rep for all 36 five-stitch groups. Join invisibly and fasten off. (36 picots) Each picot should form a small pointed tip.
Part 9: Attach the Rosette
1. Center the white rosette over the gold star.
2. Using white sewing yarn or matching cotton, tack the base of the rosette to the center at 6 to 8 evenly spaced points.
3. Keep the petals free so they retain dimension. Weave all ends securely into the wrong side.
Stitch and Repeat Checkpoints
Use this table to verify your work at key points throughout the pattern.
| Checkpoint | Repeat Structure | Expected Count | Flatness Check |
|---|---|---|---|
| Gold foundation R3 | 8 star points | 24 dc | Small flat disk |
| White R5 | 12 eyelets | 24 dc + 12 ch-1 sp | No cupping |
| White R9 | 12 wedges | 12 dc per wedge | Lobes spread evenly |
| Blush R12 | 12 shells | 7 dc per fan | Shells just touch |
| Fuchsia R16 | 12 arch fans | 8 dc + ch-3 per fan | Open ovals remain visible |
| Fuchsia R20 | 12 arch fans | 10 dc + ch-3 per fan | No ruffling |
| White R22 | 12 arch groups | 36 clusters total | Outer crown lies flat |
| Gold R25 | 36 five-stitch groups | 36 picots | Border relaxed, not puckered |
Blocking and Finishing Your Placemat
Blocking is essential for this project. It transforms your work from nice to absolutely stunning.
1. Soak the finished placemat in cool water with a small amount of gentle detergent for 10 minutes. Do not aggressively rub metallic thread.
2. Rinse, then press out water in a towel. Do not wring.
3. Pin the center first, then pin all 12 main axes, then the intermediate points. Measure from the center so the diameter stays circular.
4. Shape the white lobes, blush shells, fuchsia arches, and gold picots individually. Open each chain-space oval with your fingers before pinning.
5. Allow to dry completely before unpinning. For extra crispness, use light spray starch only after testing it on scrap metallic thread.
Troubleshooting Common Issues
The center cups: Your tension may be too tight or the metallic line may be constricting the fabric. Rework the gold outline more loosely and block before continuing.
The fuchsia rings ripple: Reduce each fan by 1 dc on each side, or shorten the connecting arch by 1 chain.
The outer edge pulls inward: Increase R23 connecting arches from ch 3 to ch 4, or use a hook 0.25 mm larger for R24 and R25.
The gold thread twists: Let the ball hang and untwist every few minutes. Crochet slowly and avoid pulling the metallic thread against itself.
The rosette flops: Use fewer attachment stitches, placed only at the base. The petals should remain dimensional.
Size Adjustments
For a smaller mat, stop after R18 and add the white cluster and gold border directly to that ring. For a larger mat, repeat one additional fuchsia arch-fan sequence before beginning the white outer cluster ring. Keep all additions in multiples of 12 so the radial symmetry remains intact.
Care Instructions
Final Thoughts on This Crochet Placemat Pattern
This Pink Gold Floral Placemat is the kind of project that makes you proud every time you set the table. The combination of white petals, blush shells, vivid fuchsia arches, and that gorgeous metallic gold edging creates something truly special. It takes time and attention, but the result is heirloom quality.
Thank you so much for choosing this pattern for your next project. I hope you love making it as much as I loved putting it together for you. If you make one, I would absolutely love to see it! Share your photos on Instagram or Facebook and tag me so I can admire your beautiful work.
Save this pattern to your Pinterest boards so you can find it whenever you are ready to start. And please drop a comment below if you make this placemat. I love hearing how your projects turn out and seeing the color combinations you choose!
Want a Quick & Easy Printable Version?
Get a clean, beautifully formatted PDF of this pattern — easy to follow step by step, ready to print or save on any device. No scrolling, no distractions, just the pattern.
Get the Printable PDF →