
Go dig through your stash right now. Find that gorgeous mercerized cotton you have been saving for something truly special. This is the project worthy of it. This Irish lace floral blouse combines traditional lace techniques with three dimensional flowers scattered across a delicate diamond mesh background. The construction is fascinating, working freestanding motifs and joining them as you build the mesh foundation.
I will be honest with you. This is an advanced pattern. You will need comfort with Irish lace mesh backgrounds, raised 3D motifs, joining motifs in progress, and working multiple yarn colors for the flower embellishments. If you have completed at least two lace garments before, you are ready for this challenge.
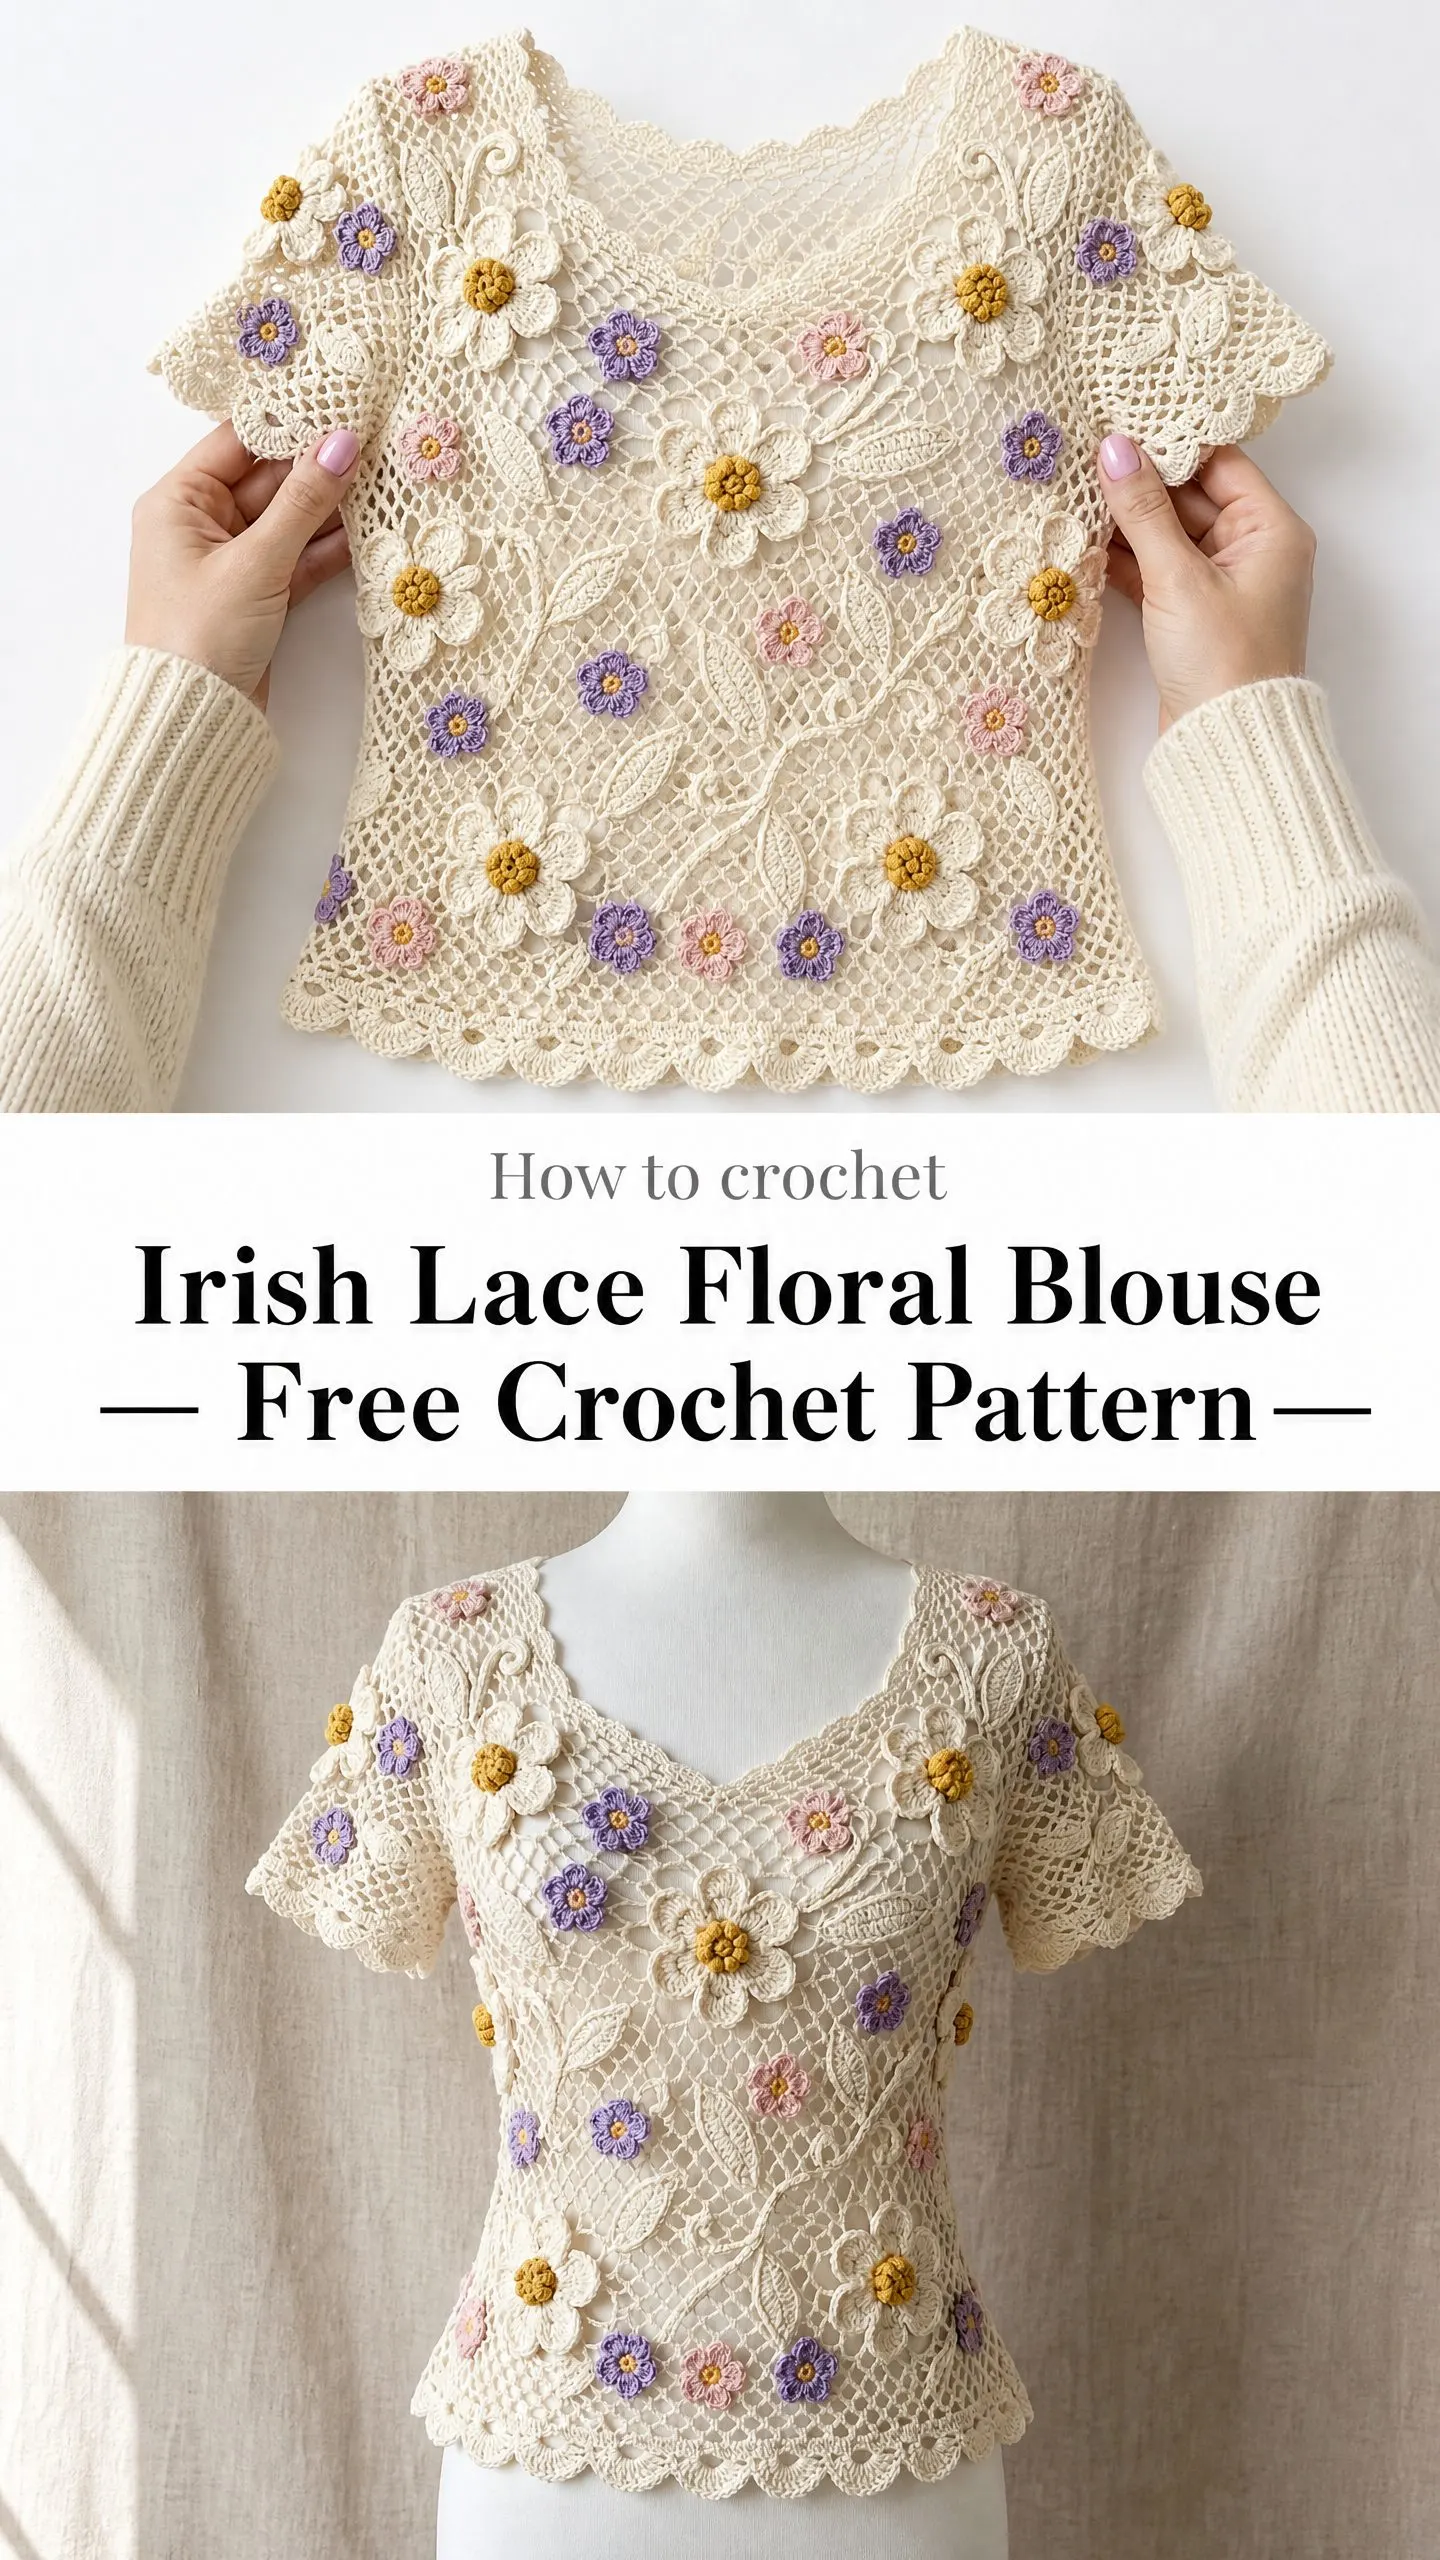
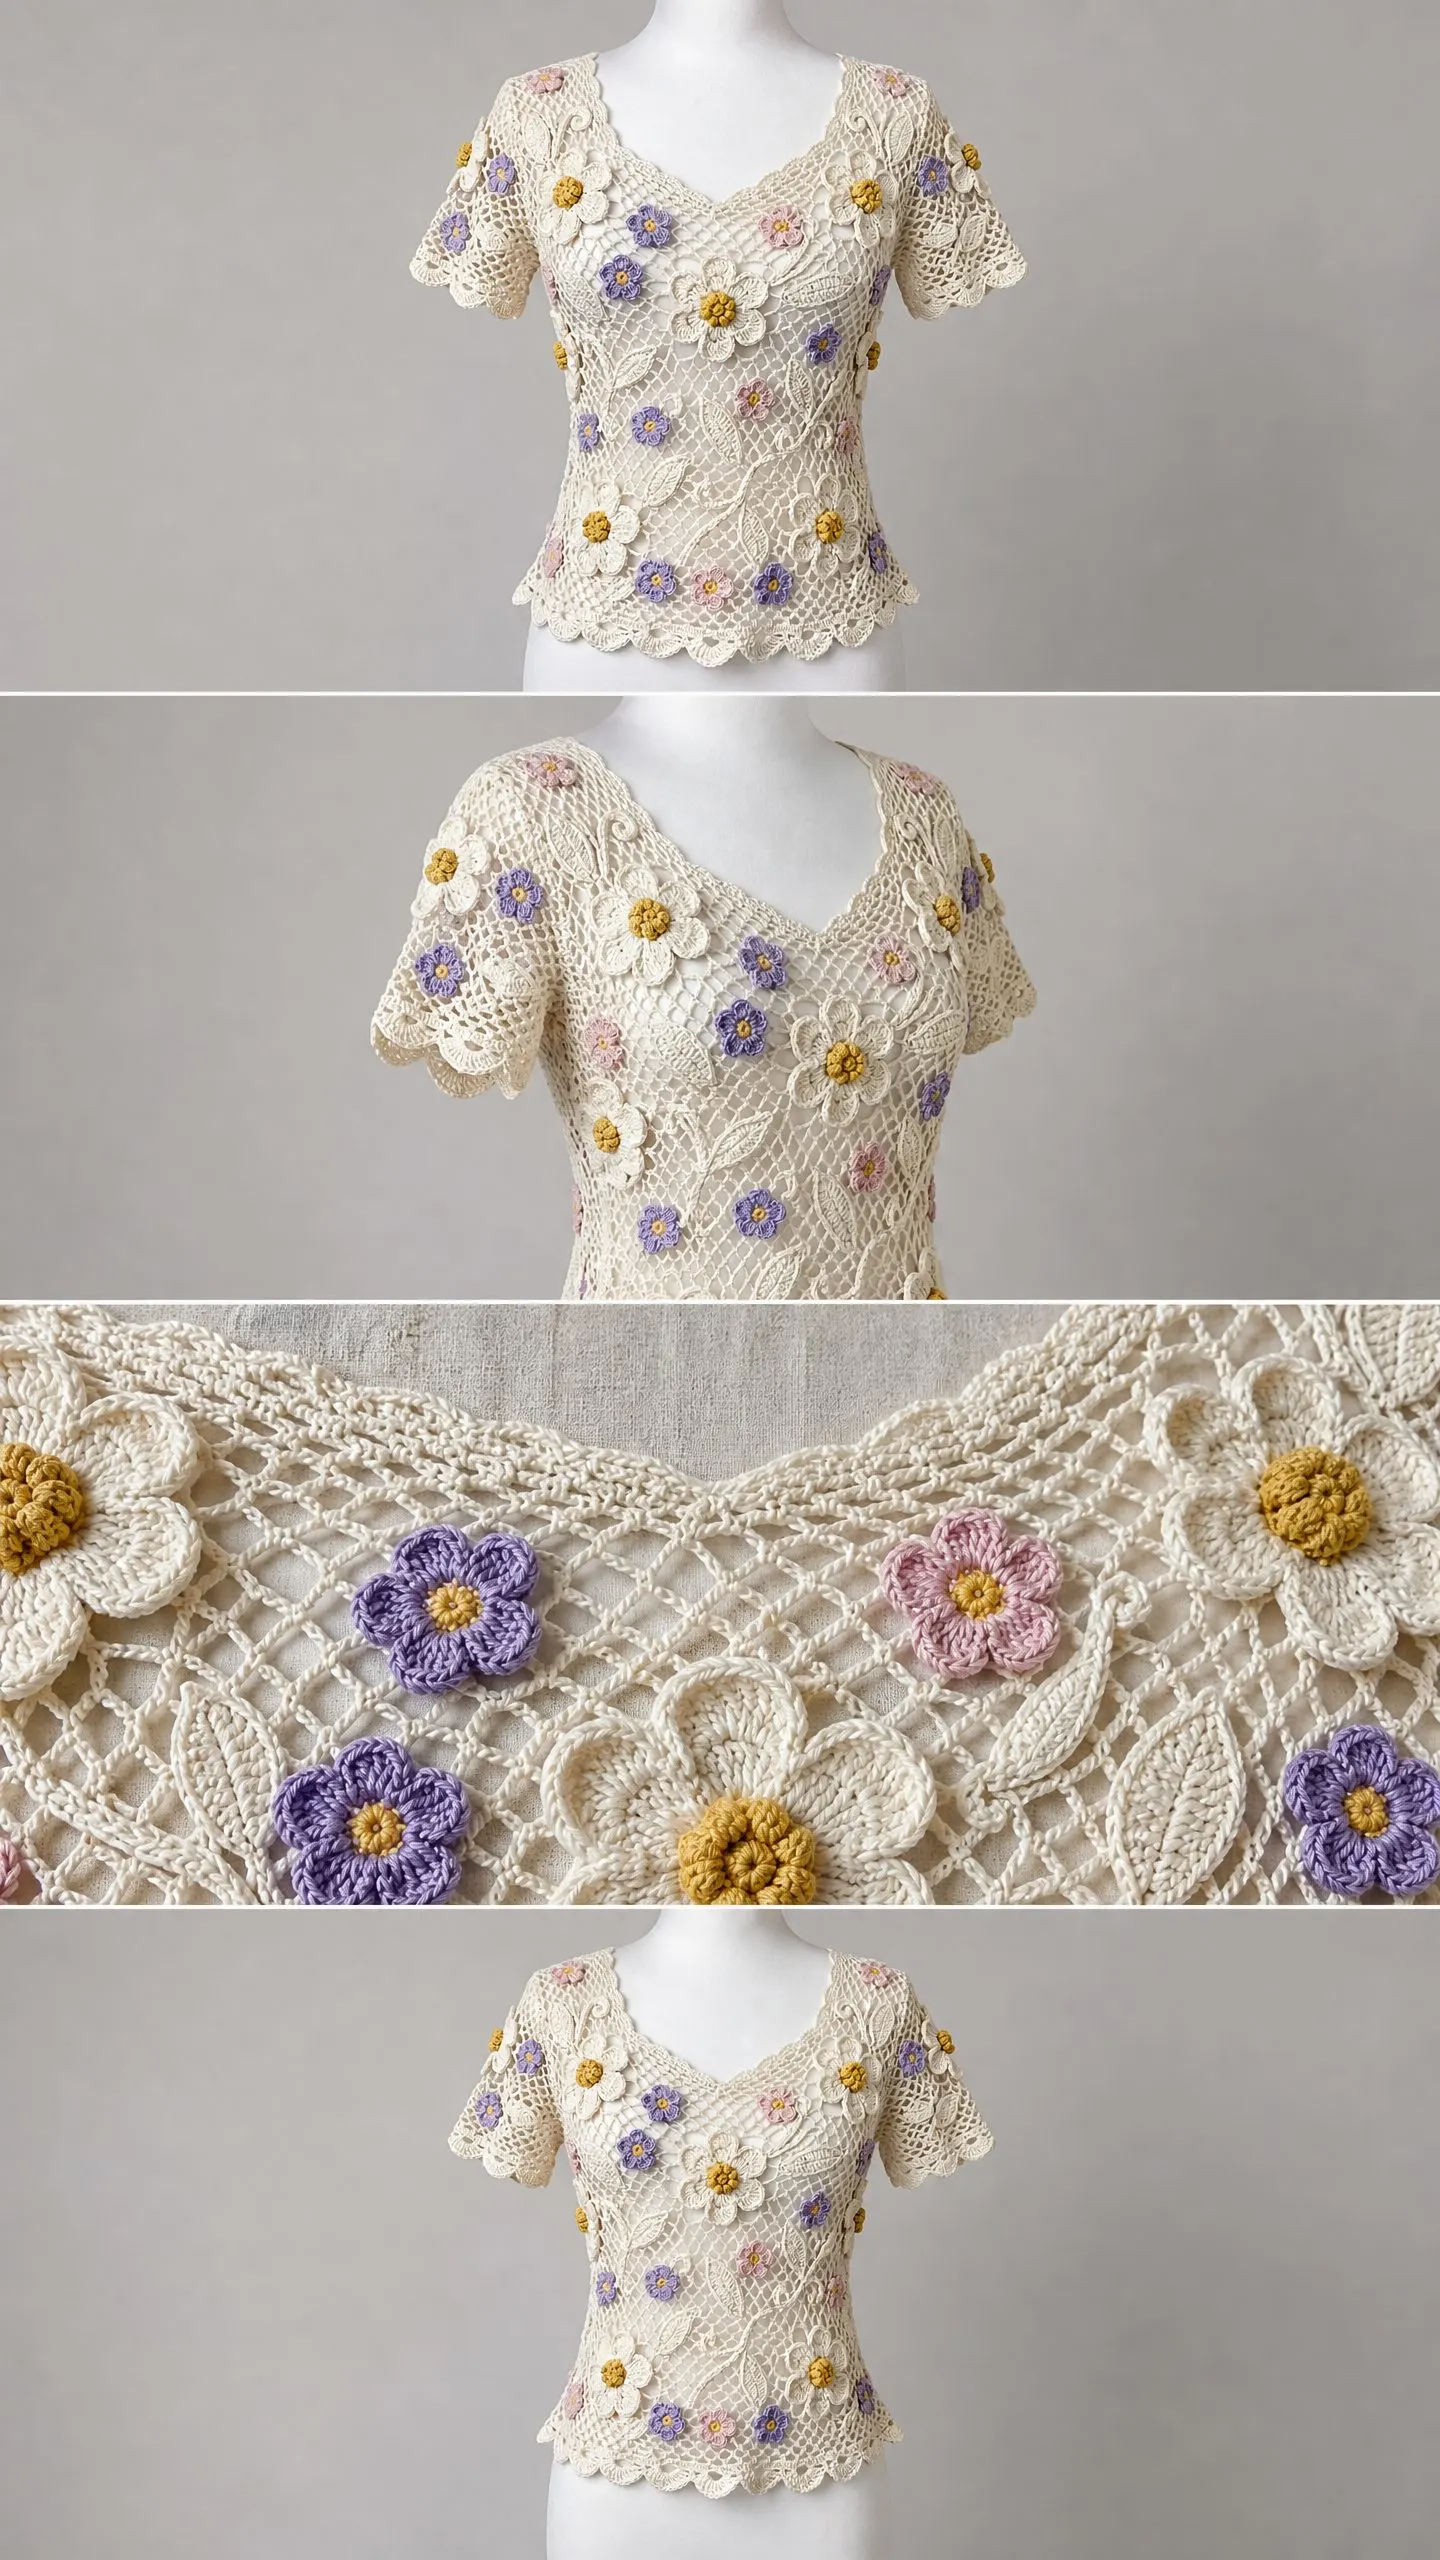
The finished piece is absolutely stunning. A fitted silhouette with a shallow V neckline, short flutter sleeves with scalloped edges, and a hip length hem with picot scallop trim. Large cream daisies with gold centers, medium lavender flowers, and small pink accent blooms dot the entire surface. Plan for 80 to 120 hours of dedicated work for a size Medium. The flowers alone take 20 to 30 hours. This is a labor of love, and every minute is worth it.
Pattern Overview and Skill Level
This blouse reproduces the look of traditional Irish crochet lace in a wearable fitted top. The body is built from a combination of raised leaf and scroll motifs worked directly into a diamond mesh background. You will create individual freestanding motifs, then join them as the background mesh is worked. Dimensional flowers are added last after blocking.
The garment is worked flat in two panels, front and back, then seamed at the sides and shoulders. Sleeves and neckline are finished in the round. This construction method gives you control over the fit and allows for easier blocking of the lace panels before assembly.
Skill level: Advanced. You should be comfortable with all the special techniques listed in the materials section before starting.
Finished Measurements
The pattern is written for size Medium throughout. Size Small adjustments appear in parentheses before the Medium number, and size Large adjustments appear in brackets after.
Size Small: Bust 34 inches (86 cm), Length 21 inches (53 cm), Sleeve length 4 inches (10 cm)
Size Medium: Bust 38 inches (97 cm), Length 22 inches (56 cm), Sleeve length 4.5 inches (11 cm)
Size Large: Bust 42 inches (107 cm), Length 23 inches (58 cm), Sleeve length 5 inches (13 cm)
The blouse is designed with 2 inches (5 cm) of negative ease at the bust for a fitted silhouette. Choose your size based on your actual bust measurement, and the negative ease will create that lovely fitted look you see in the photos.
Materials Needed
Yarn:
Yarn Suggestions:
Any smooth, tightly spun fingering weight cotton with a mercerized or polished finish will work beautifully. Avoid loosely spun or halo yarns. They will obscure the lace structure. Do not substitute a wool blend, as blocking properties and drape differ significantly.
Hooks:
Notions:
Gauge
Using Yarn A and size B-1 / 2.25 mm hook, blocked:
Motif gauges:
Gauge is critical for a fitted garment. Swatch the diamond mesh over at least 30 stitches and 30 rows, then block your swatch before measuring. Adjust hook size if necessary.
Abbreviations (US Terms)
Before we dive into the pattern, let me define every abbreviation you will encounter:
Special Stitches and Techniques
Diamond Mesh Stitch (worked flat, over a multiple of 2 stitches plus 1)
The background of this blouse is a diagonal diamond mesh. Each mesh cell is formed by a chain 2 space (ch-2 sp) with a single crochet (sc) anchor at each corner.
Foundation: Chain (ch) a multiple of 4 plus 3. For example, ch 99 for size Medium body width.
Row 1 (RS): Single crochet (sc) in 2nd ch from hook, (ch 2, skip (sk) 2 ch, sc in next ch) across. Turn.
Row 2 (WS): Ch 5, turn, sc in first ch-2 sp, (ch 2, sc in next ch-2 sp) across, ch 2, sc in last sc. Turn.
Row 3 (RS): Ch 3, sc in first ch-2 sp, (ch 2, sc in next ch-2 sp) across. Turn.
Repeat Rows 2 and 3 for diamond mesh pattern.
Picot
Ch 3, slip stitch (sl st) in first ch of ch-3. This creates a small decorative loop accent on edges.
Scallop Edging
Worked along any finished edge. Multiple of 6 stitches.
Step 1: Join yarn in any corner stitch. Ch 1.
Step 2: Sc in first st, (sk 2 sts, 5 double crochet (dc) in next st, sk 2 sts, sc in next st) across. Fasten off.
Mesh Increase (at side edges for shaping)
At beginning of row: ch 5, sc in 3rd ch from hook, ch 2, continue in mesh across. This adds 1 mesh cell at the beginning edge.
At end of row: ch 2, sc in turning ch of previous row. This adds 1 mesh cell at the end edge.
Mesh Decrease (at side edges for shaping)
At beginning of row: sl st across first mesh cell, ch 3, continue in mesh. This removes 1 mesh cell at the beginning edge.
At end of row: work to last complete mesh cell, do not work into turning ch. Turn. This removes 1 mesh cell at the end edge.
Flower Motif Instructions
You will make multiple flowers in three sizes. Make all flowers before starting the body panels so you have them ready for placement after blocking.
Large Daisy Motif (cream petals with gold center)
Make 6 for size Small, 8 for size Medium, 10 for size Large.
Step 1: With Yarn D, ch 4, sl st to first ch to form a ring.
Step 2: Ch 1, 12 sc into ring, sl st to first sc. Fasten off Yarn D. (12 sc)
Step 3: Join Yarn A in any sc.
Step 4: (Ch 8, sl st in 2nd ch from hook, sc in next ch, half double crochet (hdc) in next ch, dc in next 3 ch, sc in next ch, sk 1 sc on center ring, sl st in next sc) 6 times. (6 petals)
Step 5: Fasten off. Weave in ends. Daisy measures 2 inches / 5 cm diameter blocked.
Medium Flower Motif (lavender petals with gold center)
Make 12 for size Small, 15 for size Medium, 18 for size Large.
Step 1: With Yarn D, ch 4, sl st to first ch to form a ring.
Step 2: Ch 1, 10 sc into ring, sl st to first sc. Fasten off Yarn D. (10 sc)
Step 3: Join Yarn B in any sc.
Step 4: (Ch 5, sl st in 2nd ch from hook, sc in next ch, dc in next ch, sc in next ch, sk 1 sc on center ring, sl st in next sc) 5 times. (5 petals)
Step 5: Fasten off. Medium flower measures 1.25 inches / 3.2 cm diameter blocked.
Small Flower Motif (pink petals with gold center)
Make 8 for size Small, 10 for size Medium, 12 for size Large.
Step 1: With Yarn D, ch 4, sl st to first ch to form a ring.
Step 2: Ch 1, 8 sc into ring, sl st to first sc. Fasten off Yarn D. (8 sc)
Step 3: Join Yarn C in any sc.
Step 4: (Ch 4, sl st in 2nd ch from hook, sc in next ch, hdc in next ch, sk 1 sc on ring, sl st in next sc) 4 times. (4 petals)
Step 5: Fasten off. Small flower measures 0.75 inches / 1.9 cm diameter blocked.
Raised Leaf Motif
Make 8 for size Small, 10 for size Medium, 12 for size Large.
Step 1: With Yarn A and B-1 hook, ch 16.
Step 2: Sc in 2nd ch from hook, hdc in next ch, dc in next 3 ch, treble crochet (tr) in next 3 ch, dc in next 3 ch, hdc in next ch, sc in next ch, ch 3, sl st into last sc made (this creates the tip of the leaf). Now work back along the opposite side of foundation chain: sc in first ch of foundation, hdc in next, dc in next 3, tr in next 3, dc in next 3, hdc in next, sc in next. Sl st to first sc to close base.
Step 3: Work 1 row of sc around outer edge of leaf, placing 3 sc in ch-3 tip.
Leaf measures approximately 2.5 inches / 6.4 cm long and 1 inch / 2.5 cm wide, blocked.
Scroll Motif
Make 4 for size Small, 6 for size Medium, 8 for size Large.
Step 1: With Yarn A and B-1 hook, ch 20.
Step 2: 2 dc in 4th ch from hook, 2 dc in each ch across. (34 dc)
Step 3: Sl st into base of first dc. Wind the strip into a loose spiral and tack the center with Yarn A to hold shape.
Front Panel Instructions
The front panel is worked from the bottom hem upward. All stitch counts refer to mesh cells (ch-2 spaces), not individual chain or sc stitches, unless otherwise specified.
Foundation and Hip Section
Foundation Row: With Yarn A and C-2 hook for the foundation only, ch 103 (87, 119). Switch to B-1 hook.
Row 1 (RS): Sc in 2nd ch from hook, (ch 2, sk 2 ch, sc in next ch) across. Turn. (34 mesh cells) (28 mesh cells for Small, 39 mesh cells for Large)
Row 2 (WS): Ch 5, sc in first ch-2 sp, (ch 2, sc in next ch-2 sp) across, ch 2, sc in last sc. Turn. (35 mesh cells)
Row 3 (RS): Ch 3, sc in first ch-2 sp, (ch 2, sc in next ch-2 sp) across. Turn. (35 mesh cells)
Rows 4 through 8: Repeat Rows 2 and 3, alternating, maintaining 35 mesh cells.
Checkpoint: After Row 8, the piece should measure approximately 1.6 inches / 4 cm tall from the foundation edge.
Waist Shaping
Row 9 (Waist Decrease Row): Sl st across first mesh cell (decrease at beginning), ch 3, sc in next ch-2 sp, (ch 2, sc in next ch-2 sp) across to last mesh cell, do not work last cell. Turn. (33 mesh cells)
Rows 10 through 12: Work in established mesh pattern across 33 cells.
Row 13 (Waist Decrease Row 2): Sl st across first mesh cell, ch 3, sc in next ch-2 sp, (ch 2, sc in next ch-2 sp) across to last mesh cell, do not work last cell. Turn. (31 mesh cells)
Rows 14 through 20: Work in established mesh pattern across 31 cells.
Checkpoint: After Row 20, the piece should measure approximately 4 inches / 10 cm tall. Row 20 is approximately at the natural waist position.
Bust Shaping
Row 21 (Bust Increase Row): At beginning: ch 5, sc in 3rd ch from hook, ch 2, continue across in mesh. At end: ch 2, sc in turning ch. Turn. (33 mesh cells)
Rows 22 and 23: Work in mesh pattern across 33 cells.
Row 24 (Bust Increase Row 2): Work as Row 21. (35 mesh cells)
Rows 25 through 40: Work in established mesh pattern across 35 cells.
Checkpoint: After Row 30, the piece should measure approximately 6 inches / 15 cm tall. After Row 40, approximately 8 inches / 20 cm tall. This is the underbust point.
Armhole Shaping
Row 41 (Armhole Decrease Begin): Sl st across 3 mesh cells (skip 3 cells at beginning for armhole), ch 3, sc in next ch-2 sp, (ch 2, sc in next ch-2 sp) across to 3 cells from end, do not work last 3 cells. Turn. (29 mesh cells)
Row 42: Work in mesh pattern across 29 cells.
Row 43 (Armhole Decrease 2): Sl st across 1 mesh cell, ch 3, sc in next ch-2 sp, (ch 2, sc in next ch-2 sp) across to 1 cell from end. Turn. (27 mesh cells)
Rows 44 through 55: Work in mesh pattern across 27 cells.
Checkpoint: After Row 55, total piece height is approximately 11 inches / 28 cm. The armhole is approximately 3 inches / 7.5 cm deep. Begin V-neck shaping.
V-Neck Shaping, Left Shoulder (as worn)
Row 56 Left: Work across first 12 mesh cells only in Row 3 pattern. Turn. (12 mesh cells) Place marker at center of row to mark V-neck split point.
Row 57: Work in mesh pattern across 12 cells.
Row 58 (Neck Decrease): Work across first 11 cells in Row 3 pattern, do not work last cell. Turn. (11 mesh cells)
Row 59: Work in mesh pattern across 11 cells.
Row 60 (Neck Decrease): Work across first 10 cells. Turn. (10 mesh cells)
Row 61: Work in mesh pattern across 10 cells.
Row 62 (Neck Decrease): Work across first 9 cells. Turn. (9 mesh cells)
Row 63: Work in mesh pattern across 9 cells.
Row 64 (Neck Decrease): Work across first 8 cells. Turn. (8 mesh cells)
Rows 65 through 68: Work in mesh pattern across 8 cells.
Fasten off. Mark last row as shoulder edge.
V-Neck Shaping, Right Shoulder (as worn)
Rejoin Yarn A at center marker position, on Row 56 position on right side of work.
Note on V geometry: Row 55 has 27 cells. Left shoulder: 12 cells. Center V base: 3 cells (left unworked to create open V). Right shoulder: 12 cells. 12 + 3 + 12 = 27.
Row 56 Right: Work across remaining 12 mesh cells (from center to right edge, skipping the center 3 mesh cells that form the V base). Turn. (12 mesh cells)
Row 57: Work in mesh pattern across 12 cells.
Row 58 (Neck Decrease beginning): Sl st over 1 cell, work across remaining 11 cells. Turn. (11 mesh cells)
Continue decreasing 1 cell at neck edge every other row until 8 cells remain. Work even through Row 68.
Fasten off. Mark last row as shoulder edge.
Back Panel Instructions
Work Rows 1 through 55 exactly as Front Panel. (27 mesh cells at end of Row 55)
Back Neck Shaping
The back neck is a shallow scoop. The center 9 cells are left unworked, giving each shoulder 9 cells. 9 + 9 + 9 = 27.
Row 56 Left: Work across first 9 mesh cells in Row 3 pattern. Turn. (9 mesh cells)
Rows 57 through 68: Work in established mesh pattern across 9 cells.
Fasten off.
Row 56 Right: Rejoin Yarn A at right shoulder position (after center 9 cells are skipped). Work Rows 56 through 68 as left back shoulder. (9 mesh cells each row)
Fasten off.
Note on shoulder width alignment: The front shoulder is 8 mesh cells wide. The back shoulder is 9 mesh cells wide. When seaming, offset by one half cell at the neck edge. This is standard in Irish lace construction and accounts for the wider back neckline relative to the V front.
Hem Edging
Work before seaming for ease of access.
With RS facing, join Yarn A at bottom right corner of either panel.
Rnd 1: Work sc evenly across foundation chain, approximately 1 sc per ch. (102 sc for Medium)
Rnd 2: Work Scallop Edging across all 102 sc. Each scallop repeat uses 6 sts. 102 divided by 6 = 17 scallop repeats. (17 scallops)
Fasten off. Repeat on second panel.
Assembly and Seaming
Lay front and back panels with wrong sides together.
Using Yarn A and tapestry needle, whipstitch the two shoulder seams. Align outer shoulder edges (8 cell front shoulder to 9 cell back shoulder, as noted), sew through corresponding ch-2 spaces. The extra back cell extends into the back neck area.
Whipstitch both side seams from hem edge upward, stopping at armhole decrease point (Row 41). Leave armhole open.
Sleeve Construction
Sleeves are worked in the round from the armhole opening outward.
The armhole circumference is approximately 44 mesh cells around, based on the side lengths and the decreased edge.
Join Yarn A at armhole underarm point (bottom of armhole opening at side seam).
Rnd 1: Ch 1, sc in same sp, work (ch 2, sc) evenly around armhole circumference, spacing so that 44 ch-2 mesh cells are worked. Sl st to first sc. (44 mesh cells)
Rnd 2: Ch 5, sc in first ch-2 sp, (ch 2, sc in next ch-2 sp) around, ch 2, sl st to 3rd ch of beginning ch-5. (44 mesh cells)
Rnd 3: Ch 3, sc in first ch-2 sp, (ch 2, sc in next ch-2 sp) around, ch 2, sl st to first sc. (44 mesh cells)
Rnds 4 through 6: Alternate Rnds 2 and 3. (44 mesh cells)
Rnd 7 (Scallop): Ch 1, sc in same st, (sk 1 ch-2 sp, 5 dc in next ch-2 sp, sk 1 ch-2 sp, sc in next sc) around. (11 scallops)
Fasten off. Repeat for second sleeve.
Checkpoint: Sleeves should extend approximately 4.5 inches / 11.4 cm from armhole seam to scallop edge.
Neckline Finishing
With RS facing, join Yarn A at right back shoulder seam.
Rnd 1: Ch 1, sc evenly around entire neckline opening. For the back scoop, place 1 sc in each ch-2 sp across the back neck. Along the V-neck edges, work 2 sc per row end. At the V point, work 3 sc together to create a neat point.
Rnd 2: Work 1 round of sc, decreasing at V point by working sc3tog.
Rnd 3: Work Scallop Edging around neckline, adjusting stitch count as needed for full scallop repeats.
Fasten off and weave in all ends.
Blocking
This step is absolutely essential. Lace cotton must be wet blocked and pinned to final dimensions.
Soak all pieces in lukewarm water for 15 to 20 minutes. Gently squeeze out excess water, do not wring. Lay flat on blocking mats and pin to finished measurements, opening up all mesh cells and smoothing scallop edges. Allow to dry completely before removing pins.
Block the assembled blouse aggressively before adding flowers.
Adding Flowers and Motifs
Lay the blocked blouse flat. Arrange all flowers, leaves, and scrolls on the surface, referring to the photos for placement. The large cream daisies serve as focal points at center front, lower hem corners, and shoulders. Medium lavender flowers scatter across the body and sleeves. Small pink flowers fill in gaps. Leaves and scrolls create flowing vine effects.
Once you are happy with the arrangement, pin each motif in place. Using Yarn A and tapestry needle, stitch each motif securely to the mesh background with small invisible stitches through the back of the motif edges.
Pattern Notes for Success
The body is narrowest at the waist (around Rows 20 to 28) and widens at the bust and gently at the hip.
Raised Leaf Motifs and Scroll Motifs can either be joined during mesh construction by substituting a sl st join into the motif edge in place of an sc, or sewn on during finishing. For a first attempt, sewing is recommended.
When the pattern says to ch 3 at the beginning of a mesh row, this ch-3 counts as a turning element. Follow each row instruction exactly.
Thank you so much for choosing this pattern for your next ambitious project. I know the time commitment is significant, but the result is a true heirloom piece you will treasure forever. If you make this Irish lace floral blouse, I would absolutely love to see it. Tag me on Instagram or share in my Facebook group. Seeing your finished pieces makes my whole week.
Save this pattern to your Pinterest boards so you can find it when you are ready to start. And please drop a comment below if you have any questions or when you finish yours. I love hearing from you and cheering you on through every gorgeous stitch.
