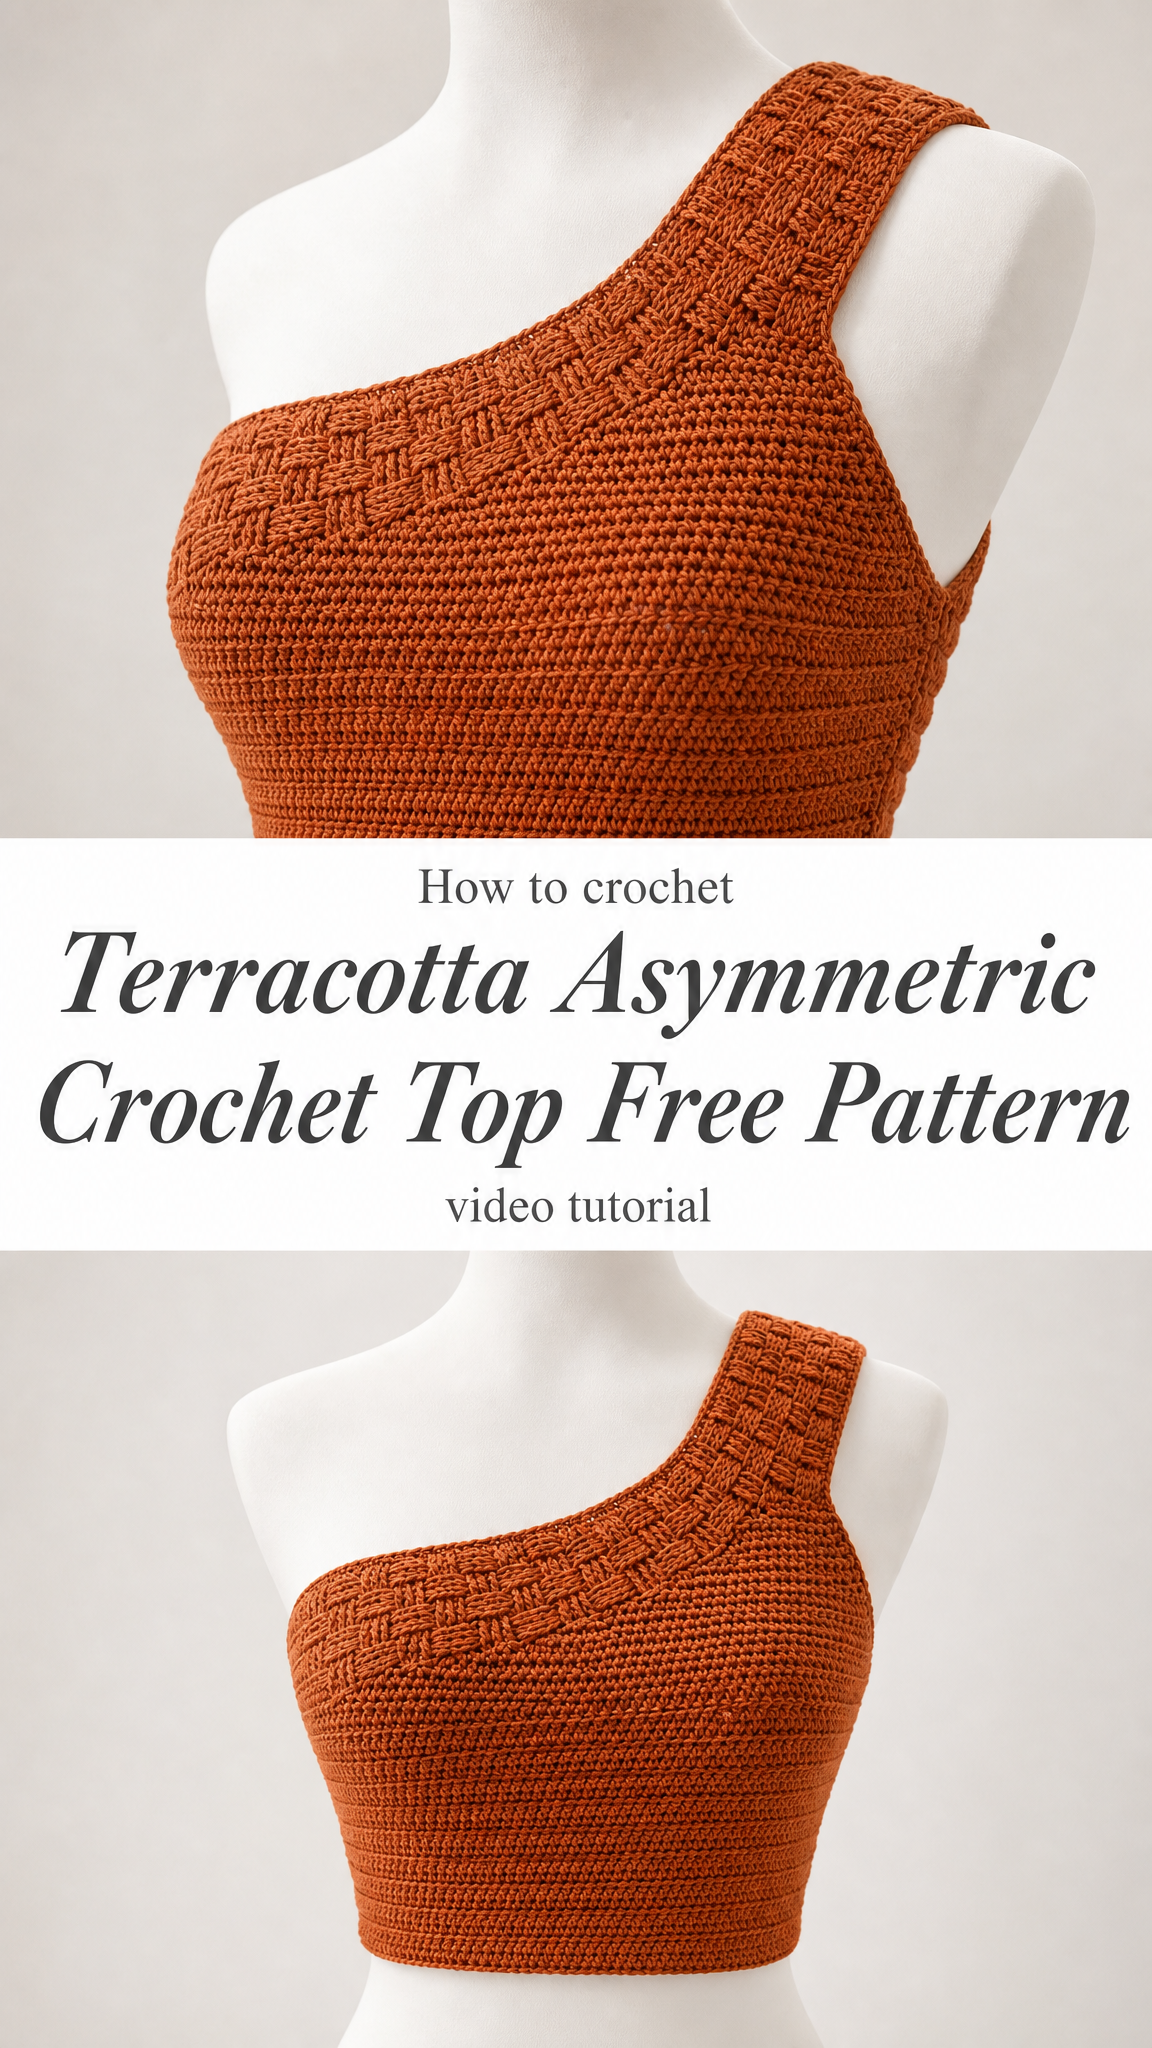
Alright, yarn lovers. This is your sign to dig into that stash and pull out that gorgeous skein you have been saving for "someday." Today is someday. This terracotta asymmetric crochet top features a stunning basket weave texture on the strap and neckline, paired with a clean single crochet body that creates beautiful structure. The one shoulder construction looks complicated but I promise it is more straightforward than you might think. This is an intermediate level project, and I am being honest with you about that. The shaping requires attention, but if you can count stitches and follow row by row instructions, you can absolutely make this top.
Why You Will Love This Crochet Top Pattern
This asymmetric crop top is one of those projects that looks like you spent way more time on it than you actually did. The basket weave stitch along the strap and upper band creates incredible visual interest and texture, while the body works up quickly in basic stitches. The fitted silhouette flatters beautifully, and the single strap design gives it that modern edge that makes it perfect for summer festivals, beach days, or pairing with high waisted jeans for a night out.
What makes this crochet top pattern special is the contrast between the textured strap area and the smooth body. It is a design choice that catches the eye without overwhelming the piece. The rust or terracotta color shown here is absolutely gorgeous, but this top would look stunning in any solid color that lets the stitch texture shine.
Materials Needed
Yarn:
Hook:
Notions:
Gauge
18 stitches and 20 rows = 4 inches in single crochet
Gauge matters for garments. Please take time to make a swatch. If your swatch is too big, go down a hook size. If it is too small, go up a hook size. Your finished top will only fit properly if your gauge matches.
Sizes
This pattern is written for size Small with adjustments noted for customization.
Finished Measurements (Size Small):
Abbreviations and Stitch Definitions
Before we dive in, let me walk you through every stitch and abbreviation you will encounter. If you are newer to garment making, read through this section carefully.
ch = chain. Wrap yarn over hook and pull through loop on hook. This creates foundation stitches.
sl st = slip stitch. Insert hook, yarn over, pull through stitch and loop on hook in one motion. Used for joining and moving across stitches without adding height.
sc = single crochet. Insert hook into stitch, yarn over and pull up a loop (2 loops on hook), yarn over and pull through both loops. This is your most basic and compact stitch.
dc = double crochet. Yarn over, insert hook into stitch, yarn over and pull up a loop (3 loops on hook), yarn over and pull through 2 loops (2 loops remain), yarn over and pull through remaining 2 loops. Creates a taller stitch.
FPdc = front post double crochet. Yarn over, insert hook from front to back to front around the post (vertical part) of the stitch in the row below, complete as a regular double crochet. This creates raised texture on the front of your work.
BPdc = back post double crochet. Yarn over, insert hook from back to front to back around the post of the stitch below, complete as a regular double crochet. This creates raised texture on the back of your work.
sc2tog = single crochet two together (decrease). Insert hook into next stitch, yarn over and pull up a loop, insert hook into following stitch, yarn over and pull up a loop (3 loops on hook), yarn over and pull through all 3 loops. This decreases your stitch count by one.
inc = increase. Work 2 stitches into the same stitch.
Special Stitch: Basket Weave Pattern
The basket weave creates that beautiful woven texture you see on the strap. Here is how the pattern repeat works:
Basket Weave (worked over a multiple of 6 stitches plus 2):
Row 1 (RS): Dc in each st across.
Row 2: Ch 2 (does not count as st), *FPdc around next 3 sts, BPdc around next 3 sts* repeat across, dc in last st.
Row 3: Ch 2, *FPdc around next 3 sts, BPdc around next 3 sts* repeat across, dc in last st.
Row 4: Ch 2, *BPdc around next 3 sts, FPdc around next 3 sts* repeat across, dc in last st.
Row 5: Ch 2, *BPdc around next 3 sts, FPdc around next 3 sts* repeat across, dc in last st.
Repeat Rows 2 through 5 for pattern.
Do not worry if this sounds confusing right now. When you are working the strap section, it will make sense. The front and back post stitches alternate in groups of three, then switch positions every two rows to create that woven look.
Pattern Instructions
Front and Back Body Panels (Make 2)
The body of this top is worked flat in rows, then seamed at the sides. Both panels are identical.
Foundation:
Ch 69 (or adjust to your bust measurement divided by 2, multiplied by your gauge).
Row 1 (RS): Sc in 2nd ch from hook and in each ch across. (68 sc)
Row 2: Ch 1, turn, sc in each st across. (68 sc)
Rows 3 through 36: Repeat Row 2. (68 sc)
You should now have a rectangle approximately 15 inches wide and 7 inches tall.
Tip for beginners: Place a stitch marker at the beginning of each row to help you keep track. Count your stitches every few rows to make sure you have not accidentally increased or decreased.
Underarm Shaping
Now we create the curve for the armhole on one side only. This is where the asymmetric magic happens.
Row 37 (RS): Ch 1, turn, sc in first 58 sts, leave remaining 10 sts unworked. (58 sc)
Row 38: Ch 1, turn, sc2tog, sc across to end. (57 sc)
Row 39: Ch 1, turn, sc across to last 2 sts, sc2tog. (56 sc)
Rows 40 through 43: Repeat Rows 38 and 39 twice more. (52 sc after Row 43)
Rows 44 through 48: Ch 1, turn, sc in each st across. (52 sc)
Fasten off, leaving a long tail for seaming.
Strap and Upper Band
This is where the basket weave texture comes in. The strap is worked separately and attached during finishing.
Foundation:
Ch 14.
Row 1: Dc in 3rd ch from hook and in each ch across. (12 dc)
Row 2: Ch 2 (does not count as st), FPdc around next 3 sts, BPdc around next 3 sts, FPdc around next 3 sts, BPdc around next 3 sts. (12 sts)
Row 3: Repeat Row 2.
Row 4: Ch 2, BPdc around next 3 sts, FPdc around next 3 sts, BPdc around next 3 sts, FPdc around next 3 sts. (12 sts)
Row 5: Repeat Row 4.
Rows 6 through 65: Repeat Rows 2 through 5 fifteen more times, or until strap measures approximately 26 inches when slightly stretched.
Tip: The strap needs to go from one side of the neckline, over the shoulder, and down the back. Measure against your body as you go. Everyone’s shoulder width is different.
Fasten off, leaving a long tail.
Ribbed Bottom Band
The bottom edge features a subtle ribbed texture created by working in the back loop only.
With RS facing, join yarn at bottom corner of front panel.
Row 1: Ch 1, working along the foundation chain edge, sc in each st across. (68 sc)
Row 2: Ch 1, turn, sc in back loop only of each st across. (68 sc)
Rows 3 through 6: Repeat Row 2.
Fasten off. Repeat for back panel.
Assembly and Finishing
Take your time with this section. Good finishing makes the difference between a handmade look and a professional look.
Step 1: Seam the Sides
Place front and back panels together with wrong sides facing. Using your tapestry needle and a length of yarn, whip stitch or mattress stitch the side seams from the bottom band up to the underarm shaping. Leave the shaped armhole area open.
Step 2: Attach the Strap
This step requires some fitting. If possible, try the body on (or use a dress form) to position the strap correctly.
The strap attaches at three points:
1. Front neckline, starting about 2 inches from the armhole edge
2. Over the shoulder
3. Back neckline, in a diagonal line down to meet the back panel
Pin the strap in place before sewing. The basket weave section creates a decorative band across the upper chest and upper back.
Using mattress stitch or whip stitch, attach the strap securely along the top edge of both front and back panels.
Step 3: Finish the Armhole Edge
Join yarn at the underarm seam.
Round 1: Ch 1, sc evenly around the entire armhole opening, working approximately 3 sc for every 4 rows along the edges and 1 sc in each stitch across the top. Sl st to first sc to join.
Round 2: Ch 1, sc in each st around. Sl st to join.
Fasten off and weave in ends.
Step 4: Finish the Straight Neckline Edge
The side without the strap has a straight edge across the chest.
Join yarn at one end of this edge.
Row 1: Ch 1, sc evenly across the top edge. (approximately 10 sc)
Row 2: Ch 1, turn, sc in each st across.
Fasten off and weave in ends.
Step 5: Weave in All Ends
Take your tapestry needle and weave each tail through the back of your stitches for at least 2 inches. Trim close to the work.
Customization Tips
For a longer crop: Add more rows to the body before beginning underarm shaping.
For a different size: Adjust your starting chain to match your bust measurement. Remember to keep the basket weave strap on a multiple of 6 plus 2 for the pattern to work correctly.
For more coverage: Make the strap wider by adding 6 more chains to the foundation.
Color ideas: This top looks stunning in solid earthy tones like terracotta, olive, mustard, or cream. The basket weave texture gets lost in variegated yarns, so I recommend sticking to solids.
Care Instructions
Hand wash in cool water with mild detergent. Lay flat to dry, reshaping as needed. Cotton tends to relax with wear and tighten back up after washing. Do not hang dry, as this can stretch the top out of shape.
Skill Building Notes
If you have never worked front post and back post stitches before, I highly recommend practicing on a small swatch before starting the strap. Watch how the stitches pop forward and recede as you alternate between FPdc and BPdc. Once you see the texture forming, it clicks.
The hardest part of this crochet top pattern is honestly the assembly. Go slowly. Pin everything before you sew. Try it on. Adjust. There is no shame in undoing a seam and repositioning.
Final Thoughts on This Asymmetric Crochet Top Pattern
I absolutely love how this terracotta asymmetric crochet top came together. The combination of textures, the modern silhouette, and the flattering fit make it one of those pieces that feels special every time you wear it. Whether you are making it for yourself or as a gift, this step by step crochet tutorial gives you everything you need to create something truly beautiful.
The basket weave detail elevates the entire design from simple crop top to statement piece. And the construction, while it requires focus, is genuinely satisfying to work through. You will learn shaping techniques that transfer to so many other garment patterns.
Thank you so much for choosing this pattern for your next project. I truly appreciate you being here. If you make this top, I would absolutely love to see it. Tag me on Instagram or share in my Facebook group. Seeing your creations honestly makes my whole day.
If this pattern spoke to you, go ahead and save it to your Pinterest boards so you can find it when you are ready to start. And please drop a comment below if you make it or have any questions along the way. I read every single one and I am always here to help you through tricky spots. Happy crocheting!
