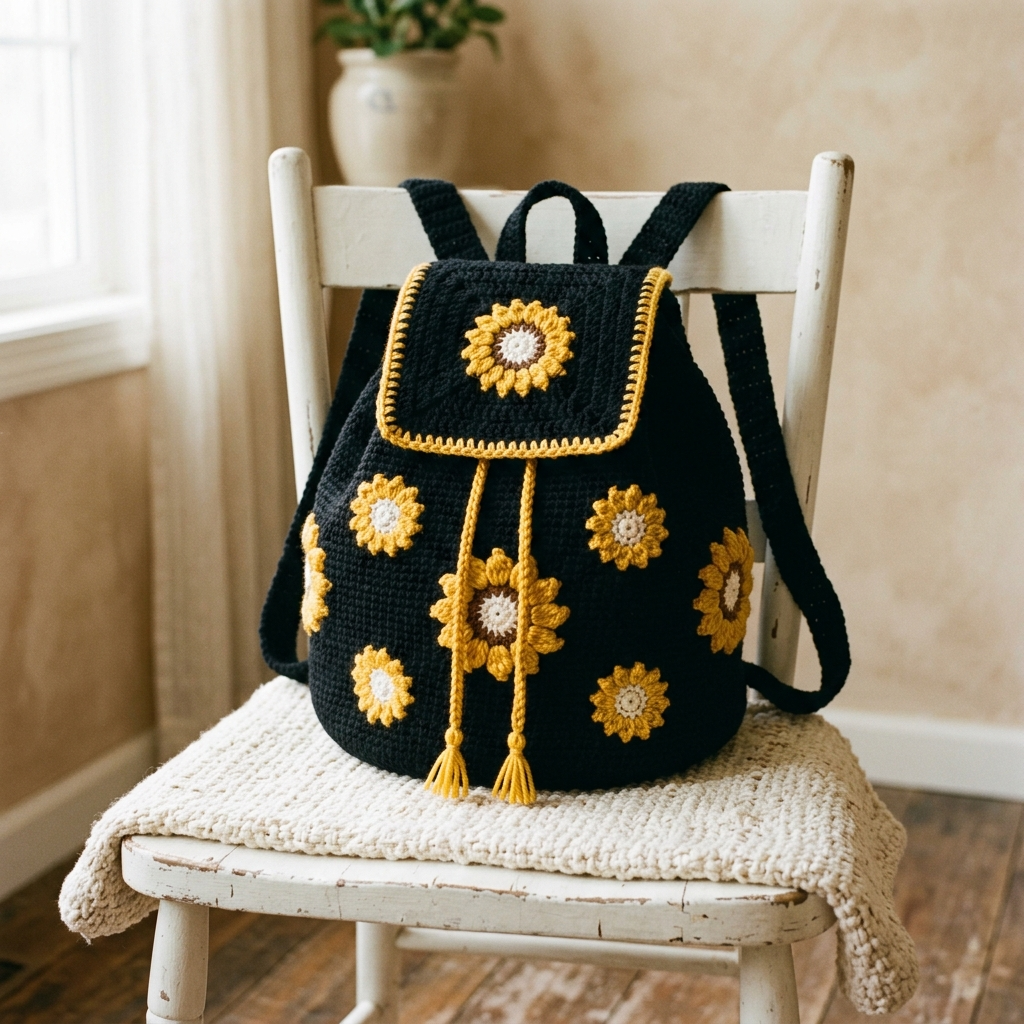
I pulled this pattern out of my design notebook from a few summers ago, and honestly, I forgot how much I loved it. I originally made it for my niece who was obsessed with sunflowers and needed something cute for day trips. She called it her "garden bag" and carried it everywhere that summer. Looking at it now, with those cheerful mustard petals scattered across the deep black cotton, I remember why I spent so many evenings tweaking the petal clusters until they looked just right. This is the Sunflower Drawstring Backpack, and I think it might be one of the prettiest functional bags I have ever designed.
Get the Ad-Free PDF Pattern
You can find the free pattern below, or you can purchase the ad-free printable PDF from my shop.
Get the Printable PDF →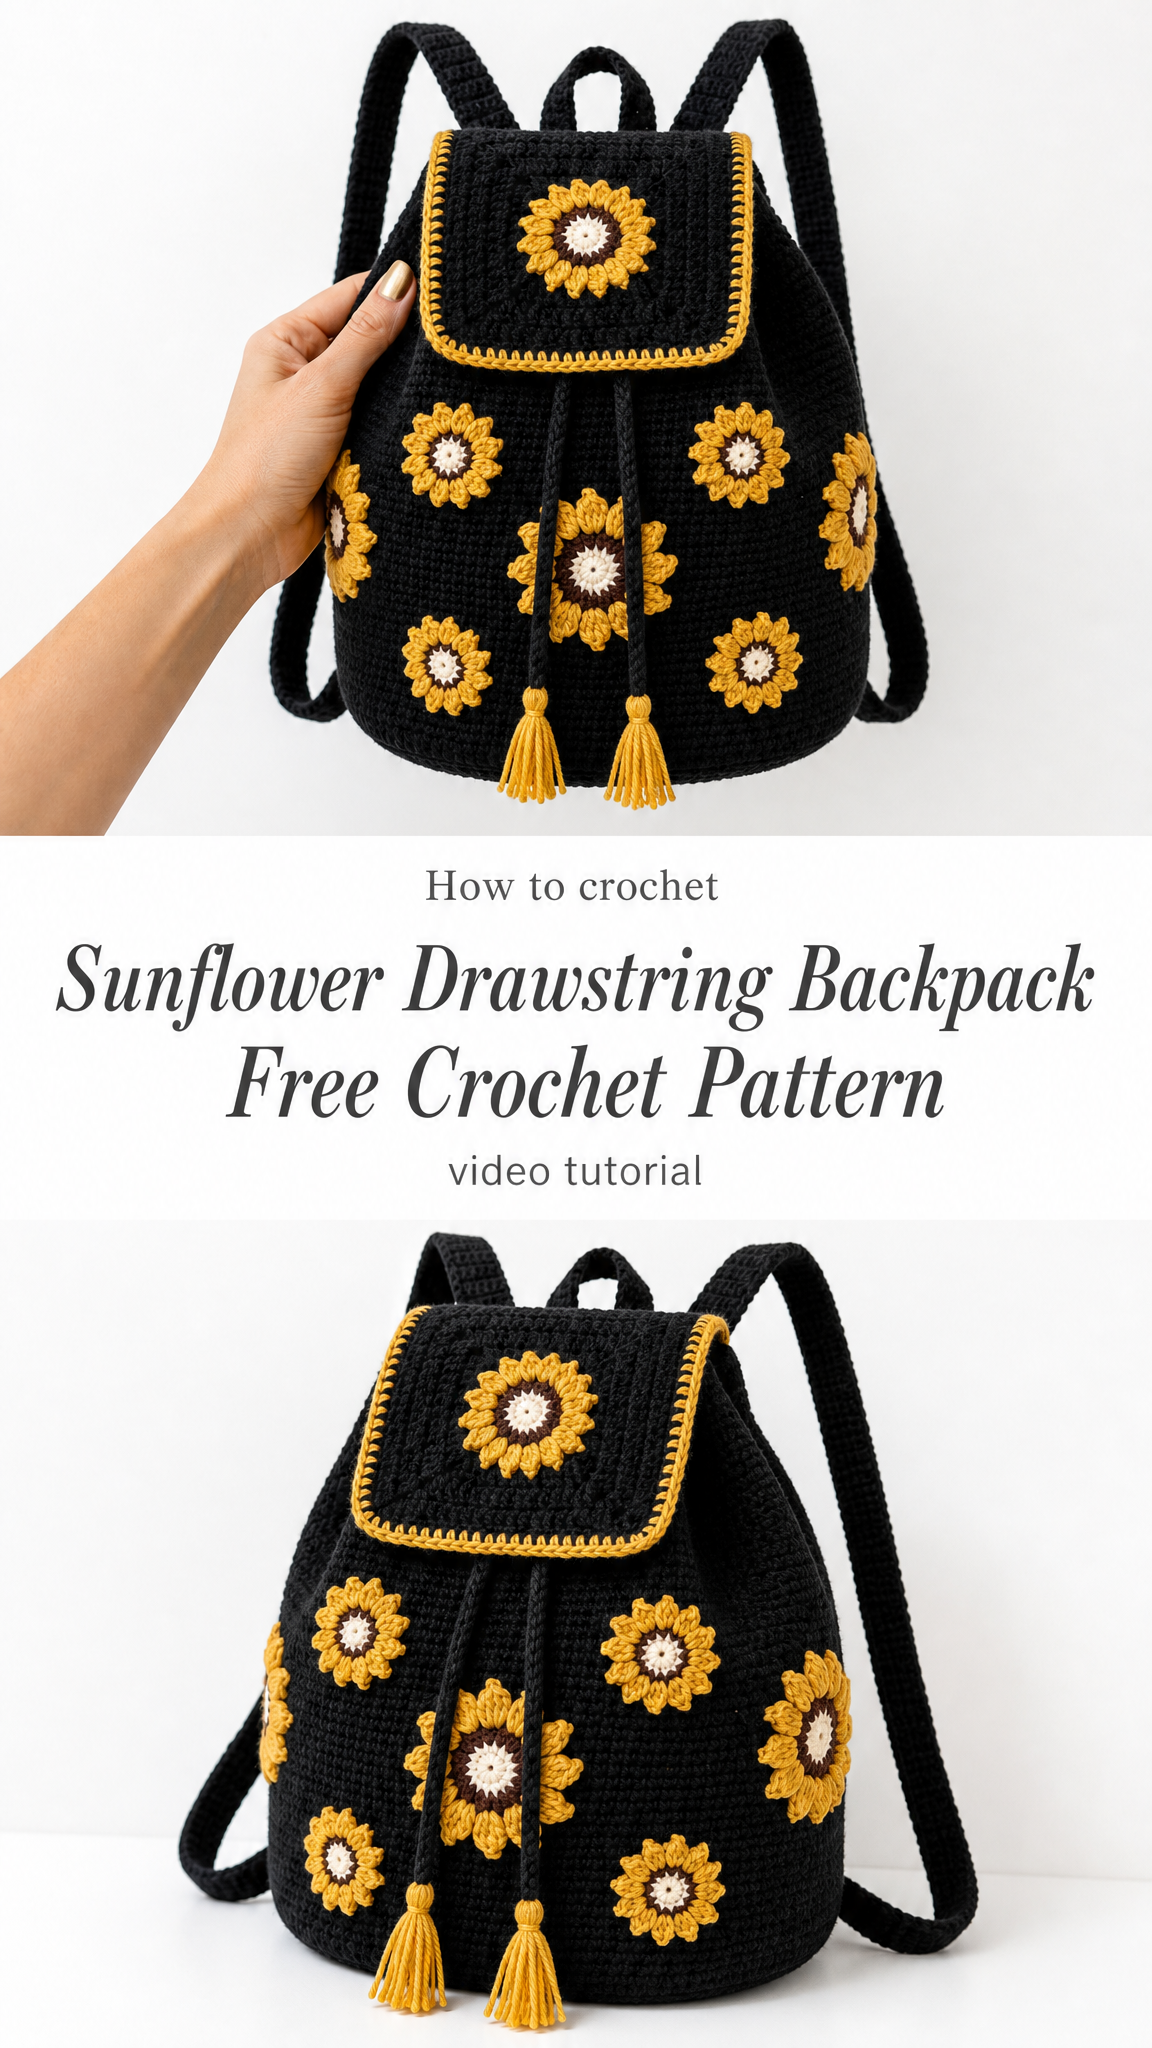
About This Sunflower Backpack Crochet Pattern
This roomy bucket-style backpack is worked from the bottom up in continuous rounds, starting with an oval base and building the walls straight up from there. The sunflower appliqués are crocheted separately and stitched on before final assembly, which makes the whole process feel much more manageable than you might expect from looking at the finished piece.
The backpack features a drawstring closure with adorable tassels, a fold-over flap with its own centered sunflower, a small top handle for grabbing, and two shoulder straps. Everything is worked in single crochet (sc), so if you are comfortable with the basics, you can absolutely make this bag.
Finished dimensions: 28 cm tall (11 inches), 24 cm wide (9.4 inches), and 12 cm deep (4.7 inches). It is a proper backpack size, perfect for books, a light jacket, snacks, or whatever you need for a day out.
Skill level: Intermediate. You should be comfortable working single crochet in continuous rounds, making a flat oval base, simple flower appliqué with whip-stitch seaming, and creating drawstring eyelets. None of these techniques are difficult on their own, but there are several components to keep track of.
Time to make: Expect around 10 to 15 hours depending on your pace.
Materials You Will Need
Yarn: Worsted weight (#4), 100% cotton. Cotton is recommended because it holds its shape beautifully for bags. Very soft acrylics tend to sag under the weight of whatever you put inside.
Hook: 3.5 mm (US E)
Color Palette and Yardage:
| Color | Used For | Yards / Meters |
|---|---|---|
| A – Black | Body, straps, handle | 400 yd / 366 m |
| B – Mustard | Trim, cord, petals | 150 yd / 137 m |
| C – Cream | Flower centers | 30 yd / 27 m |
| D – Brown | Flower rings | 35 yd / 32 m |
Approximate total: 615 yards / 562 meters. These amounts include a small buffer.
Suggested yarns: Lily Sugar’n Cream Solids (budget-friendly and widely available), Lion Brand 24/7 Cotton (mercerized sheen with crisp stitch definition), or Paintbox Yarns Cotton Aran (huge color range and smooth texture).
Other supplies: Yarn needle, stitch markers, scissors, measuring tape, scrap cardboard approximately 10 cm for making tassels, and optional removable pins for placing flowers before you sew them down.
Gauge
18 sc × 20 rows = 10 × 10 cm (4 × 4 inches) worked in single crochet with a 3.5 mm hook.
Gauge is not critical to fit since this is a bag rather than a garment, but it does affect your finished size and how much yarn you use. I recommend making a quick swatch before diving in.
Abbreviations and Stitches
Let me walk you through every abbreviation you will encounter:
Special Stitch: Petal Puff (2-dc cluster)
This creates the raised petals on each sunflower. Here is how to work a dc2tog in one stitch:
Yarn over, insert hook in the stitch, yarn over and pull up a loop, yarn over and draw through 2 loops. You now have 2 loops on your hook. Repeat that sequence one more time in the same stitch. You now have 3 loops on your hook. Yarn over and draw through all 3 loops. That is one petal.
How to Crochet the Sunflower Appliqués
Make 9 total. Eight go on the body of the bag, and one goes centered on the flap. Each finished flower measures about 6 cm (2.4 inches) across. These are worked in joined rounds.
Center (Color C – Cream)
Rnd 1: Make a magic ring. Work 6 sc into the ring. Pull tight. Sl st to the first sc to join. (6 sts)
Rnd 2: Ch 1, 2 sc in each st around. Sl st to join. (12 sts) Fasten off C.
Ring (Color D – Brown)
Rnd 3: Join D to any stitch. Ch 1, sc in each st around. Sl st to join. (12 sts) Fasten off D.
Petals (Color B – Mustard)
Rnd 4: Join B with a sl st to any stitch of the brown ring. \*Ch 2, work a 2-dc cluster (petal puff) in the same stitch as the sl st, ch 2, sl st in the next st.\* Repeat from \* around. You will create one petal per stitch. (12 petals)
Finishing the Flower
Fasten off, leaving a 30 cm (12 inch) tail for sewing. Weave in the starting tails only. Save that long tail because you will use it to appliqué the flower to the bag later.
Tip: Lightly steam-block each flower flat so the petals open up nicely. This makes a big difference in how polished they look.
How to Crochet the Body and Base
The entire body is worked in Color A (Black) in continuous rounds from an oval base up. Place a stitch marker in the first stitch of each round and move it up as you go.
Oval Base
Set up: Ch 27.
Rnd 1: 2 sc in the 2nd ch from the hook, sc in the next 24 chains, 6 sc in the last chain. Rotate to work along the opposite side of the foundation chain. Sc in the next 24 chains, 4 sc in the last space (where you started). (60 sts)
Rnds 2-7: Increase 6 stitches each round at the two curved ends, which works out to approximately 3 increases per end. This keeps the base flat as it grows.
Flat base check: Your base should lie flat and measure approximately 24 × 12 cm (9.4 × 4.7 inches). If it cups upward, add one more increase round. If it ruffles or waves, work one round even (no increases) before continuing.
Body Walls
Rnds 8+: Sc in each st around, working even with no increases, until the body measures 22 cm (8.7 inches) from the base. (96 sts)
Drawstring Eyelets, Top, and Trim
Eyelets: \*Sc in the next 4 stitches, ch 2, skip 2 stitches.\* Repeat from \* around. (16 eyelets)
Next rnd: Sc in each stitch, working 2 sc into each ch-2 space. (96 sts)
Even rnds: Sc around for 2 more rounds. Sl st and fasten off A.
Trim: Join Color B at the top edge. Ch 1, sc in each st around. Join with a sl st. Fasten off. This creates the mustard rim. (96 sts)
How to Crochet the Flap
The flap is worked flat in rows using Color A, then finished with a mustard border. One sunflower appliqué goes in the center.
Flap Panel (Color A – Black)
Row 1: Ch 26. Sc in the 2nd ch from the hook and in each ch across. (25 sts)
Rows 2+: Ch 1, turn, sc in each st across. Repeat until the flap measures 11 cm (4.3 inches), which is approximately 22 rows. (25 sts)
Fasten off A.
Flap Border (Color B – Mustard)
Edge: With the right side facing, join B to any edge stitch. Ch 1, sc evenly around all four sides, working 3 sc in each corner to turn it neatly. Sl st to join. Fasten off.
Tip: The flap width should span roughly the front-center third of the bag opening.
How to Make the Drawstring, Tassels, and Handle
Drawstring Cord (Color B – Mustard)
Chain a cord approximately 110 cm (43 inches) long. For a rounder, sturdier cord, sc back along the chain, working 1 sc in each chain. Fasten off, leaving short tails.
Tassels (Color B – Make 2)
1. Wrap yarn around a 10 cm (4 inch) piece of cardboard about 40 times.
2. Slide a strand under the top of the wrapped yarn and tie it tightly. Cut the loops along the bottom.
3. Wrap another strand around the bundle approximately 1 cm down from the top to form the neck. Knot it and bury the ends.
4. Trim the bottom level. Attach one tassel to each end of the drawstring cord.
Top Handle (Color A – Black)
Row 1: Ch 6. Sc in the 2nd ch from the hook and across. (5 sts)
Rows 2+: Ch 1, turn, sc across until the strip measures 12 cm (4.7 inches), which is about 20 rows. Fasten off, leaving a long tail for sewing. (5 sts)
The handle becomes a loop when you sew both short ends to the top-back of the bag, just below where the flap attaches.
How to Crochet the Shoulder Straps
Make 2 straps in Color A. Adjust the length to your preference before sewing.
Row 1: Ch 7. Sc in the 2nd ch from the hook and across. (6 sts)
Rows 2+: Ch 1, turn, sc across until the strap measures about 70 cm (27.5 inches), or your chosen length. Fasten off, leaving a long sewing tail. (6 sts)
Making the Straps Adjustable
Sew the top ends permanently to the upper back of the bag. At the base, crochet a small loop (ch 8, sl st into a ring) and stitch it to the lower back. Thread each strap end through its loop and knot or button it so you can adjust the length later.
If you prefer simplicity, just sew both ends down at your fitted length.
Comfort tip: For wider, softer straps, work them 8 sc wide instead of 6. You can also line the back of each strap with a strip of cotton webbing before sewing.
Assembly and Finishing
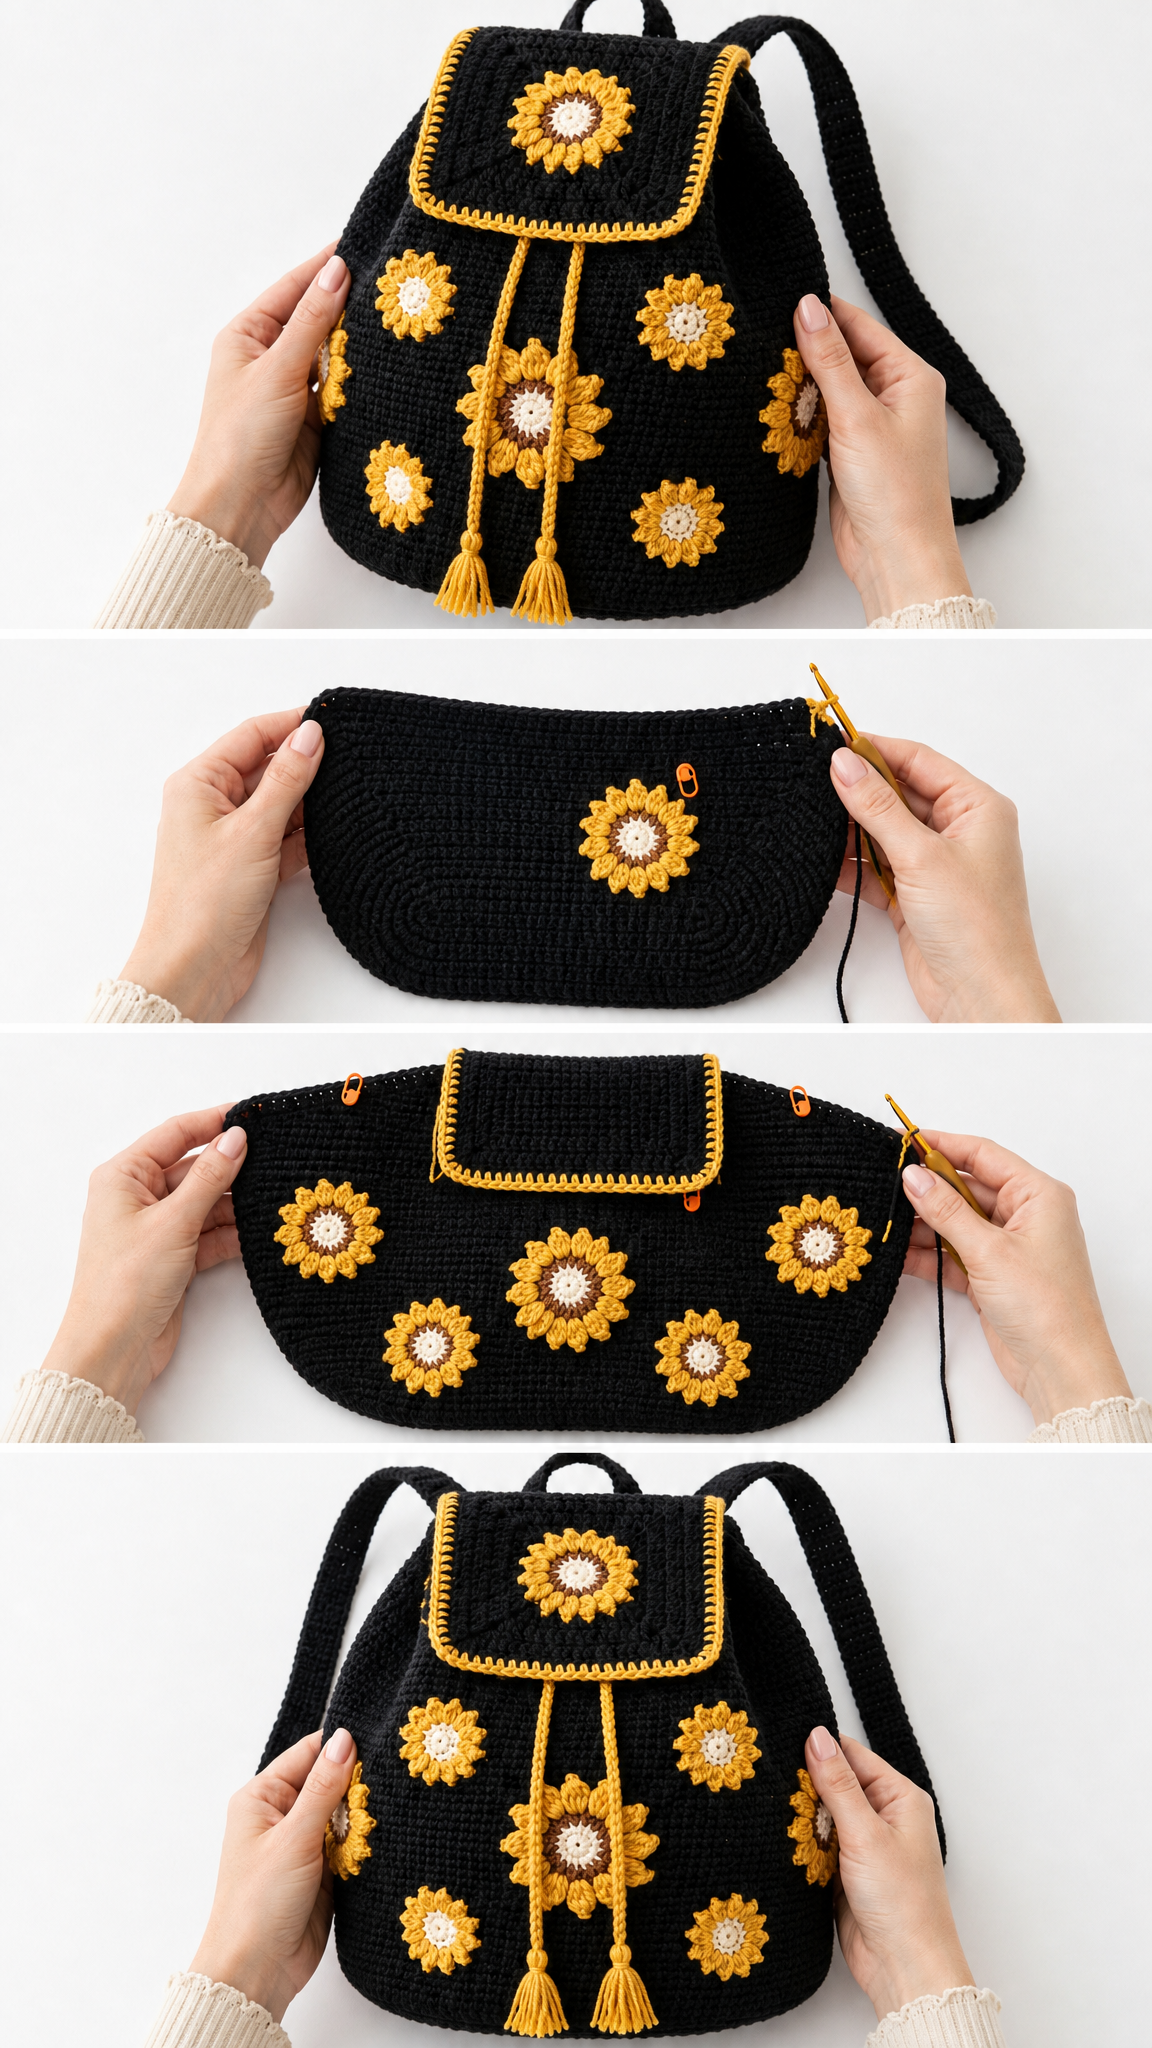
Lay out all your pieces and follow this order. The flowers go on before the straps and handle.
1. Tidy the body. Weave in all the tails from the base and body so the inside is neat.
2. Place the flowers. Pin 8 sunflowers around the body in a relaxed, staggered arrangement. Place 1 flower centered on the flap. Use removable pins to position them before committing.
3. Appliqué the flowers. Using each flower’s long tail and your yarn needle, whip-stitch around the outer edge of the petals to secure each flower flat against the fabric. Weave in tails on the inside.
4. Attach the flap. Line the top edge of the flap along the top-back of the bag, centered between the back corners. Whip-stitch firmly so the flap folds forward over the opening.
5. Thread the drawstring. Weave the cord in and out through all 16 eyelets, beginning and ending at center front. Even out the ends and make sure a tassel hangs on each side.
6. Sew the handle. Fold the handle strip into a loop and stitch both ends to the top-back, just below the flap.
7. Sew the straps. Attach the top ends to the upper back near the handle. Attach the lower ends (or loops) to the back near the base, spaced to sit comfortably on the shoulders.
8. Final touches. Weave in every remaining end securely. Pull the drawstring to gather the top, then fold the flap over.
Blocking
A light steam or spray-block helps the flowers lie flat and crisps the overall shape. Stuff the bag with a towel to hold its form while it dries.
Care Instructions
Since this bag is 100% cotton, it wears beautifully with a little gentle care:
You Did It!
Your sunflower backpack is ready to bloom. I hope you love making it as much as I loved designing it. The combination of that deep black cotton with the cheerful mustard petals really does feel like carrying a little garden around with you.
Thank you so much for choosing this pattern. I would absolutely love to see your finished backpack! If you make one, please share a photo on Instagram or Facebook and tag me. It genuinely makes my day to see these designs come to life in your hands.
If you enjoyed this pattern, I hope you will save it to your Pinterest boards so you can find it again later. And please drop a comment below if you make this bag. I would love to hear which colors you chose and how it turned out!
Want a Quick & Easy Printable Version?
Get a clean, beautifully formatted PDF of this pattern — easy to follow step by step, ready to print or save on any device. No scrolling, no distractions, just the pattern.
Get the Printable PDF →