Miniature crochet projects look intimidating. I get it. Those tiny stitches, delicate motifs, and intricate details can make even experienced crocheters hesitate. But here’s the truth: this butterfly and daisy bag charm is far easier than it appears. The butterflies are simply two shell-based wings joined with a body. The daisy is just a circle with petals worked around the edge. If you can double crochet, you can absolutely make this. Whether you’re a confident beginner ready to level up or an advanced crocheter looking for a quick satisfying project, this pattern breaks everything down into manageable pieces.
About This Crochet Bag Charm Pattern
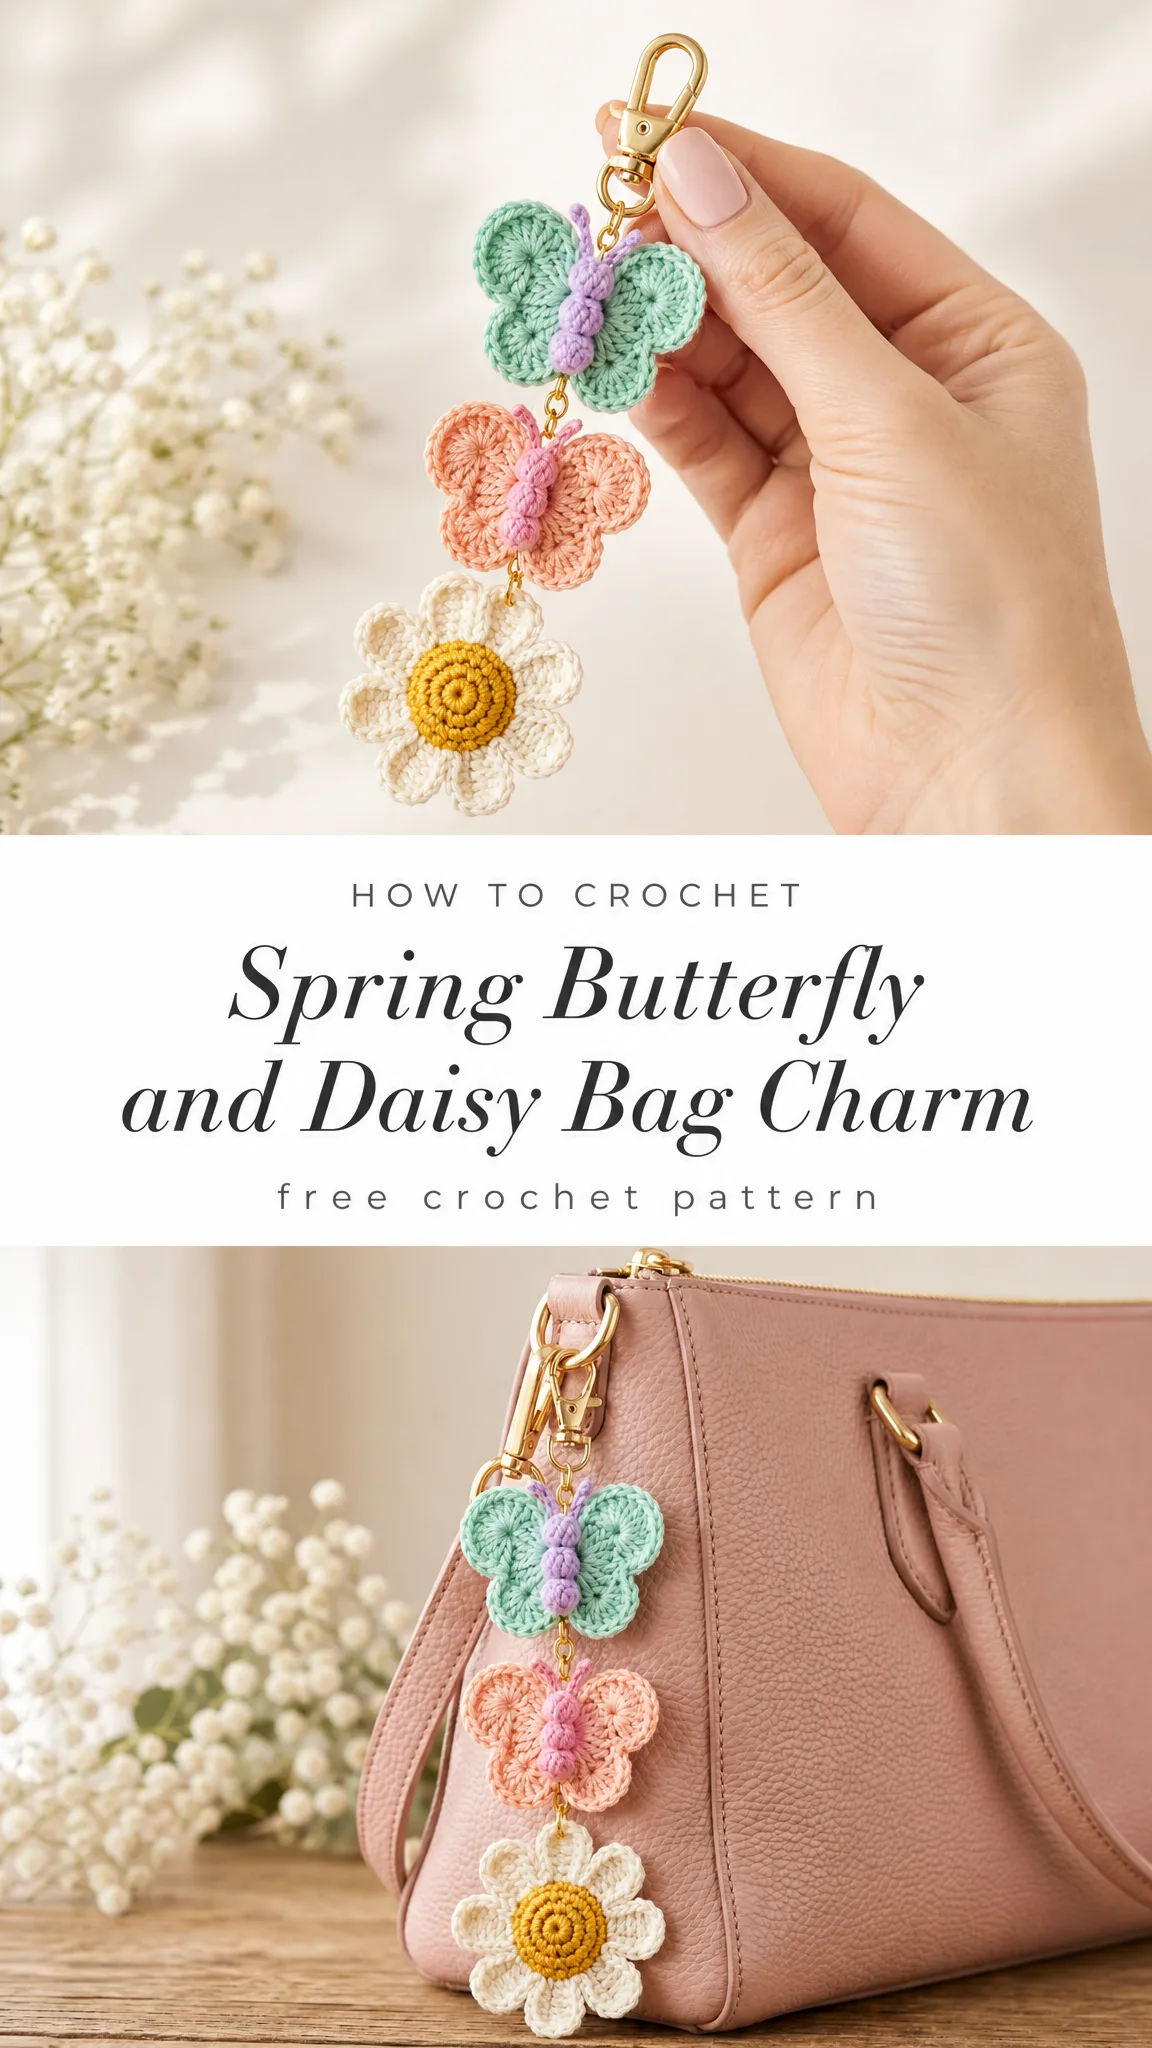
This adorable bag charm features two crocheted butterflies and one daisy flower connected in a vertical chain. The finished piece dangles beautifully from a purse, backpack, tote bag, or even a set of keys. Each motif measures approximately 1.5 to 2 inches across, and the total length from the lobster clasp to the bottom of the daisy is roughly 5 to 6 inches.
The color palette gives serious spring vibes. A mint green butterfly sits at the top with a lavender body and antennae. Below that, a soft peach butterfly features a pink body. The daisy at the bottom has creamy white petals surrounding a golden yellow center. You can absolutely customize these colors to match your personal style or coordinate with a favorite bag.
What makes this pattern beginner friendly? Each component is worked flat or in the round using basic stitches. The butterflies use chains, single crochet, half double crochet, double crochet, and treble crochet to create the wing shells. The daisy center is a simple spiral, and the petals are chain loops. Nothing complicated here, just familiar stitches arranged in new ways.
Materials Needed
Yarn:
Hook:
Notions:
Gauge and Sizing
Exact gauge is not critical for this project. However, your stitches should be tight enough that the motifs hold their shape without being stiff or difficult to work. The finished butterfly wings should measure approximately 1.5 inches wide. The daisy should measure approximately 2 inches in diameter.
If your motifs seem floppy, try going down a hook size. If they feel too tight and stiff, go up a hook size.
Abbreviations and Stitch Definitions
Before we dive into the pattern, let me define every stitch and abbreviation you’ll encounter:
ch = chain: Yarn over, pull through loop on hook. This creates the foundation for most crochet work.
sl st = slip stitch: Insert hook, yarn over, pull through both the stitch and the loop on your hook in one motion. Used for joining and moving across stitches invisibly.
sc = single crochet: Insert hook into stitch, yarn over and pull up a loop (2 loops on hook), yarn over and pull through both loops.
hdc = half double crochet: Yarn over, insert hook into stitch, yarn over and pull up a loop (3 loops on hook), yarn over and pull through all 3 loops at once.
dc = double crochet: Yarn over, insert hook into stitch, yarn over and pull up a loop (3 loops on hook), yarn over and pull through 2 loops (2 loops remain), yarn over and pull through remaining 2 loops.
tr = treble crochet: Yarn over twice, insert hook into stitch, yarn over and pull up a loop (4 loops on hook), yarn over and pull through 2 loops three separate times until 1 loop remains.
sk = skip: Pass over the indicated stitch without working into it.
st(s) = stitch(es)
sp = space
Crochet Butterfly Pattern (Make 2)
Each butterfly consists of four wings worked as two connected pairs, plus a body crocheted separately and attached.
Upper Wings (Make 1 Piece Per Butterfly)
Using mint green for the first butterfly and peach for the second butterfly:
Row 1: Ch 4, sl st in first ch to form a ring. Ch 3 (counts as first dc), work 2 dc into ring, ch 2, work 3 dc into ring. Turn. (6 dc, 1 ch-2 sp)
Row 2: Ch 3 (counts as dc), dc in same st, dc in next st, 2 dc in next st, (2 dc, ch 2, 2 dc) in ch-2 sp, 2 dc in next st, dc in next st, 2 dc in last st. Turn. (14 dc, 1 ch-2 sp)
Row 3: Ch 1, sc in first st, hdc in next st, dc in next 2 sts, tr in next 2 sts, (tr, ch 1, tr) in ch-2 sp, tr in next 2 sts, dc in next 2 sts, hdc in next st, sc in last st. Fasten off. (14 sts, 1 ch-1 sp)
This creates one set of upper wings shaped like a rounded heart.
Lower Wings (Make 1 Piece Per Butterfly)
Using the same wing color:
Row 1: Ch 4, sl st in first ch to form a ring. Ch 2 (counts as first hdc), work 1 hdc into ring, ch 1, work 2 hdc into ring. Turn. (4 hdc, 1 ch-1 sp)
Row 2: Ch 2 (counts as hdc), hdc in same st, hdc in next st, (hdc, ch 1, hdc) in ch-1 sp, hdc in next st, 2 hdc in last st. Turn. (8 hdc, 1 ch-1 sp)
Row 3: Ch 1, sc in first st, hdc in next 2 sts, dc in next st, (dc, ch 1, dc) in ch-1 sp, dc in next st, hdc in next 2 sts, sc in last st. Fasten off. (10 sts, 1 ch-1 sp)
The lower wings will be slightly smaller than the upper wings.
Butterfly Body
Using lavender for the mint butterfly and pink for the peach butterfly:
Foundation: Ch 12.
Row 1: Sc in 2nd ch from hook, sc in next 9 ch, 3 sc in last ch. Working along opposite side of foundation chain, sc in next 10 sts. Do not join. (23 sc)
Continue working in a spiral for the body:
Round 2: Sc in each st around, working 2 sc in the center stitch at the bottom curve. Sl st to first sc. Fasten off, leaving a long tail for sewing. (24 sc)
Antennae
Using the same body color, ch 8. Sl st in 2nd ch from hook, sl st in next 5 ch. Fasten off, leaving a tail. Make 2 per butterfly.
Assembly of Butterfly
1. Position the upper wings above the lower wings with wrong sides facing you.
2. Using the body piece, place it vertically over the center where all four wings meet.
3. Using your tapestry needle and the body tail, sew the body to the wings with small whip stitches around the edges.
4. Attach antennae to the top of the body by threading the tail through the top of the body piece and securing with a knot on the back.
5. Weave in all ends securely.
Tip for beginners: If the body feels tricky to attach evenly, try pinning everything in place first with sewing pins or stitch markers.
Crochet Daisy Pattern (Make 1)
The daisy is worked from the center outward.
Daisy Center
Using golden yellow:
Magic ring: Create a magic ring (adjustable loop).
Round 1: Ch 1, work 6 sc into the ring. Pull tail to tighten. Do not join, work in a continuous spiral. (6 sc)
Round 2: 2 sc in each st around. (12 sc)
Round 3: *Sc in next st, 2 sc in next st* repeat around. (18 sc)
Round 4: Sc in each st around. Sl st to first sc to join. Fasten off. (18 sc)
Daisy Petals
Join cream/off-white yarn to any stitch of Round 4.
Petal Round: *Ch 5, sl st in 2nd ch from hook, sc in next ch, hdc in next ch, dc in next ch, sk next st on center, sl st in next st* repeat 8 more times. You will have 9 petals total. Fasten off. (9 petals)
Shaping tip: After completing the petals, gently press each petal outward so they fan around the center evenly.
Finishing and Assembly
Stiffening (Optional)
For a crisper, more durable finish, you can stiffen your motifs:
1. Mix equal parts white craft glue and water.
2. Dip each motif briefly and squeeze out excess.
3. Pin to a blocking board or piece of cardboard.
4. Shape the wings and petals while wet.
5. Allow to dry completely (several hours or overnight).
Alternatively, use commercial fabric stiffener following package directions.
Connecting the Motifs
Using small jump rings and jewelry pliers:
1. Open a jump ring by twisting sideways (never pull apart).
2. Thread through the top center of the mint butterfly upper wings.
3. Close the jump ring through the loop of the lobster clasp.
4. Open another jump ring and connect the bottom of the mint butterfly to the top of the peach butterfly.
5. Open a third jump ring and connect the bottom of the peach butterfly to the top of the daisy (between two petals works well).
No pliers? You can crochet small chain loops at the connection points instead. Simply join yarn, ch 6, sl st to form a ring, and fasten off securely.
Final Touches
Pattern Tips and Variations
Color customization: This design works beautifully in any color combination. Try rainbow butterflies, pastels for spring, or rich jewel tones for fall. Monochromatic versions in different shades of the same color look elegant too.
Size adjustments: Want bigger motifs? Use worsted weight yarn and a 4mm or 5mm hook. Your finished charm will be noticeably larger and chunkier, but still adorable.
Alternative uses: These motifs work as appliqués on hats, headbands, and bags. The daisy makes a sweet hair clip. The butterflies look lovely as gift toppers or scattered on a spring wreath.
Gift potential: This bag charm makes a wonderful handmade gift for Mother’s Day, birthdays, teacher appreciation, or just because. Consider making several in different colorways for craft fairs or holiday markets.
Skill Building With This Project
If you are newer to crochet, this pattern helps you practice several important techniques:
Take your time with each motif. The individual pieces work up quickly, usually 15 to 20 minutes each once you get the rhythm. The whole charm can be completed in an evening.
Caring for Your Finished Charm
Cotton yarn is durable and washable. If your charm gets dirty, hand wash gently in cool water with mild soap. Reshape while damp and lay flat to dry. If you used fabric stiffener, you may need to reapply after washing.
Avoid leaving your charm in direct sunlight for extended periods, as colors may fade over time.
I really hope you enjoy making this sweet spring butterfly and daisy bag charm crochet pattern. It’s one of those projects that looks so much more complicated than it actually is, and the finished result always gets compliments. Thank you so much for choosing to make this project. If you’d like to share your finished charm with me, I would love to see it on Instagram or in my Facebook group.
If this pattern brought a little joy to your crafting time, I’d be so grateful if you saved it to your Pinterest boards so you can find it again later. And please drop a comment below if you make one. I love hearing which colors you chose and seeing how your version turned out!
