
Last winter, my best friend called me in a panic. She had been invited to a gala with just six weeks’ notice and couldn’t find a single dress that felt right. "Everything looks the same," she said. "I want something that makes people stop and stare." I hung up the phone, stared at my yarn stash, and thought, "What if I could crochet her something unforgettable?"
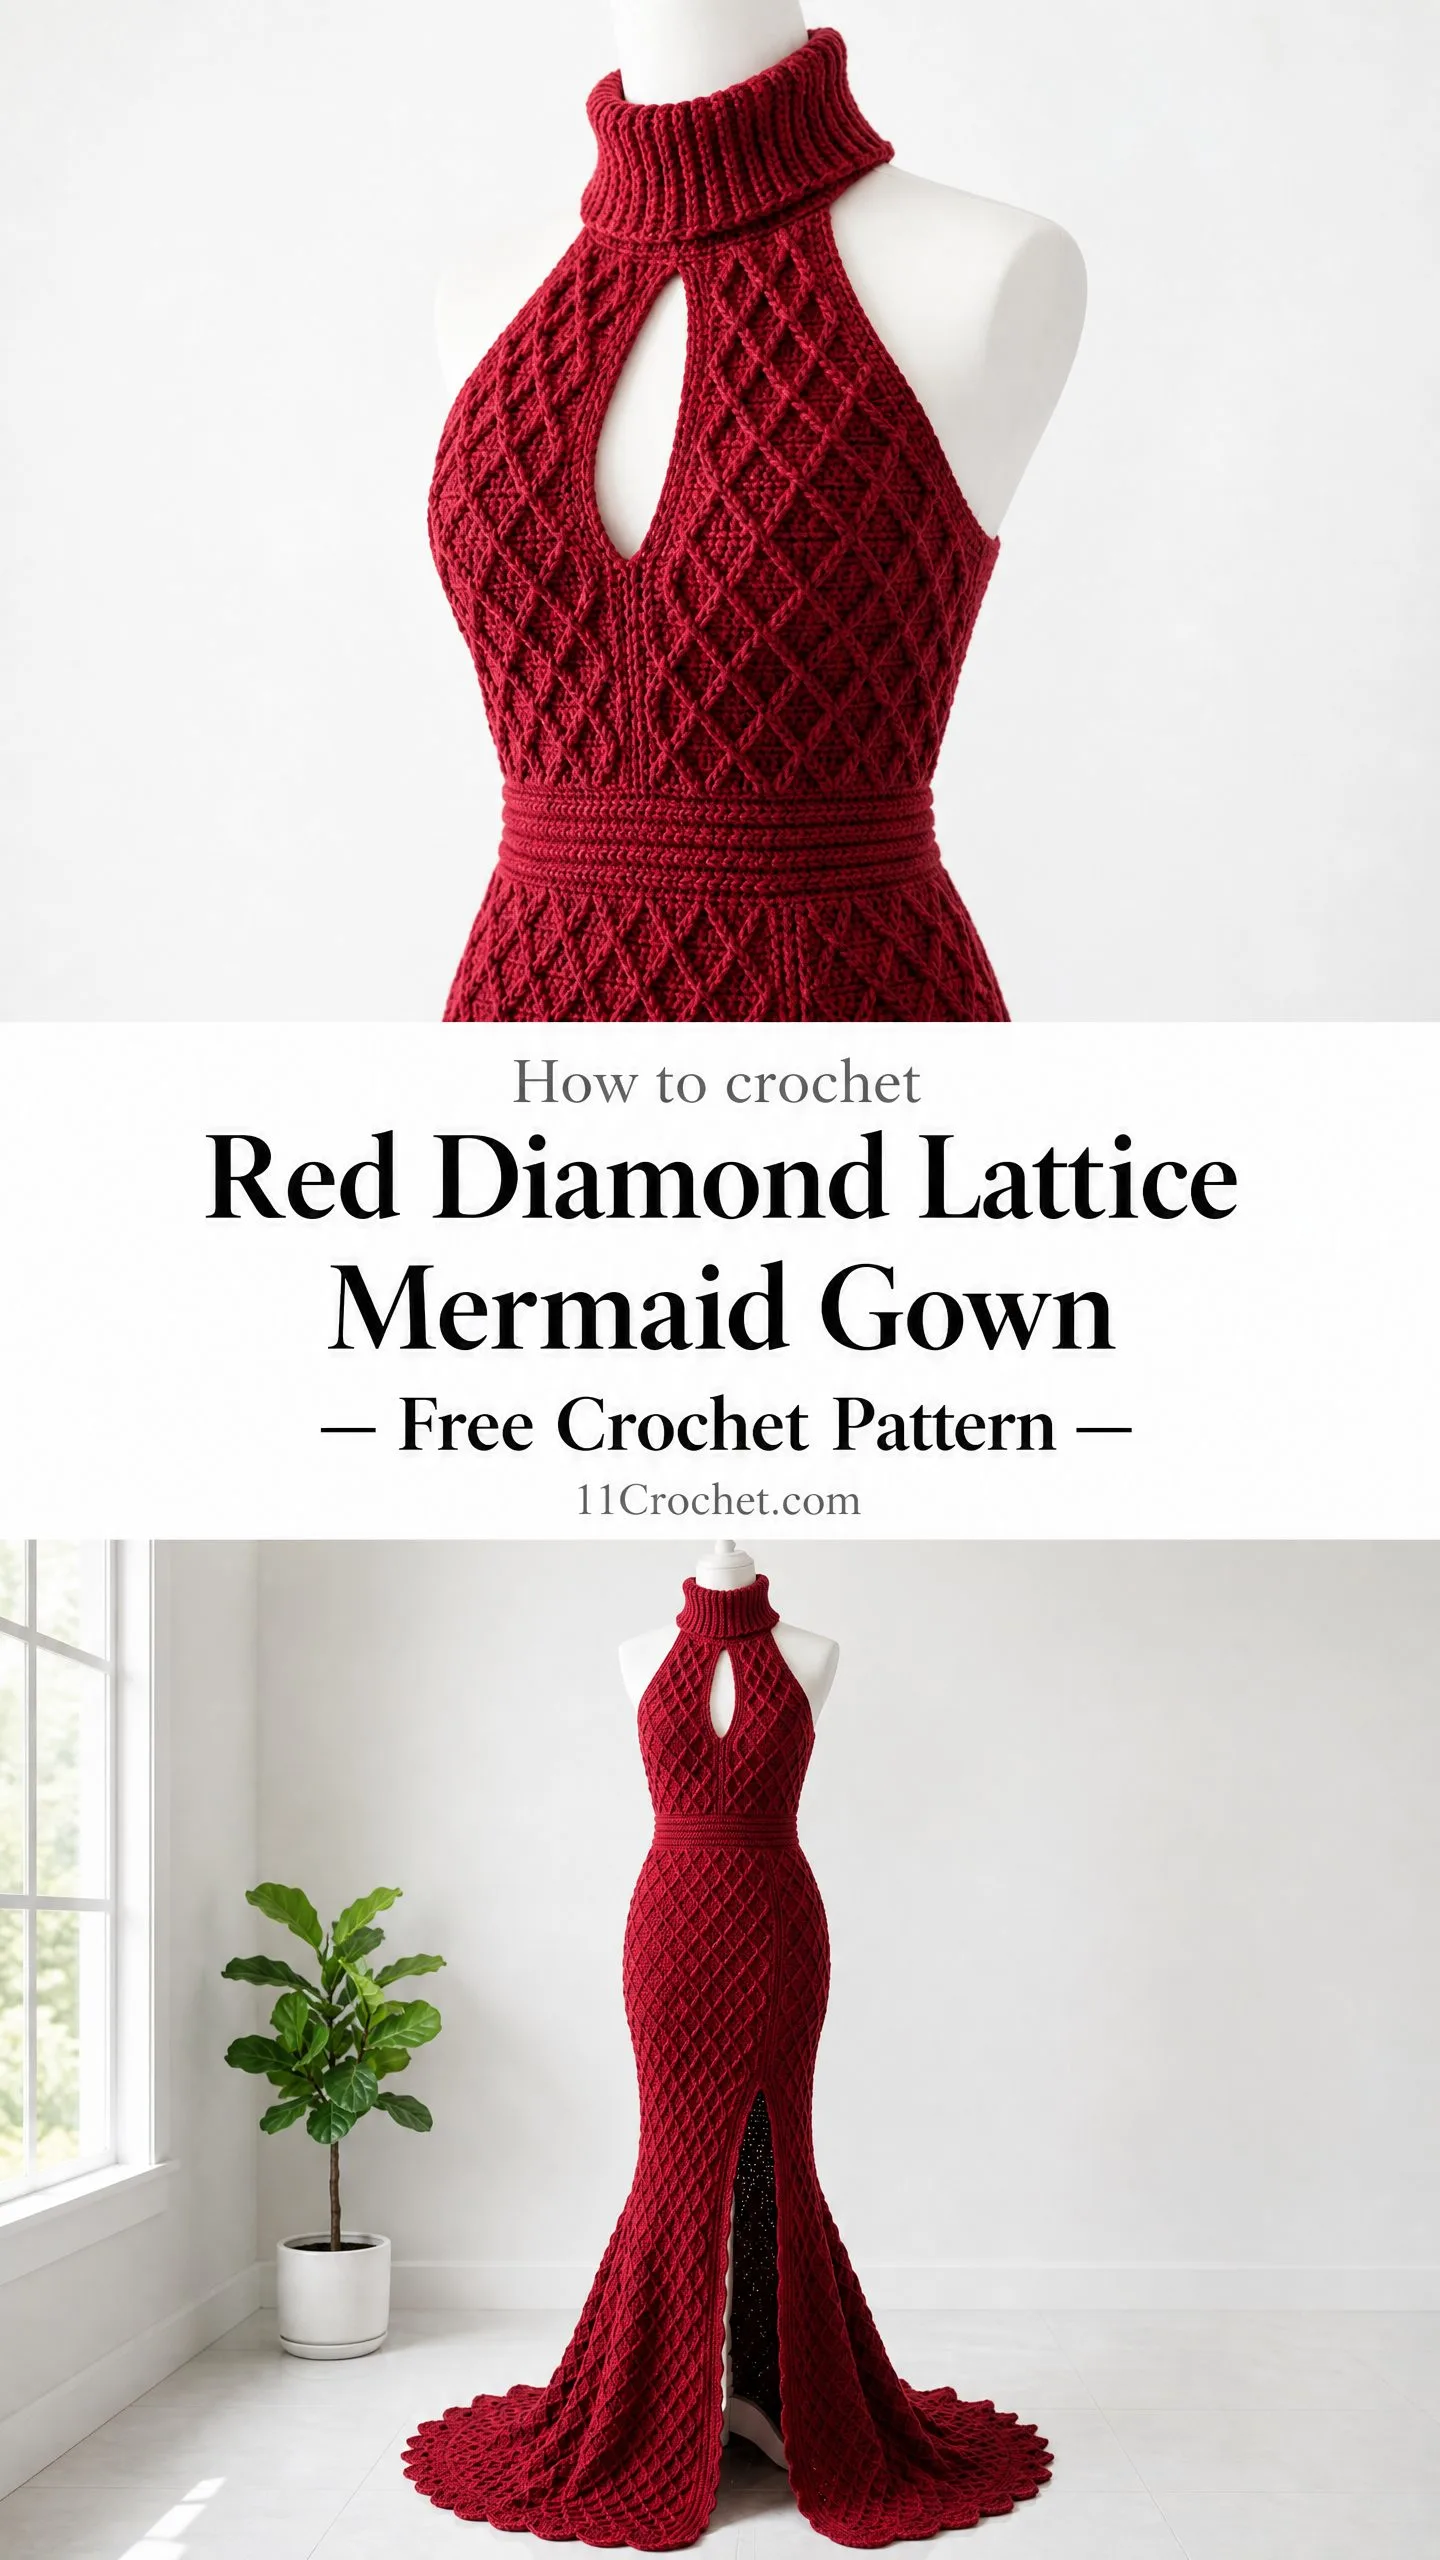
That phone call turned into months of swatching, frogging, and late nights with my hook. The result is this crimson masterpiece sitting on my dress form right now, and I genuinely cannot stop looking at it. The raised diamond lattice texture catches light in the most incredible way, the mermaid silhouette hugs every curve, and that sweeping train pooling on the floor makes the whole thing feel like couture.
This is not a beginner project. I want to be honest with you about that upfront. But if you have experience with post stitches and you are ready for a challenge that will absolutely level up your skills, keep reading. I am walking you through every single step.
About This Stunning Crochet Gown Pattern
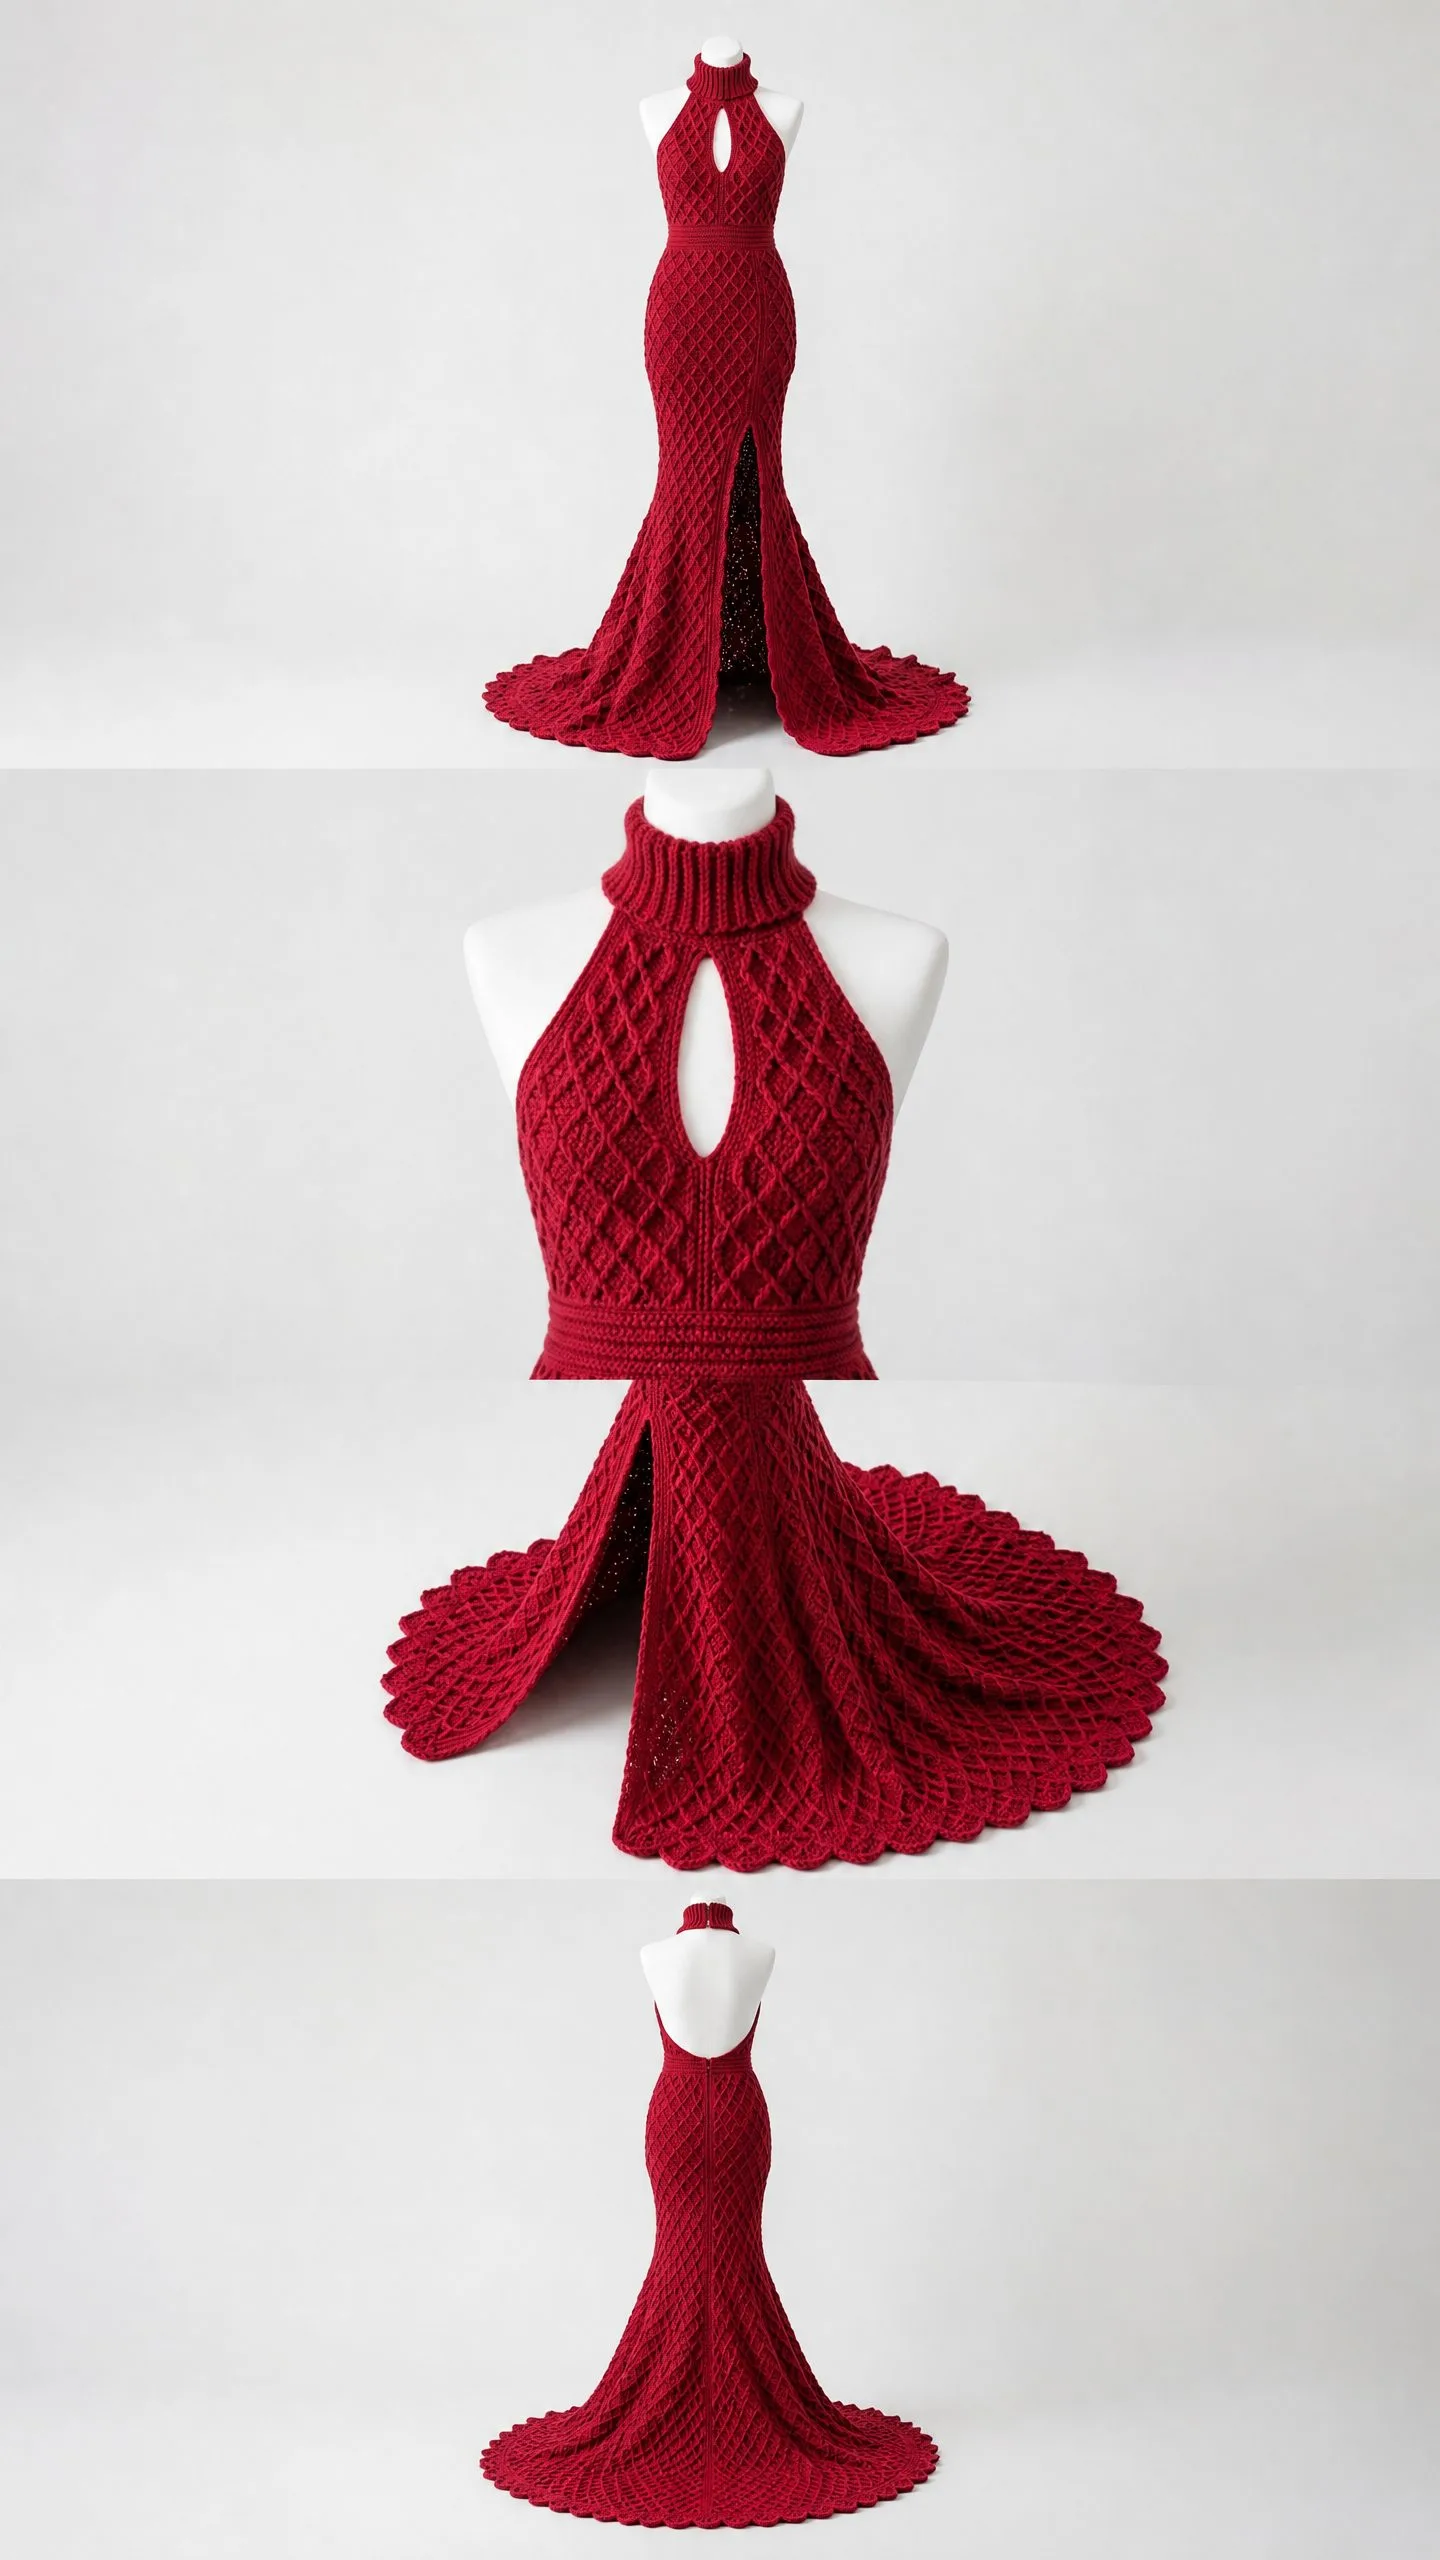
This floor-length mermaid gown features an all-over raised diamond lattice texture worked in deep crimson yarn. The silhouette is fitted through the bodice and hips, then flares dramatically below the knee into a sweeping train with a gorgeous scalloped hem.
The design includes a halter neckline that connects to a ribbed turtleneck collar with a teardrop keyhole cutout at the center front. The back is completely open, secured at the nape with the collar band. A defined ribbed waistband panel separates the bodice from the skirt, creating that beautiful hourglass shape. And yes, there is a front center slit that begins at mid-thigh and extends to the hem for movement and drama.
Construction Overview: You will start at the top with the collar, work down through the halter bodice in flat panels joined at the sides, continue into a seamless worked-in-the-round skirt, and finish with the mermaid flare and scalloped border.
The diamond lattice texture is what makes this gown extraordinary. It is achieved through a combination of front post double crochet (FPDC) and back post double crochet (BPDC) stitches arranged in a diagonal crossing pattern. This creates raised dimensional diamonds across the entire garment surface.
Skill Level
Advanced. This crochet pattern requires proficiency in post stitch textures, working garment pieces in both flat and in-the-round construction, managing shaped seams, executing a mermaid flare with precise stitch increases, and reading multi-row stitch repeats across a large stitch count.
If you are a beginner or intermediate crocheter, I strongly recommend practicing the diamond lattice swatch before beginning the garment. Work at least 30 stitches across and 20 rows to get comfortable with the rhythm.
Time Estimate
Approximately 80 to 120 hours depending on your yarn weight, hook size, and working speed. Yes, this is a significant time investment. But the finished piece is absolutely worth it.
Finished Measurements
The pattern is written for a size Medium with finished measurements as follows:
Size customization tips are included at the end of the pattern.
Materials Needed
Yarn
Bulky weight (CYCA 5) or thick worsted weight (CYCA 4 heavy) yarn in deep crimson red. You will need approximately 2,800 to 3,200 yards (2,560 to 2,925 meters) depending on your finished size and gauge swatch.
Recommended Yarn Options:
Substitution Note: Any yarn producing 12 stitches and 8 rows in 4 inches (10 cm) in single crochet on a US K (6.5 mm) hook is suitable. Avoid yarns with high shine or slipperiness as they diminish the raised post stitch definition. Matte or semi-matte wool blends or sturdy acrylics perform best.
Hooks
Notions
Gauge
Getting gauge is critical for a fitted garment. Please do not skip this step.
With US K (6.5 mm) hook and chosen yarn:
Gauge swatch: Chain 30, work 20 rows in diamond lattice pattern. Block swatch before measuring. Adjust hook size as needed to match gauge exactly.
Waistband ribbing gauge with US J (6.0 mm) hook:
Abbreviations (US Terms)
Special Stitches Explained
FPDC (Front Post Double Crochet)
This stitch creates the raised lines in the diamond pattern. Here is how to work it:
Yarn over hook. Insert hook from front to back to front around the vertical post of the indicated stitch in the row below. You are going around the post, not through the top loops. Yarn over and pull up a loop. (Yarn over, draw through 2 loops) twice.
This stitch pushes toward the front of the fabric and is the foundation of the raised diamond texture.
BPDC (Back Post Double Crochet)
Yarn over hook. Insert hook from back to front to back around the vertical post of the indicated stitch in the row below. Yarn over and pull up a loop. (Yarn over, draw through 2 loops) twice.
This stitch recedes into the background of the fabric, creating the recessed lines between the raised diamonds.
Diamond Lattice Stitch Pattern (worked flat over a multiple of 4 stitches plus 2)
The pattern creates diagonal raised lines crossing to form diamonds. Each diamond spans 4 stitches wide and 8 rows tall. Post stitches are always worked around the post of the corresponding stitch 2 rows below.
Row 1 (RS): Ch 3 (counts as dc), dc in each st across. Turn.
Row 2 (WS): Ch 3, dc in each st across. Turn.
Row 3 (RS): Ch 3, dc in first st, [FPDC around next st 2 rows below, dc in next st, FPDC around next st 2 rows below, dc in next st] rep across, dc in t-ch. Turn.
Row 4 (WS): Ch 3, dc in first st, [BPDC around FPDC below, dc in next st, BPDC around FPDC below, dc in next st] rep across, dc in t-ch. Turn.
Row 5 (RS): Ch 3, [FPDC around BPDC below, dc in next st] rep across, dc in t-ch. Turn.
Row 6 (WS): Ch 3, [BPDC around FPDC below, dc in next st] rep across, dc in t-ch. Turn.
Row 7 (RS): Ch 3, dc in first st, [FPDC around post below, dc in next st, FPDC around post below, dc in next st] rep across, dc in t-ch. Turn.
Row 8 (WS): Ch 3, dc in first st, [BPDC around FPDC below, dc in next st, BPDC around FPDC below, dc in next st] rep across, dc in t-ch. Turn.
Rows 1 through 8 form the diamond lattice repeat.
Scallop Stitch (used for hem border)
In the indicated stitch: work (sc, hdc, dc, dc, dc, hdc, sc) all in same stitch. Skip 2 stitches on either side of scallop base. This produces one shell-shaped scallop over 7 stitches.
dc2tog (Double Crochet Decrease)
Yarn over, insert hook in first stitch, yarn over and pull up loop, yarn over, draw through 2 loops. Yarn over, insert hook in next stitch, yarn over and pull up loop, yarn over, draw through 2 loops. Yarn over, draw through all 3 loops on hook.
Important Pattern Notes
Before you begin, please read through these notes. They will save you confusion later.
1. The garment is worked in sections: collar, front bodice panel, back bodice panel (flat), waistband, skirt body (in the round), mermaid flare (in the round), and hem border.
2. The front bodice panel includes the teardrop keyhole opening worked by splitting the panel at the center and rejoining. The back is left open and unworked at center, creating the open-back effect.
3. All turning chains of 3 count as the first dc throughout unless otherwise noted.
4. Stitch counts given at end of each row or round reflect total working stitches including the turning chain where applicable.
5. Markers are placed at side seams and at the center front slit beginning point. Move markers up as work progresses.
6. The skirt is worked in continuous rounds after the bodice panels are seamed together at the sides and the bottom edge is treated as the working edge.
7. The mermaid flare begins approximately 14 inches (35.5 cm) above the hem. Rapid increases over the following rows create the dramatic sweep.
8. Block all pieces before seaming. Steam or wet block depending on yarn fiber content.
9. All measurements given are for the finished blocked garment.
10. The collar is worked separately and attached last.
Step by Step Crochet Pattern Instructions
Section 1: Front Bodice Panel
The front bodice panel spans from the upper chest just below where the collar will attach, down to the waistline. It is worked flat.
Foundation Chain: With US K hook, ch 54. (This produces 52 working stitches, which equals 13 inches (33 cm) across, covering the full front bust measurement with the halter shaping.)
Row 1 (RS): Dc in 4th ch from hook and in each ch across. Turn. (52 dc)
Row 2 (WS): Ch 3, dc in each st across. Turn. (52 dc)
Row 3 (RS): Ch 3, dc in first st, [FPDC around st 2 rows below, dc in next st, FPDC around st 2 rows below, dc in next st] 12 times, dc in t-ch. Turn. (52 sts)
Row 4 (WS): Ch 3, dc in first st, [BPDC around FPDC below, dc, BPDC around FPDC below, dc] 12 times, dc in t-ch. Turn. (52 sts)
Row 5 (RS): Ch 3, [FPDC around BPDC below, dc] 25 times, dc in t-ch. Turn. (52 sts)
Row 6 (WS): Ch 3, [BPDC around FPDC below, dc] 25 times, dc in t-ch. Turn. (52 sts)
Row 7 (RS): Ch 3, dc in first st, [FPDC around post below, dc, FPDC around post below, dc] 12 times, dc in t-ch. Turn. (52 sts)
Row 8 (WS): Ch 3, dc in first st, [BPDC around FPDC below, dc, BPDC around FPDC below, dc] 12 times, dc in t-ch. Turn. (52 sts)
Rows 3 through 8 are now established as the diamond lattice repeat. Continue working these 6 rows as the repeat for the remainder of the bodice, adjusting post stitch placement to align with existing raised lines.
Rows 9 through 14: Work diamond lattice repeat rows 3 through 8. (52 sts each row)
Rows 15 through 20: Work diamond lattice repeat rows 3 through 8. (52 sts each row)
Checkpoint: After Row 20, the front bodice panel should measure approximately 10 inches (25.5 cm) tall from foundation chain. Stitch count remains 52.
Keyhole Shaping (Rows 21 through 26)
The keyhole is centered on the front panel. It splits 8 stitches wide at center, approximately 2.5 inches (6.3 cm) wide, and is 3 rows tall before rejoining.
Row 21 (RS): Work in pattern across first 22 sts, ch 9 (bridge over keyhole opening), skip next 8 sts, work in pattern across rem 22 sts, dc in t-ch. Turn. (52 sts including the 9 ch bridge counted as 8 working sts plus 1 to close gap)
Note on keyhole: The 9 chains will be worked over on the return row as 8 dc to maintain stitch count symmetry. The gap creates the teardrop shape.
Row 22 (WS): Work in pattern across first 22 sts, work 8 dc across the 9 ch bridge, work in pattern across rem 22 sts, dc in t-ch. Turn. (52 sts)
Row 23 (RS): Work diamond lattice row 5 across all 52 sts. Turn. (52 sts)
Rows 24 through 26: Continue diamond lattice pattern. (52 sts each row)
Halter Neck Shaping (Rows 27 through 40)
The halter narrows toward the neck ties. Decrease 2 stitches each RS row at each side edge (1 decrease per edge per decrease row).
Row 27 (RS): Ch 3, dc2tog over first 2 sts, work diamond lattice across to last 3 sts, dc2tog, dc in t-ch. Turn. (50 sts)
Row 28 (WS): Work diamond lattice. Turn. (50 sts)
Row 29 (RS): Ch 3, dc2tog, work across to last 3 sts, dc2tog, dc in t-ch. Turn. (48 sts)
Row 30 (WS): Work diamond lattice. Turn. (48 sts)
Row 31 (RS): Ch 3, dc2tog, work across to last 3 sts, dc2tog, dc in t-ch. Turn. (46 sts)
Row 32 (WS): Work diamond lattice. Turn. (46 sts)
Row 33 (RS): Ch 3, dc2tog, work across to last 3 sts, dc2tog, dc in t-ch. Turn. (44 sts)
Row 34 (WS): Work diamond lattice. Turn. (44 sts)
Row 35 (RS): Ch 3, dc2tog, work across to last 3 sts, dc2tog, dc in t-ch. Turn. (42 sts)
Row 36 (WS): Work diamond lattice. Turn. (42 sts)
Row 37 (RS): Ch 3, dc2tog, work across to last 3 sts, dc2tog, dc in t-ch. Turn. (40 sts)
Row 38 (WS): Work diamond lattice. Turn. (40 sts)
Row 39 (RS): Ch 3, dc2tog, work across to last 3 sts, dc2tog, dc in t-ch. Turn. (38 sts)
Row 40 (WS): Work diamond lattice. Turn. (38 sts)
Fasten off, leaving a 12-inch tail for seaming.
Checkpoint: The front bodice panel at this point should measure approximately 20 inches (51 cm) tall. The top edge (Row 40) is 38 stitches wide (approximately 12.7 inches (32 cm)). This edge will attach to the collar band. The bottom edge (Row 1) is 52 stitches wide.
Section 2: Back Bodice Panels (Worked as Two Separate Flat Pieces)
The back is open at center. Each back panel is worked separately. Each panel is half the width of the front, minus the center back opening. Each panel: 24 stitches wide at base, tapering to 18 stitches at top.
Right Back Panel
Foundation Chain: Ch 26. (24 working stitches)
Row 1 (RS): Dc in 4th ch from hook and in each ch across. Turn. (24 dc)
Rows 2 through 20: Work diamond lattice repeat maintaining 24 sts. Turn. (24 sts each row)
Checkpoint: Right back panel after Row 20 should measure approximately 10 inches (25.5 cm) tall.
Rows 21 through 26: Work in diamond lattice with no shaping. (24 sts each row)
Halter Shaping for Right Back
Decrease 1 stitch at the center-back edge (right edge on RS) every RS row.
Row 27 (RS): Work in pattern to last 3 sts, dc2tog, dc in t-ch. Turn. (23 sts)
Row 28 (WS): Work in pattern. Turn. (23 sts)
Row 29 (RS): Work in pattern to last 3 sts, dc2tog, dc in t-ch. Turn. (22 sts)
Row 30 (WS): Work in pattern. Turn. (22 sts)
Row 31 (RS): Work in pattern to last 3 sts, dc2tog, dc in t-ch. Turn. (21 sts)
Row 32 (WS): Work in pattern. Turn. (21 sts)
Row 33 (RS): Work in pattern to last 3 sts, dc2tog, dc in t-ch. Turn. (20 sts)
Row 34 (WS): Work in pattern. Turn. (20 sts)
Row 35 (RS): Work in pattern to last 3 sts, dc2tog, dc in t-ch. Turn. (19 sts)
Row 36 (WS): Work in pattern. Turn. (19 sts)
Row 37 (RS): Work in pattern to last 3 sts, dc2tog, dc in t-ch. Turn. (18 sts)
Row 38 (WS): Work in pattern. Turn. (18 sts)
Rows 39 through 40: Work in pattern without shaping. (18 sts each row)
Fasten off leaving 12-inch tail.
Left Back Panel
Work as right back panel with a mirror image: decrease occurs at the left center-back edge by working ch 3, dc2tog at beginning of each RS decrease row instead of end.
Foundation Chain: Ch 26. (24 dc)
Rows 1 through 26: Work as right back panel rows 1 through 26. (24 sts each row)
Row 27 (RS): Ch 3, dc2tog over next 2 sts, work in pattern across. Turn. (23 sts)
Row 28 (WS): Work in pattern. Turn. (23 sts)
Row 29 (RS): Ch 3, dc2tog, work in pattern across. Turn. (22 sts)
Row 30 (WS): Work in pattern. Turn. (22 sts)
Row 31 (RS): Ch 3, dc2tog, work in pattern across. Turn. (21 sts)
Row 32 (WS): Work in pattern. Turn. (21 sts)
Row 33 (RS): Ch 3, dc2tog, work in pattern across. Turn. (20 sts)
Row 34 (WS): Work in pattern. Turn. (20 sts)
Row 35 (RS): Ch 3, dc2tog, work in pattern across. Turn. (19 sts)
Row 36 (WS): Work in pattern. Turn. (19 sts)
Row 37 (RS): Ch 3, dc2tog, work in pattern across. Turn. (18 sts)
Row 38 (WS): Work in pattern. Turn. (18 sts)
Rows 39 through 40: Work in pattern. (18 sts each row)
Fasten off leaving 12-inch tail.
Checkpoint: Each back panel top edge is 18 sts wide (approximately 6 inches (15 cm)). Combined back top edges total 36 sts, matching the front top of 38 sts with 2 sts difference accommodated in seaming. Combined back base edges total 48 sts.
Section 3: Seaming the Bodice
Lay pieces with RS facing. Using mattress stitch or sl st seam on WS, join front bodice to right back panel at right side seam (foundation chain edge to foundation chain edge, Row 1 through Row 40). Repeat for left side seam.
After seaming, total stitch count at base of bodice: front 52 + back total 48 = 100 stitches around the circumference.
Total stitch count at top of bodice (halter neck): front 38 + back 36 = 74 stitches, which tapers correctly toward the halter straps.
The side seams should be invisible when viewed from front. Press seams lightly with steam if using wool or wool blend.
Section 4: Waistband
The waistband is worked in the round, picking up stitches along the bottom edge of the joined bodice. With RS facing and US J hook, join yarn at right side seam.
Setup Round: Sc evenly around bottom edge of bodice picking up 100 sts total (52 across front, 48 across back). Pm at beginning of round and at each side seam point. Join with sl st. Do not turn. (100 sc)
The waistband uses alternating FPDC and BPDC worked in the round. A 4-stitch rib repeat divides evenly into 100.
Waistband Round 1: Ch 3 (counts as dc), [FPDC around next sc post, BPDC around next sc post, FPDC around next sc post, dc in next sc] 24 times, FPDC around next sc, BPDC around next sc, FPDC around next sc. Join with sl st to top of beg ch-3. (100 sts)
Waistband Rounds 2 through 10: Ch 3, work FPDC over FPDC and BPDC over BPDC as established around. Join with sl st. (100 sts each round)
The waistband should measure approximately 3.5 inches (9 cm) tall when complete (10 rounds at waistband gauge of roughly 3 rounds per inch).
Do not fasten off. Continue to skirt.
Checkpoint: After the waistband, the piece should measure approximately 13.5 inches (34 cm) from top of bodice to bottom of waistband. Circumference at waistband is 100 stitches, which at gauge of 12 sts per 4 inches equals 33.3 inches (84.6 cm). This matches a 26-inch waist with ease added for the ribbing stretch. The ribbing pulls in significantly. This count produces approximately 26 to 28 inches (66 to 71 cm) at natural waist when worn.
Section 5: Skirt Body (Worked in the Round)
Switch to US K hook. The skirt is worked in continuous rounds in diamond lattice pattern. Begin at the waistband bottom edge.
The skirt begins at 100 stitches (waist) and increases gradually to 120 stitches at the hip over 12 rounds (approximately 6 inches (15 cm)), then maintains 120 stitches until the mermaid flare begins.
Waist to Hip Shaping
Round 1: Ch 3, work diamond lattice round (work post stitches around posts 2 rounds below using FPDC and BPDC as established) with 5 evenly spaced increases: [work 18 sts in pattern, 2 dc in next st] 5 times. Join. (105 sts)
Round 2: Ch 3, work in diamond lattice pattern around. Join. (105 sts)
Round 3: [Work 20 sts in pattern, 2 dc in next st] 5 times. Join. (110 sts)
Round 4: Work in diamond lattice pattern around. Join. (110 sts)
Round 5: [Work 21 sts in pattern, 2 dc in next st] 5 times. Join. (115 sts)
Round 6: Work in diamond lattice pattern around. Join. (115 sts)
Round 7: [Work 22 sts in pattern, 2 dc in next st] 5 times. Join. (120 sts)
Rounds 8 through 12: Work in diamond lattice pattern without increases. Join at end of each round. (120 sts each round)
Checkpoint: After Round 12 of skirt, the circumference is 120 sts. At 12 sts per 4 inches this equals 40 inches (101.6 cm). This is the hip circumference (36 inches plus standard ease). The skirt at this point measures approximately 4 inches (10 cm) below the waistband.
Straight Skirt Section
Continue working diamond lattice pattern in the round without shaping from Round 13 through Round 48 (36 additional rounds, approximately 18 inches (45.7 cm)).
Rounds 13 through 48: Work in diamond lattice pattern. Join at end of each round. (120 sts each round)
Checkpoint: After Round 48, the total skirt height below waistband is approximately 22 inches (56 cm). Total garment height from collar top to bottom of current skirt is approximately 38 inches (96.5 cm). The remaining 24 inches (61 cm) will accommodate the mermaid flare and train.
Front Slit Shaping
At Round 49, begin working the front center slit. The slit runs along center front from this point to the hem. From Round 49 onward, the skirt is worked in rows (flat) rather than rounds, with the slit as an open edge at center front.
Turn work to RS facing. Locate center front marked with stitch marker.
Row 49 (begins flat): Join yarn 2 sts left of center front marker with RS facing. Ch 3, work in diamond lattice pattern across to 2 sts right of center front marker. Turn. This leaves 4 sts total at center front unworked (2 on each side of center), creating the slit gap. Work continues on remaining 116 sts.
Rows 49 through 84 (36 rows, approximately 18 inches (45.7 cm)): Work diamond lattice in rows across 116 sts (the total 120 sts minus 4 edge sts that form the slit opening, 2 per side). Turn at end of each row. (116 sts each row)
The slit edges (2 sts on each side) receive a single crochet edge finish at end.
Section 6: Mermaid Flare
The mermaid flare begins at Row 85 of the skirt (equivalent to approximately 40 inches (101.6 cm) below waistband). Rapid stitch increases over 12 rows produce the sweeping train.
Row 85: Work in pattern, increasing 12 sts evenly (approximately every 9th and 10th st alternating). Work [8 sts in pattern, 2 dc in next st] 12 times, work rem 8 sts. Turn. (128 sts)
Row 86: Work in diamond lattice pattern. Turn. (128 sts)
Row 87: Work in pattern, increasing 12 sts evenly. [9 sts in pattern, 2 dc in next st] 12 times, work rem 8 sts. Turn. (140 sts)
Row 88: Work in diamond lattice pattern. Turn. (140 sts)
Row 89: Work in pattern, increasing 16 sts evenly. [7 sts in pattern, 2 dc in next st] 16 times, work rem 12 sts. Turn. (156 sts)
Row 90: Work in diamond lattice pattern. Turn. (156 sts)
Row 91: Work in pattern, increasing 16 sts evenly. [8 sts in pattern, 2 dc in next st] 16 times, work rem 4 sts. Turn. (172 sts)
Row 92: Work in diamond lattice pattern. Turn. (172 sts)
Row 93: Work in pattern, increasing 20 sts evenly. [7 sts in pattern, 2 dc in next st] 20 times, work rem 12 sts. Turn. (192 sts)
Row 94:
