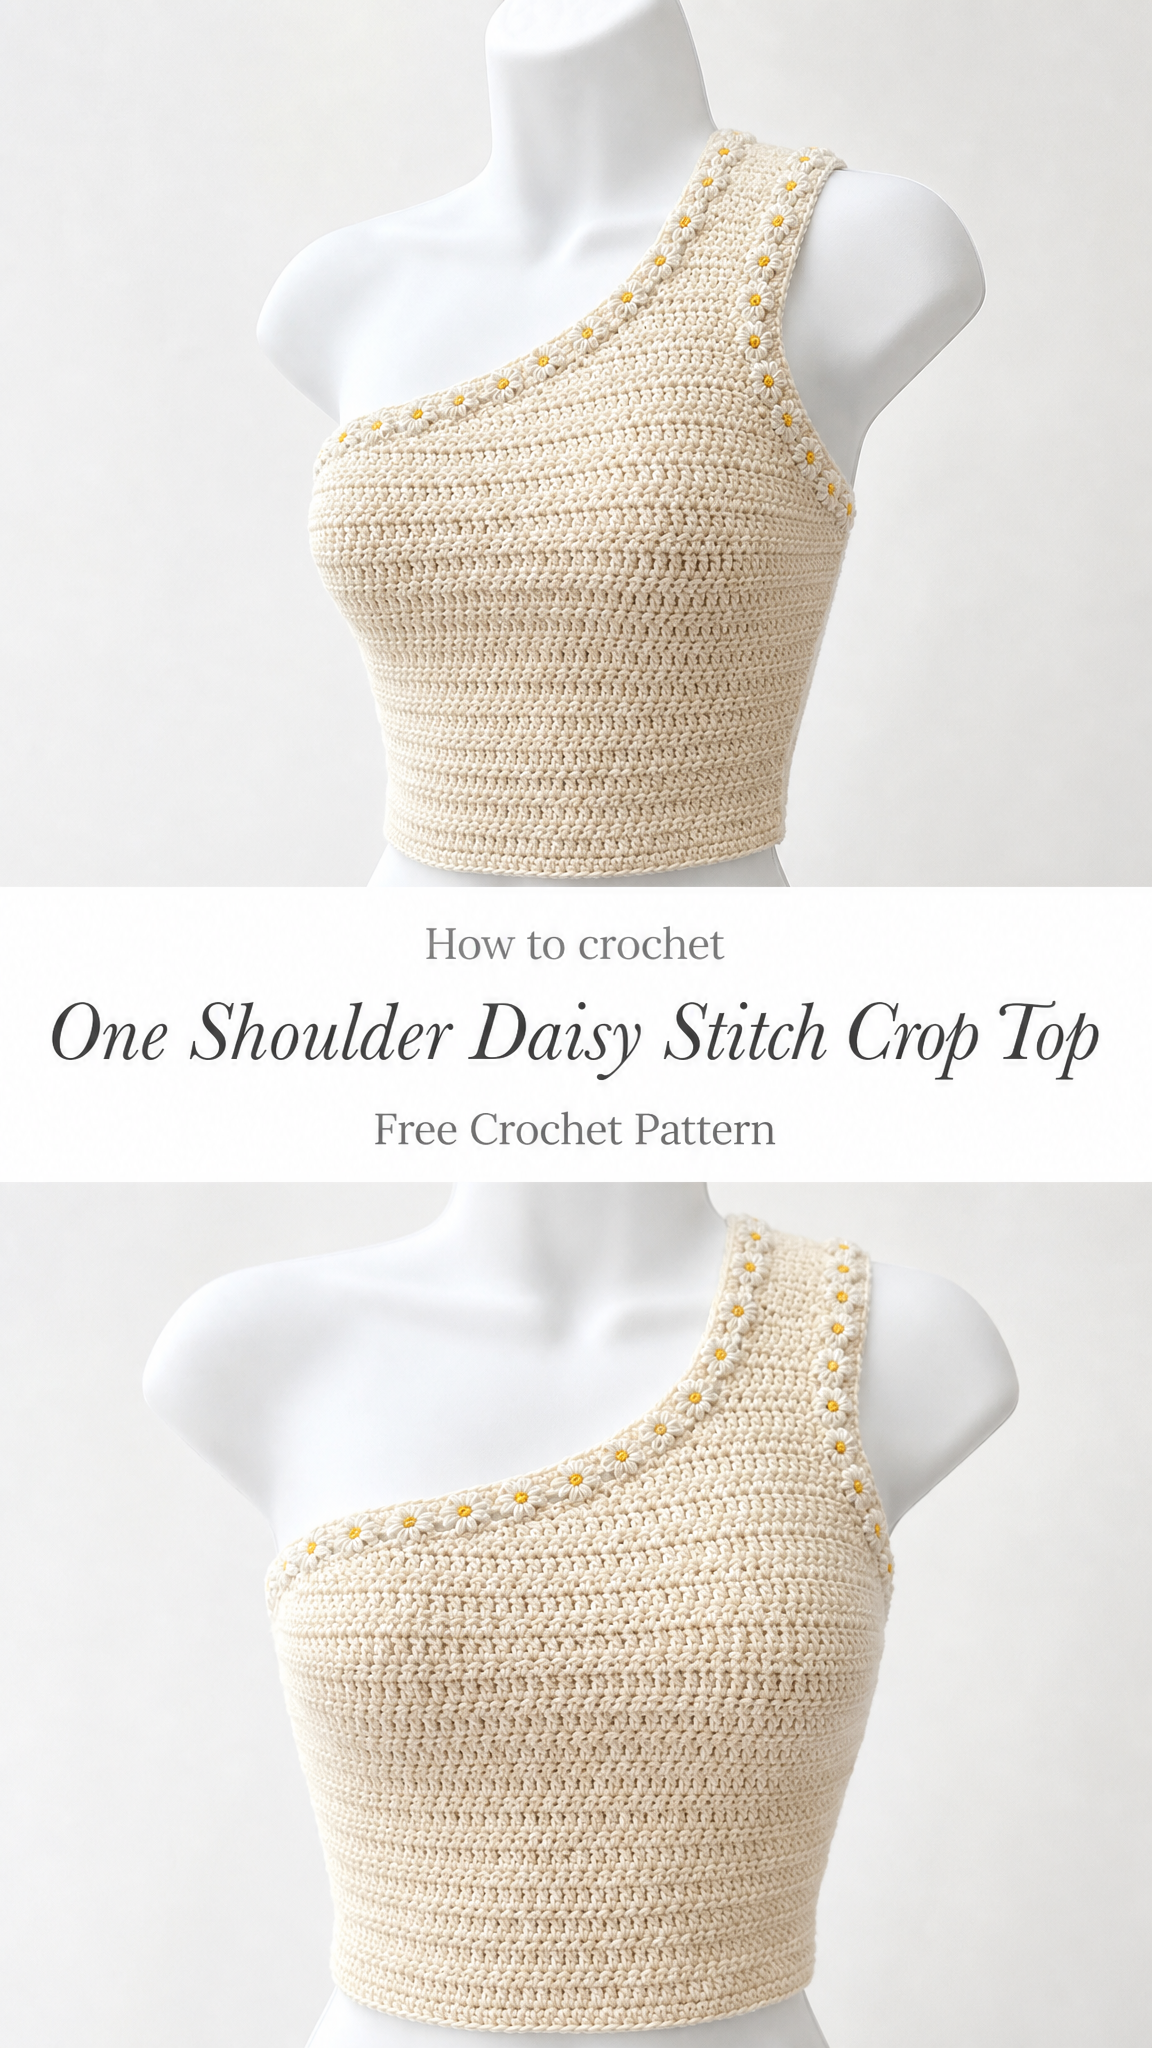
I’ve been looking for the perfect summer crochet top for months now, and this one shoulder daisy crop top is my absolute favourite design to date. The asymmetrical neckline gives it that modern edge I love, while those sweet little daisy appliqués add a touch of whimsy that just makes me smile. This is the kind of pattern that looks incredibly impressive but comes together more easily than you might think.
Why You’ll Love This Crochet Crop Top Pattern
This one shoulder crop top hits all the right notes for summer crocheting. The body uses simple stitches worked in rows, creating that gorgeous horizontal texture you see in the photos. Then you add those adorable daisy flowers along the neckline and shoulder strap for a finishing touch that elevates the whole piece.
The fitted silhouette flatters so many body types, and the asymmetrical design means you get to show off one shoulder while staying comfortable all day long. I designed this with warm weather in mind, so the yarn choice and stitch density keep it breathable and lightweight.
Skill level: Intermediate. You should be comfortable with basic stitches and shaping. The daisy appliqués require working in the round, but I’ll walk you through every step.
Materials Needed for Your Daisy Crop Top
Getting your supplies ready before you start makes the whole process smoother. Here’s everything you’ll need for this crochet crop top pattern.
Yarn:
I recommend 100% cotton or a cotton blend for this project. Cotton has beautiful stitch definition, keeps its shape well, and feels amazing against your skin in warm weather. Mercerized cotton gives an especially polished finish.
Hook:
Notions:
Gauge Information
Gauge matters for garments, so please take a few minutes to check yours before diving in.
Gauge: 18 stitches and 20 rows = 4 inches (10cm) in single crochet using 4.0mm hook
To check your gauge, chain 22 and work 24 rows of single crochet. Block lightly and measure the centre 4 inches. If you have more stitches per inch, go up a hook size. Fewer stitches? Go down a hook size.
Size Guide
This pattern includes instructions for sizes XS through XL. Choose your size based on your bust measurement.
| Size | Bust Circumference | Finished Length |
|---|---|---|
| XS | 28 to 30 inches | 12 inches |
| S | 32 to 34 inches | 13 inches |
| M | 36 to 38 inches | 14 inches |
| L | 40 to 42 inches | 15 inches |
| XL | 44 to 46 inches | 16 inches |
The pattern is written for size Small with other sizes in parentheses: XS (S, M, L, XL).
Abbreviations and Stitch Definitions
Let me break down every stitch you’ll use in this crochet tutorial. Even if you know these stitches well, it helps to be on the same page.
Ch = Chain. Wrap yarn over hook and pull through the loop on your hook. This creates one chain stitch.
Sl st = Slip stitch. Insert hook, yarn over, pull through both the stitch and the loop on your hook in one motion. Used for joining and moving across stitches invisibly.
Sc = Single crochet. Insert hook into stitch, yarn over and pull up a loop (2 loops on hook), yarn over and pull through both loops.
Hdc = Half double crochet. Yarn over, insert hook into stitch, yarn over and pull up a loop (3 loops on hook), yarn over and pull through all 3 loops.
Dc = Double crochet. Yarn over, insert hook into stitch, yarn over and pull up a loop (3 loops on hook), yarn over and pull through 2 loops, yarn over and pull through remaining 2 loops.
Sc2tog = Single crochet two together (decrease). Insert hook into first stitch, yarn over and pull up a loop, insert hook into next stitch, yarn over and pull up a loop (3 loops on hook), yarn over and pull through all 3 loops. This turns 2 stitches into 1.
BLO = Back loop only. Work into only the back loop of the stitch instead of both loops. This creates the ribbed texture visible in the top.
Step by Step Crochet Pattern Instructions
Now let’s get into the actual pattern. Take a deep breath. We’ll work through this together, one section at a time.
Front Panel
The front panel is worked flat in rows from the bottom up. That beautiful horizontal ridged texture comes from working in the back loop only.
Foundation:
Ch 65 (61, 65, 73, 81, 89).
Row 1: Sc in 2nd ch from hook and in each ch across. Turn. *64 (60, 64, 72, 80, 88) sts*
Row 2: Ch 1 (does not count as stitch here and throughout), sc in BLO of each st across. Turn. *64 (60, 64, 72, 80, 88) sts*
Rows 3 to 40 (36, 40, 44, 50, 56): Repeat Row 2.
At this point, your panel should measure approximately 8 (7, 8, 8.5, 10, 11) inches from the bottom edge. Time to shape that beautiful neckline.
Armhole and Neckline Shaping
This is where the magic happens. We’ll shape the right side first (this becomes the shoulder strap side), then the left side separately.
Right Side Shaping (Shoulder Strap Side):
Row 41 (37, 41, 45, 51, 57): Ch 1, sc in BLO across first 32 (30, 32, 36, 40, 44) sts. Turn, leaving remaining sts unworked. *32 (30, 32, 36, 40, 44) sts*
Row 42: Ch 1, sc2tog over first 2 sts, sc in BLO across. Turn. *31 (29, 31, 35, 39, 43) sts*
Row 43: Ch 1, sc in BLO to last 2 sts, sc2tog. Turn. *30 (28, 30, 34, 38, 42) sts*
Rows 44 to 53 (42 to 49, 44 to 53, 48 to 59, 54 to 67, 60 to 75): Continue alternating decrease rows, decreasing 1 st at neckline edge every row. *20 (20, 20, 23, 25, 26) sts remaining*
Shoulder Strap Rows:
Continue working even (no decreases) for 8 (8, 10, 10, 12, 12) more rows on these 20 (20, 20, 23, 25, 26) stitches.
Fasten off and weave in ends.
Left Side Shaping:
Return to the unworked stitches from Row 41. With right side facing, skip the centre 0 (0, 0, 0, 0, 0) stitches and join yarn to work the remaining 32 (30, 32, 36, 40, 44) stitches.
Row 41: Ch 1, sc in BLO across. Turn. *32 (30, 32, 36, 40, 44) sts*
Row 42: Ch 1, sc in BLO to last 2 sts, sc2tog. Turn. *31 (29, 31, 35, 39, 43) sts*
Row 43: Ch 1, sc2tog, sc in BLO across. Turn. *30 (28, 30, 34, 38, 42) sts*
Continue decreasing at the armhole edge every row until you have 12 (12, 12, 14, 16, 18) stitches remaining.
Work 4 more rows even. Fasten off.
Back Panel
The back panel is simpler because we don’t have the dramatic neckline curve.
Foundation:
Ch 65 (61, 65, 73, 81, 89).
Rows 1 to 40 (36, 40, 44, 50, 56): Work same as front panel Rows 1 to 40.
Right Side (Shoulder Strap Side):
Row 41: Ch 1, sc in BLO across first 32 (30, 32, 36, 40, 44) sts. Turn. *32 (30, 32, 36, 40, 44) sts*
Rows 42 to 49: Decrease 1 st at armhole edge (inner edge) every row. *24 (22, 24, 28, 32, 36) sts*
Continue working even until piece measures same length as front shoulder strap section. Fasten off.
Left Side:
Work to match left side of front panel, decreasing at armhole edge.
Side Seaming and Assembly
Block both panels lightly before seaming. This makes everything easier to work with.
1. Place front and back panels with right sides together.
2. Using yarn needle and matching yarn, whip stitch or mattress stitch the side seams from bottom edge up to the armhole shaping.
3. Seam the shoulder strap, matching the top edges of front and back.
4. Try on the top to check fit before weaving in all ends.
Edging
A simple single crochet edging cleans up all the raw edges beautifully.
Neckline and Armhole Edging:
Join yarn at side seam. Ch 1, sc evenly around the entire neckline opening, working approximately 3 sc for every 4 row edges. Join with sl st to first sc. Fasten off.
Repeat for armhole opening.
Bottom Edging:
Join yarn at side seam. Ch 1, sc in each st around bottom edge. Join with sl st. Fasten off.
How to Make the Daisy Appliqués
These sweet little daisies are what make this top truly special. They’re worked separately and then sewn on. You’ll need approximately 12 to 18 daisies depending on your size.
Daisy Centre (make in yellow):
Using smaller hook and yellow yarn:
Round 1: Make a magic ring. Ch 1, 6 sc into ring. Pull ring closed. Join with sl st to first sc. *6 sts*
Do not fasten off. Switch to white yarn.
Daisy Petals (continue in white):
Round 2: *Ch 3, sl st in 2nd ch from hook, sc in next ch, sl st in same sc as joining.* Repeat from * to * in each of the 6 sc around. *6 petals*
Fasten off, leaving a 6 inch tail for sewing.
Each daisy should measure approximately 1 inch across. Make a test daisy first to check your tension. If they’re too loose, try a smaller hook.
Attaching the Daisies
Lay your finished top flat. Arrange daisies along the neckline edge and down the shoulder strap, spacing them evenly. I placed mine approximately 1.5 inches apart, with the petals just overlapping the edge of the fabric.
Pin each daisy in place and step back to check the arrangement. Adjust as needed.
Using the yarn tail and your yarn needle, sew each daisy securely to the top. Stitch through the centre a few times, then tack down 2 or 3 petals to keep them lying flat. Weave in ends on the wrong side.
Tips for Success
Tension matters: Keep your tension consistent throughout. The back loop only technique can cause some crocheters to work tighter than usual. Relax your hands and let the stitches flow.
Try it on as you go: After completing the body section, hold the piece up to yourself to check the length before starting the shaping. Add or subtract rows as needed.
Cotton yarn behaviour: Cotton doesn’t have the same stretch as acrylic or wool. Choose a size with 1 to 2 inches of ease for comfortable wear.
Blocking: Steam blocking or wet blocking your finished top gives it a polished, professional look. This is especially important for cotton yarn.
Customization Ideas
This one shoulder crop top pattern works beautifully as a base for your own creativity.
Colour variations: Try a bright colour for the body with white daisies, or go bold with multicoloured flower centres. Black with white daisies looks incredibly chic.
Different flowers: Swap the daisies for tiny roses, sunflowers, or simple button flowers.
Length adjustments: Add more rows before the shaping section for a longer crop top, or continue even further for a full tank top.
Ribbed hem: Work the first 6 rows in regular single crochet (both loops) before switching to BLO for added structure at the hem.
Caring for Your Finished Top
Cotton garments last beautifully when cared for properly.
Hand wash in cool water with a gentle detergent. Gently squeeze out excess water without wringing. Lay flat on a towel and reshape. Air dry completely before storing.
If you must machine wash, use a mesh laundry bag on the delicate cycle. Avoid the dryer, as heat can cause cotton to shrink.
Final Thoughts on This Crochet Crop Top Pattern
This one shoulder daisy crop top has quickly become one of my most loved summer makes. The construction is straightforward once you understand the shaping, and those little daisies add such a sweet, feminine touch without being fussy.
Whether you’re heading to a music festival, a summer brunch, or just enjoying a warm evening, this top pairs perfectly with high waisted jeans, flowy skirts, or your favourite shorts. The neutral cream colour goes with everything, but I’d love to see your colour combinations too.
I hope this step by step crochet tutorial gives you everything you need to create your own beautiful one shoulder crop top. The pattern looks complex at first glance, but breaking it down into manageable sections makes it completely doable for any crocheter comfortable with basic shaping.
Thank you so much for choosing this pattern for your next project. It truly means the world to me when you trust my designs with your precious time and yarn. If you make this top, please tag me on Instagram or share a photo in my Facebook group. I absolutely love seeing your finished projects and the creative spins you put on my patterns.
If you loved this pattern, I’d be so grateful if you saved it to your Pinterest boards so you can find it again later and so other crocheters can discover it too. And please drop a comment below if you make this top. I’d love to hear how it turned out and see your colour choices!
