
When I sat down to design this two-piece set, I had a clear vision in my mind. I wanted something that felt bohemian and romantic, something that could work for a beach vacation, a summer festival, or even a boho bride looking for that perfect rehearsal dinner outfit. The construction needed to be interesting enough to keep an advanced crocheter engaged, but the written instructions needed to be clear enough that someone stretching their skills could follow along.
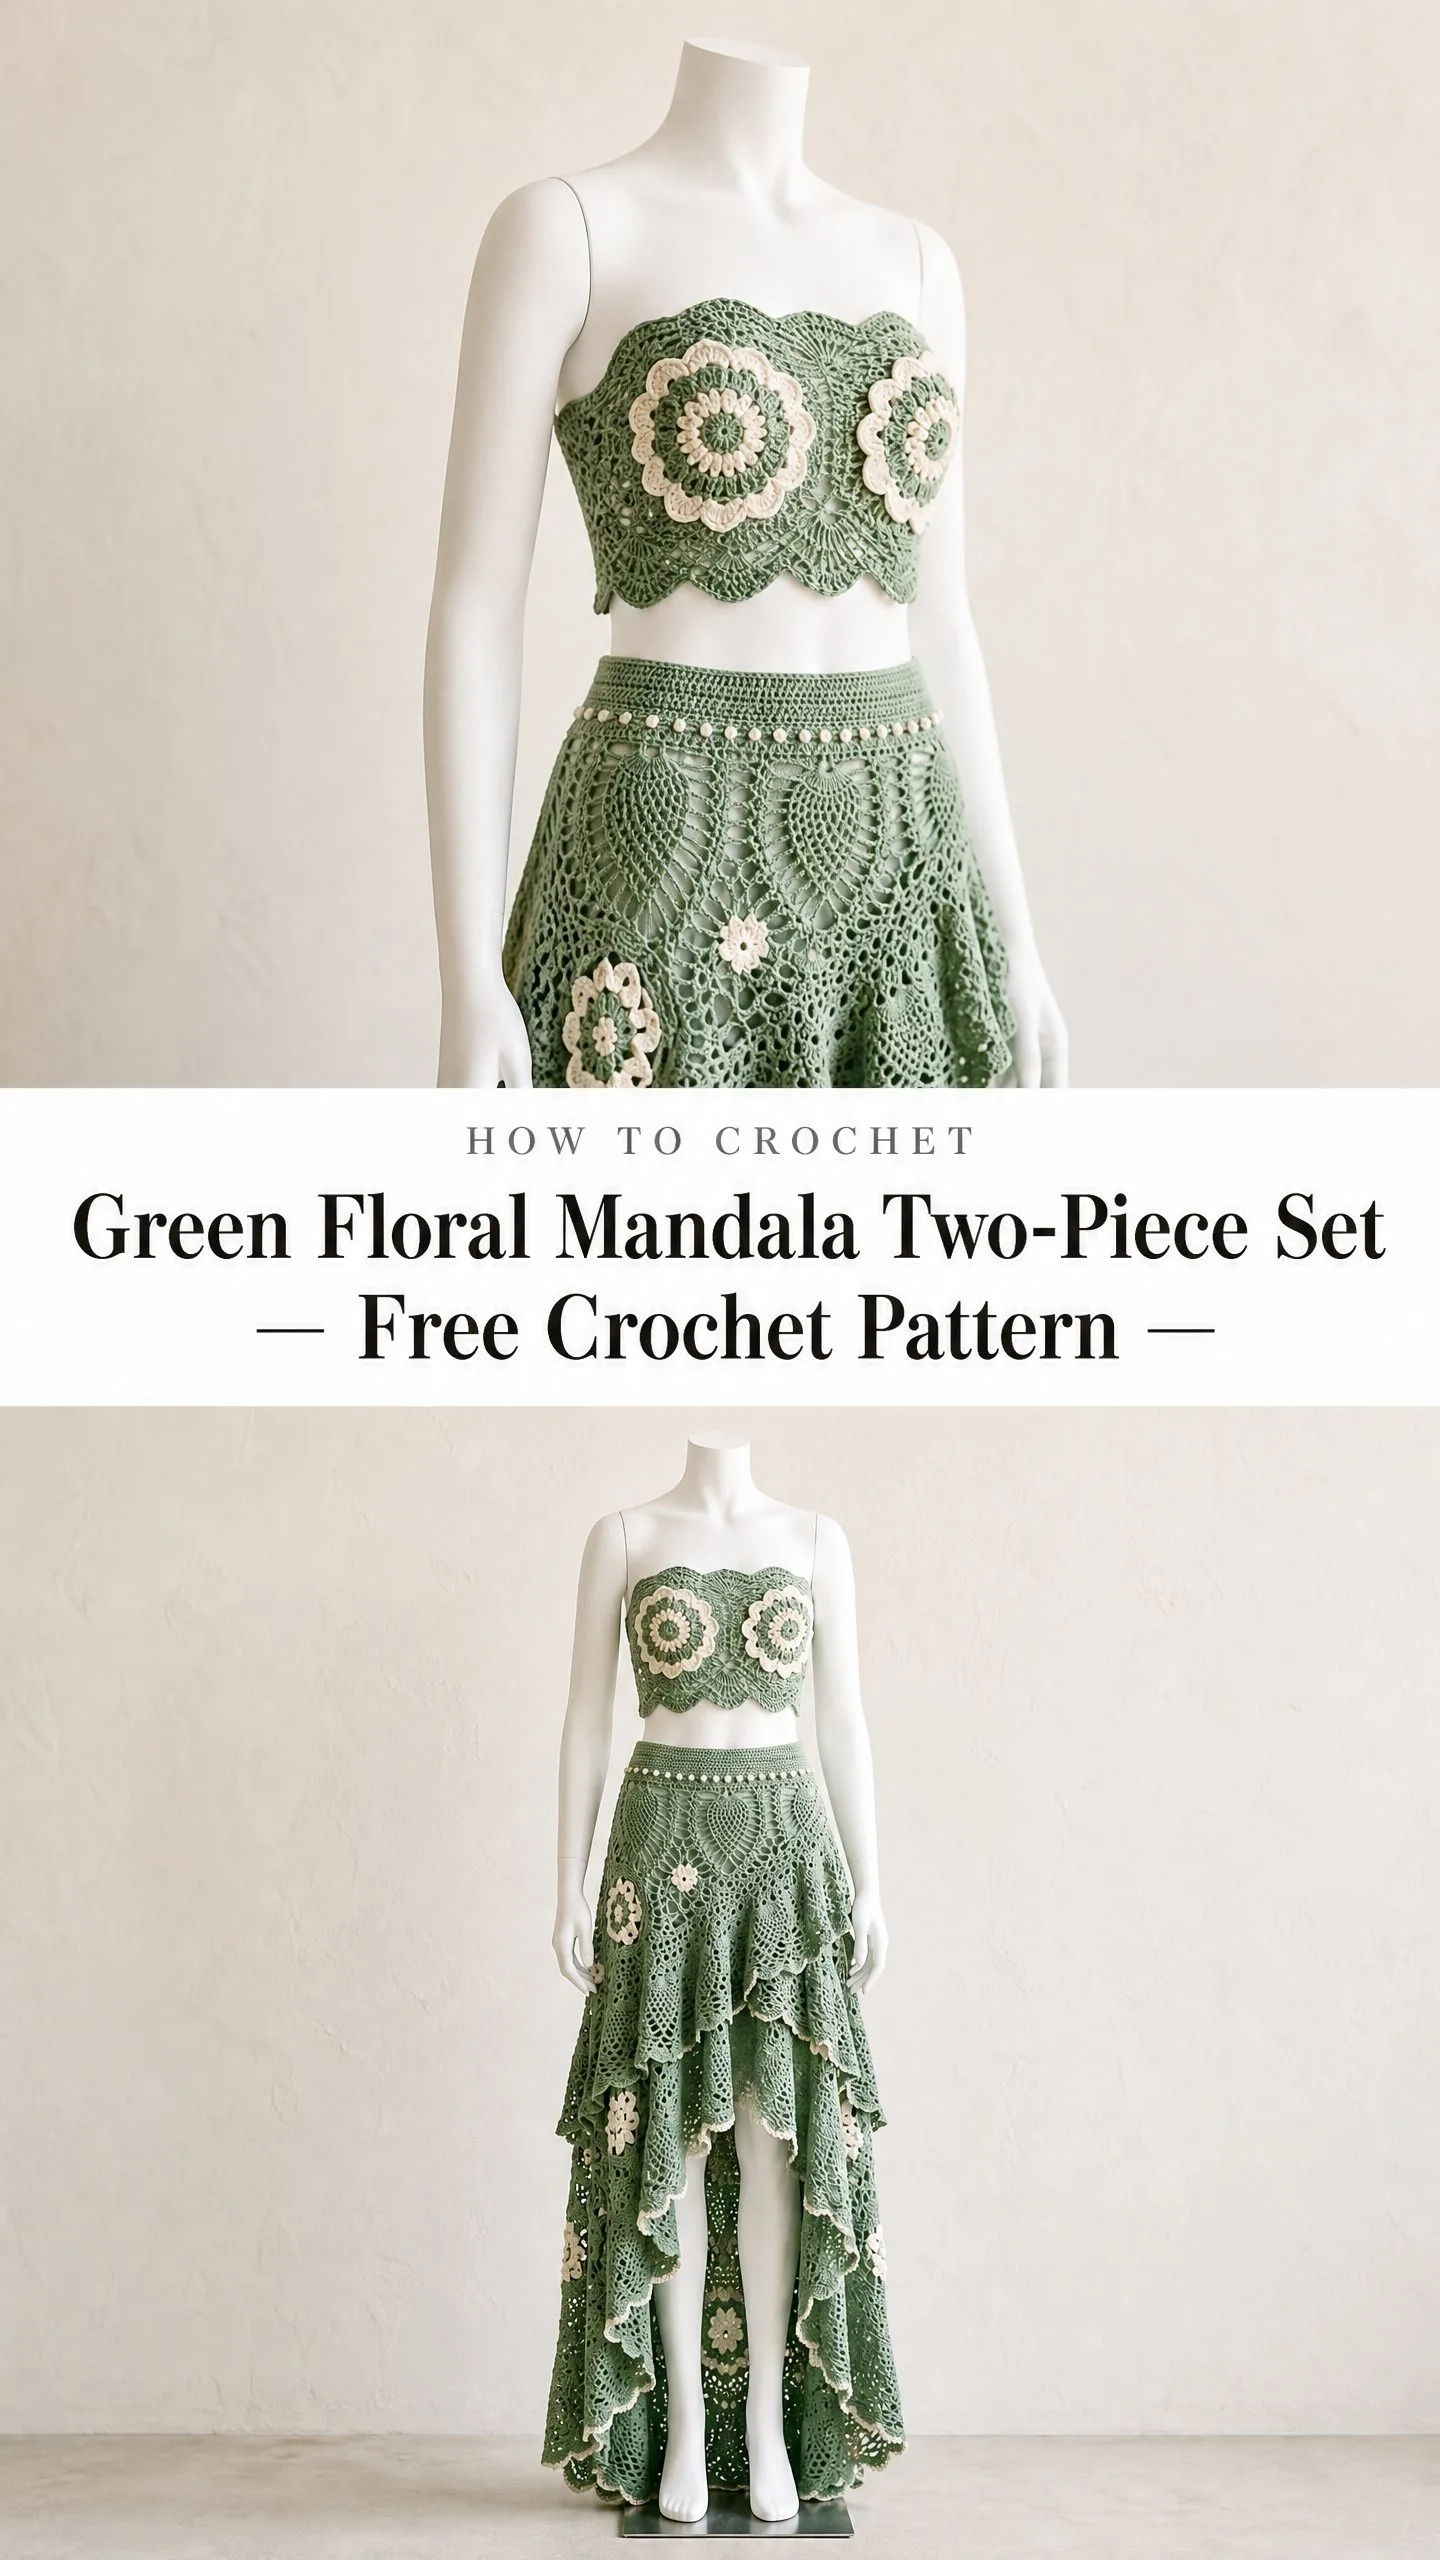
I chose sage green as the primary color because it photographs beautifully and flatters so many skin tones. The cream floral accents add that vintage, handcrafted feel I was chasing. The tiered high-low skirt was the design element I was most excited about, and honestly, I am SO pleased with how it turned out.
This is not a quick weekend project. This is the kind of pattern you work on over several weeks, savoring each completed section. But when you slip it on for the first time and see those pineapple lace tiers cascading down? Absolute magic.
About This Crochet Pattern
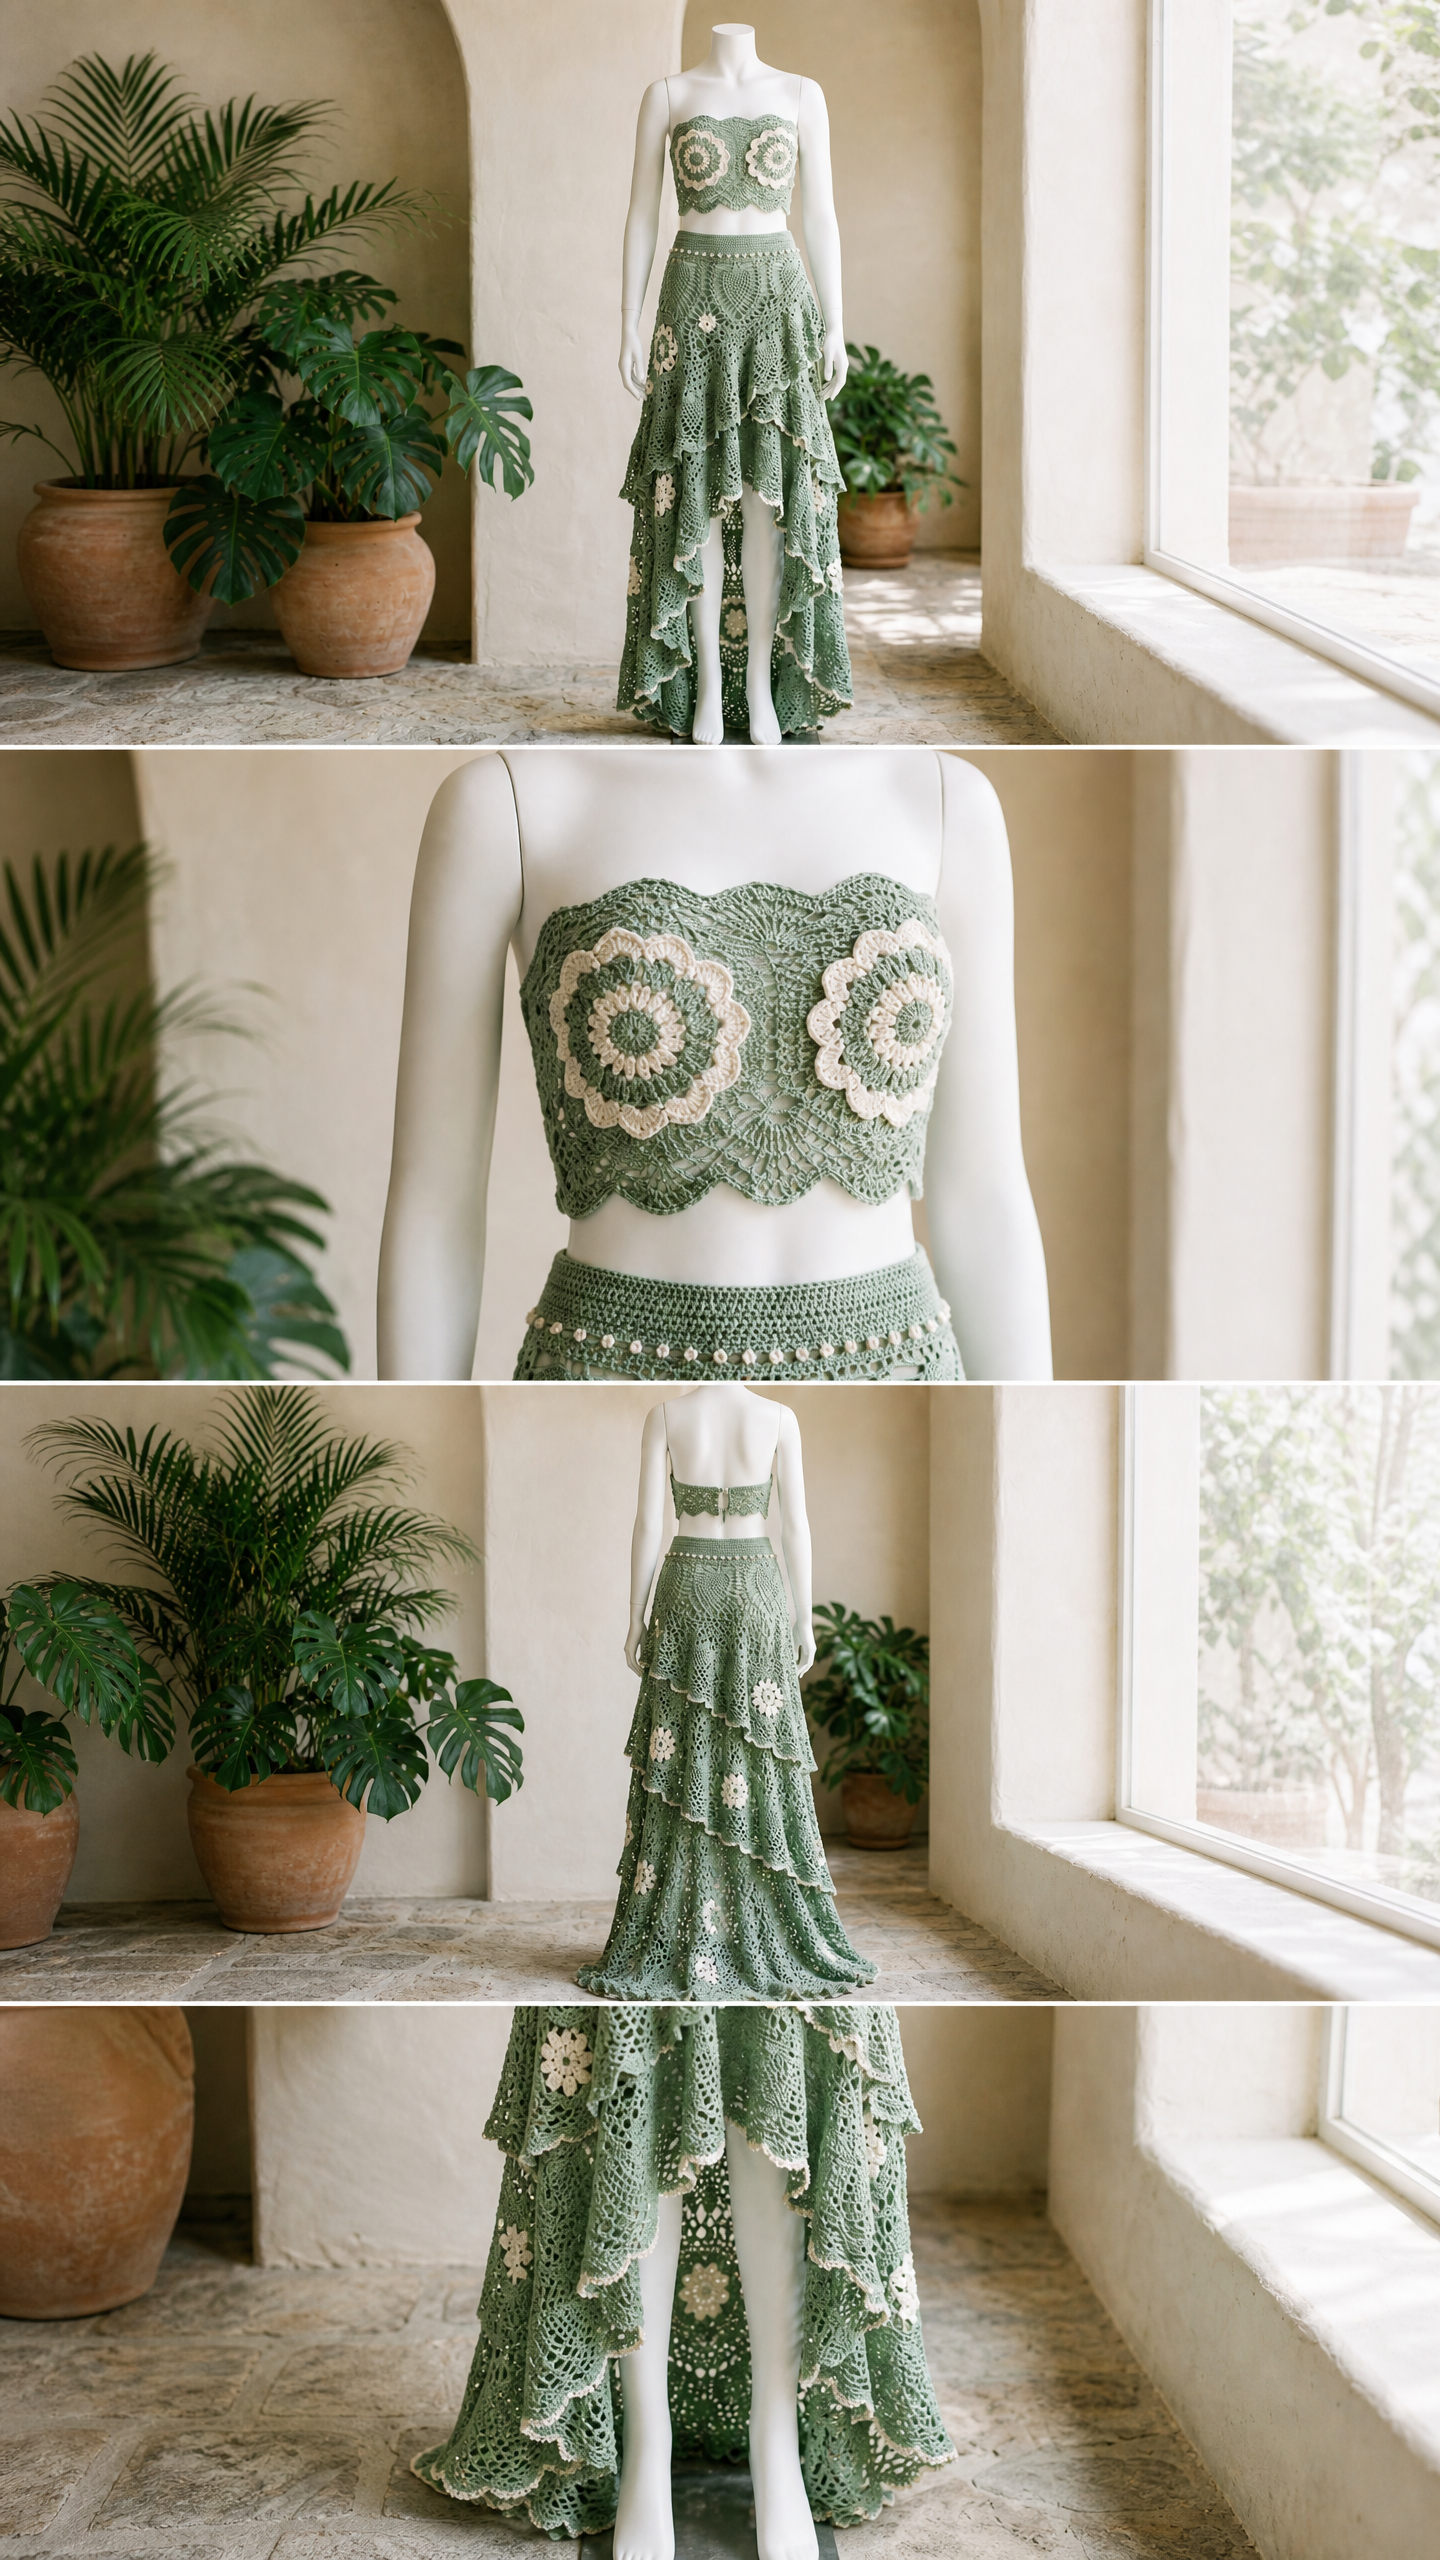
This stunning crochet two-piece set consists of a strapless bandeau top and a tiered maxi skirt with a dramatic high-low hemline. The top is constructed from two large floral mandala motifs joined at the center, finished with a scalloped border and a solid foundation band. The skirt features three cascading ruffle tiers worked in pineapple lace stitch patterns, with cream floral appliques scattered throughout for visual interest.
The overall aesthetic is bohemian, festival-ready, and bridal-adjacent. Picture yourself at a destination wedding, a music festival, or a tropical vacation. This set delivers serious statement piece energy while remaining surprisingly wearable.
Skill Level: Advanced. You will need confidence working in the round, joining motifs, reading lace patterns, constructing tiered ruffles, and managing high-low hem shaping. If you have never worked pineapple stitch clusters or picot edges before, I recommend practicing on a small swatch first.
Time Estimate: The top takes approximately 20 to 30 hours. The skirt requires 50 to 70 hours. Plan for 70 to 100 total hours depending on your experience level and working speed.
Finished Measurements
This pattern is written for a size Medium (US 8 to 10).
Bandeau Top:
Skirt:
Materials Needed
Yarn:
Recommended Yarn Options:
Choose a smooth, tightly twisted cotton or cotton-blend yarn. Avoid fuzzy or stretchy fibers as they will obscure the lace detail. Acrylic blends are not recommended because they will not block properly.
Hooks:
Additional Supplies:
Gauge
Gauge is mandatory for this fitted garment. Please take the time to check your gauge before beginning.
Motif gauge: One completed Floral Mandala Motif through Round 7 equals 7.5 inches (19 cm) in diameter after blocking, using Color A and US E-4 hook.
Stitch gauge: 18 stitches and 10 rows in double crochet equals 4 inches (10 cm), using Color A and US E-4 hook.
Waistband gauge: 20 single crochet and 20 rows equals 4 inches (10 cm), using Color A and US D-3 hook.
To check your motif gauge, complete one Floral Mandala Motif through Round 7 and block it flat. Measure across the widest diameter. Adjust your hook size up if the motif is too small, or down if it is too large.
Abbreviations and Special Stitches
Before we dive into the pattern, let me walk you through every abbreviation and special technique you will encounter.
Standard Abbreviations:
Special Stitches:
Picot-3: Chain 3, slip stitch into the first chain made. This creates a small decorative knot used on scalloped borders and motif edges.
Shell: Work 5 double crochet into the same stitch or space. This creates a fan-shaped group.
Pineapple Cluster (PC): Into the designated chain-4 space, work (yo, insert hook, pull up loop, yo, pull through 2 loops) 5 times so that 6 loops remain on hook, yo and pull through all 6 loops. This creates a closed puff-like cluster.
Beginning Pineapple Cluster (beg-PC): Chain 4 (counts as first leg), then into the same chain-4 space work (yo, insert hook, pull up loop, yo, pull through 2 loops) 4 times so that 5 loops remain on hook, yo and pull through all 5 loops.
V-stitch (V-st): Work (dc, ch 2, dc) into the same stitch or space.
Fan Stitch: Work (dc, ch 1, dc, ch 1, dc, ch 1, dc, ch 1, dc) into the same stitch or space.
Invisible Join: Cut yarn leaving a 6-inch tail. Thread onto yarn needle. Insert needle under both loops of the first real stitch of the round. Then insert needle back down through both loops of the last stitch of the round. Pull snug to simulate a stitch.
Pattern Notes Before You Begin
1. The bandeau top is constructed from two Floral Mandala Motifs worked in the round, joined side by side, with a scalloped border around the top and sides and a solid foundation band along the bottom edge.
2. The skirt is worked in the round from the waistband down. The waistband is a firm single crochet tube, and the skirt body features three tiered layers that hang freely.
3. Color A is the primary yarn throughout. Color B is used for the centers of the Floral Mandala Motifs (Rounds 1 to 3) and for applique flower accents.
4. All rounds are worked with RS facing unless otherwise stated. Do not turn at the end of rounds unless specifically instructed.
5. Block all pieces before final assembly. Cotton yarn relaxes significantly with blocking, and the lace pattern will not be fully visible until blocked.
6. When blocking, pin the scalloped edges gently to maintain their wave. Do not stretch them flat.
7. For the optional bead trim, pre-string beads onto a length of Color A before beginning the bead row.
Floral Mandala Motif Instructions
Make 2 motifs for the top. Make 12 motifs for skirt appliques.
The motif is worked in the round from a magic ring. Rounds 1 through 3 are worked in Color B. Rounds 4 through 7 are worked in Color A.
Round 1: Using Color B and E-4 hook, make a magic ring. Ch 3 (counts as dc), work 11 dc into ring, join to top of beg ch-3. Pull ring tail tight. (12 dc)
Round 2: Ch 1 (does not count as stitch), sc in same st, ch 3, skip 1 st, (sc in next st, ch 3, skip 1 st) 5 times, join to first sc. (6 sc, 6 ch-3 spaces)
Round 3: Sl st into first ch-3 sp, ch 1, (sc, hdc, 3 dc, hdc, sc) in same ch-3 sp, (sc, hdc, 3 dc, hdc, sc) in each remaining ch-3 sp around, join to first sc. (6 petals; 42 total stitches)
Round 4: Fasten off Color B. Join Color A with standing sc in the back loop of the center dc of any petal. Working in BLO throughout this round: ch 4, (sc in BLO of center dc of next petal, ch 4) 5 times, join to first sc. (6 sc, 6 ch-4 spaces)
Round 5: Sl st into first ch-4 sp, ch 3 (counts as dc), 4 dc in same sp, ch 2, (5 dc in next ch-4 sp, ch 2) 5 times, join to top of beg ch-3. (6 shells of 5 dc; 30 dc, 6 ch-2 spaces)
Round 6: Sl st to center dc of first shell, ch 1, sc in same st, ch 5, sc in ch-2 sp, ch 5, (sc in center dc of next shell, ch 5, sc in ch-2 sp, ch 5) 5 times, join to first sc. (12 sc, 12 ch-5 spaces)
Round 7: Sl st into first ch-5 sp, ch 3 (counts as dc), 6 dc in same sp, ch 1, (7 dc in next ch-5 sp, ch 1) 11 times, join to top of beg ch-3. Fasten off Color A, leaving a 12-inch tail for joining top motifs. (12 groups of 7 dc; 84 dc, 12 ch-1 spaces)
Block before joining. Blocked diameter should be 7.5 inches (19 cm).
Bandeau Top Construction
Joining the Two Motifs
Lay the two blocked motifs side by side with RS facing up. The joining seam runs vertically through the center of the top.
Identify one group of 7 dc on each motif that will face inward toward the join. Place motifs so that the two center groups on the inner edges are aligned.
Holding RS together, use Color A and E-4 hook to slip stitch through both layers: sl st through the center dc of the inner group of one motif and the corresponding center dc of the adjacent motif simultaneously. Continue sl st through paired stitches along the adjacent ch-1 sp, then the neighboring half-groups. This creates a joined seam of approximately 7 stitches. Fasten off and weave in ends.
Top Border (Scalloped Upper Edge and Sides)
This border is worked around the outer perimeter of the joined motif pair, beginning at the upper right outer edge. The lower edge is left open for the foundation band.
Join Color A with sl st in the rightmost ch-1 space at the upper right of the right motif.
Border Round 1: For each ch-1 space along upper and side edges, work (sc in ch-1 sp, ch 3, sc in same ch-1 sp, sk 3 dc, sc in next dc, ch 3, sc in same dc, sk 3 dc) across each 7-dc group and ch-1 sp unit.
At the outer top peak of each motif (the topmost ch-1 space), work (sc, ch 5, sc) into the ch-1 sp for a taller center peak scallop.
Fasten off at the left side lower edge after completing 20 scallop units.
Foundation Band
Using Color A and D-3 hook, join with sc in the lower right corner stitch of the right motif.
Row 1 (RS): Sc evenly across the lower edge of the joined motifs, working 1 sc per dc and 2 sc per ch-1 space across the bottom. Turn. (44 sc)
Row 2 (WS): Ch 1, sc in BLO of each sc across. Turn. (44 sc)
Rows 3 through 12: Repeat Row 2. (44 sc each row)
The foundation band should measure approximately 2 inches (5 cm) tall.
Band Edge Finish: Ch 1, turn work to work along the side edge. Sc evenly down the short right side edge (approximately 12 sc), then across the lower edge in sl st, then up the short left side edge (approximately 12 sc). Fasten off. Weave in ends.
Skirt Construction
Waistband
Using Color A and D-3 hook, ch 141.
Row 1 (RS): Sc in second ch from hook and in each ch across. Turn. (140 sc)
Rows 2 through 16: Ch 1, sc in BLO of each sc across. Turn. (140 sc each row)
The waistband strip should measure approximately 28 inches (71 cm) long and 3 inches (7.5 cm) wide.
Joining: Fold the strip with RS together, matching the starting chain edge to the final Row 16 edge. Sl st through both layers across all 140 stitches to join into a tube. Turn the tube RS out.
Optional Bead Row: With RS facing, join Color A at the upper edge of the waistband tube. Ch 1, (sc, slide 1 bead up snug to hook, sc) in the same st, sc in next st, (slide 1 bead up, sc in next st) repeat placing 1 bead every 3rd stitch around the upper edge. Join. Fasten off.
Upper Skirt Body
Join Color A with sl st to the lower edge of the waistband tube, using E-4 hook.
Round 1: Ch 3 (counts as dc), dc in each st around the lower edge of the waistband. Join to top of beg ch-3. (140 dc)
Round 2: Ch 5 (counts as dc plus ch 2), sk 1 dc, (dc in next dc, ch 2, sk 1 dc) around, join to 3rd ch of beg ch-5. (70 dc, 70 ch-2 spaces)
Round 3: Ch 3 (counts as dc), 2 dc in first ch-2 sp, (dc in next dc, 2 dc in ch-2 sp) around, dc in last dc, join. (210 dc)
Round 4: Ch 4 (counts as dc plus ch 1), sk 1 dc, (dc in next dc, ch 1, sk 1 dc) around, join to 3rd ch of beg ch-4. (105 dc, 105 ch-1 spaces)
Round 5: Ch 3 (counts as dc), dc in each ch-1 sp and each dc around, join. (210 dc)
Rounds 6 through 8: Ch 3 (counts as dc), dc in each dc around, join. (210 dc each round)
Round 9 (Pineapple Base): Ch 7 (counts as dc plus ch 4), sk 2 dc, (dc in next dc, ch 4, sk 2 dc) around, join to 3rd ch of beg ch-7. (70 dc, 70 ch-4 spaces)
Tier 1 Construction
Mark center front stitch. The front half covers 35 ch-4 spaces, and the back half covers 35 ch-4 spaces.
Tier 1 Front Section:
Row T1-F1 (RS): Join Color A with sl st into first front ch-4 sp, beg-PC in same sp, ch 3, (PC in next ch-4 sp, ch 3) across 35 front spaces, turn. (35 PC, 34 ch-3 spaces)
Row T1-F2 (WS): Ch 6, sc in first ch-3 sp, (ch 4, sc in next ch-3 sp) across, ch 4, dc in last PC, turn. (35 ch-4 spaces)
Row T1-F3 (RS): Ch 4 (counts as dc plus ch 1), 4 dc in first ch-4 sp, ch 1, (5 dc in next ch-4 sp, ch 1) across to last sp, 5 dc in last sp, ch 1, dc in 3rd ch of turning ch, turn. (35 shells, 36 ch-1 spaces)
Row T1-F4 (WS): Ch 1, sc in first dc, (ch 3, sc in next ch-1 sp, ch 3, sc in center dc of shell) across, ending ch 3, sc in ch-1 sp, ch 3, sc in top of turning ch, turn. (71 sc, 70 ch-3 spaces)
Row T1-F5 (RS): Ch 1, sc in first sc, (shell in next ch-3 sp, sc in next sc) across, turn. (35 shells, 36 sc)
Row T1-F6 (WS): Ch 4, sc in center dc of first shell, (ch 4, sc in next sc, ch 4, sc in center dc of next shell) across, ch 4, sc in last sc, ch 1, dc in first sc, turn. (71 sc, 70 ch-4 spaces)
Row T1-F7 (RS): Ch 1, sc in dc base, (5 dc in ch-4 sp, sc in next sc) across, ending 5 dc in last ch-4 sp, sc in last sc, turn. (35 shells, 36 sc)
Row T1-F8 (WS): Ch 4, (sc in center dc of shell, ch 4, sc in next sc, ch 4) across, ending sc in center dc of last shell, ch 1, dc in last sc. Fasten off front tier section.
Tier 1 Back Section:
Work Rows T1-F1 through T1-F8 exactly as for the front section. Then continue with 4 additional rows:
Row T1-B9 (RS): Rejoin Color A at right edge. Ch 1, sc in first sc, (shell in next ch-3 sp, sc in next sc) across, turn. (35 shells, 36 sc)
Row T1-B10 (WS): Ch 4, sc in center dc of first shell, (ch 4, sc in next sc, ch 4, sc in center dc of next shell) across, ch 4, sc in last sc, ch 1, dc, turn. (71 sc, 70 ch-4 spaces)
Row T1-B11 (RS): Ch 1, sc in dc, (5 dc in ch-4 sp, sc in next sc) across, turn. (35 shells, 36 sc)
Row T1-B12 (WS): Ch 4, (sc in center dc of shell, ch 4, sc in next sc, ch 4) across, sc in center dc of last shell, ch 1, dc. Fasten off.
Tier 1 Edge Finish: Rejoin Color A at any point along the entire lower edge. Work 1 round of: (sc in sc, Picot-3, sc in same sc, sc in next 5 dc of shell) around. Fasten off.
Tier 2 Construction
Return to Round 8. Join Color A with sl st to any dc.
Tier 2 Attachment Round: Ch 7 (counts as dc plus ch 4), sk 2 dc, (dc in next dc, ch 4, sk 2 dc) around, join to 3rd ch of beg ch-7. (70 dc, 70 ch-4 spaces)
Round T2-1: Beg-PC in first ch-4 sp, ch 3, (PC in next ch-4 sp, ch 3) around, join to top of beg-PC. (70 PC, 70 ch-3 spaces)
Round T2-2: Sl st into first ch-3 sp, ch 6 (counts as dc plus ch 3), dc in same sp, ch 3, (V-st in next ch-3 sp, ch 3) around, join to 3rd ch of beg ch-6. (70 V-sts, 140 ch-3 spaces)
Round T2-3: Sl st into first ch-2 sp of V-st, ch 3 (counts as dc), 6 dc in same ch-2 sp, ch 2, (7 dc in ch-2 sp of next V-st, ch 2) around, join to top of beg ch-3. (70 groups of 7 dc, 70 ch-2 spaces)
Round T2-4: Sl st to center dc of first group, ch 1, sc in same dc, ch 5, sc in ch-2 sp, ch 5, (sc in center dc of next group, ch 5, sc in ch-2 sp, ch 5) around, join to first sc. (140 ch-5 spaces, 140 sc)
Round T2-5: Sl st into first ch-5 sp, ch 3 (counts as dc), 6 dc in same sp, ch 1, (7 dc in next ch-5 sp, ch 1) around, join to top of beg ch-3. (140 groups of 7 dc, 140 ch-1 spaces)
Round T2-6: Sl st to center dc, ch 1, sc in same dc, ch 5, sc in ch-1 sp, ch 5, (sc in center dc of next group, ch 5, sc in ch-1 sp, ch 5) around, join. (280 ch-5 spaces, 280 sc)
Round T2-7: Sl st into ch-5 sp, ch 3 (counts as dc), 8 dc in same sp, ch 1, (9 dc in next ch-5 sp, ch 1) around, join. (280 groups of 9 dc, 280 ch-1 spaces)
Round T2-8: Sl st to center dc, ch 1, sc in same dc, ch 3, Picot-3, ch 3, (sc in center dc of next group, ch 3, Picot-3, ch 3) around, join. Fasten off.
Tier 3 Construction
Tier 3 attaches to Round 5. Continue working this tier using the same pineapple lace structure as Tier 2, but extend the length by adding additional rounds to create the floor-length back train. The high-low effect is achieved by working extra rows on the back half, following the same front/back split method used in Tier 1.
Finishing
Block all pieces thoroughly before wearing. Wet block or steam block on mats, pinning the scalloped edges to maintain their wave shape. Allow to dry completely.
Attach the 12 applique motifs to the skirt tiers using Color A and a yarn needle. Distribute them evenly across all three tiers, with more concentrated placement on Tier 2 and Tier 3 as shown in the reference images.
Weave in all remaining ends securely.
Tips for Success
This is a substantial project, so pace yourself. I recommend completing and blocking all motifs first. Then work the top to completion before starting the skirt. This gives you satisfying milestones along the way.
The pineapple lace tiers are the most time-intensive portion. Take breaks when needed, and always count your stitches at the end of each round.
If you are new to high-low shaping, do not stress. The construction is simpler than it looks. You are essentially just working more rows on the back half than the front half.
I truly hope you love making this set as much as I loved designing it. The combination of floral mandala motifs and cascading pineapple lace creates something truly special, and I cannot wait to see your finished versions.
If you found this pattern helpful, I would love it if you saved it to your Pinterest boards so you can find it easily when you are ready to start. And please, leave a comment below if you make this set. Seeing your creations brings me so much joy, and your photos might just inspire someone else to pick up their hook and give it a try.
