
You know that gorgeous skein of golden mercerized cotton sitting in your stash? The one you have been saving for something truly special? This is the project worthy of it.

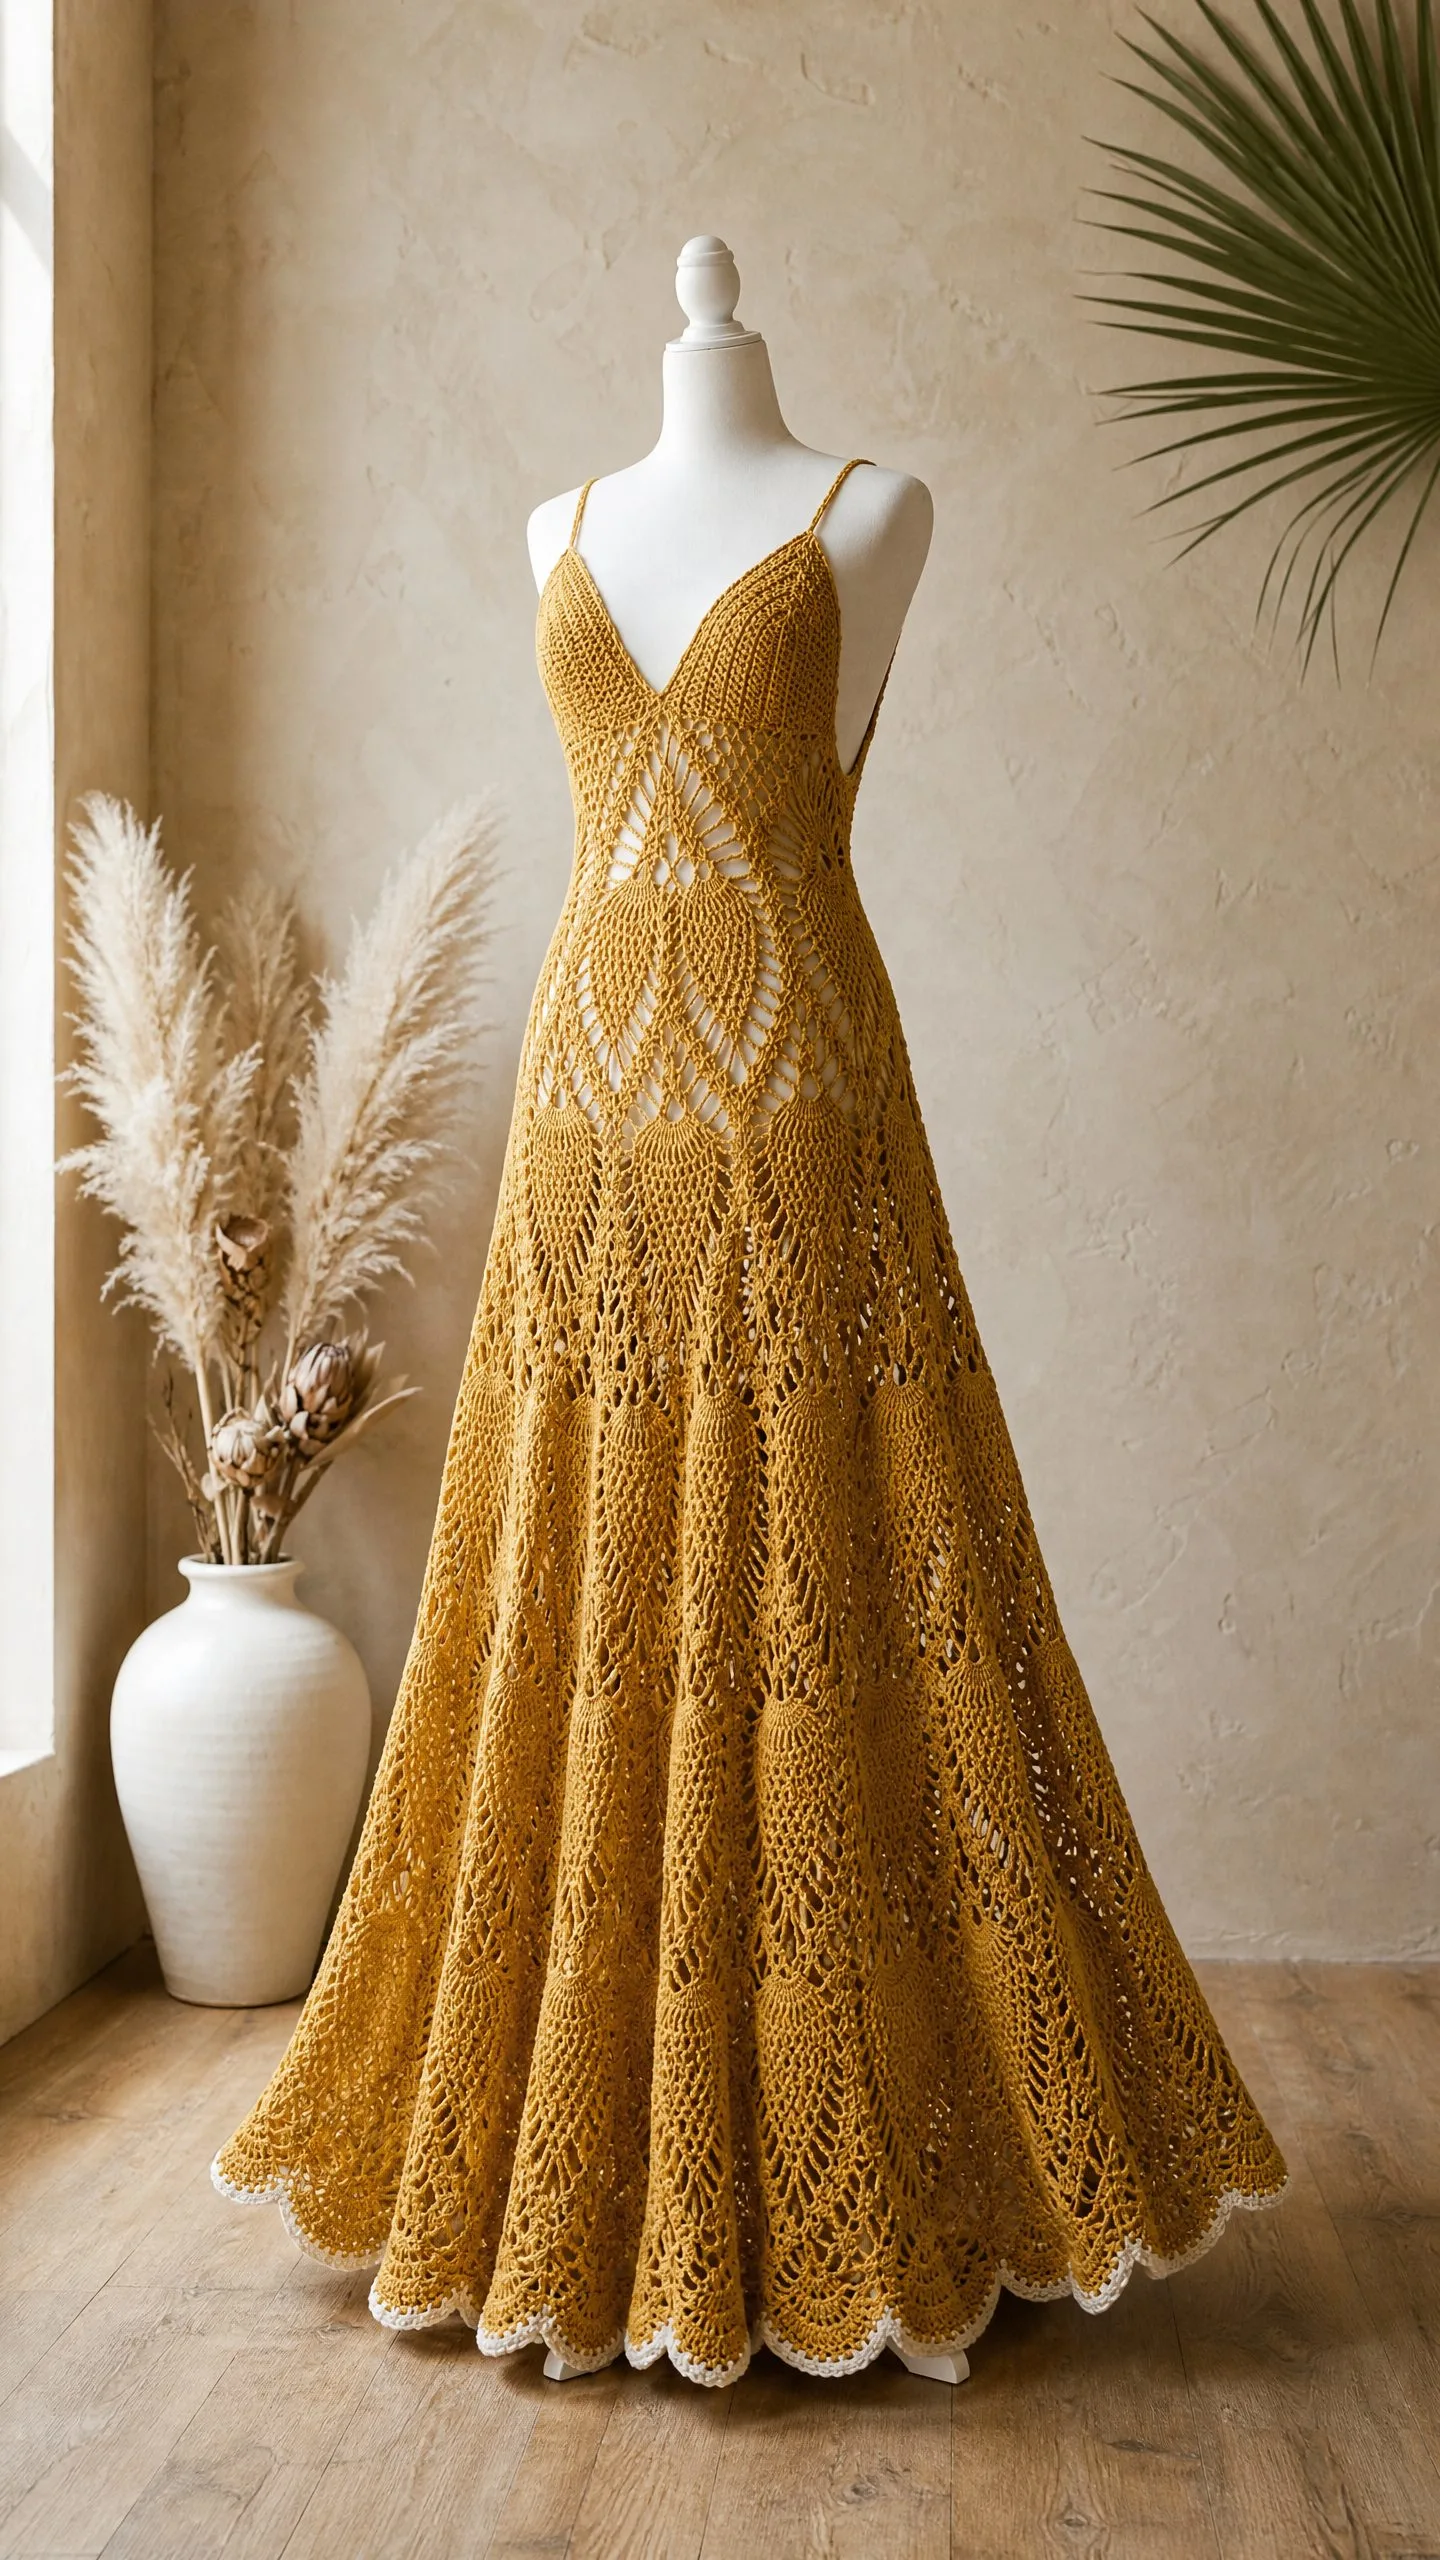
This floor-length pineapple lace maxi dress is an advanced project that will challenge your skills and reward you with a stunning wearable work of art. The construction moves top-down from two bodice triangles that join into a seamless tube, then expands through three dramatic tiers of pineapple lace motifs. The classic pineapple stitch pattern creates the perfect balance of structure and drape for a dress that flows beautifully to the floor.
I will be honest with you. This is not a quick weekend project. We are talking 80 to 120 hours of focused work. But if you have solid experience with lace crochet and you understand how pineapple motifs build and decrease, this pattern breaks everything down into manageable sections. Grab your finest hook and let us create something extraordinary.
About This Crochet Pattern
This golden maxi dress features a deep V-neckline at both front and back, delicate spaghetti straps, and a dramatically flared A-line skirt that sweeps to the floor. The entire garment is worked in a warm mustard or antique gold yarn with just a touch of cream or ivory contrast at the scalloped hem.
The bodice consists of two triangular cups worked flat from the top down, then joined at the sides. From there, the skirt works in the round through three expanding tiers. Each tier contains progressively more pineapple motifs, which is what creates that gorgeous flare. Tier 1 has 10 pineapples. Tier 2 doubles to 20 pineapples. Tier 3 expands to a full 40 pineapples circling the hem.
Because this is an open lace garment, you will want to wear it over a slip or bodysuit lining for modesty. The lacework at both the bodice and skirt allows significant visibility without a liner underneath.
Skill Level
This pattern is rated Advanced. You should have confident experience with pineapple lace construction before beginning. The techniques required include working increases within lace repeat frameworks, managing large stitch counts in the round, and executing multi-step special stitches.
You will need to be comfortable with chain-5 picots, cluster stitches, and reading stitch patterns conceptually. If terms like "3-dc cluster" or "v-stitch" feel unfamiliar, I recommend practicing with a simpler pineapple project first.
Finished Measurements
As written, this pattern fits Size S/M with the following measurements:
Size customization tips appear at the end of this pattern.
Materials Needed
Yarn
You will need fingering weight yarn (also called sock weight, CYCA 1). I strongly recommend 100 percent mercerized cotton or a cotton-linen blend for the best drape and stitch definition.
Main Color (MC): Golden mustard or antique gold. You will need approximately 2,800 yards (2,560 meters).
Contrast Color (CC): Cream or ivory for the hem edging only. You will need approximately 120 yards (110 meters).
Yarn Substitution Suggestions
Option 1: Paintbox Yarns Simply DK Cotton (100% cotton, 276 yards per 100g skein). Use 10 to 11 skeins in Mustard Yellow plus 1 skein in Champagne White. Note: this is DK weight, so adjust your hook to US E-4 / 3.5 mm and swatch carefully.
Option 2: Drops Safran (50% cotton, 50% linen, 175 yards per 50g skein). Use 16 skeins in Curry plus 1 skein in Off White. This blend gives excellent drape with a slight sheen that suits the pineapple motif beautifully.
Option 3: Lion Brand 24/7 Cotton (100% mercerized cotton, 186 yards per 100g skein). Use 15 skeins in Goldenrod plus 1 skein in Ecru.
Substitution note: Any smooth, plied fingering or sport weight cotton yarn with good stitch definition will work. Avoid fuzzy, hairy, or textured yarns because they will obscure the lace openwork. Always prioritize gauge over brand. Purchase all skeins from the same dye lot.
Hook
US B-1 / 2.25 mm or US C-2 / 2.75 mm. Swatch to match gauge. A 2.75 mm hook works better for makers with tighter tension.
Notions
Gauge
Getting gauge right is absolutely critical for this garment. A difference of even half a stitch per inch will result in a dress that is several inches off in circumference.
With MC and recommended hook, after blocking:
Gauge Swatch Instructions
Chain 32. Work 20 rows in the main lace mesh pattern (see Special Stitches below). Block your swatch completely before measuring. Lace does not show its true gauge until blocked.
Abbreviations (US Terms)
Before we dive in, here is every abbreviation you will encounter:
Special Stitches
Shell Stitch (shell): Work 5 dc all into the same stitch or space. This forms the fan base of each pineapple motif.
Pineapple Cluster (pc-cl): Yarn over, insert hook into designated stitch or space, yarn over and pull up a loop, yarn over and draw through 2 loops. You have made 1 partial dc. Repeat this 2 more times into the SAME stitch or space so you have 4 loops on hook. Yarn over and draw through all 4 loops. This completes a 3-dc cluster.
At the narrowing tip of each pineapple, use a 2-dc cluster instead: yarn over, insert hook, pull up loop, yarn over through 2 loops twice into the same space, then yarn over through all 3 loops.
V-Stitch (v-st): Work [dc, ch 2, dc] all into the same stitch or space.
Picot: Ch 3, sl st back into the first ch of the ch-3. Used at the scalloped hem edging.
Mesh Row: Dc into first stitch, [ch 2, sk 2 sts, dc into next st] across. Creates the open mesh ground between pineapple motifs.
Joining Slip Stitch: Standard sl st used to join rounds. Always sl st into the top of the first stitch of the round, not into the turning chain.
Beginning Cluster (beg-cl): Ch 3 (counts as first dc), then work 2 more partial dc into same space and draw through all loops together. This forms the start of a pineapple row without adding an extra chain-3 stitch.
Important Pattern Notes
1. The dress is worked in two phases. Phase A: the two bodice triangles (left cup and right cup) are worked flat, top down, then joined at the center front and center back. Phase B: the full body tube (from underarm to hem) is worked in the round.
2. The pineapple motifs in the bodice are worked on a smaller scale (mini pineapples of 5 dc shell base expanding to 9 dc shell, then decreasing to a point). In the skirt, full pineapples begin with a 9 dc shell base and expand across three tiers.
3. All rounds in the skirt are joined rounds unless noted. Do not turn unless instructed.
4. The turning chain counts as one dc throughout unless specifically noted otherwise.
5. Stitch counts in parentheses at the end of each row represent total working stitches, including the top of turning chains where they stand as dc.
6. All increases in the skirt are made by working extra chain spaces at each repeat junction to add one full pineapple motif per tier increase.
7. The straps are worked as simple chains and single crochet columns, then sewn or slip-stitched to the bodice tops. Length is adjustable.
8. Block the dress flat on mats before wearing. The lace will not show its full beauty until wet-blocked.
9. A liner or slip is strongly recommended for modesty.
Pattern Instructions
Section 1: Front Bodice Triangle (Make 1)
The front bodice is a triangle worked from the top V-point downward to the underarm. It is worked flat, back and forth in rows, with increases at both side edges every other row.
Foundation: With MC, ch 6. Sl st to first ch to form a small ring. Do not use a magic ring here, as the chain ring creates the V-neckline point.
Row 1 (RS): Ch 3 (counts as dc), work 4 dc into ring, turn. (5 dc)
Row 2 (WS): Ch 5 (counts as dc + ch 2), dc into first dc, ch 2, sk 1 dc, v-st into center dc, ch 2, sk 1 dc, [dc, ch 2, dc] into top of t-ch, turn. (2 v-sts, 2 ch-2 sps at edges)
Row 3 (RS): Ch 3, 2 dc into first ch-2 sp, ch 2, shell into ch-2 sp of first v-st, ch 2, dc into ch-2 sp of center v-st, ch 2, shell into ch-2 sp of second v-st, ch 2, 3 dc into turning ch sp, turn. (2 shells of 5 dc, 1 center dc, 6 edge dc, 4 ch-2 sps = 22 sts and spaces)
Row 4 (WS): Ch 5, dc into same sp, ch 2, sk to first shell, dc into 1st dc of shell, [ch 1, dc] 4 times across shell (5 dc with ch-1 between = pineapple row 1), ch 2, v-st into center dc, ch 2, dc into 1st dc of second shell, [ch 1, dc] 4 times (pineapple row 1), ch 2, v-st into final sp, turn. (2 pineapple bases of 5 dc, 2 v-sts at edges, center v-st)
Row 5: Ch 3, 2 dc into ch-2 sp, ch 2, [sk ch-1 sp, pc-cl over next 3 dc-tops] twice working 3-dc clusters, ch 2, shell into center v-st sp, ch 2, [pc-cl over 3] twice, ch 2, 3 dc into final sp, turn. (2 clusters per pineapple side, 1 shell center, 6 edge dc)
Rows 6 through 22: Continue pineapple motif rows as established. Add 2 stitches at each outer edge every RS row by working a v-st or [dc, ch 2, dc] into the edge turning-chain space. Simultaneously narrow each pineapple column by working one fewer cluster per RS row until the pineapple tips in approximately Row 14 to Row 16. When a pineapple tips, begin a new pineapple by placing a shell into the ch-2 space beneath the tip cluster on the following WS row.
Checkpoint: After Row 22, count stitches across the widest point. You should have approximately 96 working stitches and chain spaces across, which at gauge measures approximately 16 inches (40.5 cm) wide.
Row 23 (underarm row): Ch 1, sc evenly across all stitches and chain spaces, working 1 sc per dc and 1 sc per chain space. (96 sc)
Fasten off, leaving a long tail for seaming.
Section 2: Back Bodice Triangle (Make 1)
Work exactly as the Front Bodice Triangle. The back has the same deep V neckline. Fasten off.
Section 3: Joining the Bodice
Place the Front and Back bodice triangles with RS facing out. Hold them together with the widest (underarm) edges aligned.
Side seam: With MC, join yarn at the left side underarm corner. Working through both layers, sl st or sc the side seams together for approximately 8 sc (8 sl sts), then leave an opening of approximately 1 inch (2.5 cm) for the armhole. Continue sc the remaining side edge together. Repeat for the right side seam.
After joining both side seams, the bodice forms a tube with two open V-necklines at the top and the underarm join at the bottom.
Join round setup: With RS facing, attach MC at the right side seam at the underarm join level. Ch 1. Work 1 sc into every stitch around the full circumference of the joined underarm edge. (192 sc around)
Place a stitch marker at both side seams (2 markers total, dividing front 96 from back 96).
This join round is Round 1 of the skirt body.
Section 4: Waist Shaping
The next 8 rounds shape the waist by working even without increases or decreases.
Round 1: Already worked in joining. (192 sc)
Rounds 2 through 4: Ch 3, dc into each sc around, sl st to top of beg ch-3 to join. (192 dc)
These 3 rounds of plain dc form the waist band base and serve as the foundation for the mesh panel connecting bodice lace to skirt pineapple lace.
Round 5: Ch 5 (counts as dc + ch 2), sk 2 dc, [dc into next dc, ch 2, sk 2 dc] around, sl st to 3rd ch of beg ch-5. (64 dc, 64 ch-2 sps = 192 stitch positions)
Rounds 6 and 7: Ch 5, [dc into next dc, ch 2] around, sl st to join. (64 dc, 64 ch-2 sps)
Round 8: Ch 3, [2 dc into ch-2 sp, dc into dc] around, sl st to top of beg ch-3. (192 dc)
Checkpoint: After Round 8, the piece should measure approximately 8 inches (20.5 cm) from the underarm join. Waist circumference should be approximately 26 to 28 inches (66 to 71 cm).
Section 5: Hip Expansion Round
Round 9 (increase round): Ch 3, dc into same st, [dc into next 2 dc, 2 dc into next dc] around. (256 dc)
Revised Round 10: Ch 3, dc into next dc, [dc2tog, dc into next 14 dc] around, sl st to join. (240 dc, 15 pineapple repeats of 16 sts each)
Place 15 stitch markers, 1 every 16 stitches.
Section 6: Skirt Tier 1 (Rounds 11 through 21)
The first tier consists of 10 full pineapple motifs worked in the round.
Round 11 (mesh setup round): Ch 1, sc into first dc, [ch 5, sk 3 dc, sc into next dc] around, sl st to first sc. (60 ch-5 arches, 60 sc = 120 total anchors)
Round 12 (shell placement round): Sl st into first ch-5 arch. For each set of 6 consecutive arches (1 pineapple repeat):
Repeat 10 times around, sl st to top of beg ch-3. (10 shells of 9 dc, 40 sc in ch-3 sps, 10 bridge dc)
Round 13 (pineapple row 1): Sl st to first dc of first shell. Ch 4 (counts as dc + ch 1). [dc into next dc of shell, ch 1] 8 times across the 9-dc shell. Ch 3, sc into bridge dc. Ch 3. Continue around, sl st to 3rd ch of beg ch-4. (10 groups of 9 dc with ch-1 between, 10 bridge sc)
Round 14 (pineapple row 2): Ch 1, sc into first ch-1 sp of first pineapple. [Ch 3, sc into next ch-1 sp] 7 times. Ch 5 (bridge arch). Repeat around, sl st to first sc. (10 pineapples each with 8 sc and 7 ch-3 inner arches, 10 ch-5 bridge arches)
Round 15: Sl st to first ch-3 arch. Ch 4, [dc, ch 1] 6 times, dc into 7th ch-3 arch. Ch 3, sc into bridge arch center, ch 3. Repeat around, sl st to beg ch-4. (10 pineapples of 7 dc, 10 bridge sc)
Round 16: Ch 1, sc into first ch-1 sp. [Ch 3, sc into next ch-1 sp] 5 times. Ch 5 bridge. Repeat around. (10 pineapples with 6 sc and 5 ch-3 arches, 10 ch-5 bridges)
Round 17: Sl st to arch. Ch 4, [dc, ch 1] 4 times, dc. Ch 3, sc into bridge, ch 3. Repeat around. (10 pineapples of 5 dc, 10 bridge sc)
Round 18: Ch 1, sc into ch-1 sp, [ch 3, sc] 3 times. Ch 5 bridge. Repeat around. (10 pineapples with 4 sc and 3 ch-3 arches, 10 ch-5 bridges)
Round 19: Sl st to arch. Ch 4, [dc, ch 1] 2 times, dc. Ch 3, sc into bridge, ch 3. Repeat around. (10 pineapples of 3 dc, 10 bridge sc)
Round 20: Ch 1, sc into ch-1 sp, ch 3, sc into next ch-1 sp. Ch 5 bridge. Repeat. (10 pineapples with 2 sc and 1 ch-3 arch, 10 ch-5 bridges)
Round 21 (pineapple tip round): Sl st to arch. Ch 3, pc-cl into same arch (2-dc cluster tip). Ch 3, sc into bridge arch center. Ch 3. Repeat around. (10 tip clusters, 10 bridge sc)
Checkpoint: After Round 21, the piece should measure approximately 22 to 24 inches (56 to 61 cm) from the underarm join. Width should be approximately 32 to 34 inches (81 to 86 cm) in circumference.
Tier 1 Expansion Round (Round 22): Ch 1, sc into tip cluster. [Ch 5, sc into bridge sc, ch 5, shell of 9 dc into bridge arch (new pineapple shell), ch 5, sc into next tip cluster, ch 5, sc into bridge sc] repeat around. (20 pineapple starts for Tier 2)
Section 7: Skirt Tier 2 (Rounds 23 through 31)
Tier 2 continues with 20 pineapple motifs. Bridges are now ch 6 to accommodate the expanded circumference.
Round 23: Working from Round 22 shells, work: [ch 4, dc into dc of shell, ch 1] across each 9-dc shell, ch 3, sc between shells, ch 3. (20 pineapples of 9 dc with ch-1 between, 20 bridge sc)
Rounds 24 through 31: Follow the same pineapple decrease sequence as Tier 1, working each pineapple from 9-dc down to tip clusters.
Checkpoint: After Round 31, the piece should measure approximately 38 to 40 inches (96 to 102 cm) from the underarm join. Circumference should be approximately 48 to 52 inches (122 to 132 cm).
Tier 2 to Tier 3 Expansion (Round 32): Follow the same expansion method, creating 40 pineapple starts for Tier 3.
Section 8: Skirt Tier 3 (Rounds 33 through 40+)
Tier 3 runs 40 pineapple motifs. Bridges are now ch 7 to accommodate the expanded circumference.
Round 33: Ch 4, [dc, ch 1] 8 times across each 9-dc shell, ch 3, sc into bridge, ch 3. (40 pineapples of 9 dc with ch-1 between, 40 bridge sc)
Continue the pineapple decrease sequence through to the final tip round.
Hem Edging
Switch to CC (cream or ivory). Work a scalloped picot edge around the final round, placing picots at each pineapple tip and along the bridge arches for a delicate finish.
Straps
With MC, ch 150 (or desired length to fit from front bodice point, over shoulder, to back bodice point). Work 1 row of sc along the chain. Fasten off. Make 2. Attach to bodice points with slip stitches or sewing.
Finishing
Weave in all ends securely. Wet block the entire dress flat on blocking mats, pinning out each pineapple motif to open the lace fully. Allow to dry completely before wearing.
Size Customization Tips
To adjust the bust size, add or remove increases in the bodice triangles. Each additional 4 stitches at Row 23 adds approximately 0.67 inches to the bust circumference.
To adjust the waist, modify the number of dc rounds in Section 4 or change your hook size slightly for that section only.
To adjust length, add additional rows between tier expansions or work a fourth tier following the same doubling method.
I hope this pineapple lace maxi dress becomes a treasured piece in your wardrobe. It takes time and patience, but the result is absolutely worth every stitch. If you make this dress, I would love to see your finished project. Save this pattern to your Pinterest boards so you can find it when you are ready to cast on, and please leave a comment below to share your progress or ask any questions. Happy crocheting!
