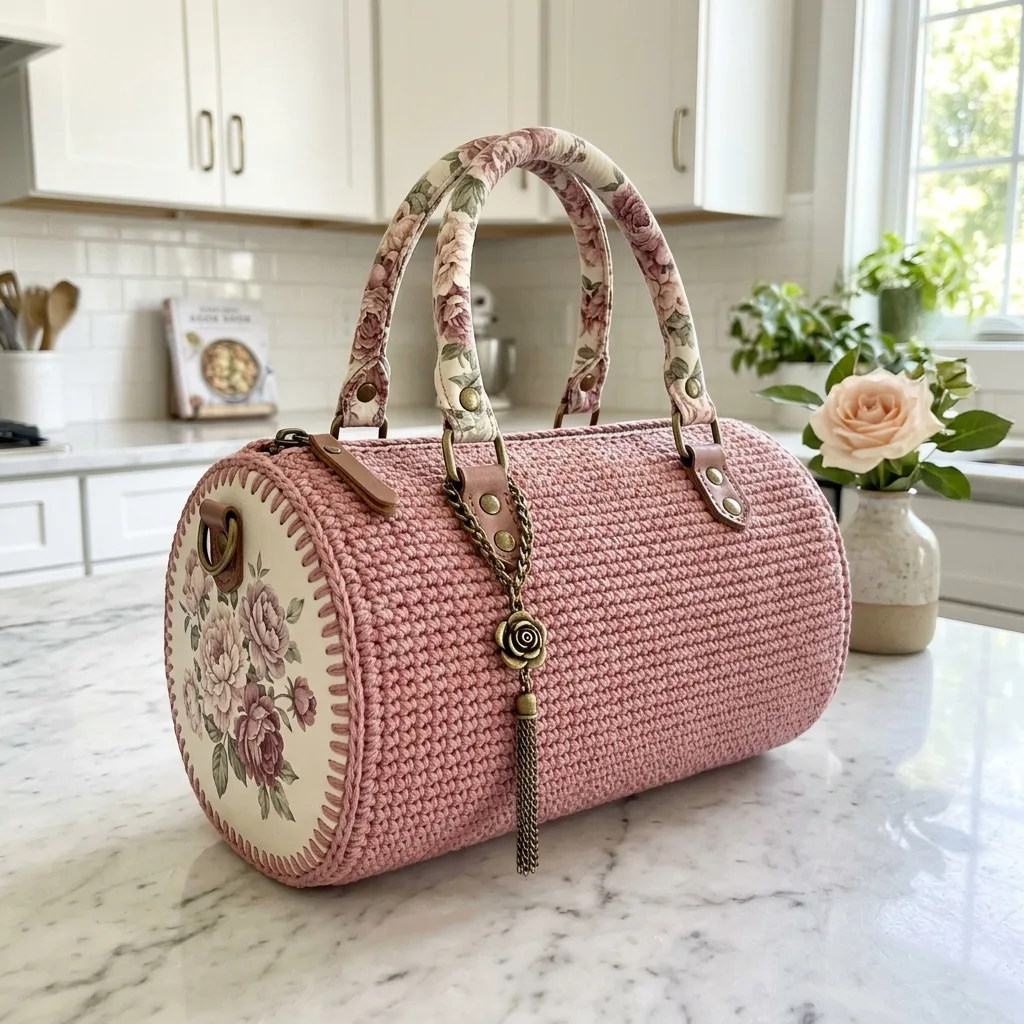
I don’t know about you, but I have a serious soft spot for bags that look like they belong in a vintage boutique window. The kind that makes strangers stop you on the street to ask where you got it. This barrel purse gives you all that romantic, heirloom charm with the satisfaction of saying "I made it myself."
Get the Ad-Free PDF Pattern
You can find the free pattern below, or you can purchase the ad-free printable PDF from my shop.
Get the Printable PDF →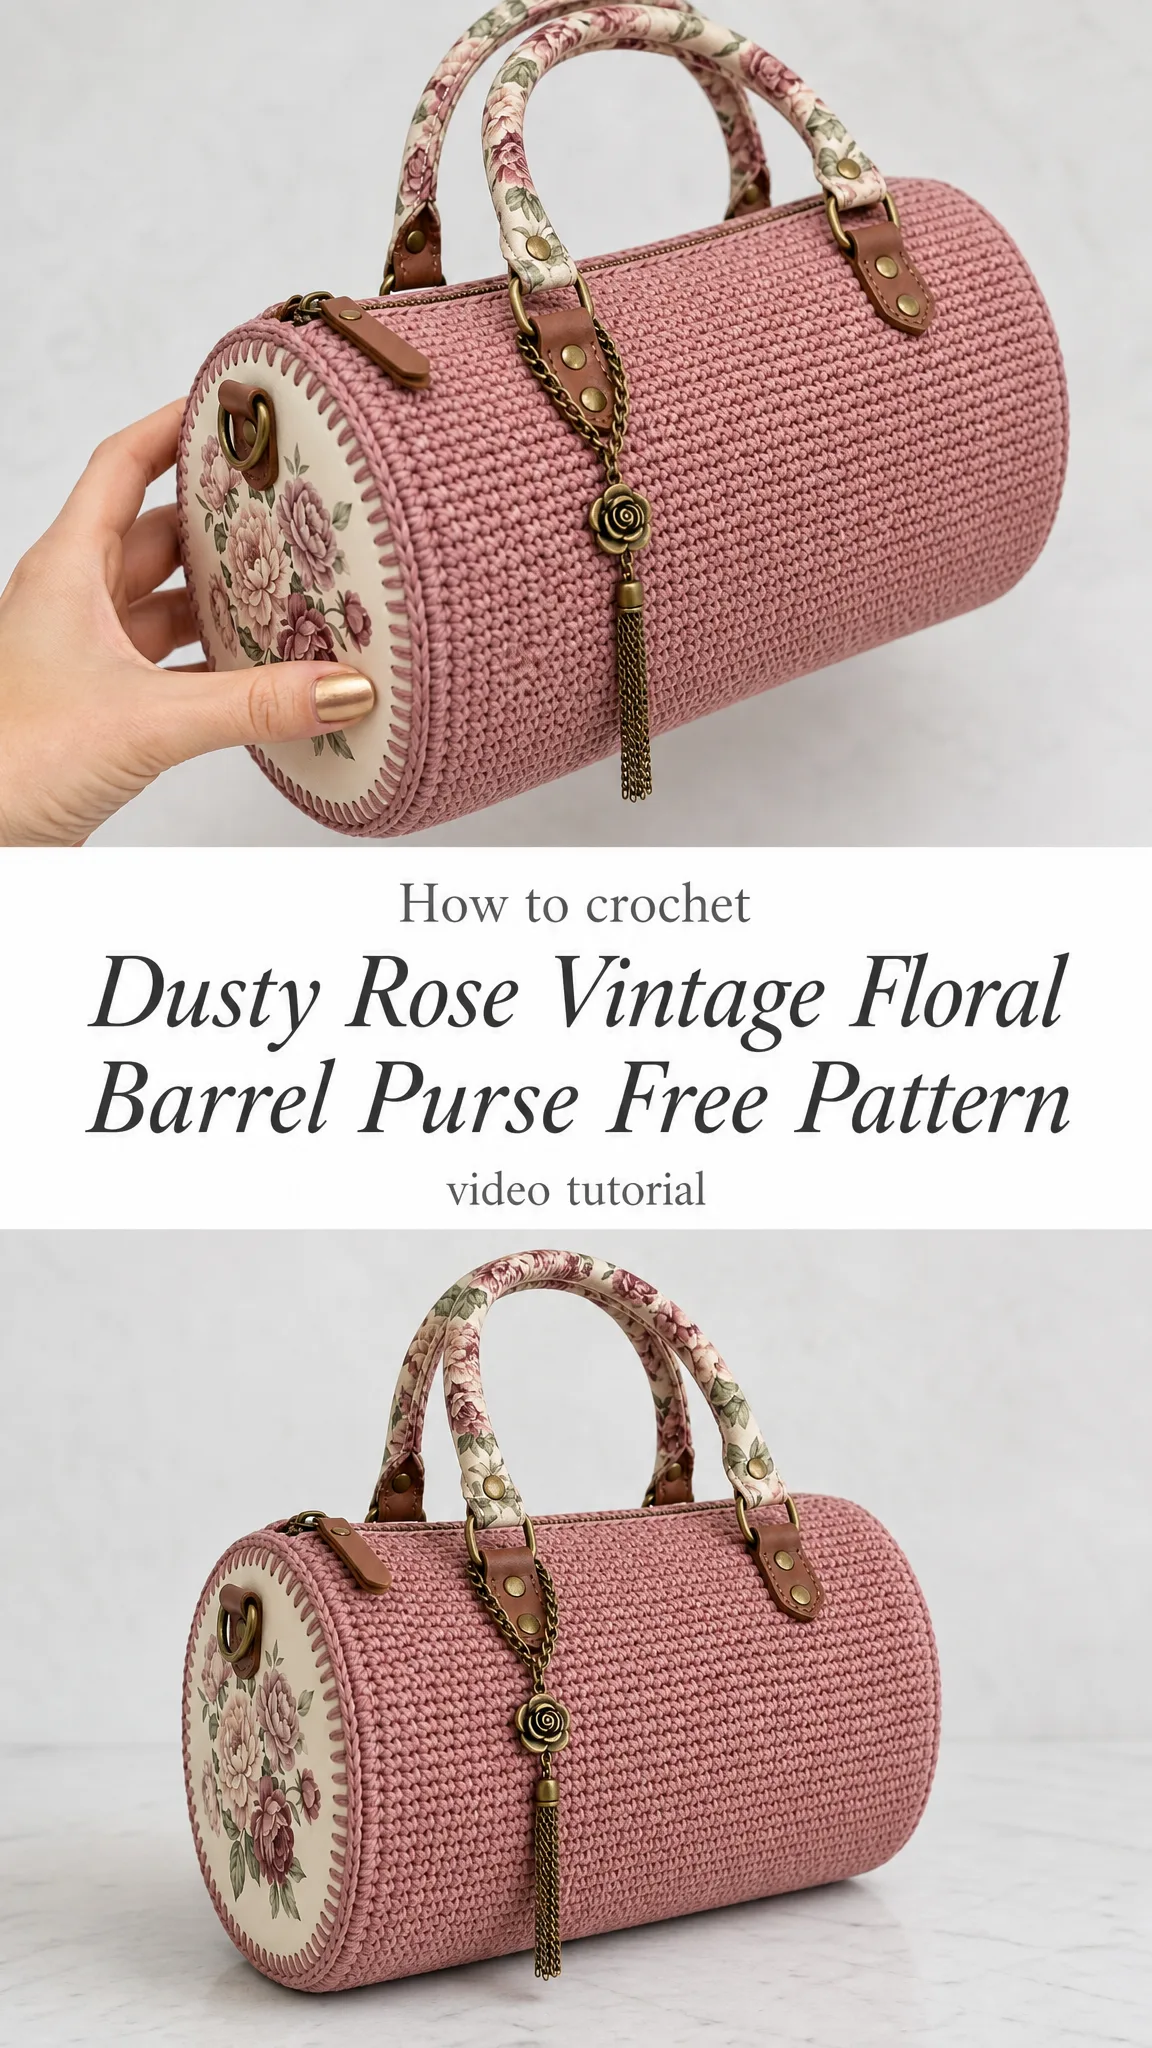
This Dusty Rose Vintage Floral Barrel Purse combines crocheted elegance with fabric accents for a truly unique accessory. The dusty rose body, floral end panels, and antique brass hardware create something that looks far more complicated than it actually is. If you can single crochet in the round and follow a simple increase pattern, you can absolutely make this stunning bag.
About This Crochet Barrel Purse Pattern
This pattern is a design reconstruction inspired by vintage handbag styles, and the result is absolutely gorgeous. The finished purse measures approximately 11.5 inches (29 cm) long with a 7.5 inch (19 cm) diameter, making it the perfect size for everyday essentials without being bulky.
The construction method is surprisingly straightforward. You’ll create a crocheted barrel body using single crochet worked in continuous rounds, then attach two circular end panels covered with beautiful floral fabric. The hardware elements, including the wrapped handles, D-rings, and decorative charm, transform it from a simple crochet project into a professional-looking accessory.
Skill Level: Intermediate
Estimated Time: 12 to 18 hours
This is rated intermediate because while the stitches themselves are basic, you’ll be working with hardware installation, fabric elements, and zipper attachment. None of these steps are difficult, but they do require a bit of patience and attention to detail.
Materials You’ll Need
Before you start, gather everything so you won’t have to stop mid-project. Here’s your complete shopping list:
Yarn
Suggested Yarns: Paintbox Cotton DK, Drops Safran, or Rico Creative Cotton DK. You can substitute any smooth DK weight cotton that matches the gauge. Avoid yarns with too much texture since you want a clean, even fabric for this polished look.
Tools
Hardware and Fabric
Optional
Gauge
Getting your gauge right matters here because the end panels need to match the body circumference exactly.
20 single crochet stitches × 20 rounds = 4 inches × 4 inches (10 cm × 10 cm)
Take time to make a gauge swatch before starting. If your swatch is too small, go up a hook size. If it’s too large, go down a hook size. Maintain even tension throughout for a uniform, professional finish.
Abbreviations
Let me walk you through each abbreviation you’ll see in this pattern:
Step-by-Step Pattern Instructions
Now for the fun part. Let’s build this beautiful barrel purse from the bottom up.
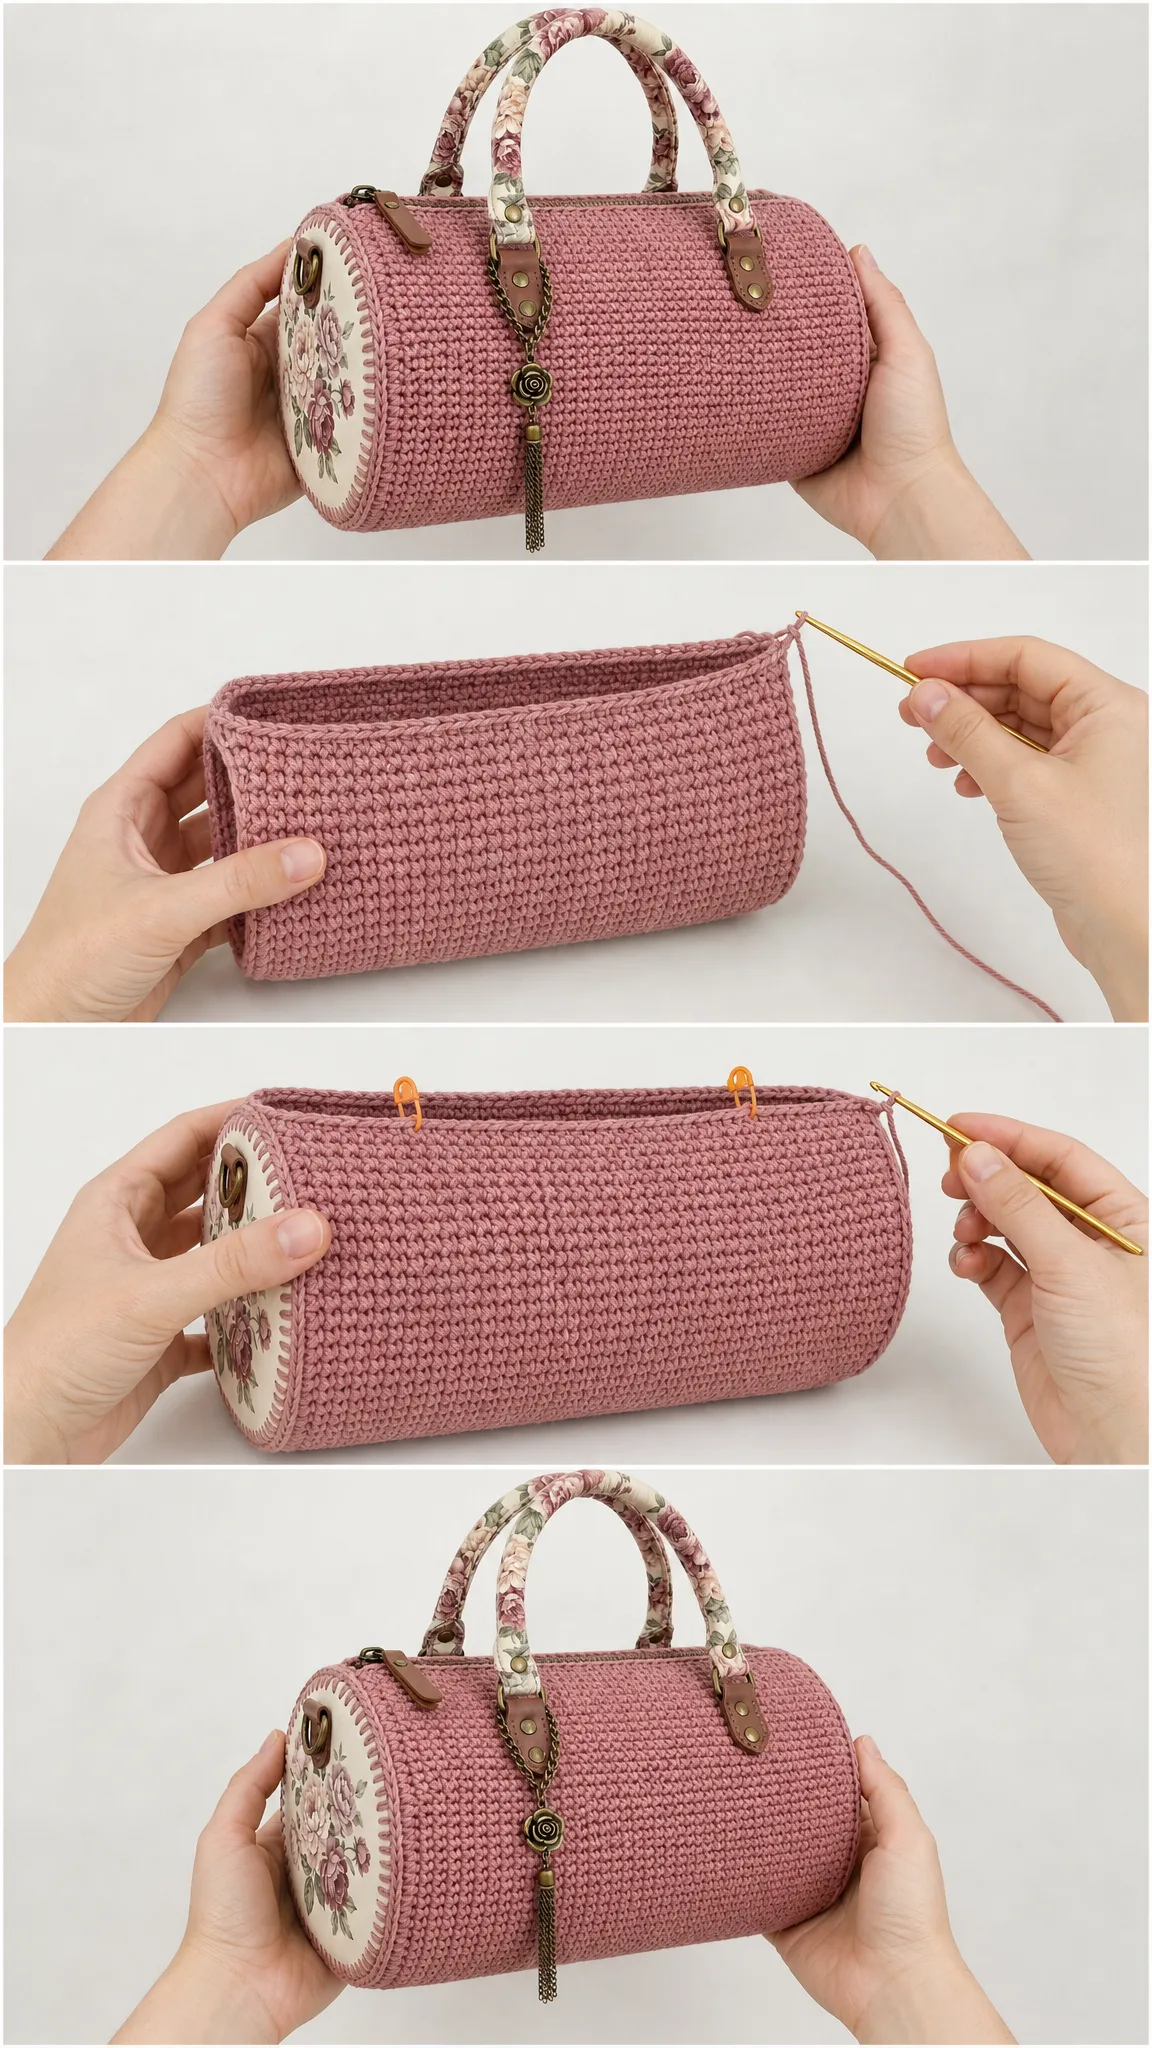
Crocheting the Body
Round 1: Make a foundation chain of 46 stitches. Work around the chain to form an oval base. This means you’ll single crochet along one side of the chain, work several stitches into the last chain to turn the corner, then single crochet along the opposite side of the chain (working into the unused loops), and work several stitches into the first chain to complete the oval. Place stitch markers at each curved end to track your shaping.
Rounds 2 through 8: Work single crochet in continuous rounds, increasing evenly at both curved ends. Continue until your circumference reaches approximately 47 to 48 stitches. The increases at the ends create the rounded shape that will eventually meet your circular end panels.
*Tip: Don’t join rounds with a slip stitch. Instead, use a stitch marker to track where each round begins and move it up as you go. This creates a seamless fabric without visible join lines.*
Rounds 9 through 58: Work even in single crochet without any increases to create the barrel body. This is the straightforward part. Just keep crocheting around and around, maintaining consistent tension throughout. The body should measure approximately 11.5 inches (29 cm) when complete.
At the end of Round 58, slip stitch to join and fasten off, leaving a long tail for seaming later.
Making the End Panels (Make 2)
These circular panels form the decorative ends of your barrel. You’ll crochet them first, then cover them with fabric.
Round 1: Work 6 single crochet into a magic ring. Pull the ring tight. (6 stitches)
Round 2: Work an increase in every stitch around. (12 stitches)
Round 3: *Single crochet in next stitch, increase in next stitch.* Repeat from * to * around. (18 stitches)
Round 4: *Single crochet in next 2 stitches, increase in next stitch.* Repeat around. (24 stitches)
Continue increasing evenly in this manner, adding 6 stitches per round, until your circle measures 7.5 inches (19 cm) in diameter. This should match the diameter of your barrel body opening.
Fasten off and weave in ends.
Covering the End Panels with Fabric
This is where the vintage floral magic happens. Cut two circles of your floral fabric slightly larger than your crocheted panels, about half an inch larger all around for seam allowance.
You have two options here:
Option 1: Create fabric-covered inserts by wrapping the fabric around a cardboard or plastic circle cut to size, then whipstitch the covered insert to your crocheted panel.
Option 2: Apply fabric directly to the crocheted circle using fabric glue, folding the edges under and securing them to the back.
Either way, the floral fabric should sit neatly on top of your crocheted circle, with the crochet edge visible around the perimeter.
Joining the End Panels to the Body
Line up one end panel with the opening of your barrel body. The stitch counts should match up. Using your tapestry needle and matching yarn, whipstitch the panel securely to the body. Work through both layers evenly, keeping your stitches neat and consistent.
The visible whipstitching around the edge becomes a decorative element, so take your time here. Use matching yarn for a seamless look, or contrast yarn if you want to emphasize the stitching.
Repeat for the second end panel.
Installing the Zipper
Create a centered top opening approximately 9 inches (23 cm) long. You can do this by leaving an opening as you crochet the final rounds, or by carefully cutting the opening after completing the body.
Pin your zipper into the opening, making sure it sits flat and centered. Using a sharp needle and matching thread, sew the zipper securely with small, even stitches. Take your time with this step. A well-installed zipper makes all the difference in how professional your finished bag looks.
Making and Attaching Handle Tabs
Create 4 reinforced tabs using faux leather or crocheted tabs backed with interfacing. These need to be sturdy since they’ll bear the weight of the bag and its contents.
Position the tabs evenly along the upper body of the bag, two on each side. Attach using rivets for a professional look, or sew them securely with heavy-duty thread if you prefer not to use hardware.
Wrapping and Attaching the Handles
Take your purchased purse handles and wrap them with strips of your floral fabric. Spiral the fabric around the handles, overlapping slightly, and secure the ends with fabric glue or small stitches.
Once wrapped, attach the handles to the tabs. Make sure they’re secure and can bear weight before you load up your bag.
Adding Hardware Details
Attach D-rings at each end of the bag if you want the option to add a shoulder strap later. These can be sewn or riveted into place.
For the finishing touch, attach your decorative rose charm and tassel to the front of the bag using a small chain. This adds that vintage boutique quality that makes this bag so special.
Finishing Your Barrel Purse
Weave in all remaining ends securely. Check all seams and attachments to make sure everything is sturdy.
If desired, lightly steam the crocheted portions to even out any tension inconsistencies. Be careful not to apply heat directly to fabric or hardware elements.
Care Instructions: This bag should be spot cleaned only with a damp cloth. Do not machine wash, bleach, tumble dry, or iron directly on the surface.
Tips for Left-Handed Crocheters
Left-handed makers can mirror all shaping and placement instructions. The finished bag dimensions will remain exactly the same. Just work in the opposite direction from what the pattern describes, and position hardware elements as a mirror image.
Pattern Notes and Helpful Hints
Color and Material Guide
The pattern uses a thoughtful color palette that creates that vintage romantic aesthetic:
Feel free to customize these colors to suit your style. A sage green body with botanical print fabric would be lovely. Or try navy blue with a toile pattern for a French countryside feel.
I really hope you love making this Dusty Rose Vintage Floral Barrel Purse as much as I loved putting this pattern together. It’s the kind of project that feels special from start to finish, and the result is something you’ll reach for again and again.
If you make this bag, I would absolutely love to see it. Save this pattern to your Pinterest boards so you can find it easily when you’re ready to start, and please drop a comment below to let me know how yours turns out. Happy crocheting!
Want a Quick & Easy Printable Version?
Get a clean, beautifully formatted PDF of this pattern — easy to follow step by step, ready to print or save on any device. No scrolling, no distractions, just the pattern.
Get the Printable PDF →