
I set out to design a tote bag that would feel truly special. Something structured enough to hold its shape, beautiful enough to show off, and interesting enough to keep me engaged through every round. The combination of a clean cream body with that bold magenta mandala panel was exactly what I had in mind.
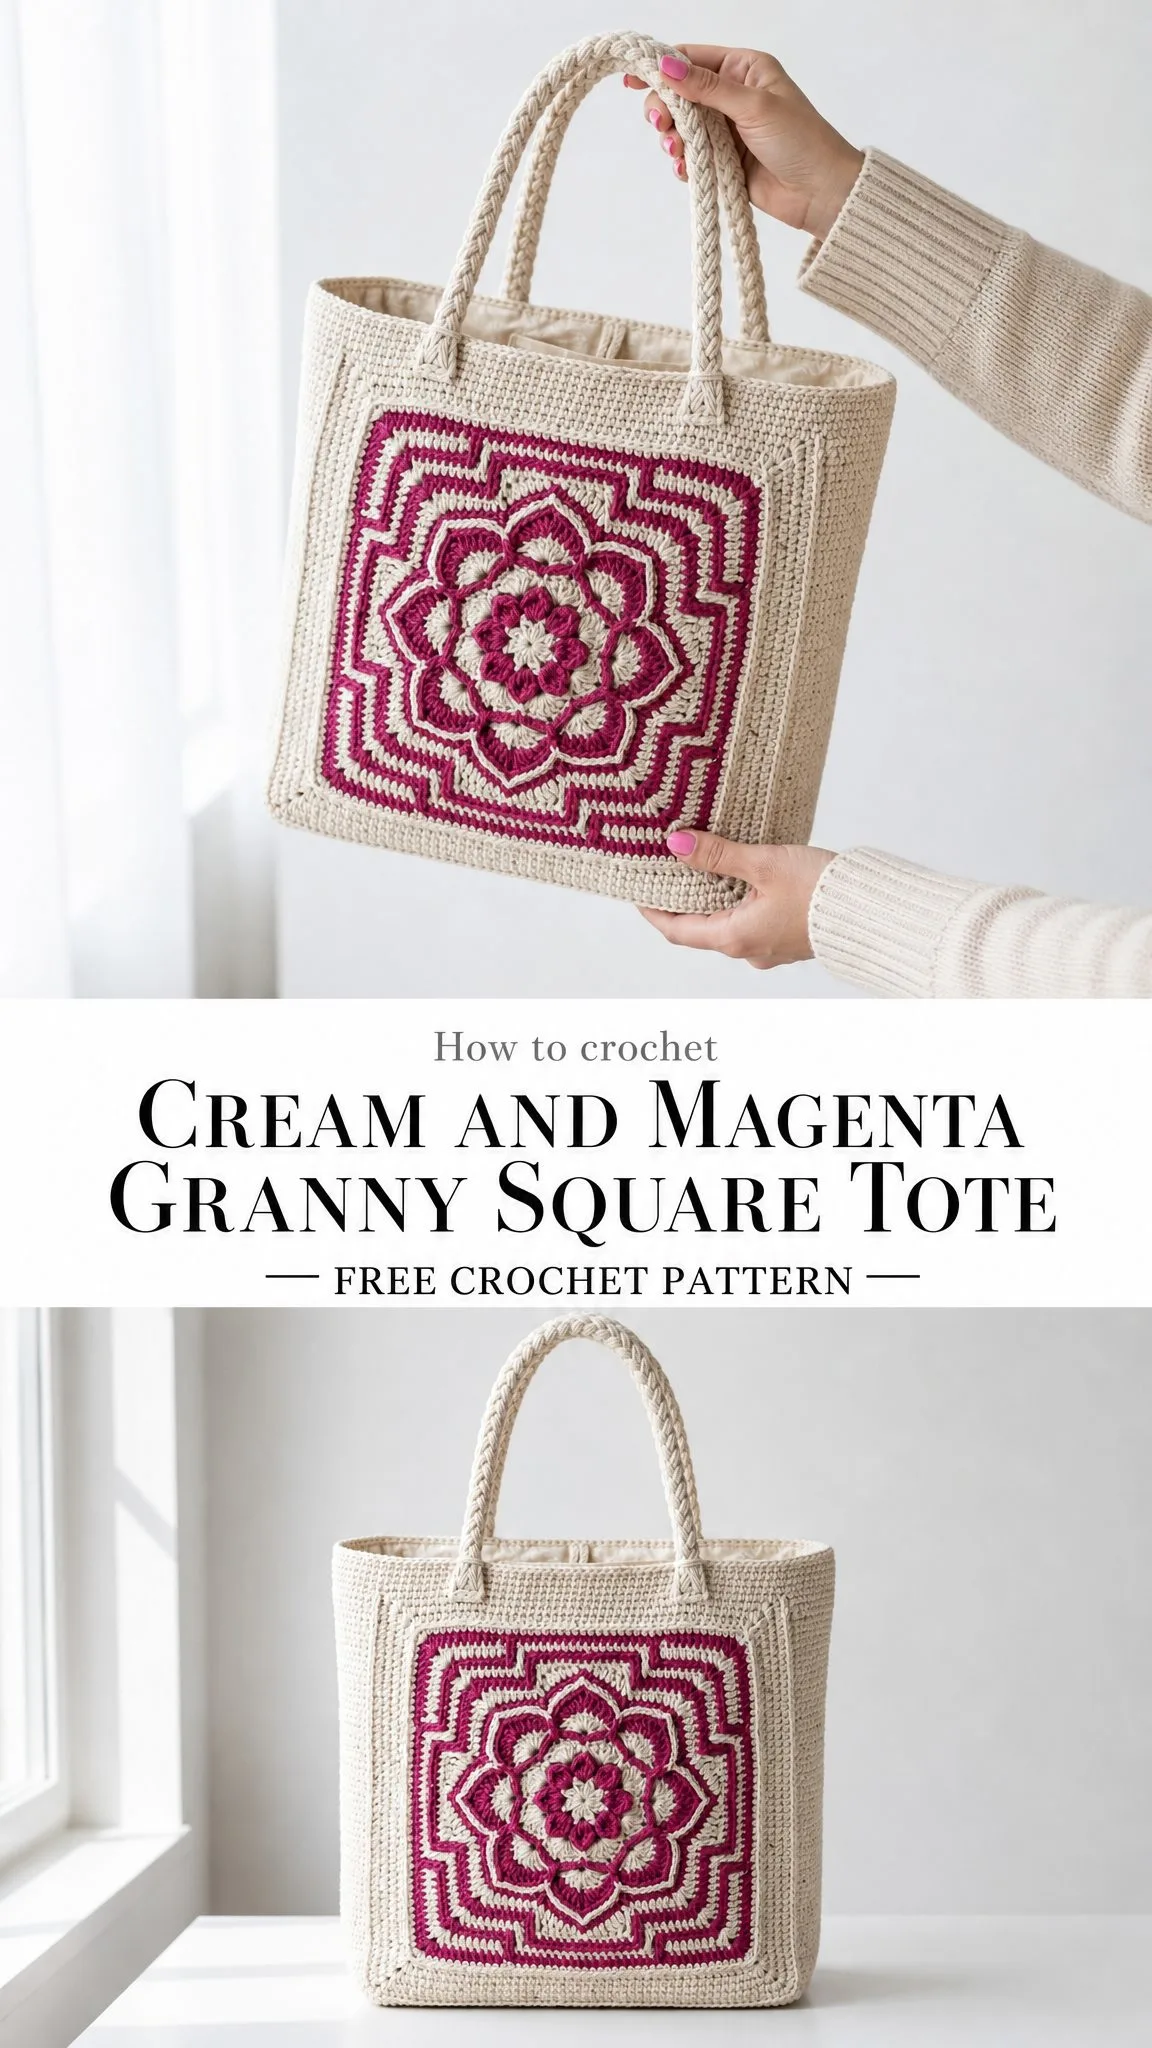
This bag checks every box I wanted. The construction builds your skills without overwhelming you. The mandala square gives you that satisfying meditative rhythm of working in rounds. And the finished piece looks like something you would find in a high-end boutique.
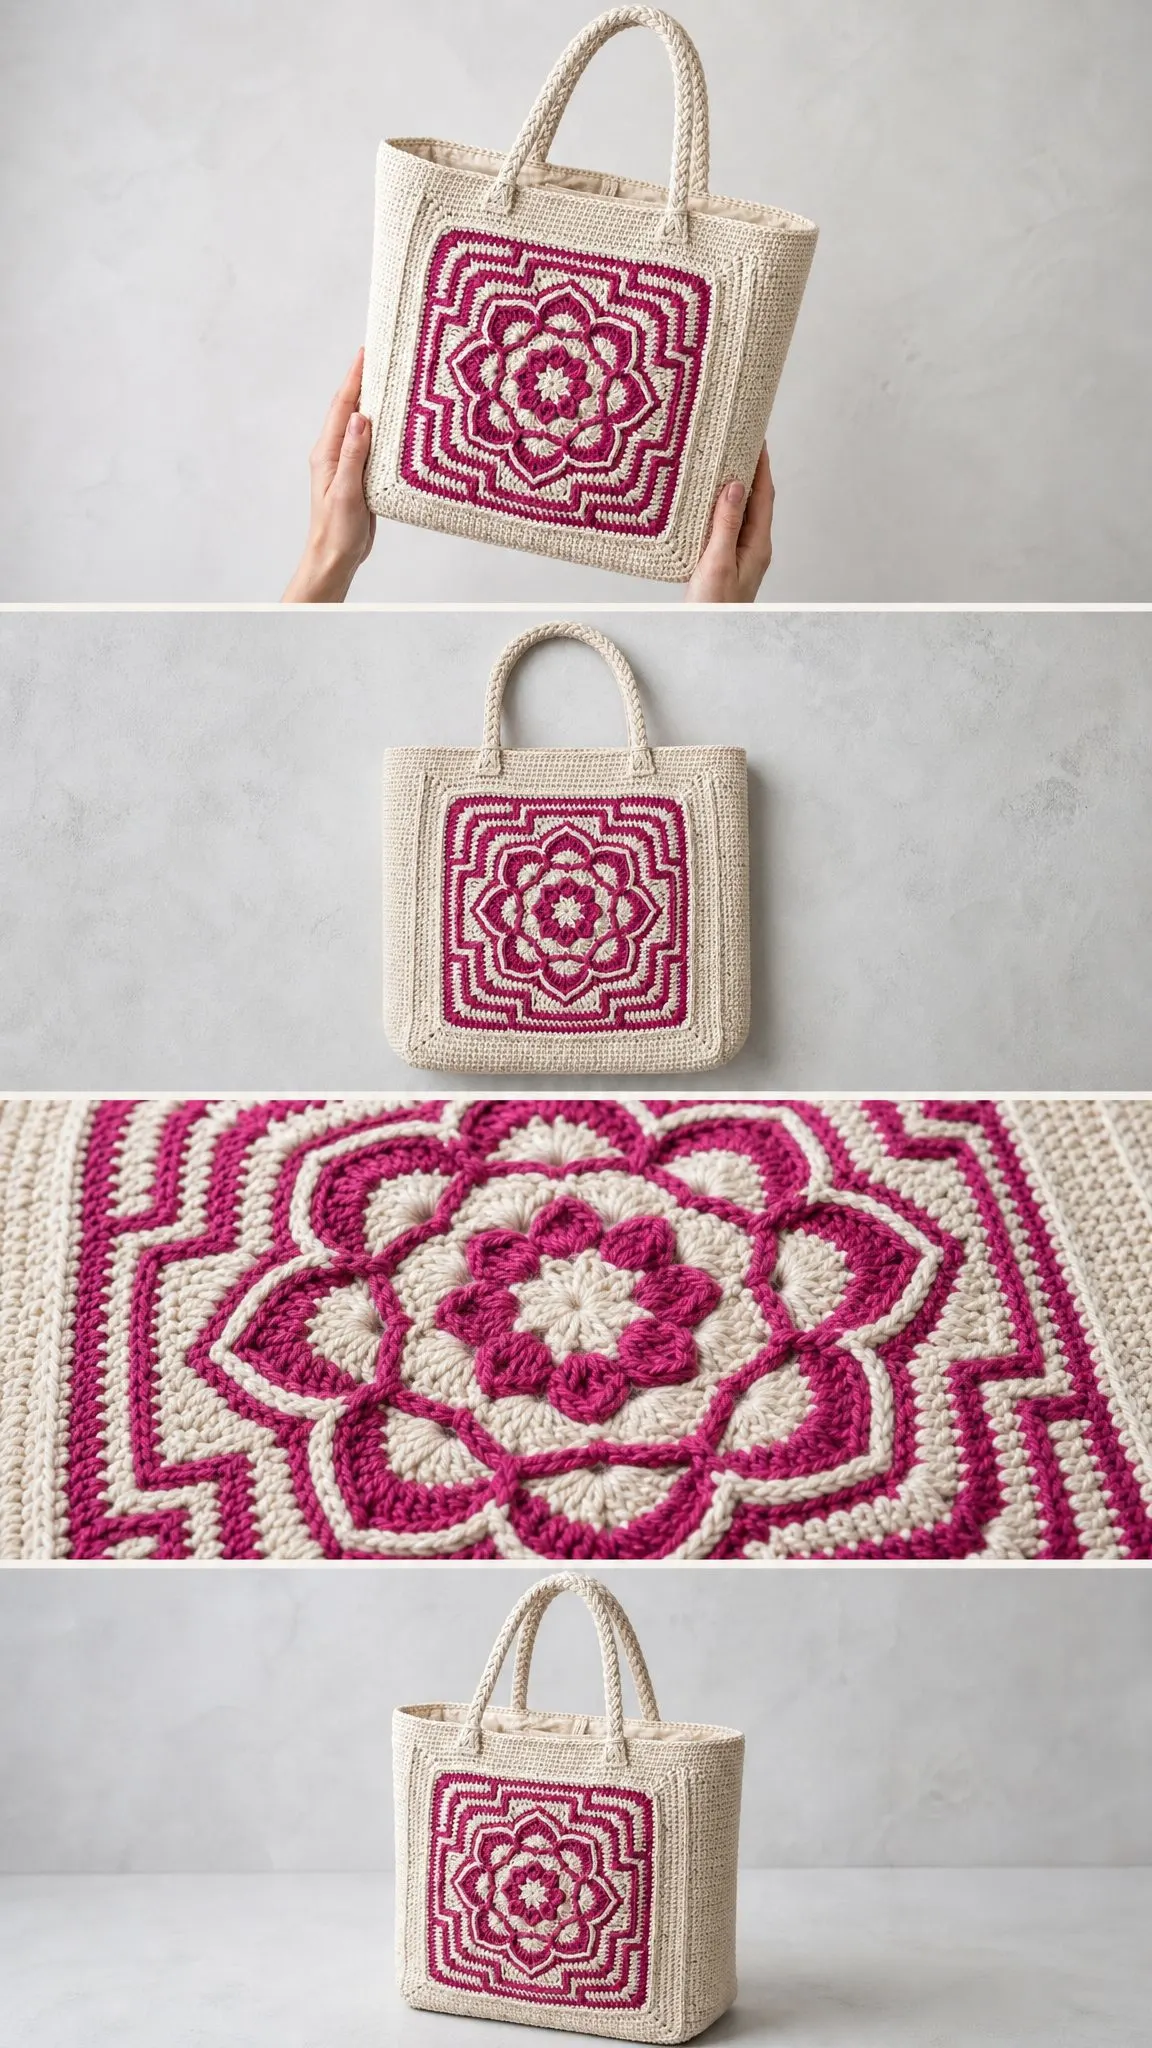
I am SO pleased with how this turned out. The dimensional flower center, the geometric border with those stepped corner details, the sturdy braided handles. It all comes together into a tote that is as practical as it is gorgeous.
About This Crochet Pattern
This structured crochet tote bag features a cream cotton body worked in single crochet (sc) from the base up. The star of the show is the large raised mandala-style granny square panel applied to both the front and back faces. You will work the square panel separately in rounds using a combination of standard stitches and front post stitches to create that beautiful dimensional flower and geometric border effect.
The bag has a firm, boxy shape with a flat base and upright sides. Braided rope-style handles give it a polished, professional finish. A fabric lining completes the interior.
Skill Level: Advanced Intermediate
The bag body construction is straightforward single crochet in the round. The mandala granny square requires working front post stitches, joining rounds in two colors, and reading a multi-round motif with consistent tension. If you are comfortable with colorwork and textured stitches, you will complete this project confidently.
Time Estimate: Approximately 25 to 35 hours total. The mandala squares account for roughly 10 to 14 hours each. The bag body is approximately 6 to 8 hours. Assembly and finishing add 3 to 4 hours.
Finished Size
Bag body: approximately 14 inches wide by 13 inches tall by 5 inches deep (35.5 cm wide by 33 cm tall by 12.5 cm deep), not including handles.
Handles: approximately 11 inches long by 0.75 inches wide (28 cm by 2 cm).
Mandala panel: approximately 10 inches by 10 inches (25.5 cm by 25.5 cm).
Materials Needed for This Crochet Tote Bag
Yarn
Main Color (MC): cream or natural off-white, 100 percent cotton, worsted weight (Category 4), approximately 900 yards (820 m) total.
Contrast Color (CC): magenta or deep fuchsia, 100 percent cotton, worsted weight (Category 4), approximately 350 yards (320 m) total.
Recommended Yarn Options
1. Lion Brand 24/7 Cotton in Ecru (MC) and Magenta (CC). This yarn has excellent stitch definition for textured work, is machine washable, and holds its shape well in structured bag construction.
2. Paintbox Yarns Simply DK Cotton used doubled (MC in Champagne, CC in Raspberry). Doubling a DK gives a sturdy fabric close to worsted gauge and the color range is wide.
3. Paintbox Yarns Cotton DK used doubled (MC in Paper White, CC in Fuchsia). Same principle as above. The smooth finish highlights the dimensional stitch texture of the mandala.
Substitution Note: Choose a smooth, tightly spun cotton or cotton-blend with low stretch. Avoid fuzzy or textured yarns that will obscure the front post stitch definition in the mandala panel. Whatever yarn you choose, swatch to the stated gauge before beginning. Cotton has little elasticity and your stitch count must be precise for the panel to fit the bag face correctly.
Hooks
Notions
Gauge
With G-6 / 4.0 mm hook and worsted weight cotton:
18 stitches by 22 rows = 4 inches by 4 inches (10 cm by 10 cm) in single crochet, blocked.
Mandala panel round gauge: completed through Round 14 of the Mandala Square = approximately 10 inches by 10 inches (25.5 cm by 25.5 cm), blocked.
Gauge is critical for this project. The mandala panel is designed to fit precisely on the bag face. If your panel is smaller, go up a half hook size. If larger, go down a half hook size. Always block your gauge swatch with the same method you plan to use for the finished pieces.
Abbreviations (US Terms)
Special Stitches
Front Post Treble Crochet (fptr)
Yarn over twice. Insert hook from front to back to front around the post of the indicated stitch in the round below (not into the top loops). Pull up a loop. (Yarn over, pull through 2 loops on hook) three times. One fptr complete. This stitch creates a raised ridge on the front surface and is the primary texture stitch in the mandala panel.
Front Post Double Crochet (fpdc)
Yarn over once. Insert hook from front to back to front around the post of the indicated stitch in the round below. Pull up a loop. (Yarn over, pull through 2 loops on hook) twice. One fpdc complete.
Back Post Double Crochet (bpdc)
Yarn over once. Insert hook from back to front to back around the post of the indicated stitch in the round below. Pull up a loop. (Yarn over, pull through 2 loops on hook) twice. One bpdc complete.
Popcorn Stitch
Work 5 dc into the same stitch. Remove hook from working loop. Insert hook from front to back through the top of the first dc of the group. Pick up the working loop and pull it through. Ch 1 to close. One popcorn complete. This creates the raised center bud of the mandala flower.
Petal Cluster
(Yarn over, insert hook into indicated st, pull up loop, yarn over, pull through 2 loops) 3 times into the same stitch. Yarn over, pull through all 4 loops on hook. Ch 1 to close. One petal cluster complete.
Joining New Color
At the end of the last stitch before a color change, stop before the final yarn over that completes the stitch. Drop current color to back. Pick up new color and complete the stitch with the new color. Continue with new color. Carry unused color loosely along the back or cut and rejoin as specified.
Pattern Notes Before You Begin
The bag is worked in two main sections: the bag body (worked in the round from the base) and the mandala panels (worked flat in rounds, two identical panels made). The mandala panels are blocked and then seamed to the front and back of the finished bag body before lining and handle attachment.
All rounds of the bag body begin and end at the same point. Use a stitch marker to indicate the beginning of each round and move it up as you work.
The bag body is worked in continuous rounds of single crochet with no turning. The right side faces outward throughout.
The mandala square is worked in joined rounds (join each round with a slip stitch, chain to begin). Turn your work at the start of each round only when specified for the textured post stitch rounds.
When working fptr stitches in the mandala, always work into the stitch of the round before the most recently completed round unless otherwise stated. The fptr draws the stitch up from below and wraps around the post of that lower stitch, creating the dimensional effect.
For the lining: Cut two rectangles 15 inches by 14 inches (38 cm by 35.5 cm) for front and back, two rectangles 6 inches by 14 inches (15 cm by 35.5 cm) for sides, and one rectangle 15 inches by 6 inches (38 cm by 15 cm) for the base. Seam allowance of 0.5 inch (1.3 cm) is included.
Step by Step Crochet Tutorial
Part One: Bag Base and Body
The base is worked as a flat oval in single crochet, then the sides are built upward in continuous rounds.
Bag Base
Foundation Chain: With MC and G-6 hook, ch 38.
Round 1 (RS): Sc in second ch from hook and in each ch across to last ch. Work 3 sc in last ch (corner). Rotate work 180 degrees. Sc in each remaining loop of the foundation ch across to first ch. Work 3 sc in first ch. Join with sl st to first sc. Do not turn. (78 sc)
Note: The oval base has 36 stitches across each long edge and 3 corner stitches at each short end, giving 36 plus 36 plus 3 plus 3 = 78.
Round 2: Ch 1. Sc in same st as join. Sc in each of next 35 sc. 3 sc in next sc (center corner st). Sc in each of next 36 sc. 3 sc in next sc (center corner st). Sc in last sc. Join with sl st to first sc. (82 sc)
Round 3: Ch 1. Sc in same st as join. Sc in each of next 36 sc. 3 sc in next sc. Sc in each of next 38 sc. 3 sc in next sc. Sc in last sc. Join with sl st to first sc. (86 sc)
Round 4: Ch 1. Sc in same st as join. Sc in each of next 37 sc. 3 sc in next sc. Sc in each of next 40 sc. 3 sc in next sc. Sc in each of next 2 sc. Join with sl st to first sc. (90 sc)
Round 5: Ch 1. Sc in same st as join. Sc in each of next 39 sc. 3 sc in next sc. Sc in each of next 42 sc. 3 sc in next sc. Sc in each of next 3 sc. Join with sl st to first sc. (94 sc)
Checkpoint: The base oval should measure approximately 14 inches by 5 inches (35.5 cm by 12.5 cm) at this point. Lay it flat and measure before continuing.
Bag Sides
Round 6 (begin sides): Ch 1. Working into back loops only for this round only, sc in each st around. Join with sl st to first sc. (94 sc)
Note: Working into back loops only for Round 6 creates a crisp fold line that defines the base edge.
Rounds 7 through 77 (body): Ch 1. Sc in each sc around. Join with sl st to first sc. (94 sc each round)
Work all 71 rounds through both loops. This builds the side walls.
Checkpoint: After Round 77 the bag body should measure approximately 13 inches tall from the base fold line. The bag circumference should measure approximately 38 inches.
Round 78 (top edge): Ch 1. Sc in each sc around. Join with sl st. Fasten off MC. (94 sc)
Part Two: Mandala Square Panel (Make 2)
Each panel is approximately 10 inches by 10 inches. Work two identical panels.
All rounds begin and end on the RS unless a round specifies to turn.
Use CC (magenta) and MC (cream) as directed.
Center Flower
Round 1: With CC and G-6 hook, make a magic ring. Ch 3 (counts as first dc). Work 11 dc into ring. Join with sl st to top of ch-3. (12 dc)
Round 2: Ch 1. Work 1 popcorn stitch in first st. Ch 2. (Work 1 popcorn in next st. Ch 2.) 11 times. Join with sl st to top of first popcorn. (12 popcorns, 12 ch-2 sps)
Round 3: Sl st into first ch-2 sp. Ch 1. (Sc, hdc, dc, hdc, sc) in each ch-2 sp around. Join with sl st to first sc. (12 petals, 60 sts total)
Round 4: Working behind the petals of Round 3, insert hook from front between the first and second petal of Round 3 and sl st around the ch-2 post of Round 2 below. Ch 4. (Sl st around next ch-2 post of Round 2 between petals. Ch 4.) 11 times. Join with sl st to first sl st. (12 ch-4 loops)
Round 5: Ch 1. (Sc, hdc, 3 dc, hdc, sc) in each ch-4 loop around. Join with sl st to first sc. (12 large petals, 84 sts total)
Round 6: Ch 1. Working in MC, sc in back loop of each st around. Join with sl st to first sc. (84 sc)
Round 7: Ch 1. Sc in first 3 sc. (Work fptr around the post of the popcorn two rounds below the current round, centering between petals. Sc in next 7 sc.) 11 times. Work fptr around last remaining popcorn post. Sc in last 4 sc. Join with sl st to first sc. (84 sts: 72 sc, 12 fptr)
Checkpoint: The center flower motif should measure approximately 3.5 inches (9 cm) across at this point.
Building the Square
Round 8 (CC): Ch 3 (counts as dc). Dc in each st around. Join with sl st to top of ch-3. (84 dc)
Round 9 (MC): Ch 1. Sc in each dc around. Join with sl st. (84 sc)
Round 10 (CC): Begin shaping into a square. Ch 3. (Dc in next 20 dc. In next dc: dc, ch 2, dc [corner made]. Dc in next 20 dc. In next dc: dc, ch 2, dc.) Rep once more, working corners at stitch 42 and stitch 63 relative to start of round. You will distribute 84 sts evenly into 4 sections of 21 sts, placing a ch-2 corner at every 21st st. (84 dc plus 4 ch-2 corner spaces)
Round 11 (MC): Ch 1. (Sc in each dc to corner ch-2 sp. [Sc, ch 2, sc] in ch-2 sp.) 4 times. Join with sl st. (92 sc plus 4 ch-2 corner sps)
Round 12 (CC): Ch 3. (Dc in each sc to corner ch-2 sp. [2 dc, ch 2, 2 dc] in ch-2 sp.) 4 times. Join with sl st. (100 dc plus 4 ch-2 corner sps)
Round 13 (MC): Ch 1. (Sc in each dc to corner ch-2 sp. [Sc, ch 2, sc] in corner sp.) 4 times. Join with sl st. (108 sc plus 4 ch-2 corner sps)
Round 14 (CC): Ch 3. (Fptr around the corresponding dc two rounds below at regular intervals: work fptr every 4th stitch across each side to create the raised geometric border lines. Between fptr, work dc in remaining sts. At each corner: [2 dc, ch 2, 2 dc].) Work as follows per side: dc in 2 sc. (Fptr in corresponding st 2 rounds below. Dc in next 3 sc.) Rep 5 times per side. Fptr in corresponding st. Dc in 2 sc. [2 dc, ch 2, 2 dc] in corner sp. Rep for all 4 sides. Join with sl st. (116 sts plus 4 ch-2 corner sps)
Round 15 (MC): Ch 1. (Sc in each st to corner sp. [Sc, ch 2, sc] in corner sp.) 4 times. Join with sl st. (124 sc plus 4 ch-2 corner sps)
Round 16 (CC): Ch 3. ([2 dc, ch 2, 2 dc] in corner sp. Dc in each sc across to next corner sp.) 4 times. Join with sl st. (132 dc plus 4 ch-2 corner sps)
Round 17 (MC): Ch 1. (Sc in each st across to corner sp. [Sc, ch 2, sc] in corner sp.) 4 times. Join with sl st. (140 sc plus 4 ch-2 corner sps)
Round 18 (CC): Repeat Round 16 method. ([2 dc, ch 2, 2 dc] in corner sp. Dc across.) 4 times. Join. (148 dc plus 4 ch-2 corner sps)
Round 19 (MC): Ch 1. (Sc across to corner sp. [Sc, ch 2, sc] in corner sp.) 4 times. Join. (156 sc plus 4 ch-2 corner sps)
Round 20 (CC, geometric notch border): This round creates the stepped corner notch effect visible in the finished panel. At each corner, instead of a smooth curve, work the following sequence:
At each side leading into a corner: dc in next 3 sts. Ch 2. Sk 2 sts. Dc in next 3 sts (this creates the notch indent at corners). [2 dc, ch 2, 2 dc] in corner ch-2 sp. Rep notch sequence on exit side of corner. Dc in each remaining st across to next corner approach.
Work the notch sequence at all 4 corners. Join with sl st. Fasten off CC.
Round 21 (MC): Ch 1. Sc in each dc around. Sc in each ch-2 notch sp (2 sc per notch sp). [Sc, ch 2, sc] in corner sp. Join. (Approx 164 sc plus 4 ch-2 corners and 8 notch sps)
Round 22 (CC): Ch 3. Dc in each sc around. At corners: [2 dc, ch 2, 2 dc]. At notch ch-2 sps: [dc, ch 2, dc]. Join. Fasten off.
Round 23 (MC): Ch 1. Sc in each dc around. Sc in each notch sp. [Sc, ch 2, sc] in corner sp. Join. Fasten off MC.
Checkpoint: The panel should measure approximately 10 inches by 10 inches (25.5 cm by 25.5 cm) after blocking. If it measures less than 9.5 inches, redo with a larger hook. If more than 10.5 inches, redo with a smaller hook.
Part Three: Handle Tubes (Make 6)
Each braided handle is made from 3 crocheted tubes braided together. Make 6 tubes total (3 per handle).
Each tube:
Foundation: With MC and E-4 / 3.5 mm hook, ch 5. Join with sl st to form a ring.
Round 1: Ch 1. Sc in each ch around. (5 sc)
Rounds 2 through 95: Sc in each sc around, stuffing tube lightly if desired for firmness. (5 sc each round)
Fasten off, leaving a 12-inch tail.
The tube will curl naturally into a cord shape.
Make 6 tubes.
Braid Assembly: For each handle, hold 3 tubes together. Secure the tops together with a length of scrap yarn. Braid the 3 tubes firmly for the full length. Secure the bottoms. Each completed braided handle measures approximately 19 inches long before attachment. The working handle loop above the bag measures approximately 11 inches.
Part Four: Assembly
Block both mandala panels by wet-blocking: submerge in cool water, press out excess water in a towel, pin to blocked measurements of 10 inches by 10 inches on a foam mat, and allow to dry completely.
Block the bag body by spraying lightly with water and smoothing to shape. Allow to dry.
Attach mandala panels: Center one panel on the front face of the bag body. The panel should sit with its lower edge approximately 1 inch above the base fold line and its side edges approximately 2 inches from the side edges of the bag. Pin or baste in place. Using MC and a yarn needle, whipstitch around all 4 edges of the panel through both panel edge stitches and the corresponding stitches of the bag body. Work a stitch into every other sc of the bag body for a secure, flat join. Repeat for the back face.
Attach handles: Each handle attaches at two points. Measure 3 inches from each side edge on the front top edge and mark with stitch markers. These two points are approximately 8 inches apart. For each marked point, insert the braid end between the bag body and lining, folding the braid tail down 1.5 inches inside the bag. Stitch through all layers firmly with yarn needle and MC. Repeat at the second attachment point. Sew across the braid width three times for security. Repeat for back handles.
Install lining: Cut lining pieces as noted in Pattern Notes. Seam the lining pieces into a box shape matching the bag interior dimensions. Press seams. If using interfacing, fuse before sewing. Fold the top edge of the lining down by 0.75 inch and press. Place lining inside bag, wrong side of lining facing wrong side of bag body. Pin the folded top edge of the lining just below the top edge of the bag. Slipstitch around the full top perimeter with needle and matching thread, catching the top edge of the crocheted fabric.
Size Customization Tips
To make the bag wider: Add chains in multiples of 2 to the foundation chain. Every 2 additional chains adds approximately 0.5 inch of width. Adjust the mandala panel attachment position accordingly.
To make the bag taller: Add additional plain sc rounds to the body section before Round 78. Each round adds approximately 0.18 inch. Add 5 to 6 rounds to add approximately 1 inch of height.
To make the bag deeper: Add stitches to each short end of the foundation oval. Every 2 additional stitches at each end adds approximately 0.25 inch of depth. Adjust lining dimensions to match.
For a smaller bag: Remove chains from the foundation in multiples of 2 and reduce body rounds proportionally. You may wish to reduce the mandala panel by omitting Rounds 20 through 23 for a simpler border.
Finishing and Care
Weave in all yarn ends securely, especially at color change points in the mandala panel. Thread ends through 4 to 6 stitches in alternating directions and trim.
Cotton benefits greatly from blocking. The stitches even out and the panel squares up correctly.
Care instructions: Hand wash in cool water with mild detergent. Do not wring. Roll in a clean towel and press to remove excess water. Reshape and dry flat. Avoid hot water, which can shrink cotton and distort the raised post stitches.
Machine wash on delicate cycle in a mesh laundry bag is acceptable if the yarn label permits, but hand washing prolongs the life of the mandala panel detail.
Do not bleach. Do not tumble dry. Iron on low heat if needed, using a pressing cloth and avoiding the raised mandala stitches.
Store the bag stuffed with tissue or a small tote insert to preserve the boxy shape when not in use.
Final Thoughts on This Cream and Magenta Granny Square Tote Crochet Pattern
Thank you so much for choosing this pattern. I hope you love making it as much as I loved designing it. If you finish your tote, I would absolutely love to see it. Tag me on Instagram or share a photo in our Facebook group. Seeing your finished projects is honestly the best part of my day.
If you want to save this crochet tote bag pattern for later, go ahead and pin it to your favorite Pinterest board. And please drop a comment below if you make one. I always love hearing how your projects turn out and seeing the color combinations you choose.
