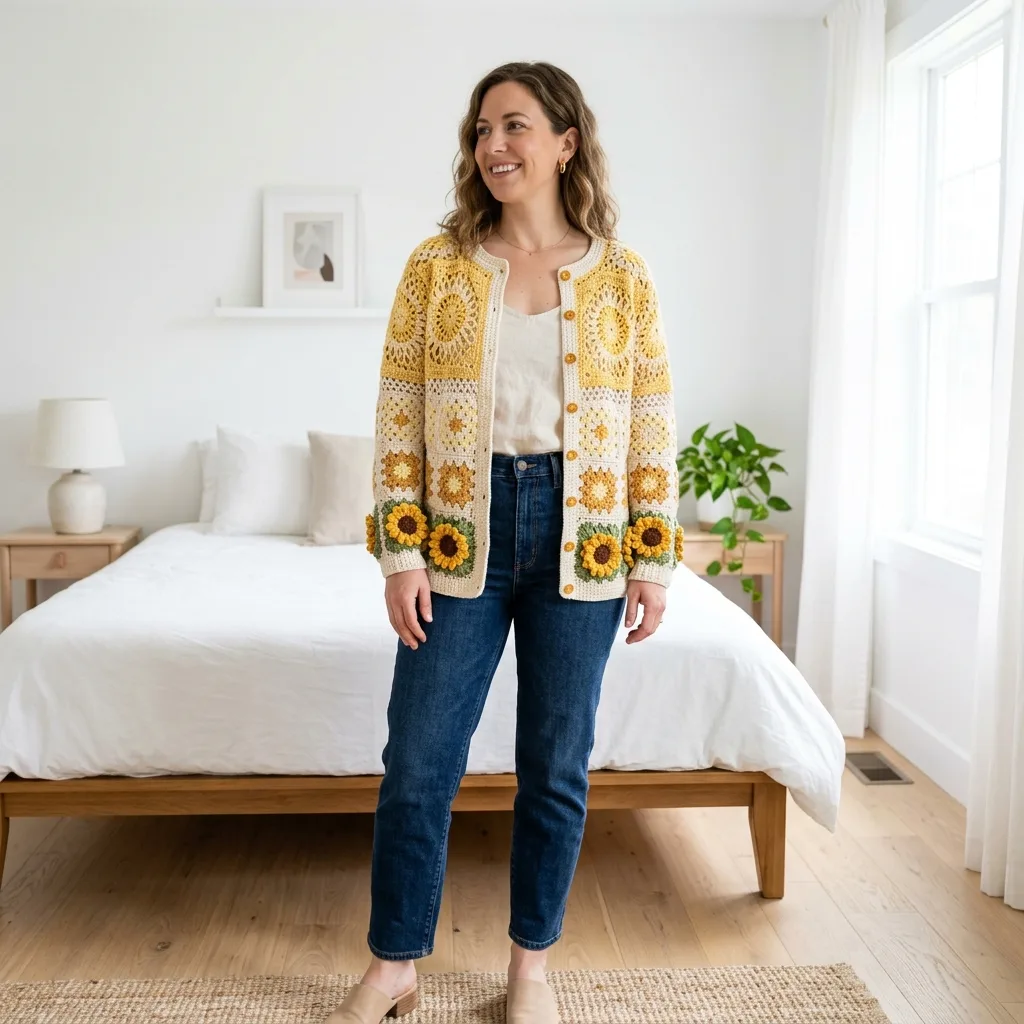
Looking for a cozy layering piece that doubles as a cheerful statement maker? This granny square cardigan delivers on both fronts. Built from 77 joined squares in a warm buttercup palette, it features bold sunflower appliques along the hem and cuffs that practically radiate sunshine. The stitches are straightforward double crochet (dc) clusters and simple single crochet (sc) bands, making this an approachable project for confident intermediate crocheters. It works up as a relaxed, drop shoulder fit in size M/L, with clear customization notes so you can adjust for your measurements. Whether you are treating yourself or crafting a one-of-a-kind gift, this cardigan is sure to bring smiles.
Get the Ad-Free PDF Pattern
You can find the free pattern below, or you can purchase the ad-free printable PDF from my shop.
Get the Printable PDF →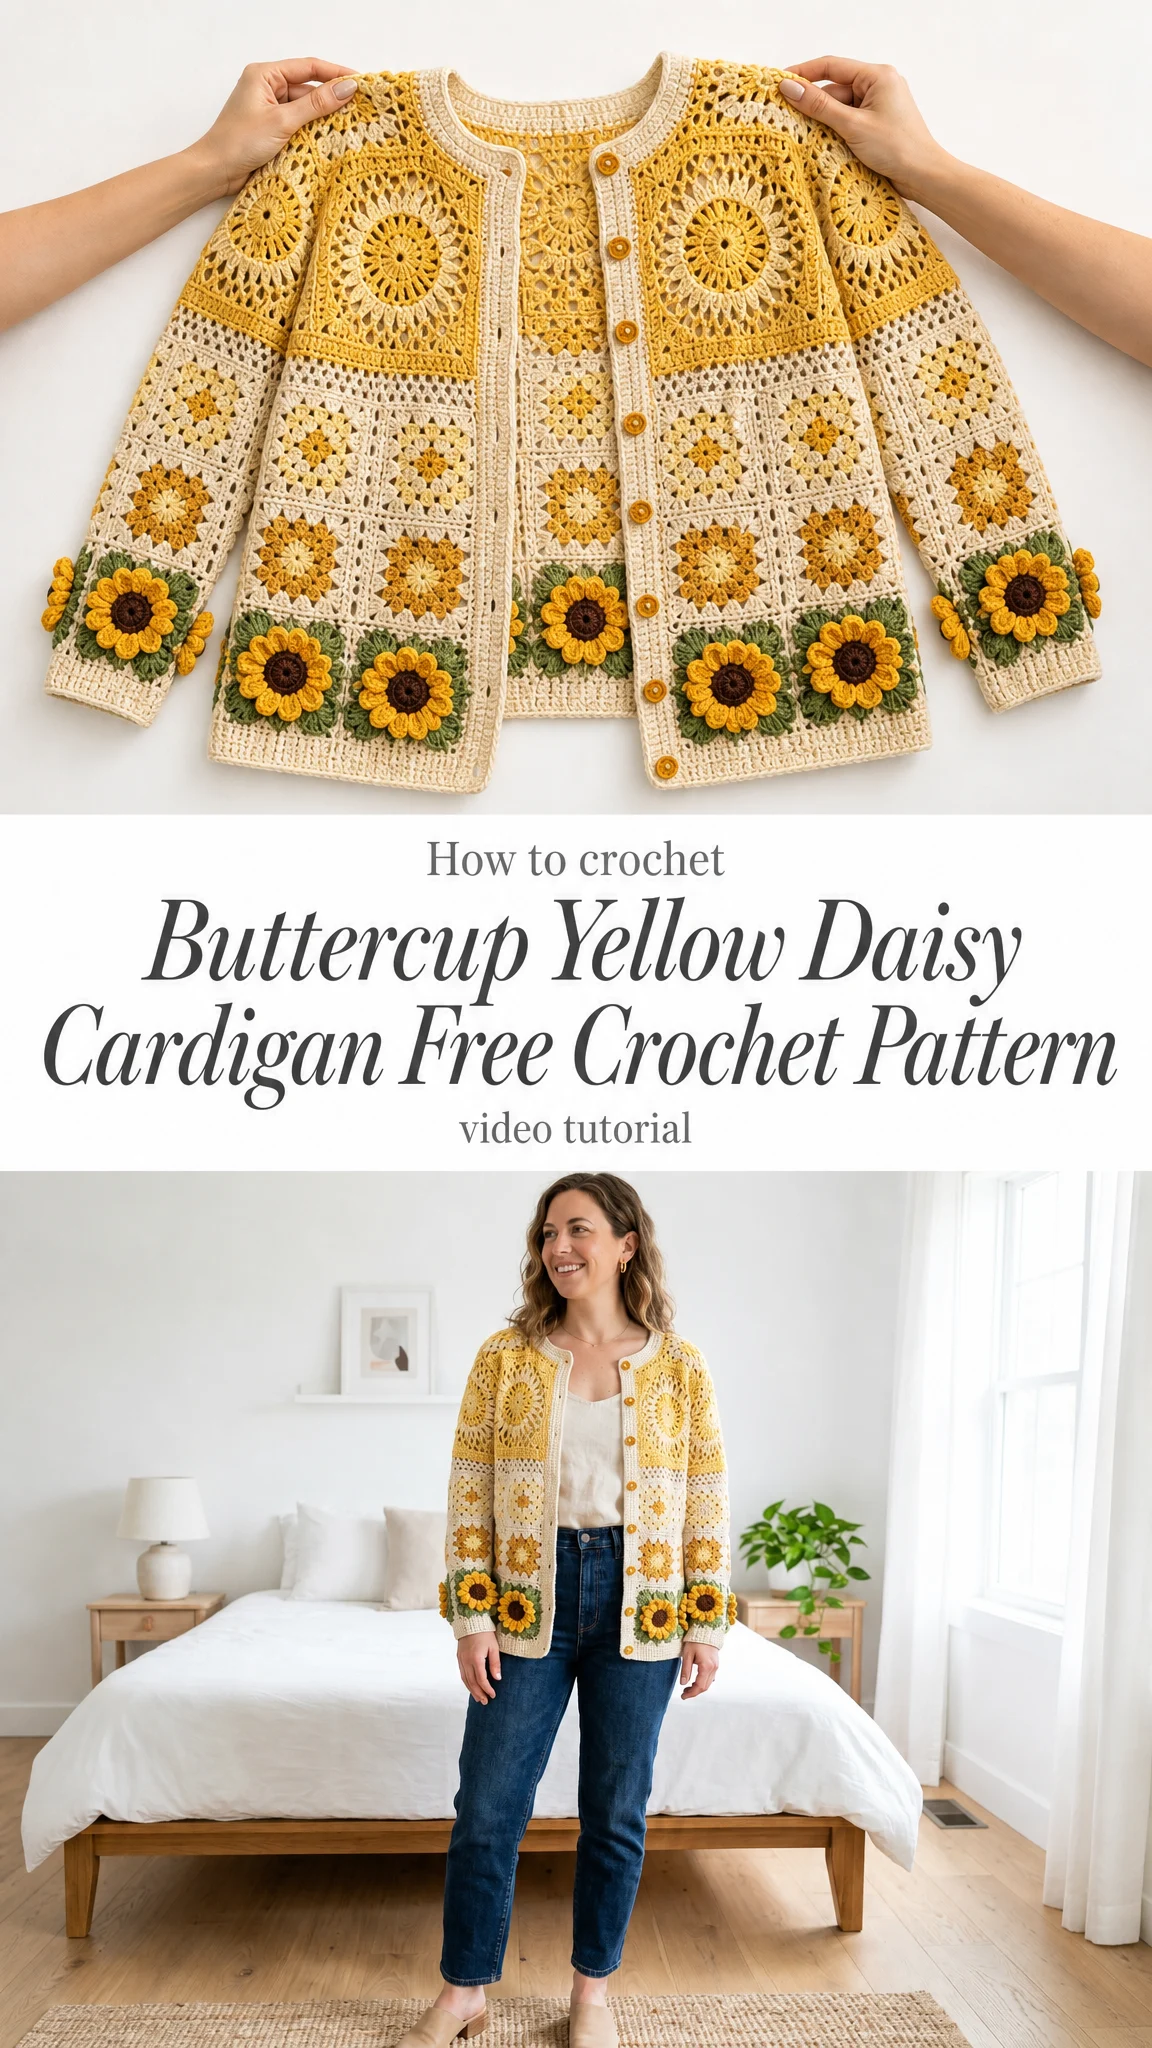
About This Buttercup Yellow Daisy Cardigan Pattern
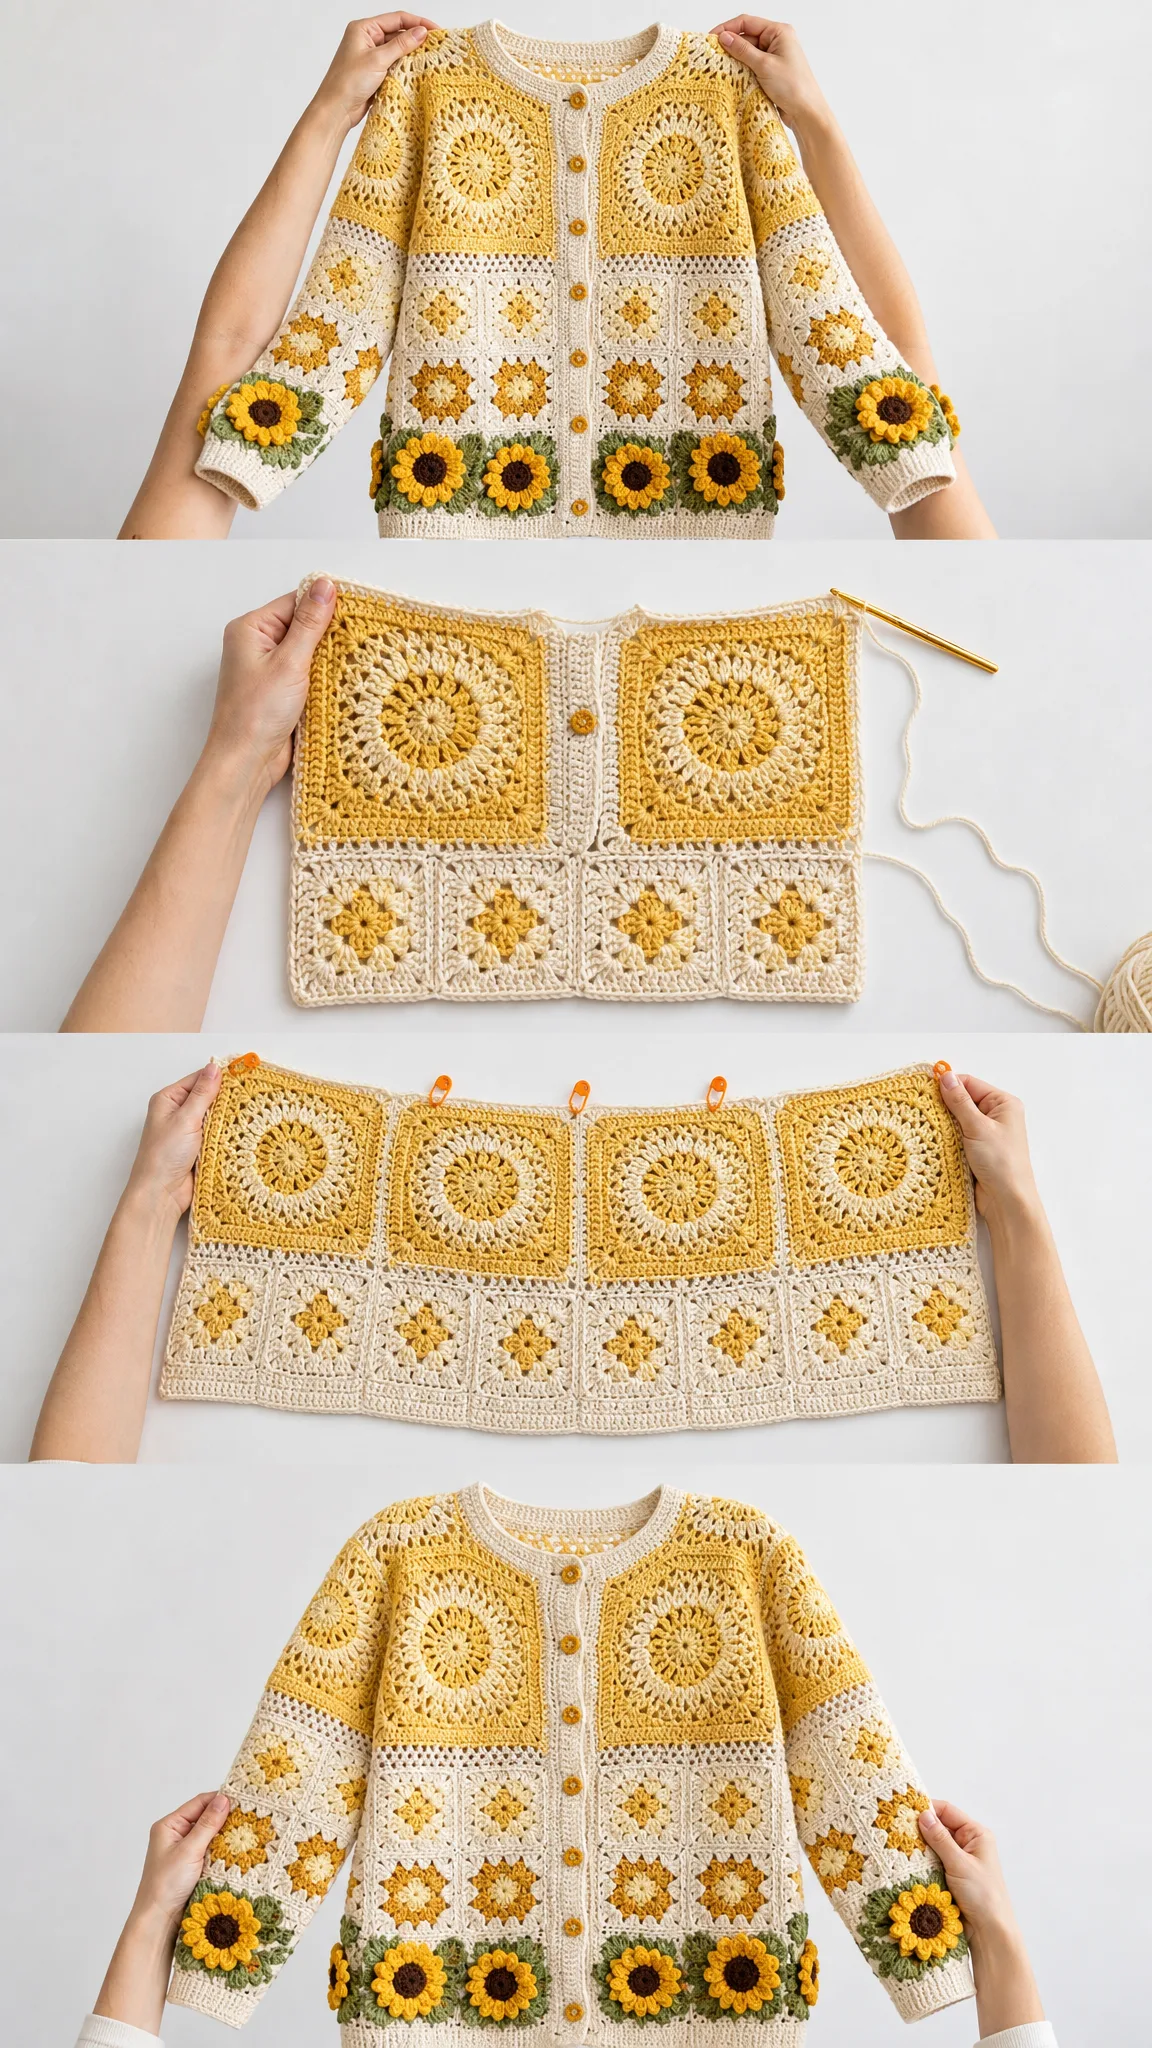
This cardigan uses a modular construction that makes the process feel manageable and even portable. You will create individual granny squares, join them into body panels and sleeve tubes, then add ribbed bands and adorable sunflower appliques. The color placement creates beautiful horizontal bands: butter yellow across the shoulders, cream through the middle, golden yellow lower down, and cream squares adorned with sunflowers along the bottom edge.
The finished cardigan measures 40 inches around the bust with 4 to 6 inches of positive ease, giving you that relaxed, comfortable fit perfect for layering over a simple tee or tank.
Skill Level
This pattern is rated confident intermediate. You should be comfortable with:
If you have made granny square blankets or simple garments before, you are ready for this project.
Finished Measurements
| Measurement | Finished Size |
|---|---|
| Bust circumference | 40 in / 101.5 cm |
| Body length from shoulder | 23 in / 58.5 cm |
| Upper sleeve circumference | 16 in / 40.5 cm |
| Sleeve length from dropped shoulder | 18 in / 45.5 cm |
| Ease | 4-6 in / 10-15 cm positive ease |
Materials Needed
Yarn:
Color breakdown:
Hooks:
Notions:
Yarn Suggestions
Here are some excellent options that will give you beautiful stitch definition:
When substituting yarn, choose a smooth DK or light worsted that blocks to gauge without becoming stiff. Match gauge first, then adjust motif count only if you want a different size.
Gauge
Gauge is mandatory for this pattern.
One blocked 5-round granny square should measure 4 inches by 4 inches (10 cm by 10 cm).
Row gauge for bands is approximately 18 single crochet (sc) rows equals 4 inches (10 cm).
Swatch, block, and match both measurements before beginning. This step saves you from heartbreak later. Trust me on this one.
Abbreviations
| Abbreviation | Meaning |
|---|---|
| ch | chain: wrap yarn over hook and pull through loop |
| sl st | slip stitch: insert hook, yarn over, pull through stitch and loop on hook |
| sc | single crochet: insert hook, yarn over, pull up loop, yarn over, pull through both loops |
| hdc | half double crochet: yarn over, insert hook, pull up loop, yarn over, pull through all 3 loops |
| dc | double crochet: yarn over, insert hook, pull up loop, yarn over, pull through 2 loops twice |
| st(s) | stitch(es) |
| sp | space |
| BLO | back loop only: work into only the back loop of the stitch |
| RS/WS | right side / wrong side |
Special Stitches
Granny corner: Work 3 dc, ch 2, 3 dc all in the same ch-2 corner space. This creates the characteristic corner bump that lets you join squares neatly.
Join-as-you-go slip stitch join: With wrong sides together, hold matching edges aligned. Insert hook through both corner spaces or both tops of stitches, then slip stitch loosely across. This creates a flat, nearly invisible seam on the right side.
Ribbed sc band: Chain 1, sc in each st, turn. On following rows, sc in BLO across. Working in the back loop only creates flexible ribbing that lies flat and stretches nicely.
Flower petal: In next st, work sl st, ch 2, 3 dc, ch 2, sl st. One petal made. When you work these around a ring, they naturally fan out into a dimensional flower.
Note for Left-Handed Makers
Work the same written instructions. Your joining direction will mirror the diagrams, but keep right sides facing out and match the same panel counts. The construction works identically.
The Pattern
Motifs: 5-Round Base Granny Square
Make 77 base granny squares total. Plan your colors in bands:
Each square measures 4 inches by 4 inches (10 cm by 10 cm) after blocking.
Round 1: In magic ring, ch 3 (counts as dc), 2 dc, ch 2, *3 dc, ch 2; rep from * 3 times, join. (12 dc, 4 corners)
Round 2: Sl st to corner. Ch 3, 2 dc, ch 2, 3 dc in same corner; *ch 1, granny corner in next corner; rep from * 3 times, ch 1, join. (24 dc, 4 ch-1 sps)
Round 3: Sl st to corner. Granny corner, *ch 1, 3 dc in next ch-1 sp, ch 1, granny corner; rep around, join. (36 dc, 8 ch-1 sps)
Round 4: Work granny corners with two 3-dc side groups between corners, separated by ch 1. Join. (48 dc, 12 ch-1 sps)
Round 5: Work granny corners with three 3-dc side groups between corners, separated by ch 1. Join and fasten off. (60 dc, 16 ch-1 sps)
Sunflower Applique
Make 17 sunflowers total.
Center: With brown, ch 4, join into a ring.
Round 1: Ch 1, 12 hdc in ring, join. (12 hdc)
Petals: Join golden yellow. Work one flower petal in each hdc around. (12 petals)
Leaves: Join green behind petals. *Ch 6, sc in 2nd ch from hook and next 4 ch, sl st behind next petal; rep 6 to 8 times. Fasten off, leaving a sewing tail.
Panel Map and Joining
Here is how your squares arrange into panels:
| Panel | Motif Layout | Finished Piece |
|---|---|---|
| Back | 5 columns x 5 rows | 20 x 20 in / 51 x 51 cm |
| Left front | 2 columns x 5 rows | 8 x 20 in / 20.5 x 51 cm |
| Right front | 2 columns x 5 rows | 8 x 20 in / 20.5 x 51 cm |
| Sleeve 1 | 4 columns x 4 rows | 16 x 16 in / 40.5 x 40.5 cm |
| Sleeve 2 | 4 columns x 4 rows | 16 x 16 in / 40.5 x 40.5 cm |
Color Placement
Join Body Panels
1. Join the 25 back squares into a 5 x 5 rectangle. Checkpoint: 20 in wide x 20 in tall.
2. Join each front as a 2 x 5 rectangle. Checkpoint: Each front is 8 in wide x 20 in tall.
3. Shoulders: Seam each 8 in front shoulder to the outer 8 in of the back top edge, leaving a 4 in back neck opening.
4. Sides: Seam from lower hem upward for 12 in (30.5 cm), leaving the top 8 in (20.5 cm) open for each armhole.
5. Body before bands measures about 36 in (91.5 cm) around. Button bands add about 4 in (10 cm) total.
Join Sleeves
1. For each sleeve, join 16 squares into a 4 x 4 rectangle. Seam the long edges to make a tube. Checkpoint: Top opening is 16 in (40.5 cm) around.
2. Pin sleeve tube into armhole with seam at underarm. Sew evenly around the 16 in armhole opening. Repeat for second sleeve.
Bands, Cuffs, and Buttons
Work bands after all major seams are complete. Use a hook one size smaller if your bands flare.
Hem Edging
With cream and RS facing, join at right front lower corner. Work 1 sc in each dc and ch-sp along the lower edge, aiming for 3 sc per inch. Across 36 in, you should have about 108 sc. Work 3 rows sc, turning after each row. (108 sc)
Fasten off. Block the hem flat before sewing flowers if the edge waves.
Front and Neck Band
1. Pick up 60 sc along right front edge, 12 sc across back neck, and 60 sc down left front edge. (132 sc)
2. Rows 2-3: Ch 1, sc across, turn. (132 sc)
3. Buttonhole row, right front side: Sc 4, *ch 2, skip 2, sc 6; rep from * 7 times, then sc 72 across neck and left front. (118 sc, 7 ch-2 buttonholes)
4. Next row: Sc in each sc and 2 sc in each ch-2 sp across. (132 sc)
5. Rows 5-7: Ch 1, sc across. Fasten off. (132 sc)
Cuffs
1. At wrist edge, pick up 48 sc around. (48 sc)
2. Work 8 rounds sc BLO, joining each round. (48 sc)
3. Optional taper: On round 5, sc2tog every 11th and 12th st four times. (44 sc)
Sunflowers and Buttons
1. Sew 9 sunflowers across the body hem, one centered on each bottom-row square.
2. Sew 4 sunflowers around each sleeve cuff edge, one centered on each bottom sleeve square.
3. Sew 7 buttons opposite the buttonholes. Reinforce button backs with a small scrap of yarn if needed.
Customization Tips
Size Adjustments
Troubleshooting
| Issue | Fix |
|---|---|
| Squares differ in size | Steam block each square to exactly 4 in / 10 cm before joining |
| Band ripples | Use smaller hook or pick up fewer stitches, about 2 sc over 3 edge rows |
| Band pulls tight | Use larger hook or pick up closer to 1 sc per row |
| Armhole feels tight | Leave 1 extra square height open at side seam or add one sleeve column |
| Flowers curl | Steam gently from the wrong side and tack down petal tips |
Checkpoints
Use these measurements to verify your progress:
Finishing and Care
Blocking
1. Weave in all ends securely on the wrong side.
2. Wet block or steam block the cardigan to measurements, pinning the lower edge and front bands straight.
3. Let dry completely before adding buttons and final flower tacks.
4. Try on and add small hidden tacks at the underarm seam if the sleeve shifts.
Care Instructions
Final Thoughts on This Buttercup Yellow Daisy Cardigan Crochet Pattern
This cardigan brings together classic granny square construction with cheerful sunflower details that make it truly special. The modular approach means you can work on squares during your commute, waiting rooms, or cozy evenings at home. Then the satisfaction of joining them all together and watching your cardigan take shape is so rewarding.
I hope you enjoy making this buttercup yellow daisy cardigan as much as I enjoyed creating this pattern. The combination of simple stitches and bold floral accents creates something that looks complex but is absolutely achievable with patience and attention to gauge.
Thank you so much for choosing this pattern for your next crochet project! If you make this cardigan, I would absolutely love to see it. Share your photos on Instagram or Facebook and tag me so I can celebrate your beautiful work. Seeing your finished makes truly brightens my day.
If you loved this pattern, save it to your Pinterest boards so you can find it easily when you are ready to start. And please drop a comment below if you make this cozy cardigan. I would love to hear which color palette you chose!
Want a Quick & Easy Printable Version?
Get a clean, beautifully formatted PDF of this pattern — easy to follow step by step, ready to print or save on any device. No scrolling, no distractions, just the pattern.
Get the Printable PDF →