I’ve been hunting for the perfect everyday bag pattern for months, and this burgundy backpack is exactly what I had in mind. The structured shape, that gorgeous spiral flap, the braided straps. It checks every box. This is my new favourite t-shirt yarn project, and I’m so excited to share it with you.
Get the Ad-Free PDF Pattern
You can find the free pattern below, or you can purchase the ad-free printable PDF from my shop.
Get the Printable PDF →
What makes this backpack special is how polished it looks while still being totally achievable for someone who knows their basic stitches. The body is just single crochet worked in the round. The flap is a simple spiral circle. Nothing fancy, but the result looks like something you’d find in a boutique.
If you’ve been wanting to try t-shirt yarn but weren’t sure where to start, this is your sign. The chunky texture hides any small tension inconsistencies, and the whole bag comes together in a weekend. Let’s get into it.
About This Backpack Pattern
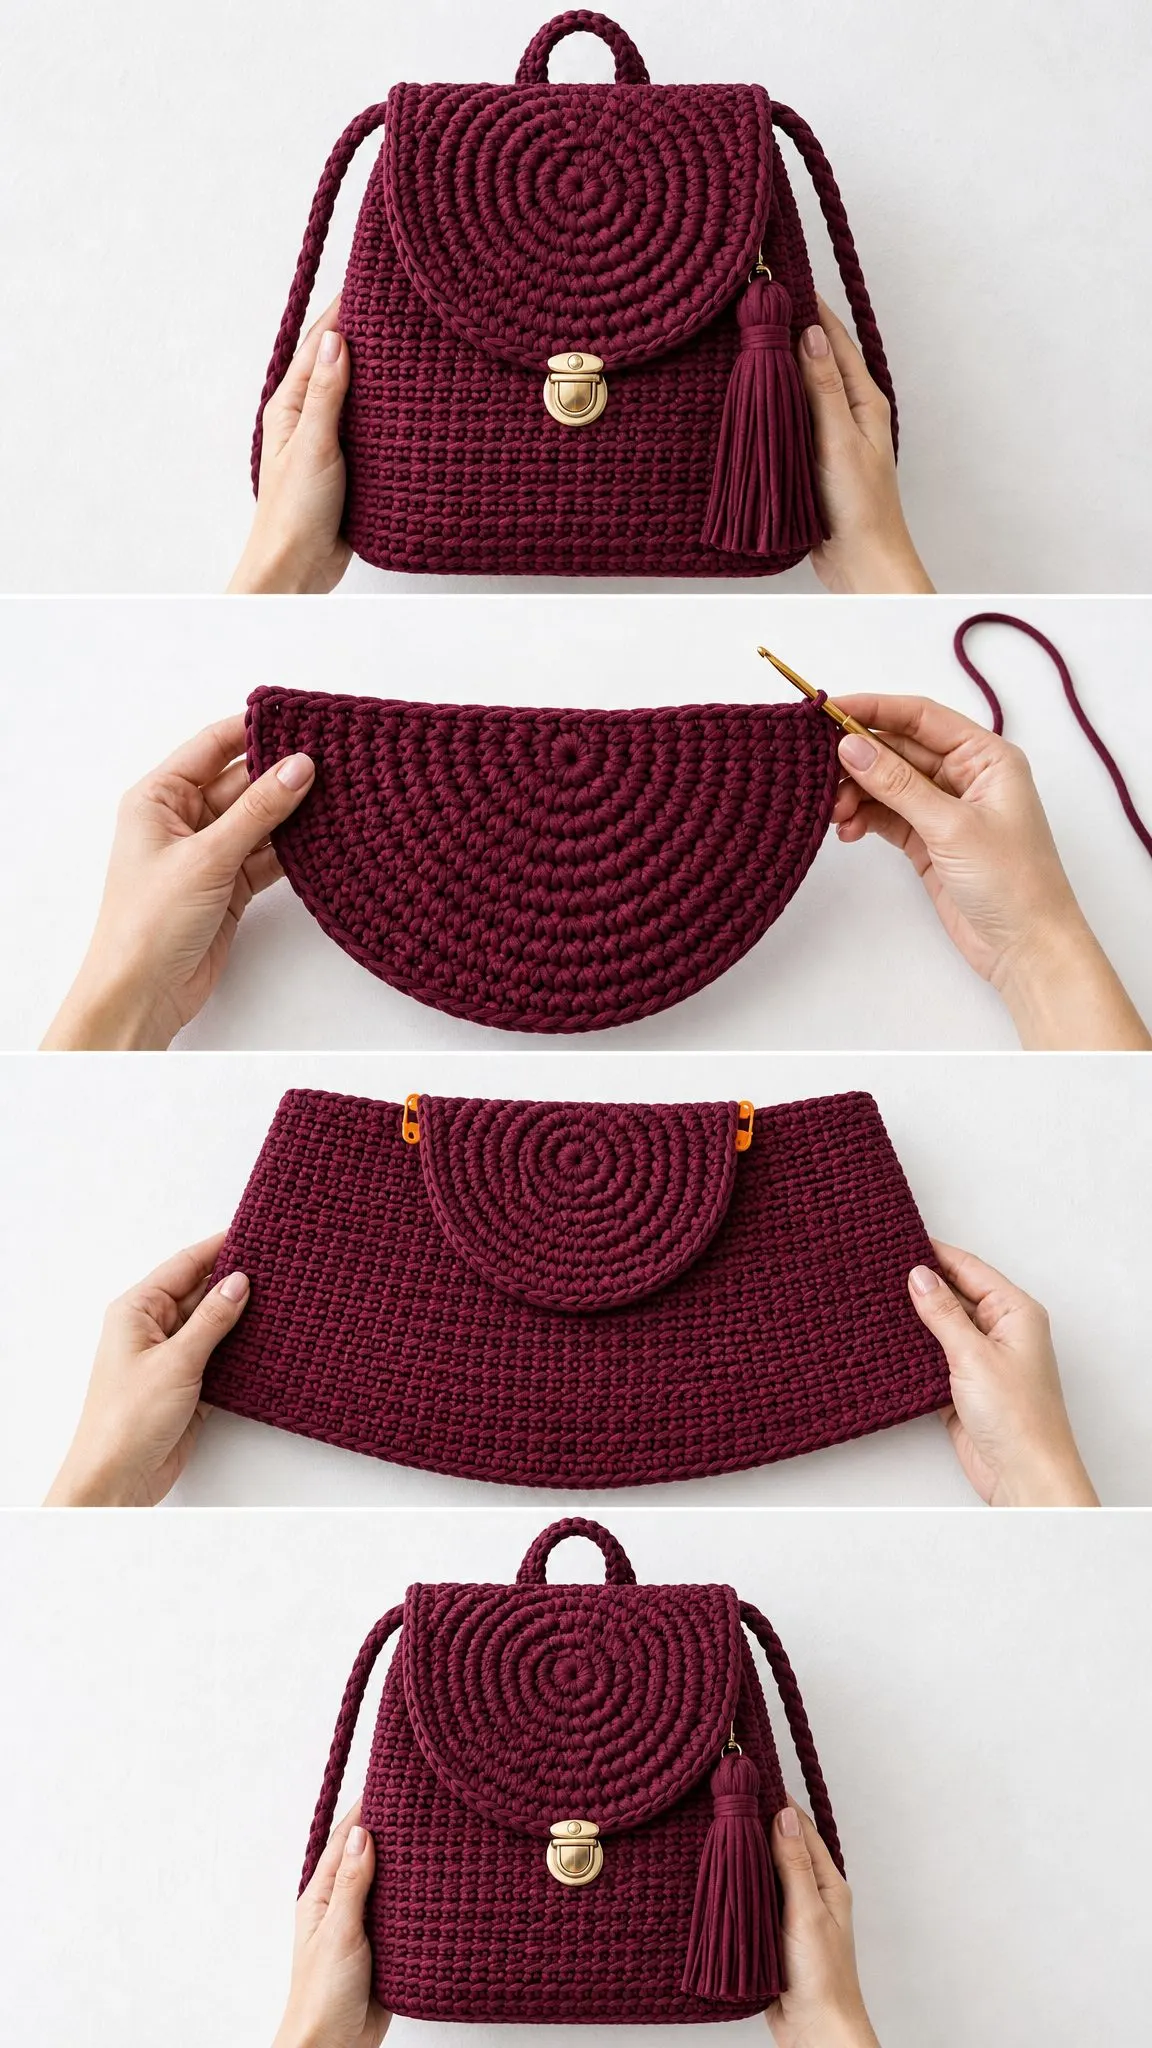
This structured mini backpack features a flat rectangular base, a textured body worked upward in joined rounds, and an oversized spiral flap that folds over the front. The finishing touches include a braided top handle, adjustable shoulder straps, a matching tassel charm, and a gold-tone tuck lock closure.
The construction method is straightforward. You’ll crochet a flat base first, then pick up stitches around the edge and work the body upward. The spiral flap is made separately and sewn to the back top edge. All the hardware and finishing elements get added at the end.
Finished size: Approximately 11 inches wide x 12 inches tall x 4 inches deep (28 x 30.5 x 10 cm)
Skill level: Confident beginner to intermediate. You’ll need to be comfortable with basic stitches, maintaining firm tension, seaming pieces together, installing hardware, and finishing cord elements.
Time estimate: 6 to 9 hours, depending on your yarn firmness and finishing pace.
Materials You’ll Need
Gathering your supplies before you start makes everything smoother. Here’s what the pattern calls for:
Yarn: 230 to 280 yards (210 to 256 metres) of super bulky t-shirt yarn or flat tape yarn in burgundy. The pattern suggests Hoooked Zpagetti for excellent bag structure, Wool and the Gang Jersey Be Good for a polished surface, or Paintbox Recycled T-Shirt Yarn as an accessible option with a strong colour range.
Hook: US L/11 (8 mm) crochet hook, or the size needed to match gauge.
Notions: Locking stitch markers, tapestry needle, sharp scissors, clips, tape measure.
Hardware: 1 gold-tone tuck lock or turn lock, 2 swivel hooks or D-rings, 2 strap rings, optional bag feet.
Optional extras: Fabric lining, plastic canvas or bag base insert, removable tassel cap or lobster clasp.
A quick note on yarn substitution. Choose a firm t-shirt yarn that creates a dense fabric at gauge. If your yarn is soft or stretchy, you may need to go down a hook size, add a lining, or use a plastic canvas insert to help the backpack hold its shape.
Gauge Information
Getting your gauge right matters here because it affects the bag’s structure and finished size.
Body gauge: 7 single crochet stitches x 7.5 rows = 4 inches (10 cm) in firm single crochet.
Flap gauge: Rounds 1 through 10 of the flap should measure approximately 10.5 to 11 inches (26.5 to 28 cm) across.
Make a 5 inch (13 cm) swatch before starting. Your fabric should feel firm but not board-stiff, and you shouldn’t see large gaps between stitches. If your swatch is too loose, try a smaller hook. If it’s too tight and rigid, go up a hook size.
Abbreviations and Special Stitches
Let me walk you through the abbreviations used in this pattern. All instructions use US crochet terminology. If you typically work from UK patterns, remember that US single crochet equals UK double crochet.
ch = chain
sl st = slip stitch
sc = single crochet (insert hook, yarn over, pull up a loop, yarn over, pull through both loops)
inc = increase, which means working 2 single crochet stitches in the same stitch
st(s) = stitch or stitches
rnd = round
rep = repeat
RS / WS = right side / wrong side
Special Techniques
Firm single crochet: This is just a regular single crochet worked with snug tension. Insert your hook under both loops, yarn over, pull up a loop, yarn over, pull through both loops. Keep your loops tight so the bag stands upright on its own.
Invisible join: When you finish a round, cut your yarn and pull the tail through the final stitch. Thread your tapestry needle, insert it under both loops of the first stitch of the round, then back into the centre of the final stitch. This creates a seamless join. Weave in the tail.
Simple Romanian-style cord: Chain 2. Work a single crochet in the second chain from hook. Turn your work clockwise, insert your hook under the side bump that just formed, and work another single crochet. Continue turning clockwise after each stitch and working under the newest side bump until your cord reaches the required length. This creates a sturdy round cord perfect for handles and straps.
Pattern Notes Before You Begin
A few things to keep in mind as you work:
The chain 1 at the start of rows and rounds does not count as a stitch. Don’t work into it when you come back around.
Join body rounds with a slip stitch to the first single crochet, then chain 1 to begin the next round.
Use markers to divide the body into sections: front 20 stitches, side 7 stitches, back 20 stitches, side 7 stitches. This helps you keep track of placement for hardware and the flap.
For a cleaner front appearance, place all your joins at one back corner.
Keep all seams and hardware tails on the inside of the bag.
If you’re left-handed, work the same stitch counts and measurements. Your spiral will travel in the opposite direction, so place the tassel and closure by measurement rather than by right/left visual orientation.
Instructions: Base and Body
Base Rectangle
Row 1: Chain 21. Work a single crochet in the second chain from hook and in each chain across. Turn. (20 sc)
Rows 2 through 7: Chain 1, single crochet in each stitch across. Turn after Rows 2 through 6. Do not turn after Row 7. (20 sc each row)
Edge pick-up round: Chain 1. Work 20 single crochet across the top edge, 7 single crochet down the first side edge, 20 single crochet across the foundation edge, and 7 single crochet up the second side edge. Join with a slip stitch. (54 sc)
At this point, your base should measure approximately 11 inches x 4 inches (28 x 10 cm). If it’s significantly off, check your gauge.
Body
Round 1: Chain 1, single crochet in each stitch around. Join with a slip stitch. (54 sc)
Rounds 2 through 22: Chain 1, single crochet in each stitch around. Join with a slip stitch. (54 sc each round)
Top edge: Chain 1, slip stitch loosely in each stitch around. Join and fasten off. (54 sl sts)
Here’s a helpful checkpoint. At the end of Round 12, your body should be approximately 6.5 inches (16.5 cm) tall from the base. At the end of Round 22, it should be approximately 12 inches (30.5 cm) tall. The front panel should remain about 11 inches (28 cm) wide.
Instructions: Spiral Flap
The flap is worked in a continuous spiral. Do not join rounds. Move your stitch marker up at the first stitch of each round to keep track of where you are.
Round 1: Make a magic ring, work 6 single crochet in ring. (6 sc)
Round 2: Increase in each stitch around. (12 sc)
Round 3: [Single crochet in next stitch, increase] 6 times. (18 sc)
Round 4: [Single crochet in next 2 stitches, increase] 6 times. (24 sc)
Round 5: [Single crochet in next 3 stitches, increase] 6 times. (30 sc)
Round 6: [Single crochet in next 4 stitches, increase] 6 times. (36 sc)
Round 7: [Single crochet in next 5 stitches, increase] 6 times. (42 sc)
Round 8: [Single crochet in next 6 stitches, increase] 6 times. (48 sc)
Round 9: [Single crochet in next 7 stitches, increase] 6 times. (54 sc)
Round 10: [Single crochet in next 8 stitches, increase] 6 times. (60 sc)
Finish: Slip stitch in next stitch, fasten off with a 24 inch (61 cm) tail for sewing.
Flap Placement
Pin the top 20 stitches of the flap to the back top edge, centred between the side markers. Sew through the top third of the circle only, leaving the lower circle unattached so it folds over the front. The bottom of the flap should land about 2.5 inches (6.5 cm) below the top front edge.
Optional Raised Spiral Accent
For a more pronounced spiral texture like you see in the photos, surface slip stitch along the ridge between rounds from the centre outward using matching yarn. Keep the stitches relaxed so the flap stays flat.
Straps, Handle, Tassel, and Hardware
Top Handle
Make one Romanian-style cord 9 inches (23 cm) long. Curve it into a handle shape and sew both ends to the back top edge, placing the ends about 2.5 inches (6.5 cm) apart. Reinforce by stitching through the inside several times.
Shoulder Straps
Make 2 cords, each 30 inches (76 cm) long, or adjust the length for your preferred fit.
Attach one end of each cord to the upper back, 2 stitches in from each side marker.
Attach the lower ends to rings at the lower back corners. Keep both straps equal in length before weaving in tails.
For the braided look shown in the photos, make each strap from three 34 inch (86 cm) yarn strands, braid firmly, knot the ends, then sew the knots inside the bag.
Tassel
Wrap yarn 14 times around a 6 inch (15 cm) piece of cardboard. Tie the top with a 10 inch (25 cm) strand, cut the lower loops, wrap the neck 0.75 inches (2 cm) below the top, and trim evenly. Attach near the right side of the flap with a ring or swivel clasp.
Closure Installation
Centre the tuck lock on the front panel, approximately 4.5 inches (11.5 cm) below the top edge.
Close the flap over the front and mark the matching lock plate position on the flap.
Install hardware according to the package directions. Add a small scrap of felt, lining fabric, or plastic canvas behind the hardware to prevent tearing.
A helpful tip: install the closure after the flap is sewn on and the bag is lightly shaped. This gives you the most accurate placement and helps the flap sit smoothly.
Finishing and Blocking
Weave in all ends securely on the inside. For bulky yarn tails, split them and weave each half in a different direction for a more secure finish.
Steam lightly from a distance without pressing the stitches flat. Shape the base and corners by hand while the fabric is still warm.
For a crisp silhouette, cut plastic canvas to fit the base and back panel, then cover with lining fabric.
Add lining before final hardware tightening if you want hidden hardware backs.
Size Customization Options
Wider bag: Add 2 stitches to the base chain for every extra 1 inch (2.5 cm) of width. Keep the front and back panels equal.
Deeper bag: Add 2 more base rows for about 1 inch (2.5 cm) additional depth.
Taller bag: Add or remove body rounds. At this gauge, 2 rounds add about 1 inch (2.5 cm) height.
Larger flap: Continue the spiral increase pattern by adding one more single crochet between increases each round. Stop when the circle is about the same width as the front panel.
Troubleshooting Common Issues
Bag flares outward: Your tension may be loose. Go down a hook size or add a lining insert.
Flap cups inward: Increases are too tight or yarn is stiff. Steam gently, or add one plain single crochet round before the final round.
Flap ruffles: Increases are too loose. Redo the final round with a smaller hook or stop at Round 9.
Body twists: Keep joins at the same back corner and avoid over-tightening the slip stitch join.
Closure pulls through fabric: Add reinforcement behind both closure pieces.
Care Instructions
Spot clean with cool water and mild soap.
Do not wring. Press between towels and reshape while damp.
Dry flat away from direct heat.
Store stuffed with tissue paper to preserve the flap and base shape.
You Did It!
Thank you so much for making this backpack with me. I really hope you love your finished bag as much as I love mine. If you make one, I’d absolutely love to see it! Tag me on Instagram or share a photo in the Facebook group.
If this pattern is going on your to-make list, go ahead and save it to your Pinterest boards so you can find it easily when you’re ready to start. And if you do make it, please leave a comment below. I love hearing how projects turn out and seeing your colour choices!
Want a Quick & Easy Printable Version?
Get a clean, beautifully formatted PDF of this pattern — easy to follow step by step, ready to print or save on any device. No scrolling, no distractions, just the pattern.
Get the Printable PDF →