Last summer, I lost my favorite bracelet somewhere between the beach towels and the tide pools. It was nothing fancy, just a simple little charm bracelet my daughter made me years ago. I spent the whole drive home thinking about how I could recreate that beachy feeling with my hook and some thread. That evening, I pulled out my crochet cotton and started experimenting. Three prototypes and one very late night later, I had these tiny ocean charms sitting on my desk. My daughter laughed and said they looked better than the original. I think she might be right.
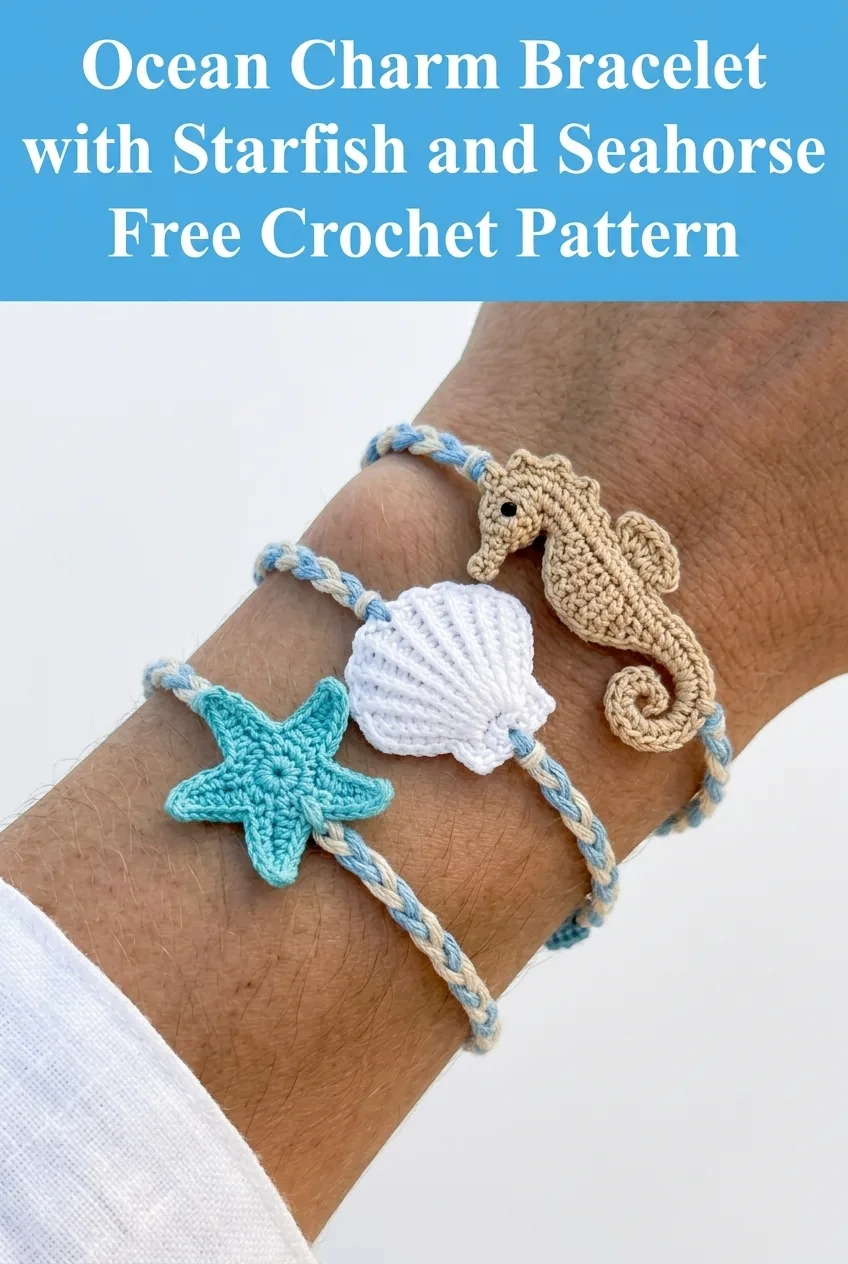
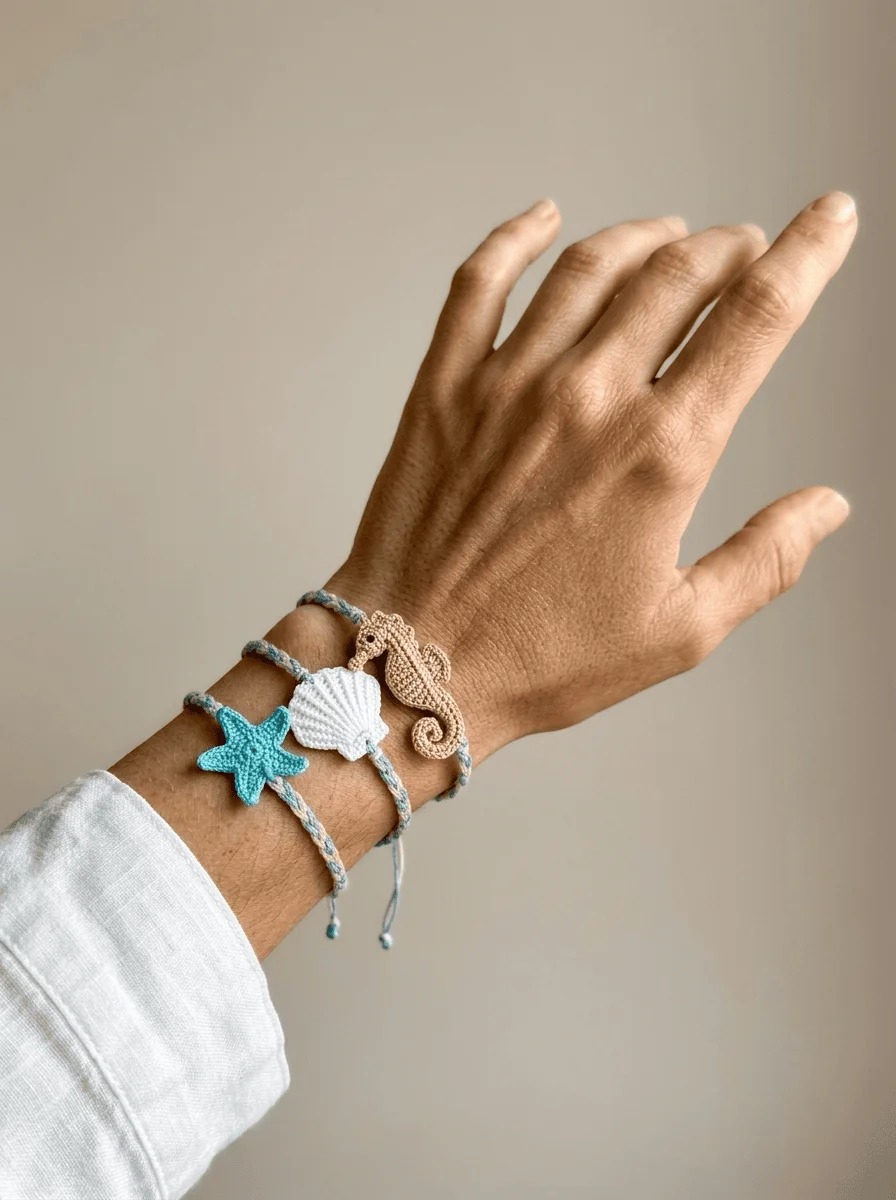
This ocean charm bracelet brings all the coastal vibes to your wrist with three adorable motifs: a textured starfish, a ridged scallop shell, and a curly little seahorse. Each charm works up in about fifteen minutes once you get the hang of it, and the adjustable braided bands mean one size truly fits most. Whether you want to wear all three stacked together or gift them individually, these bracelets make the perfect summer accessory.
Why You’ll Love This Crochet Bracelet Pattern
These miniature ocean charms look impressive but use only basic stitches. If you can work a single crochet (sc) and a double crochet (dc), you can absolutely make these. The tiny scale might feel intimidating at first, but I promise the stitches are the same ones you already know. They’re just a bit smaller.
The charms measure approximately 1 to 1.5 inches each, making them lightweight and comfortable for everyday wear. The braided cord bands feature an adjustable sliding knot closure, so you don’t need to worry about clasps or sizing.
This bracelet pattern works beautifully as:
Materials You’ll Need
Gathering your supplies before you start makes the whole process smoother. Here’s everything you’ll need for all three bracelets:
Yarn:
Hook:
Notions:
Gauge:
Exact gauge isn’t critical for jewelry projects, but your fabric should be tight enough that no gaps appear between stitches. If your stitches look loose and holey, go down a hook size.
Skill Level and Techniques
This pattern is beginner friendly with some intermediate shaping. You should be comfortable with:
Don’t worry if you’ve never crocheted anything this small before. The stitches work exactly the same way. Just take it slow and use good lighting. I like to crochet these near a window during the day.
Abbreviations and Stitch Definitions
Let me break down every stitch you’ll need:
ch = chain: Wrap yarn over hook, pull through loop on hook. This creates the foundation for most crochet work.
sl st = slip stitch: Insert hook, yarn over, pull through both the stitch and the loop on your hook in one motion. Used for joining and moving across stitches without adding height.
sc = single crochet: Insert hook into stitch, yarn over and pull up a loop (two loops on hook), yarn over and pull through both loops. This is your shortest basic stitch.
hdc = half double crochet: Yarn over, insert hook into stitch, yarn over and pull up a loop (three loops on hook), yarn over and pull through all three loops. Slightly taller than single crochet.
dc = double crochet: Yarn over, insert hook into stitch, yarn over and pull up a loop, yarn over and pull through two loops, yarn over and pull through remaining two loops. Creates a taller stitch with nice drape.
inc = increase: Work two stitches into the same stitch. This adds one stitch to your count.
dec or sc2tog = decrease: Insert hook into first stitch, pull up a loop, insert hook into next stitch, pull up a loop (three loops on hook), yarn over and pull through all three. This removes one stitch from your count.
magic ring = adjustable starting ring: Create a loop with your yarn, work your first round of stitches into that loop, then pull the tail to close the center tight. If magic rings frustrate you, chain 4 and slip stitch to join instead.
Starfish Charm Pattern
The starfish works from the center out with five identical arms. This uses increases to create the star shape.
Center:
Round 1: Make a magic ring, ch 1, work 5 sc into the ring, sl st to first sc to join. Pull ring closed. (5 sts)
Arms (make all 5 in continuous rounds):
Arm 1:
Row 1: Ch 4, sc in second ch from hook, hdc in next ch, dc in last ch. Do not turn. Sl st into next sc of Round 1. (3 sts in arm)
Arm 2:
Row 1: Ch 4, sc in second ch from hook, hdc in next ch, dc in last ch. Sl st into next sc of Round 1. (3 sts in arm)
Continue this pattern for Arms 3, 4, and 5, slip stitching into each remaining sc from Round 1.
After completing all five arms, fasten off leaving a 6-inch tail for attaching to the bracelet cord.
Finishing the Starfish:
Weave in your starting tail securely. Block gently by pinning the arms flat and spritzing with water. Let dry completely. The starfish should measure approximately 1 inch across.
Scallop Shell Charm Pattern
This shell works in rows with turning chains to create those beautiful ridged lines.
Base:
Row 1: Ch 8, sc in second ch from hook and in each ch across. Turn. (7 sts)
Row 2: Ch 1, 2 sc in first st, sc in next 5 sts, 2 sc in last st. Turn. (9 sts)
Row 3: Ch 1, 2 sc in first st, sc in next 7 sts, 2 sc in last st. Turn. (11 sts)
Row 4: Ch 1, 2 sc in first st, sc in next 9 sts, 2 sc in last st. Turn. (13 sts)
Row 5: Ch 1, 2 sc in first st, sc in next 11 sts, 2 sc in last st. Turn. (15 sts)
Ridge Detail:
Row 6: Ch 1, working in back loops only (BLO), sc in each st across. Turn. (15 sts)
Row 7: Ch 1, working in back loops only, sc in each st across. Turn. (15 sts)
Scalloped Edge:
Row 8: Ch 1, sc in first st, *sk 1 st, 5 dc in next st (shell made), sk 1 st, sc in next st* repeat from * to * across. Fasten off. (3 shells plus 4 sc)
Shell Border:
Join yarn at bottom right corner of the shell base. Work sc evenly around the curved sides, placing 2 sc at each corner to keep it flat. Sl st to join. Fasten off leaving a 6-inch tail.
The finished shell should measure approximately 1 inch wide and 1.25 inches tall.
Seahorse Charm Pattern
The seahorse is the most detailed charm but still very achievable. Work slowly and count your stitches.
Head and Body:
Round 1: Make a magic ring, ch 1, work 6 sc into the ring, sl st to join. (6 sts)
Round 2: Ch 1, 2 sc in each st around, sl st to join. (12 sts)
Round 3: Ch 1, *sc in next st, 2 sc in next st* repeat around, sl st to join. (18 sts)
Rounds 4-5: Ch 1, sc in each st around, sl st to join. (18 sts)
Round 6: Ch 1, *sc in next st, sc2tog* repeat around, sl st to join. (12 sts)
Snout:
Row 7: Ch 5, sc in second ch from hook and in next 3 ch. Sl st into next 2 sts of Round 6. Do not turn.
Continue Body:
Round 8: Sc in next 8 sts of Round 6, sl st to join. (8 sts)
Round 9: Ch 1, sc in each st around, sl st to join. (8 sts)
Round 10: Ch 1, *sc in next 2 sts, sc2tog* repeat around, sl st to join. (6 sts)
Rounds 11-13: Ch 1, sc in each st around, sl st to join. (6 sts)
Tail Curl:
Round 14: Ch 1, sc2tog, sc in next 4 sts, sl st to join. (5 sts)
Round 15: Ch 1, sc2tog, sc in next 3 sts, sl st to join. (4 sts)
Round 16: Ch 6, sl st in second ch from hook and in each ch back to body. Fasten off.
Dorsal Fin:
Join yarn at the back of the body between Rounds 6 and 7. Ch 3, dc in same space, *sl st in next row edge, ch 3, dc in same space* repeat for 4 total scallops down the back. Fasten off.
Eye:
Sew a tiny black bead or make a French knot with black thread on the head.
If desired, lightly stuff the head with a tiny pinch of fiberfill before closing. This is optional but gives nice dimension.
Adjustable Braided Cord Tutorial
Each bracelet needs an adjustable cord. This sliding knot design lets the wearer tighten or loosen the fit.
Making the Cord:
Cut three strands of crochet thread, each approximately 24 inches long. You can use all one color or mix two colors for a twisted effect like shown in the photos.
1. Knot all three strands together at one end
2. Braid the strands together for about 10 inches
3. Knot the other end to secure
4. Trim the starting knots close
Attaching the Charm:
Thread one end of the braided cord through your tapestry needle. Pass it through the top edge of your charm, centering the charm on the cord.
Creating Sliding Knots:
This is easier than it looks. I’ll walk you through it.
1. Overlap the two ends of your cord, pointing in opposite directions
2. Take the right end and wrap it around both cords three times, moving toward the charm
3. Thread that end back through the wraps you just made
4. Pull tight to create your first sliding knot
5. Repeat with the left end, wrapping in the opposite direction
6. Pull tight to create your second sliding knot
7. Trim the excess cord ends to about half an inch
8. Add a tiny knot at each trimmed end to prevent fraying
Test your sliding knots by pulling the bracelet open and closed. They should move smoothly but hold their position when worn.
Helpful Tips for Tiny Crochet
Working this small takes some adjustment. Here are my best tips:
Lighting matters. Work near a window or use a bright task lamp. You need to see every stitch clearly.
Take breaks. Tiny work strains your eyes and hands. Step away every 15 to 20 minutes.
Use stitch markers. Even experienced crocheters lose their place in small rounds. Mark your first stitch of each round.
Count constantly. With so few stitches per round, one missed increase throws everything off.
Block your pieces. These small charms benefit enormously from blocking. Pin them flat, spritz with water, and let them dry overnight.
Practice first. If you’ve never worked with crochet thread, make a few practice swatches before starting your charms.
Customization Ideas
Once you’ve mastered these three charms, the ocean is your oyster. Consider these variations:
You can also resize these patterns by using different yarn weights. Sport weight yarn with a 3.5mm hook creates charms about twice as large, perfect for bag charms or ornaments.
Care Instructions
These delicate bracelets need gentle care to stay beautiful.
Cotton thread holds up well to everyday wear, but the small stitches can catch on things. A little awareness goes a long way.
Wrapping Up Your Ocean Charm Bracelet Crochet Pattern
These sweet little ocean bracelets bring summer to your wrist no matter what the calendar says. The combination of the textured starfish, ridged scallop shell, and curly seahorse creates a charming set that looks far more complicated than it actually is. Once you complete your first charm, you’ll want to make dozens. Trust me, I speak from experience. My craft table currently holds about fifteen seahorses in various colors.
This step by step crochet tutorial gives you everything you need to create these beach-inspired accessories from scratch. Whether you’re making them for yourself, gifting them to ocean-loving friends, or selling them at summer markets, these tiny charms always bring smiles.
Thank you so much for choosing this pattern for your next project. I genuinely love seeing what you create. If you make these bracelets, please share a photo on Instagram or in our Facebook group. Tag me so I can see your beautiful work and maybe feature it.
If you loved this ocean charm bracelet pattern, go ahead and pin it to your crochet boards on Pinterest so you can find it again whenever the beach mood strikes. And please drop a comment below to let me know which charm is your favorite. I’m always curious whether team starfish or team seahorse wins. Happy hooking, friend.
