Last month, I walked into my kitchen and realized my windowsill had become a complete disaster. Tiny succulent pots everywhere, no counter space left, and somehow my spider plant had migrated to the top of the refrigerator. I needed vertical storage desperately, but everything I found in stores was either ugly plastic or way too expensive for what it was. So I grabbed some cotton yarn from my stash and started sketching out this hanging basket design. Three pockets, one wooden dowel, and a bit of jute twine later, I had the prettiest plant storage I have ever made. Now I want you to have the pattern too.

This crochet hanging basket pattern is perfect for anyone who loves plants, needs better organization, or just wants a beautiful handmade piece for their wall. The construction is surprisingly straightforward once you understand how the pockets connect, and the finished piece looks so much more impressive than the effort required to make it.
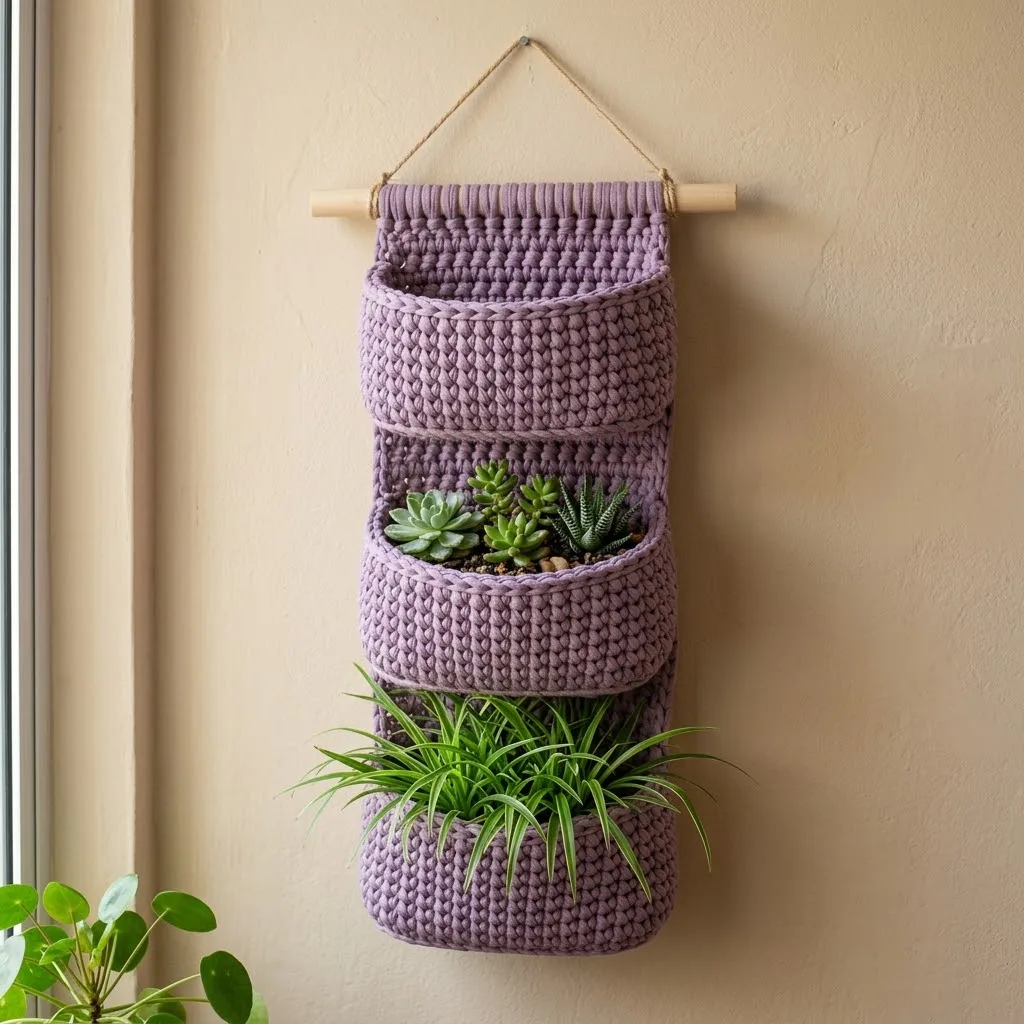
About This Three-Tier Hanging Basket Crochet Pattern
This lavender three-tier hanging basket features three generously sized pockets worked in sturdy single crochet stitches, connected by a solid back panel with a decorative ribbed top section. The whole piece hangs from a wooden dowel threaded through the top, with jute twine creating a simple triangle hanger.
Finished Dimensions:
Skill Level: Intermediate beginner. If you can work single crochet in rows and rounds, you can absolutely make this. The joining technique is the trickiest part, and I will walk you through it completely.
Materials Needed for Your Crochet Hanging Basket
Yarn:
Hook:
Additional Supplies:
Gauge Information
Gauge matters here because you want a tight fabric that holds its shape under the weight of plants or other items. With bulky cotton yarn and a 6.0mm hook, you should get approximately 12 single crochet stitches and 14 rows = 4 inches in single crochet worked flat.
If your fabric feels loose or floppy, go down a hook size. If it feels stiff and hard to work, go up a hook size. The finished baskets should have minimal stretch and visible stitch definition.
Stitches and Abbreviations Used
Let me break down every stitch you will need for this crochet tutorial. Even if you know these already, a quick refresher never hurts.
ch = chain. Wrap yarn over hook, pull through loop on hook. This creates the foundation row.
sl st = slip stitch. Insert hook, yarn over, pull through both loops on hook at once. Used for joining and moving across stitches invisibly.
sc = single crochet. Insert hook into stitch, yarn over and pull up a loop (two loops on hook), yarn over and pull through both loops. Creates a short, dense stitch.
sc2tog = single crochet two together. A decrease stitch. Insert hook into first stitch, pull up loop, insert hook into next stitch, pull up loop (three loops on hook), yarn over and pull through all three. Reduces stitch count by one.
BLO = back loop only. Work the stitch into only the back loop of the previous row’s stitch, leaving the front loop unworked. Creates a ridged texture.
How to Crochet the Three-Tier Hanging Basket: Step by Step
This pattern is worked in sections and then assembled. You will make three identical pockets, one back panel with integrated hanging section, and then sew everything together.
Part One: Crochet Pocket (Make 3)
Each pocket starts with a flat circular base, then the sides are built up by working in continuous rounds.
Base:
Round 1: Create a magic ring. Work 6 sc into the ring. Pull tight to close. (6 sts)
If magic rings intimidate you, here is an alternative: ch 2, then work 6 sc into the second chain from hook. Same result, less stress.
Round 2: Work 2 sc into each stitch around. (12 sts)
Round 3: *Sc in next st, 2 sc in next st.* Repeat from * around. (18 sts)
Round 4: *Sc in next 2 sts, 2 sc in next st.* Repeat from * around. (24 sts)
Round 5: *Sc in next 3 sts, 2 sc in next st.* Repeat from * around. (30 sts)
Round 6: *Sc in next 4 sts, 2 sc in next st.* Repeat from * around. (36 sts)
Your base should measure approximately 4 inches across. If you want larger pockets, continue increasing in pattern for one or two more rounds.
Sides:
Now we stop increasing and work even to build the pocket walls.
Round 7: Working in BLO only for this round, sc in each st around. (36 sts)
This back loop only round creates a sharp edge where the base meets the sides. It helps the pocket hold its shape.
Rounds 8 through 14: Sc in each st around. (36 sts per round)
Round 15: Sl st in next st. Fasten off, leaving a long tail for sewing.
Each finished pocket should be approximately 4 inches wide and 3 to 4 inches tall. Make three identical pockets.
Part Two: Back Panel with Hanging Section
The back panel connects all three pockets and includes the decorative ribbed section at the top where the dowel slides through.
Main Panel:
Row 1: Ch 21. Sc in second ch from hook and in each ch across. Ch 1, turn. (20 sts)
Rows 2 through 60: Sc in each st across. Ch 1, turn. (20 sts)
This creates a panel approximately 6 inches wide and 17 inches long. Adjust row count if needed to accommodate your pockets.
Ribbed Top Section:
Now we add the textured ribbed section that folds over the dowel.
Row 61: Working in BLO, sc in each st across. Ch 1, turn. (20 sts)
Rows 62 through 70: Working in BLO, sc in each st across. Ch 1, turn. (20 sts)
Row 71: Sl st in each st across. Fasten off.
The back loop only rows create horizontal ridges that give this section its distinctive corduroy-like texture.
Part Three: Assembly
Now comes the fun part where everything comes together. Take your time here.
Attaching the Pockets:
1. Lay your back panel flat with the ribbed section at the top.
2. Position the top pocket approximately 2 inches below where the ribbed section ends. The pocket opening should face outward.
3. Using your yarn needle and a length of matching yarn, whip stitch the back of the pocket to the panel. Sew through approximately one third of the pocket’s back surface. This allows the pocket to billow forward.
4. Position the middle pocket approximately 3 inches below the first pocket. Sew in place using the same method.
5. Position the bottom pocket approximately 3 inches below the middle pocket. Sew in place.
Creating the Dowel Channel:
Fold the ribbed top section forward and down, creating a tube that the dowel can slide through. Using a yarn needle and matching yarn, whip stitch the bottom edge of the ribbed section to the back of the panel, leaving both ends open.
Slide your wooden dowel through the channel. It should extend approximately 1 inch past each side.
Adding the Hanger:
Cut a piece of jute twine approximately 20 to 24 inches long. Tie one end securely to one end of the dowel. Tie the other end to the opposite side of the dowel, adjusting the length until your triangle hanger is the desired height.
Tips for Success with This Crochet Pattern
Keeping Your Pockets Sturdy:
If you plan to put actual potted plants in these pockets, consider lining them with plastic or placing plants in small containers first. The crochet fabric can stretch over time with heavy contents.
Yarn Substitution:
T-shirt yarn creates an even sturdier result with beautiful drape. Macramé cord in 3mm to 5mm thickness also works wonderfully. Just adjust your hook size until you achieve a tight fabric.
Customizing the Length:
Want only two pockets? Simply shorten your back panel by 20 rows and omit one pocket. Want four pockets? Add 20 rows to the panel and make an extra pocket.
Color Ideas:
This pattern looks stunning in natural, cream, sage green, terracotta, or classic white. Consider using a variegated cotton yarn for subtle color shifts throughout.
What to Put in Your Finished Hanging Basket
Beyond plants, this three-tier hanging basket works beautifully for:
The pockets are deep enough to hold most small items securely while keeping them visible and accessible.
Troubleshooting Common Issues
My pockets are floppy. Your tension might be too loose. Try going down one hook size and remaking the pockets.
The back panel curls. Single crochet fabric tends to curl. Blocking helps, or you can add a border of slip stitches around the entire panel before assembly.
My dowel keeps sliding out. Add a small dot of hot glue to each end of the dowel where it meets the fabric channel. Alternatively, tie small knots in yarn and wedge them into the ends.

Final Thoughts on This Crochet Hanging Basket Pattern
I hope this lavender three-tier hanging basket crochet pattern brings you as much joy as it brought me. Every time I look at mine hanging by the window, I feel proud of what my hands created. The combination of practical storage and handmade beauty is exactly what I love about crochet.
This project makes an incredible housewarming gift, especially for plant lovers. Pair it with a few small succulents or air plants, and you have a thoughtful present that looks far more expensive than it actually is.
Thank you so much for choosing to make this pattern. Seriously, it means the world that you trusted me to guide you through this project. If you make your own version, I would absolutely love to see it! Tag me on Instagram or share a photo in my Facebook group. Seeing your creations is hands down my favorite part of this whole pattern-writing adventure.
If this pattern made your project list, go ahead and save it to your Pinterest boards so you can find it easily when you are ready to start. And please drop a comment below if you make one. I read every single comment and love hearing how your projects turn out!
