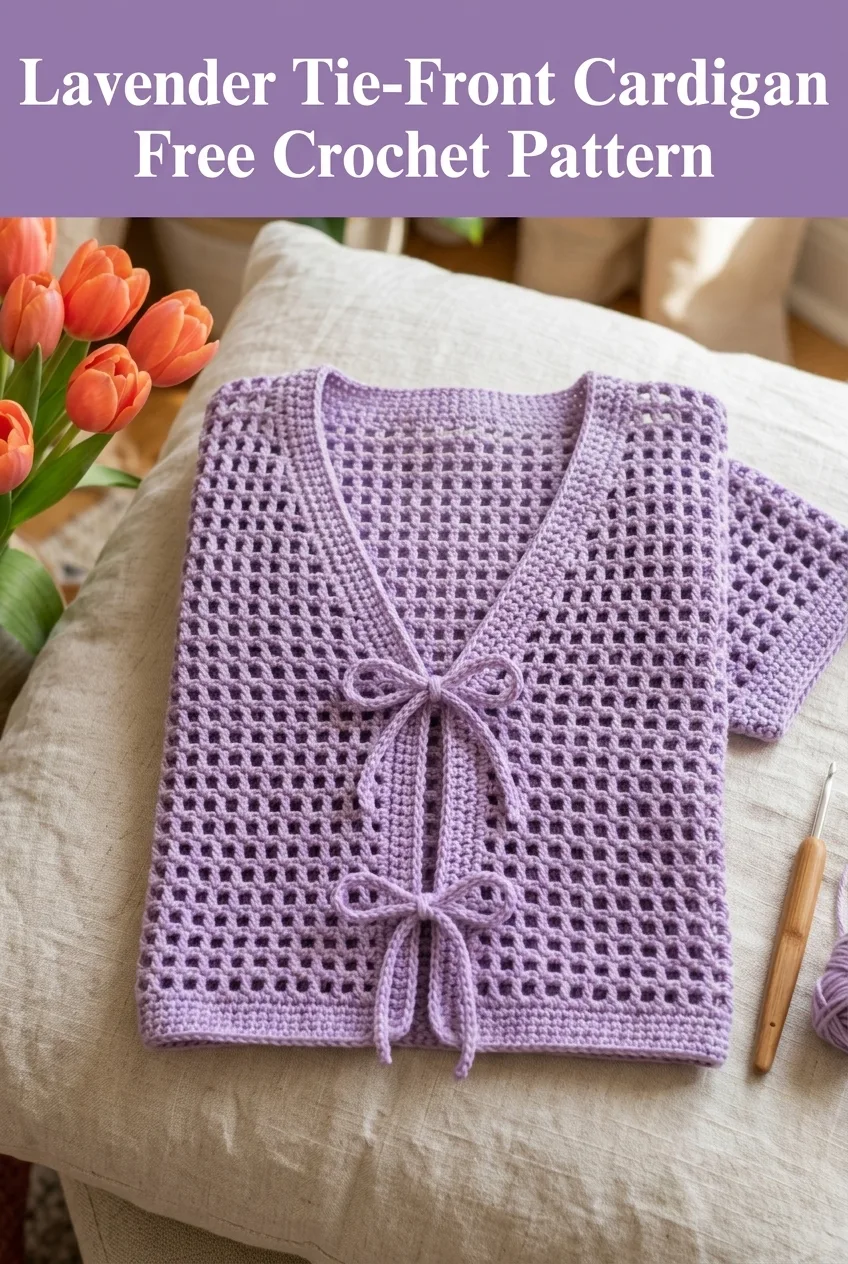
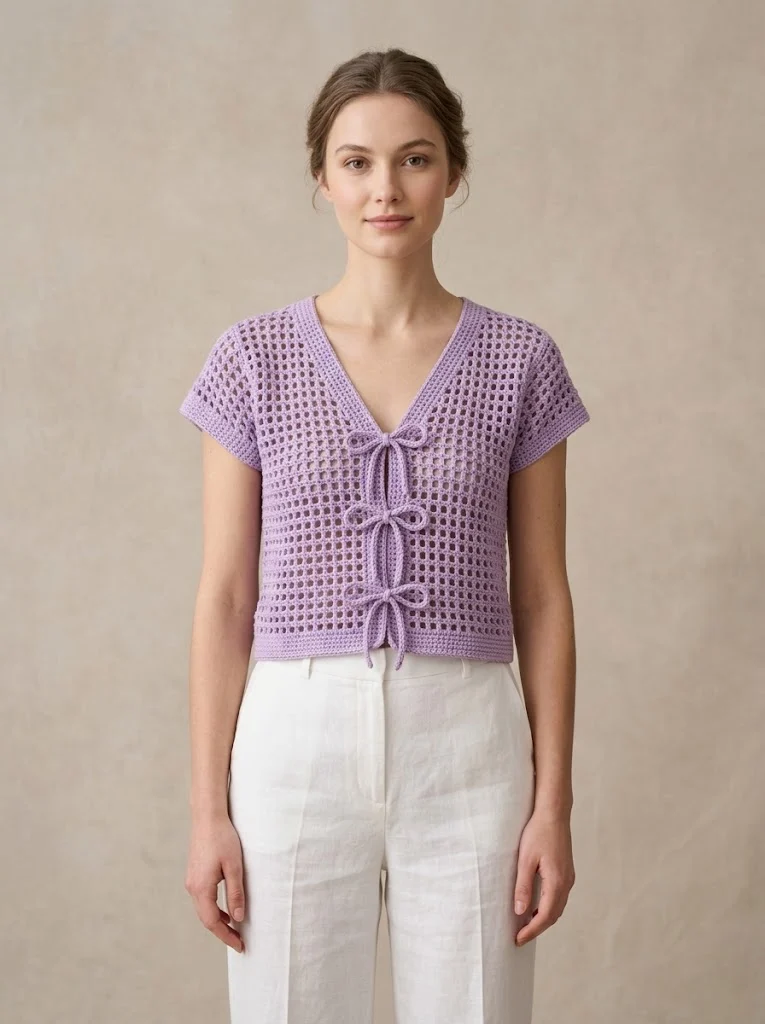
Looking for a lightweight layering piece that works up quickly and keeps you cozy on breezy spring evenings? This lavender tie-front cardigan is exactly that. The body uses a simple mesh stitch pattern that creates beautiful texture without complicated techniques, while the solid borders and adorable bow ties add a feminine, polished finish. Whether you’re making this for yourself or as a thoughtful handmade gift, the construction is straightforward enough for confident beginners and satisfying enough for experienced crocheters who want a relaxing project.
Why You’ll Love This Cardigan Pattern
This tie-front cardigan hits all the right notes. It’s airy enough for transitional weather, cute enough to dress up a simple outfit, and practical enough to wear around the house. The mesh body gives it a lovely drape without being too revealing, and those double bow closures? Absolutely charming.
I designed this cardigan to be worked flat in pieces, then seamed together. This method gives you more control over fit and makes the project portable. You can easily toss a panel in your bag and work on it anywhere.
The open mesh stitch pattern looks intricate but it’s actually just a two-row repeat using basic stitches. If you can chain and double crochet, you can make this cardigan.
Skill Level
Confident Beginner to Intermediate
You should be comfortable with:
Don’t worry if you’ve never made a garment before. I’ll walk you through every section. Cardigans look intimidating, but they’re really just rectangles and a bit of shaping.
Materials Needed
Yarn:
Recommended Yarn Substitutes:
Hook:
Notions:
Gauge
16 stitches and 8 rows = 4 inches in mesh stitch pattern using 5.0mm hook
Gauge matters for garments. Please take time to make a swatch. If your swatch is too big, go down a hook size. If it’s too small, go up. Your finished cardigan will thank you.
Finished Measurements
This pattern is written for Size Medium with an approximate 36 to 38 inch bust.
Finished Dimensions:
To adjust sizing, add or subtract multiples of 4 stitches to your starting chain. Each 4-stitch repeat adds approximately 1 inch to the width.
Abbreviations and Stitch Definitions
Let me break down every stitch you’ll need. Even if you know these, a quick refresher never hurts.
Ch = Chain. Wrap yarn over hook, pull through loop on hook. This is your foundation.
Sl st = Slip stitch. Insert hook, yarn over, pull through both the stitch and the loop on your hook in one motion. Used for joining and creating a flat seam.
Sc = Single crochet. Insert hook into stitch, yarn over and pull up a loop (two loops on hook), yarn over and pull through both loops.
Dc = Double crochet. Yarn over, insert hook into stitch, yarn over and pull up a loop (three loops on hook), yarn over and pull through two loops, yarn over and pull through remaining two loops. This is the main stitch for your mesh pattern.
Ch-sp = Chain space. The gap created by chains in the previous row. You’ll work into these spaces, not into individual chain stitches.
Sk = Skip. Pass over the indicated stitch or space without working into it.
Special Stitch: Mesh Pattern
The mesh creates those beautiful open squares you see in the cardigan body. Here’s how it works:
(Dc, ch 1, sk 1) across the row creates the grid pattern. On the following row, you work your double crochets into the chain-1 spaces from the row below, not into the tops of the previous double crochets.
This offset placement is what makes the mesh look like a lattice. Once you get the rhythm, it’s almost meditative.
Pattern Notes
A note about turning chains: In this pattern, the turning chain 3 counts as your first double crochet unless otherwise noted. This is important for maintaining your stitch count.
Crochet Pattern Instructions

Back Panel
Foundation: Ch 77 (or a multiple of 4 + 1 for size adjustments)
Row 1 (Right Side): Dc in 5th ch from hook (skipped chains count as dc + ch 1), *ch 1, sk 1 ch, dc in next ch*, repeat from * across. Turn. (38 dc, 37 ch-1 spaces)
Row 2: Ch 4 (counts as dc + ch 1), sk first ch-sp, *dc in next dc, ch 1*, repeat from * across, ending with dc in top of turning chain. Turn. (38 dc, 37 ch-1 spaces)
Rows 3 through 40: Repeat Row 2.
Your back panel should measure approximately 19 inches wide and 20 inches long. Fasten off and weave in ends.
Left Front Panel
Foundation: Ch 41
Row 1 (Right Side): Dc in 5th ch from hook, *ch 1, sk 1 ch, dc in next ch*, repeat from * across. Turn. (20 dc, 19 ch-1 spaces)
Rows 2 through 28: Work even in mesh pattern as established. (20 dc, 19 ch-1 spaces)
Begin V-Neck Shaping:
Row 29: Ch 4, work in pattern across to last 2 dc, sk 1 dc, dc in last dc. Turn. (19 dc)
Row 30: Ch 3 (counts as dc), dc in first ch-sp, continue in pattern across. Turn. (19 dc)
Row 31: Work in pattern to last 2 dc, sk 1 dc, dc in last dc. Turn. (18 dc)
Rows 32 through 40: Continue decreasing 1 stitch at neck edge every other row until 14 dc remain.
Fasten off. This creates the angled V-neck opening.
Right Front Panel
Work same as Left Front Panel, reversing all shaping. Your decreases will happen at the beginning of right-side rows instead of the end.
Tip: If shaping feels confusing, lay your left panel on a flat surface and work the right panel as a mirror image. Mark which edge is your neck edge with a stitch marker.
Sleeves (Make 2)
Foundation: Ch 65
Row 1 (Right Side): Dc in 5th ch from hook, *ch 1, sk 1 ch, dc in next ch*, repeat from * across. Turn. (32 dc, 31 ch-1 spaces)
Rows 2 through 14: Work even in mesh pattern. (32 dc)
Solid Border Rows:
Row 15: Ch 1, sc in each dc and each ch-sp across. Turn. (63 sc)
Row 16: Ch 1, sc in each sc across. Turn. (63 sc)
Row 17: Ch 1, sc in each sc across. Fasten off. (63 sc)
The solid single crochet border at the sleeve cuff matches the borders on the body and gives the sleeve a finished look.
Assembly
Now for the fun part. Grab your tapestry needle.
1. Shoulder Seams: Align the top edges of your front panels with the back panel, right sides together. Seam approximately 5 inches from each outer edge, leaving the center open for your neckline.
2. Side Seams: With right sides together, seam the front and back panels from the bottom hem up, stopping about 8 inches from the top to leave armhole openings.
3. Attach Sleeves: Fold each sleeve in half lengthwise to find the center. Match this center point to the shoulder seam. Pin in place, then whip stitch or slip stitch the sleeve cap to the armhole opening. Seam the sleeve underarm and side seam in one continuous line.
Seaming Tip: Use a mattress stitch for nearly invisible seams, or a simple whip stitch if you prefer speed. Both work beautifully.
Front Border and Neckline
Round 1: Join yarn at bottom right front corner with a sl st. Ch 1, sc evenly up the right front edge, around the V-neck, and down the left front edge. Work approximately 3 sc for every 2 rows to keep the edge flat. Do not join. Turn.
Row 2: Ch 1, sc in each sc across. Turn.
Row 3: Ch 1, sc in each sc across. Turn.
Row 4: Ch 1, sc in each sc across. Fasten off.
This creates a neat, stable border that frames the front opening beautifully.
Bottom Border
Row 1: Join yarn at one side seam. Ch 1, sc evenly across the entire bottom edge of the cardigan. Turn.
Rows 2 through 4: Ch 1, sc in each sc across. Turn.
Fasten off after Row 4.
Tie Closures (Make 4)
The sample shows two sets of bow ties. Each bow is made from two separate tie pieces knotted together.
For each tie:
Ch 80. Sl st in 2nd ch from hook and in each ch across. Fasten off.
This creates a simple cord approximately 12 inches long.
Attachment: Using your tapestry needle, thread one tie through the front border on the right side, about 4 inches below the V-neck point. Attach a corresponding tie on the left front at the same height. Tie them into a bow.
Repeat for the second set of ties, positioning them about 4 inches below the first set.
Alternatively, you can sew the ties directly to the inside of the border if you prefer them permanently attached.
Finishing Touches
Weave in all remaining ends. I know, I know. Nobody’s favorite part. But it makes such a difference.
Blocking: Wet block or steam block your finished cardigan to even out the mesh pattern and help the borders lay flat. Lay it flat on a towel, pat it into shape, and let it dry completely.
Customization Ideas
Want to make this cardigan your own? Here are some easy modifications:
Longer length: Add more rows to the body panels before beginning neck shaping. Every 2 rows adds approximately half an inch.
Three-quarter sleeves: Double the sleeve length, or work until your sleeve reaches your desired length from shoulder to wrist.
Different closure: Skip the ties and add buttons, or leave it open as a true shrug style.
Colorwork: Use a contrasting color for the solid borders and ties for a playful look.
Care Instructions
For cotton or cotton blend yarns, machine wash on gentle cycle with cold water. Lay flat to dry to maintain shape. Avoid hanging wet garments, as they can stretch.
For acrylic blends, follow yarn label instructions. Most can be machine washed and dried on low heat.
Final Thoughts on This Lavender Tie-Front Cardigan Pattern
This crochet cardigan pattern combines simple stitches with charming details to create something truly wearable. The mesh body keeps it lightweight and breathable, while those sweet bow closures add personality. It’s the kind of project that feels rewarding without being stressful.
I hope you love making this as much as I loved designing it. There’s something so satisfying about finishing a garment you can actually wear out the door.
Thank you for choosing this pattern and trusting me to guide you through it. If you make your own lavender tie-front cardigan, I would absolutely love to see it. Tag me on Instagram or share a photo on Facebook. Seeing your creations genuinely makes my day.
If this pattern is calling your name, go ahead and save it to your Pinterest boards so you can find it when you’re ready to cast on. And please drop a comment below if you give it a try. I love hearing how your projects turn out and answering any questions along the way. Happy crocheting, friend.
