
When I first sketched out this design, I knew I wanted something that would feel truly special to wear. A dress with fitted shaping, romantic bell sleeves, and cascading lace in soft ivory, blush, and dusty mauve. I wanted it to work across multiple sizes with detailed cup shaping that actually fits real bodies.
Get the Ad-Free PDF Pattern
You can find the free pattern below, or you can purchase the ad-free printable PDF from my shop.
Get the Printable PDF →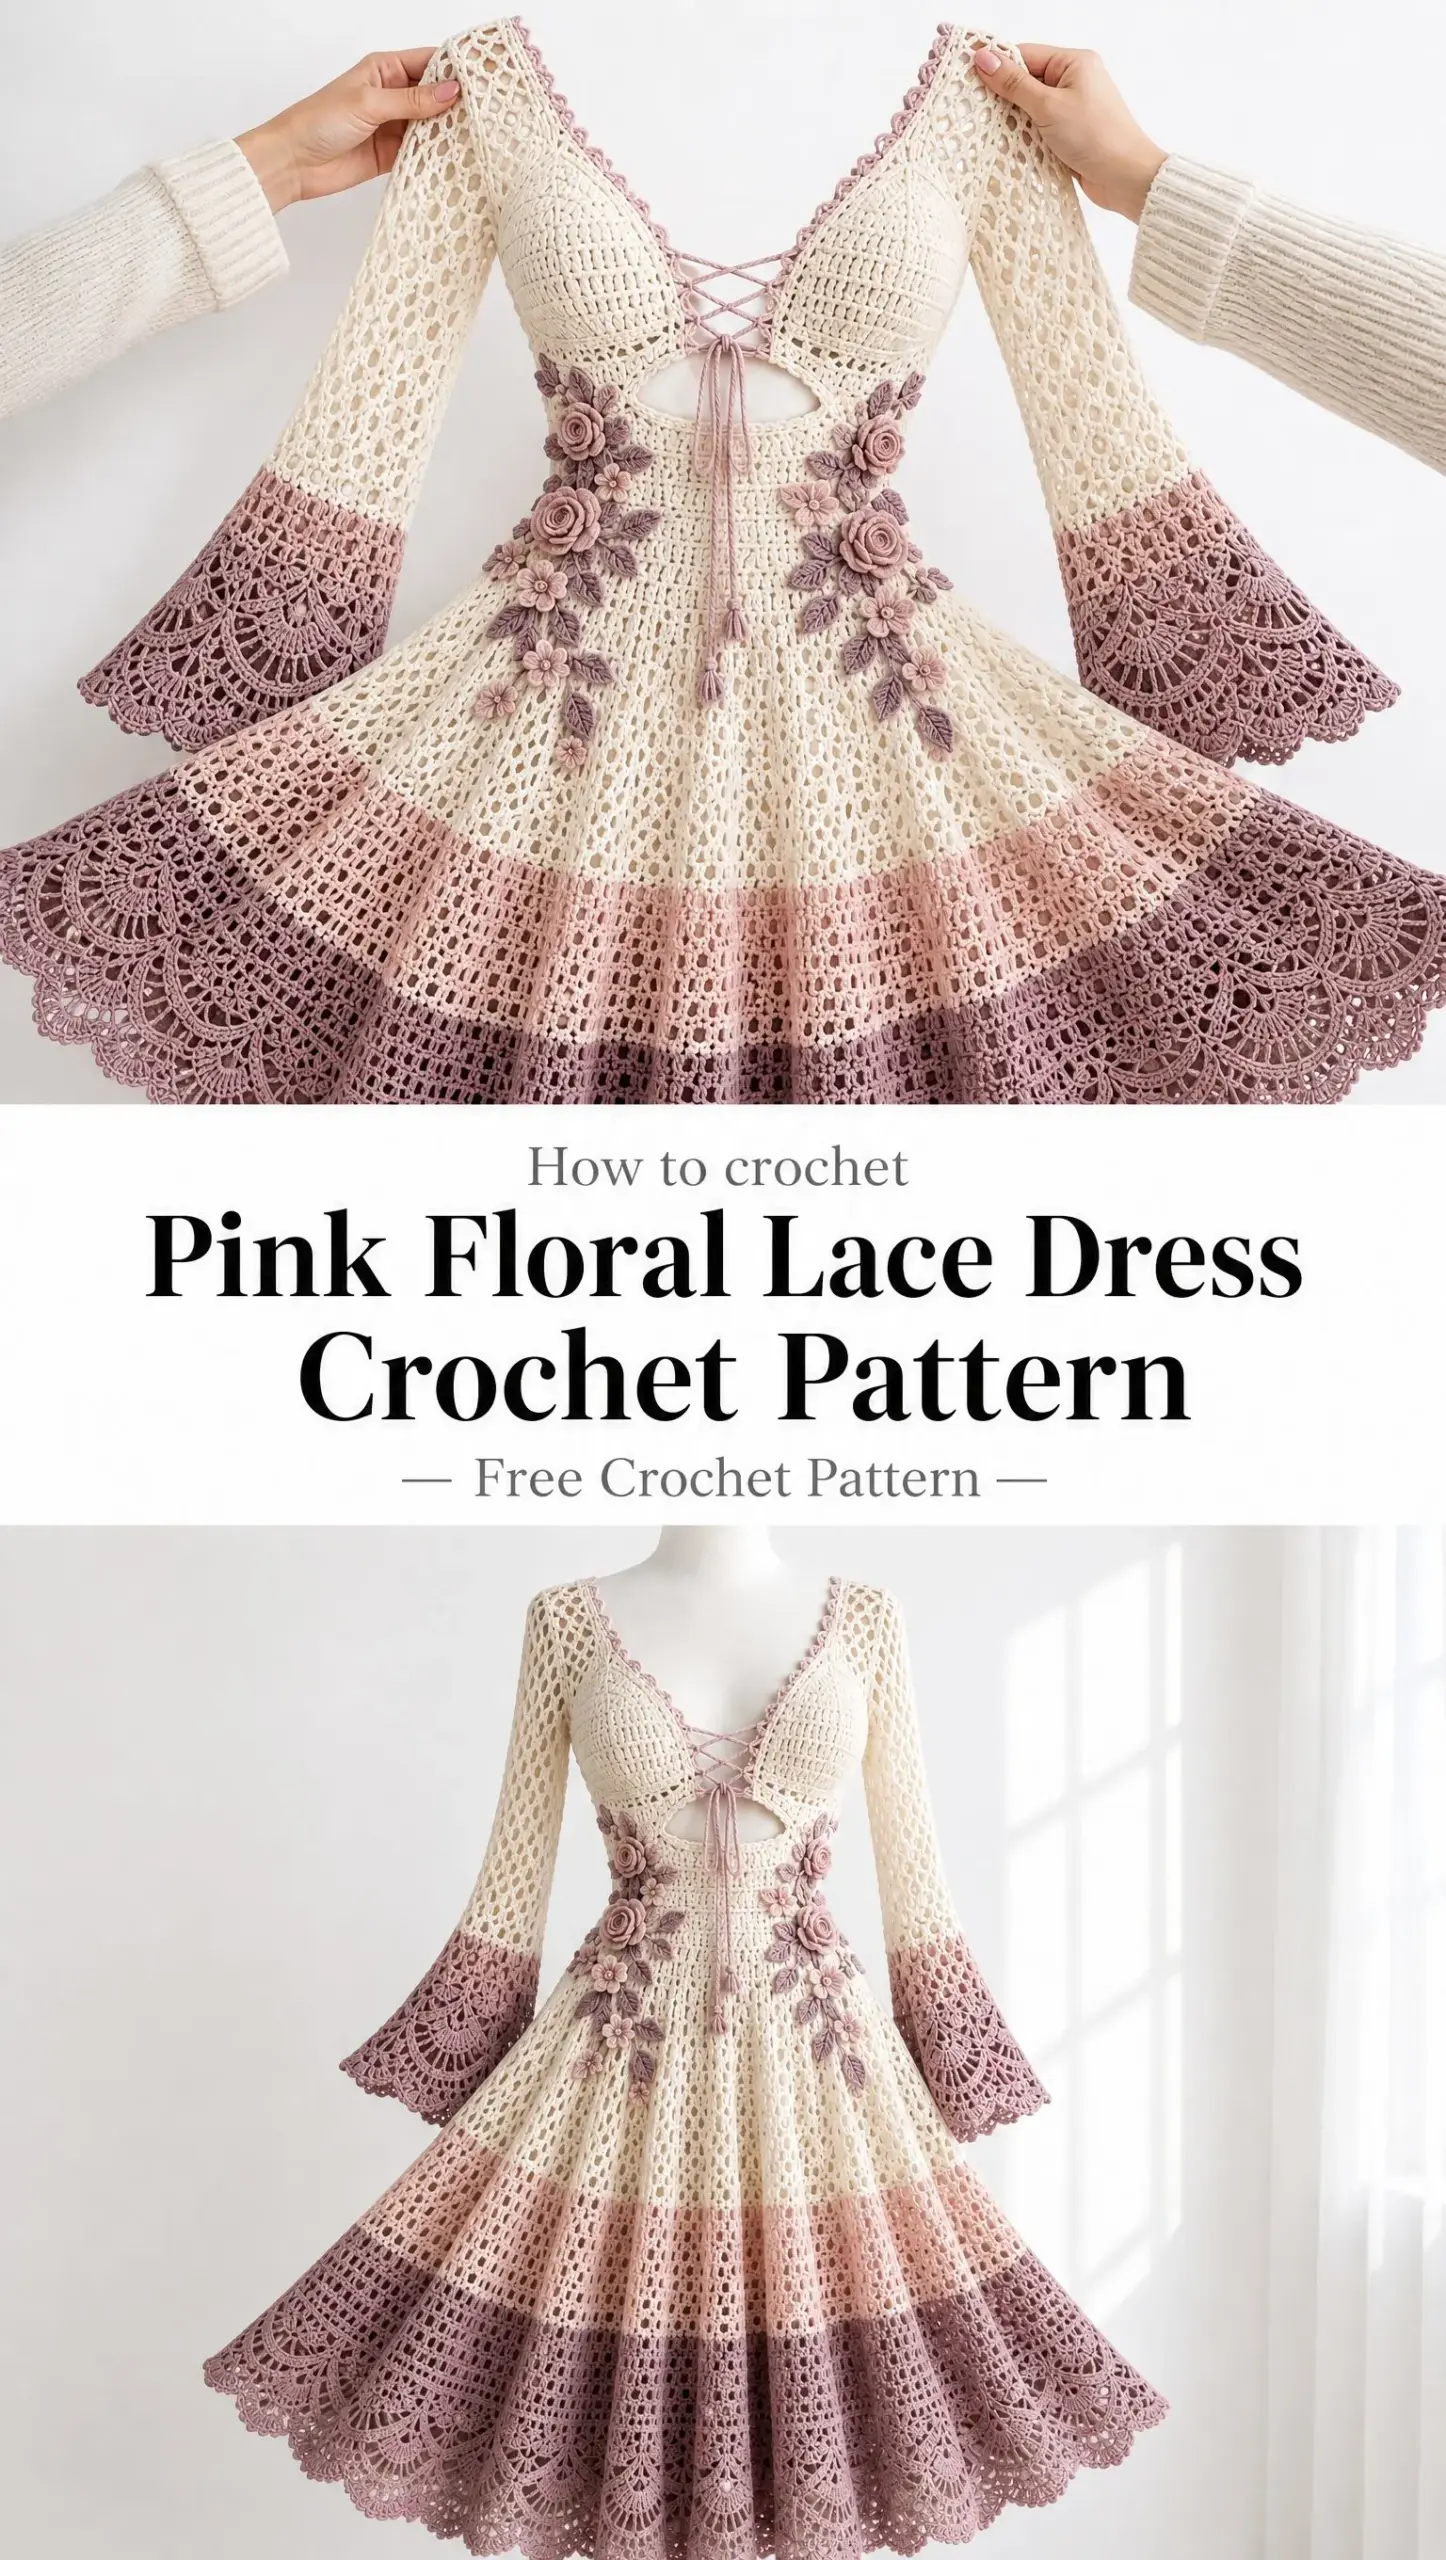
The construction uses separate fitted pieces that come together into one gorgeous garment. You will work shaped bust cups, a structured back band, diamond mesh sleeves with dramatic fan cuffs, and a full circular skirt with color blocked lace sections. Then you will add hand sewn floral appliques at the waist for that romantic finishing touch.
I am SO pleased with how this turned out. It is an advanced intermediate project that will challenge you in the best ways and leave you with a wearable work of art.
About This Crochet Dress Pattern
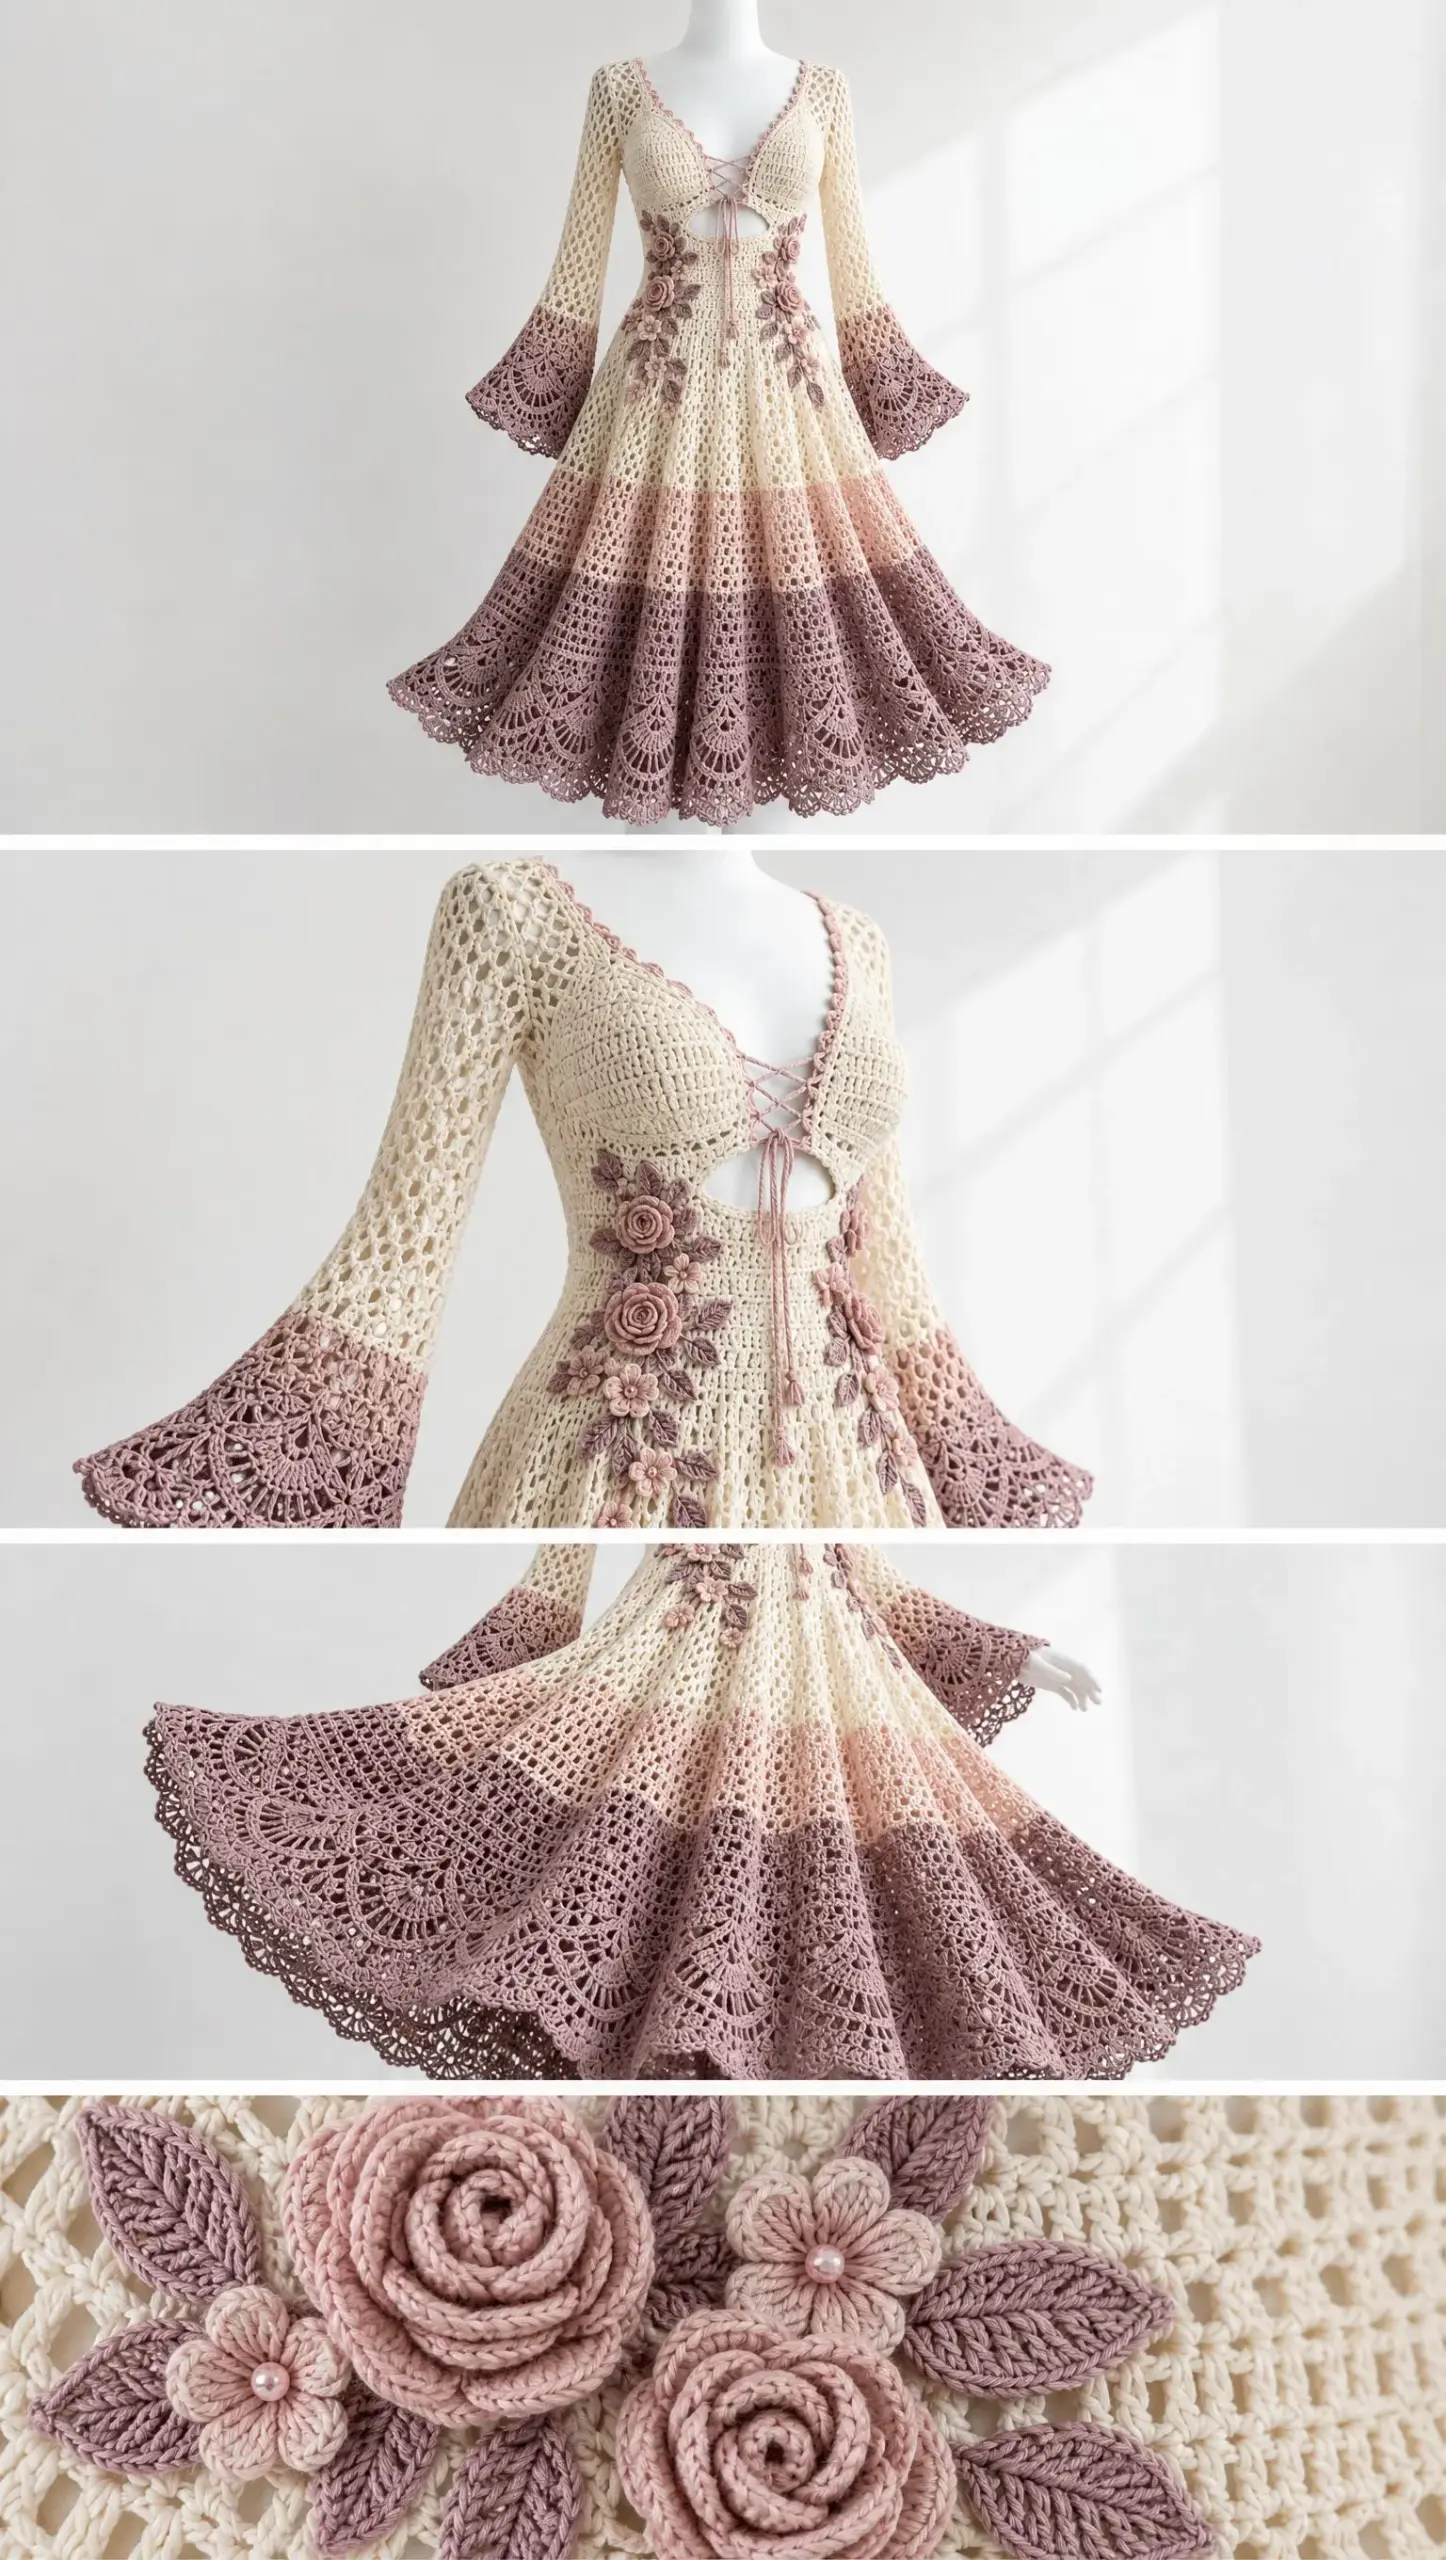
This Pink Floral Lace Dress recreates a stunning romantic aesthetic with thoughtful garment construction techniques. The bodice features shaped cups for stability, a laced V neckline rather than a fully closed front, and a narrow underbust opening that separates the cup area from the floral waist. The long diamond mesh sleeves finish in dramatic fan lace cuffs that flutter beautifully with movement.
The skirt joins at the waist and expands rapidly into a light circular silhouette. You will work it in broad ivory, blush, and dusty mauve bands with a deep scalloped lace border at the hem. The finished dress has that dreamy, ethereal quality that makes crochet garments so magical to wear.
Pattern level: Advanced intermediate. This pattern uses garment shaping, fitted cups, mesh stitch patterns, color changes, lace edging, and sewn crochet appliques. You will work from your body measurements and should try on frequently throughout construction.
Sizes: XS through 3XL
US crochet terminology is used throughout.
Finished Measurements and Size Guide
Before you begin, measure yourself and choose the size closest to your full bust measurement. Then use the adjustment notes throughout the pattern for cup depth, waist, sleeve length, and skirt length.
| Measurement | XS | S | M | L | XL | 2XL | 3XL |
|---|---|---|---|---|---|---|---|
| To fit bust (in) | 30-32 | 34-36 | 38-40 | 42-44 | 46-48 | 50-52 | 54-56 |
| Finished underbust (in) | 27 | 30 | 33 | 36 | 40 | 44 | 48 |
| Finished waist (in) | 25 | 28 | 31 | 34 | 38 | 42 | 46 |
| Upper hip at skirt join (in) | 34 | 37 | 40 | 44 | 48 | 52 | 56 |
| Bodice length shoulder to waist (in) | 14.5 | 15 | 15.5 | 16 | 16.5 | 17 | 17.5 |
| Skirt length waist to hem (in) | 24 | 24.5 | 25 | 25.5 | 26 | 26.5 | 27 |
| Sleeve length from underarm (in) | 18 | 18.5 | 19 | 19.5 | 20 | 20.5 | 21 |
Suggested ease: About 0 to 1 inch negative ease through the waist and underbust. About 0 to 1 inch positive ease at the full bust depending on cup depth. The skirt is intentionally very full.
Materials Needed
Yarn: Fine matte mercerized or combed cotton, fingering to sport weight (Category 1-2), approximately 170-210 yards per 50g skein.
Hooks:
Notions:
Gauge
Getting gauge right is essential for this fitted garment. Fine cotton has little recovery, so accurate gauge and blocking are critical.
Main double crochet fabric after wet blocking: 22 dc x 11 rows = 4 x 4 inches (10 x 10 cm) using 3.0 mm hook
Diamond mesh: 5 complete diamonds x 9 rows = approximately 4 x 4 inches
Dense cup fabric with 2.5 mm hook: 24 hdc x 15 rows = 4 x 4 inches
Wash and fully dry your swatch exactly as you will treat the dress. Cotton lace can lengthen after blocking. If your stitch gauge is too loose, use a smaller hook. If too tight, use a larger hook.
Abbreviations
Here are all the abbreviations you will need for this pattern. I have included plain English definitions so you know exactly what each stitch means.
Special Stitches
These special stitches appear throughout the pattern. Practice them on a swatch before starting the dress.
Fan: Work 7 dc in the indicated stitch or chain space. This creates a shell shape that fans out beautifully.
Large fan: Work (2 dc, ch 1, 2 dc, ch 1, 2 dc) all in the same space. This expanded fan is used in the hem border.
Picot: Ch 3, then sl st in first ch. This creates a small decorative point.
Cluster decrease: Yarn over, insert hook in next stitch and draw up a loop, yarn over and draw through 2 loops. Repeat in next stitch. Then yarn over and draw through all loops on hook. This joins two partial stitches into one.
Puff center: [Yarn over, insert hook, draw up a tall loop] 5 times in same stitch. Yarn over and draw through all loops, ch 1 to close. This creates a raised puffy center for flowers.
Construction Overview
Before diving into the step by step instructions, here is how all the pieces come together. Understanding the construction map will help you visualize the finished dress as you work each section.
1. Make two fitted bust cups in ivory, adjusting cup depth before proceeding.
2. Crochet the upper back band and shoulder straps. Join cups to back to establish the fitted bodice frame.
3. Add the deep V neckline edging and eyelet loops, then make the blush lacing cord.
4. Work the narrow underbust bridge and side sections while deliberately leaving the center oval opening.
5. Work the fitted waist band downward in joined rounds, shaping to the waist and then back out slightly to the upper hip.
6. Work two long diamond mesh sleeves from the armholes. Add broad dusty pink and mauve bell cuffs and fan lace edging.
7. Attach yarn at the waist to skirt join and expand quickly into a circular skirt. Work ivory, blush, then mauve lace sections.
8. Add the deep mauve fan lace hem border.
9. Crochet roses, small flowers, leaves, and vines. Sew them symmetrically up both sides of the waist and trail a few motifs onto the upper skirt.
10. Block the entire dress, stabilize the waist if desired, hide all ends, and lace the front neckline.
Fitted Bust Cups (Make 2)
Use Color A and the 2.5 mm hook. Cups are worked from the center outward around a foundation chain, creating a curved teardrop triangle shape. The top point becomes the shoulder side edge and the lower edge joins the underbust bridge.
Foundation chain by size: XS 19, S 21, M 23, L 25, XL 27, 2XL 29, 3XL 31.
Row 1: Ch the size specific number. Hdc in 2nd ch from hook and in each ch to last ch. Work 5 hdc in last ch. Rotate to work along opposite side of foundation chain. Hdc in each remaining foundation loop. Turn. This creates the center ridge.
Row 2: Ch 1, hdc in each stitch to the center 5 stitch group. Work 2 hdc in each of the next 3 center stitches. Then hdc to end. Turn.
Row 3 and beyond: Continue in hdc, increasing 3 stitches evenly across the curved center on every row. Keep the outer side edge straight and allow the inner neckline edge to angle inward naturally.
Row 4: When cup width across fullest part measures approximately 6 (6.5, 7, 7.5, 8, 8.5, 9) inches, stop increasing. Work 1 to 3 plain rows if extra depth is needed.
Shape neckline point: At the inner edge, decrease 1 stitch every row for 4 to 8 rows until a clean V edge forms. At the outer edge, keep enough height to meet the shoulder strap comfortably.
Finishing: Work 1 row sc around all cup edges. Place markers at lower inner corner, lower outer corner, and top shoulder point. Fasten off.
Cup adjustment tip: For a fuller bust, add plain rows after reaching width, or add one extra increase row before shaping the neckline. For a smaller cup, stop the increase rows earlier. Make both cups identical and compare them against a well fitting bra or your body before joining.
Upper Back Band and Shoulder Frame
Use Color A and 3.0 mm hook. The back band sits across the upper back, roughly level with the lower half of the cups. It is intentionally firm.
Row 1 (Foundation): Ch 72 (80, 88, 96, 106, 116, 126). Dc in 3rd ch from hook and across. 70 (78, 86, 94, 104, 114, 124) dc. Turn.
Rows 2-7: Ch 2 (does not count as stitch), dc across. For a taller back, work up to 9 rows. Fasten off.
Joining cups to back: Pin each cup lower outer corner to the corresponding end of the back band. The lower edges of cups should angle slightly downward toward center front. Join with a neat whipstitch or slip stitch seam, matching about 1.5 to 2.5 inches of each cup outer edge to the back band.
Shoulder straps: Join Color A at top of one cup. Ch 3, work 5 dc across a narrow strap. Continue back and forth until strap reaches top back edge without strain, approximately 8 to 11 inches depending on size and torso length. Sew to back band. Repeat for second strap.
Armhole edging: Edge each armhole opening with 1 round sc, placing 2 sc in row ends where needed to prevent pulling. Do not over tighten.
Deep V Neckline and Blush Lacing
Step 1: With RS facing and Color A, join at lower inner edge of right cup. Sc evenly up the right neckline, around the back neck and strap edge if desired, then down the left neckline. Fasten off.
Step 2: Join Color B at lower right neckline. Work sc in edge, ch 3, sk approximately 1/2 inch of edge. Repeat upward, creating 5 to 7 lacing loops. Work plain sc around back neck, then matching loops down the left neckline. Fasten off.
Step 3 (Lacing cord): With Color B, make a 36 to 48 inch Romanian cord or tightly worked chain. For a simple cord, ch to length, then sl st in the back bump of every chain. Fasten off and add tiny tassels if desired.
Step 4: Lace the cord from lower neckline upward in a crisscross pattern, then return downward so the ends meet at the center front. Tie in a bow at the lower V.
Underbust Bridge and Oval Opening
The reference dress has a horizontal oval cutout centered beneath the bust. The side sections connect the cups to the waist while the center remains open.
Step 1: With Color A and RS facing, join at lower outer corner of right cup. Work dc evenly along the bottom of the right cup to within 2.5 to 3.5 inches of center front. Stop and turn.
Step 2: Work 5 to 7 rows dc on this right underbust side panel, decreasing at the lower inner edge every other row so it tapers toward the center opening. Fasten off.
Step 3: Repeat symmetrically on the left cup.
Step 4: Across the back, work downward from the upper back band in dc until the lower edge aligns with the bottom of both side panels.
Step 5: Join the side panels to the back at the side seams. Leave the center front gap open. The finished oval opening should measure about 4.5 (5, 5.5, 6, 6.5, 7, 7.5) inches wide and 1.75 to 2.5 inches high after edging.
Step 6: Edge the entire opening with 1 round sc in Color A. On the second round, work reverse sc or a tiny picot every 4 to 5 stitches if desired. Fasten off.
Fitted Floral Waist Band
The waist band is worked in joined rounds from the lower bodice edge. Target stitch counts are approximate and should be adjusted to your actual gauge and waist measurement.
Round 1: Join Color A at a side seam on the lower edge of the bodice. Work 1 round sc evenly around, aiming for 138 (154, 170, 188, 210, 232, 254) stitches. Join with sl st.
Round 2: Ch 2, dc around. Join.
Rounds 3-6: Dc around, decreasing 4 stitches per round evenly until the band sits smoothly at the natural waist without gaping.
Rounds 7-10: Work even in dc or in a decorative dense mesh of dc, ch 1, sk 1. Keep the center front and back firm enough to support the skirt.
Rounds 11-13: Increase 4 to 8 stitches per round evenly to flare gently toward the upper hip and prepare for skirt attachment.
Final round: Work 1 round sc. Do not fasten off if continuing directly into the skirt.
Optional waist stabilization: After blocking, hand sew 1/4 inch clear elastic to the inside of one waist round using loose zigzag stitches. Stretch elastic only enough to match your waist measurement. Do not cinch the crochet.
Diamond Mesh Sleeves (Make 2)
Sleeves are worked top down in joined rounds from each armhole. Use Color A for the mesh and Color B or C for the wide cuff. The mesh is intentionally open and should hang softly.
Round 1: With 3.0 mm hook and Color A, join at underarm. Sc evenly around armhole. Adjust to an even multiple of 4 stitches. Join.
Round 2: Ch 5 (counts as dc, ch 2), sk 1, dc in next st, ch 2, sk 1, dc in next st around. Join to 3rd ch of beginning chain.
Round 3: Sl st into first ch-2 sp, ch 3, dc in same sp, ch 3, 2 dc in next ch-2 sp around. Join.
Round 4: Ch 5, dc between the 2 dc group below, ch 2, dc in next gap between 2 dc groups around. Join.
Rounds 5 and beyond: Repeat Rounds 3 and 4 to create elongated diamond mesh. For sleeve taper, every 4th or 5th repeat skip one complete mesh space at the underarm by working the two neighboring spaces together. Continue until sleeve reaches 2.5 to 3.5 inches above wrist.
Cuff setup with Color B: Work 2 sc in each ch space around, adjusting to a multiple of 12. Join.
Cuff Round 1: Ch 3, dc around, increasing 12 stitches evenly.
Cuff Round 2: Dc in next 3 sts, 2 dc in next st around. Join. Change to Color C if you want a deeper mauve cuff.
Cuff Round 3: Sk 2 sts, 7 dc in next st, sk 2 sts, sc in next st around. Join.
Cuff Round 4: Sl st to center of first fan, ch 6, sc in center of next fan, ch 6, sc in center of next fan around.
Cuff Round 5: In each ch-6 sp work (sc, hdc, 2 dc, tr, 2 dc, hdc, sc). Join.
Cuff Round 6: Work sc around, adding a picot at the top of each fan. Fasten off.
Full Circular Lace Skirt
The skirt should spread to roughly twice its waist to hem height. This requires aggressive early increases, followed by more gradual expansion. Work in joined rounds. Use the larger hook only if your mesh is tight.
Round 1 (Color A): From lower waist edge, ch 3 and work 1 dc in each stitch around, increasing evenly as needed so the fabric does not pull inward. Join.
Round 2: Dc in next 2 sts, 2 dc in next st around. Join. This gives approximately 33% increase.
Round 3: Dc in next 3 sts, 2 dc in next st around. Join.
Round 4: Dc, ch 1, sk 1 around, increasing by working (dc, ch 1, dc) into every 8th to 10th stitch or space.
Round 5: Work 2 dc in each ch-1 sp, ch 1 between groups. Maintain a flat circle. If the fabric cups, add more increases. If it ruffles excessively, reduce increases.
Rounds 6-18: Repeat a 2 round mesh sequence. Round A: 2 dc in next space, ch 2. Round B: dc in each dc, ch 2 over ch space. Add 8 to 12 evenly spaced increase points per round by placing an extra 2 dc group at those locations.
Continue Color A until skirt measures about 10 to 11 inches from waist or about 40% of desired skirt length.
Change to Color B. Work 8 to 11 inches of the same airy mesh, shifting increase points every few rounds so no visible vertical wedges form.
Change to Color C for the lower section. Work 5 to 7 inches of mesh before beginning the hem lace. At this point the circumference should be very full and the skirt should hang in soft folds rather than form a stiff cone.
Flat circle test: Every 4 to 6 rounds, lay the skirt on a flat surface. A slight wave is desirable for fullness, but deep ruffles mean too many increases. Cupping means too few. Correct gradually over the next 2 to 3 rounds rather than making a drastic change in one round.
Deep Mauve Fan Lace Hem Border
Step 1: Prepare the final mesh round so the stitch and space count is a multiple of 12. Add or remove a few stitches invisibly across the round if necessary.
Round 1: With Color C, sc around.
Round 2: Sc in next st, ch 5, sk 3 sts around. Join.
Round 3: In each ch-5 sp work (2 dc, ch 1, 2 dc). Join.
Round 4: In each ch-1 sp work a large fan (2 dc, ch 1, 2 dc, ch 1, 2 dc), ch 1 between fans.
Round 5: Sc in first ch-1 sp of fan, ch 4, sc in second ch-1 sp of same fan, ch 5 around.
Round 6: In each ch-4 sp work (sc, hdc, 3 dc, hdc, sc). In each ch-5 sp work sc to anchor.
Round 7: Sl st to top of each small fan, ch 7 to next fan top. Repeat around.
Round 8: In each ch-7 sp work (sc, hdc, 2 dc, 3 tr, 2 dc, hdc, sc). Join.
Final Round: Sc around each fan, placing a picot at the center treble. Fasten off and weave in securely.
Floral Appliques
Make a mix of large roses, small five petal flowers, leaves, and slender vines. Arrange them before sewing so both sides feel balanced but not perfectly mirrored.
Large Spiral Rose (Make 4-6)
Row 1: With Color B or C and 2.5 mm hook, ch 42. Work 2 dc in 4th ch from hook, ch 1, sk 1, 3 dc in next ch, ch 1, sk 1 across. The strip will curl naturally.
Row 2: Ch 1, turn. In each 3 dc group work (sc, hdc, 3 dc, hdc, sc). Fasten off leaving an 18 inch sewing tail.
Assembly: Beginning at the narrow end, coil the strip into a rose. Stitch through all layers on the back every 1/2 inch so the rose cannot unwind. Flatten the back before attaching to garment.
Small Five Petal Flower (Make 8-14)
Round 1: Magic ring. Work 10 sc into ring. Join.
Round 2: Sl st in next st, in next st work (sc, hdc, 3 dc, hdc, sc). Repeat 5 times total. Join and fasten off.
Center: With a contrasting color, work one puff center into the center ring or embroider several French knot like wraps with yarn.
Leaf (Make 16-24)
Row 1: Ch 10. Starting in 2nd ch from hook: sc, hdc, dc, 2 tr, dc, hdc, sc. Work 3 sc in last ch.
Row 2: Working down opposite side of foundation chain: sc, hdc, dc, 2 tr, dc, hdc, sc. Join.
Optional vein: Surface slip stitch from base to tip in a contrasting shade. Fasten off leaving a sewing tail.
Curving Vine (Make 4)
Step 1: Ch 28 to 40. Work 2 sc in each chain for a gentle curl, or alternate 1 sc and 2 sc for a looser curve.
Step 2: For tiny offshoots, at 3 to 4 locations ch 5, sl st back to main vine, then continue. Fasten off leaving a sewing tail.
Applique Placement and Sewing
Step 1: Put the dress on a mannequin or dress form. Pin the largest roses at both sides of the waist, one slightly above and one slightly below the natural waist on each side.
Step 2: Add leaves in diagonal pairs pointing upward toward the underbust and downward onto the upper skirt.
Step 3: Fill gaps with small flowers. Keep the exact center front relatively open so the laced neckline and underbust oval remain the focal points.
Step 4: Let 2 to 4 vines trail downward 4 to 7 inches onto the upper skirt. Curve them with the skirt folds rather than placing them perfectly vertical.
Step 5: Remove the dress from the form. Sew each motif with matching yarn, catching only the back loops of the applique and the top layer of garment stitches. Do not stitch through open holes unless anchoring a leaf tip.
Step 6: After sewing, flex the fabric gently. Add discreet anchoring stitches under raised roses so they remain secure during wear.
Finishing and Blocking
Step 1: Weave in every end for at least 1.5 to 2 inches through same color stitches, changing direction twice. Split the yarn plies with the tapestry needle on the final pass for extra security.
Step 2: Wash the dress gently in cool water with a small amount of mild soap. Do not wring.
Step 3: Roll in towels to remove excess water. Lay flat on blocking mats and shape to measurements. Pin neckline, sleeve fans, and hem scallops carefully.
Step 4: Support the skirt while drying so its weight does not stretch the waist. Allow to dry completely before unpinning.
Step 5: Try on and check waist stability. Add clear elastic inside the waist if the skirt weight pulls the band downward.
Step 6: Relace the neckline. Steam only if your yarn label permits it. Never press the raised floral motifs flat.
Custom Fit Adjustments
| Adjustment | How to Change It |
|---|---|
| Longer or shorter bodice | Add or remove rows in the upper back band and side underbust sections before the waist band. Keep armholes deep enough for movement. |
| Fuller cup | Add width by continuing cup increase rows, then add 1 to 3 plain rows for depth before neckline shaping. |
| Smaller cup | Stop cup increases sooner and begin neckline shaping 1 to 2 rows earlier. |
| Narrower waist | Decrease 4 extra stitches on two waist rounds. Avoid cinching more than about 2 inches below your actual waist. |
| Longer skirt | Repeat the mesh sequence before the hem border. Every extra 2 inches of length may require additional yarn and a few extra increase points. |
| Less dramatic skirt | Use only half as many increase points after Round 8 and stop when circumference gives the desired drape. |
| More dramatic bell cuff | Add one extra dc increase round before the fan lace. |
| Sleeve fit | Decrease mesh only at underarm. For fuller upper arms, work the first 4 to 6 inches without decreases. |
Yarn Estimates by Size
| Size | Ivory A | Blush B | Mauve C |
|---|---|---|---|
| XS | 1,250-1,450 yd | 500-600 yd | 700-850 yd |
| S | 1,400-1,600 yd | 550-650 yd | 750-900 yd |
| M | 1,550-1,800 yd | 650-750 yd | 850-1,000 yd |
| L | 1,750-2,000 yd | 700-850 yd | 950-1,100 yd |
| XL | 1,950-2,250 yd | 800-950 yd | 1,050-1,250 yd |
| 2XL | 2,150-2,450 yd | 900-1,050 yd | 1,150-1,350 yd |
| 3XL | 2,350-2,700 yd | 1,000-1,150 yd | 1,250-1,500 yd |
These estimates include a modest allowance for swatching and appliques. A longer or fuller skirt can increase yarn usage substantially.
Final Assembly Checklist
Before you call this dress complete, run through this checklist:
Pattern Notes for Successful Wear
Because this is a fine cotton lace dress with a very full skirt, the waist carries significant weight. Store the finished dress folded rather than hanging for long periods. If you plan to wear it frequently, the optional clear elastic waist stabilization is strongly recommended. A lightweight slip dress can be worn underneath for coverage while preserving the airy crochet effect.
Your exact stitch counts may vary with yarn, hook, gauge, cup depth, and personal measurements. Measure frequently and prioritize the listed finished dimensions over blindly following a stitch number.
You Did It!
Thank you so much for choosing this pattern. I hope you love making this romantic lace dress as much as I loved designing it. It is a true labor of love, and I cannot wait to see your finished versions.
If you make this Pink Floral Lace Dress crochet pattern, I would absolutely love to see it! Tag me on Instagram or share a photo in my Facebook group. Seeing your creations truly makes my day.
Be sure to save this pattern to your Pinterest boards so you can find it easily when you are ready to start. And please drop a comment below if you make it or have any questions along the way. I am always here to help!
Want a Quick & Easy Printable Version?
Get a clean, beautifully formatted PDF of this pattern — easy to follow step by step, ready to print or save on any device. No scrolling, no distractions, just the pattern.
Get the Printable PDF →