
This stunning circular placemat makes an unforgettable handmade gift for housewarmings, weddings, or holiday tables. The pattern uses puff stitches, double crochet shells, and delicate picot edging to create a layered, scalloped design that looks far more complex than it actually is. If you can work in joined rounds and follow a color sequence, you can absolutely make this.
Get the Ad-Free PDF Pattern
You can find the free pattern below, or you can purchase the ad-free printable PDF from my shop.
Get the Printable PDF →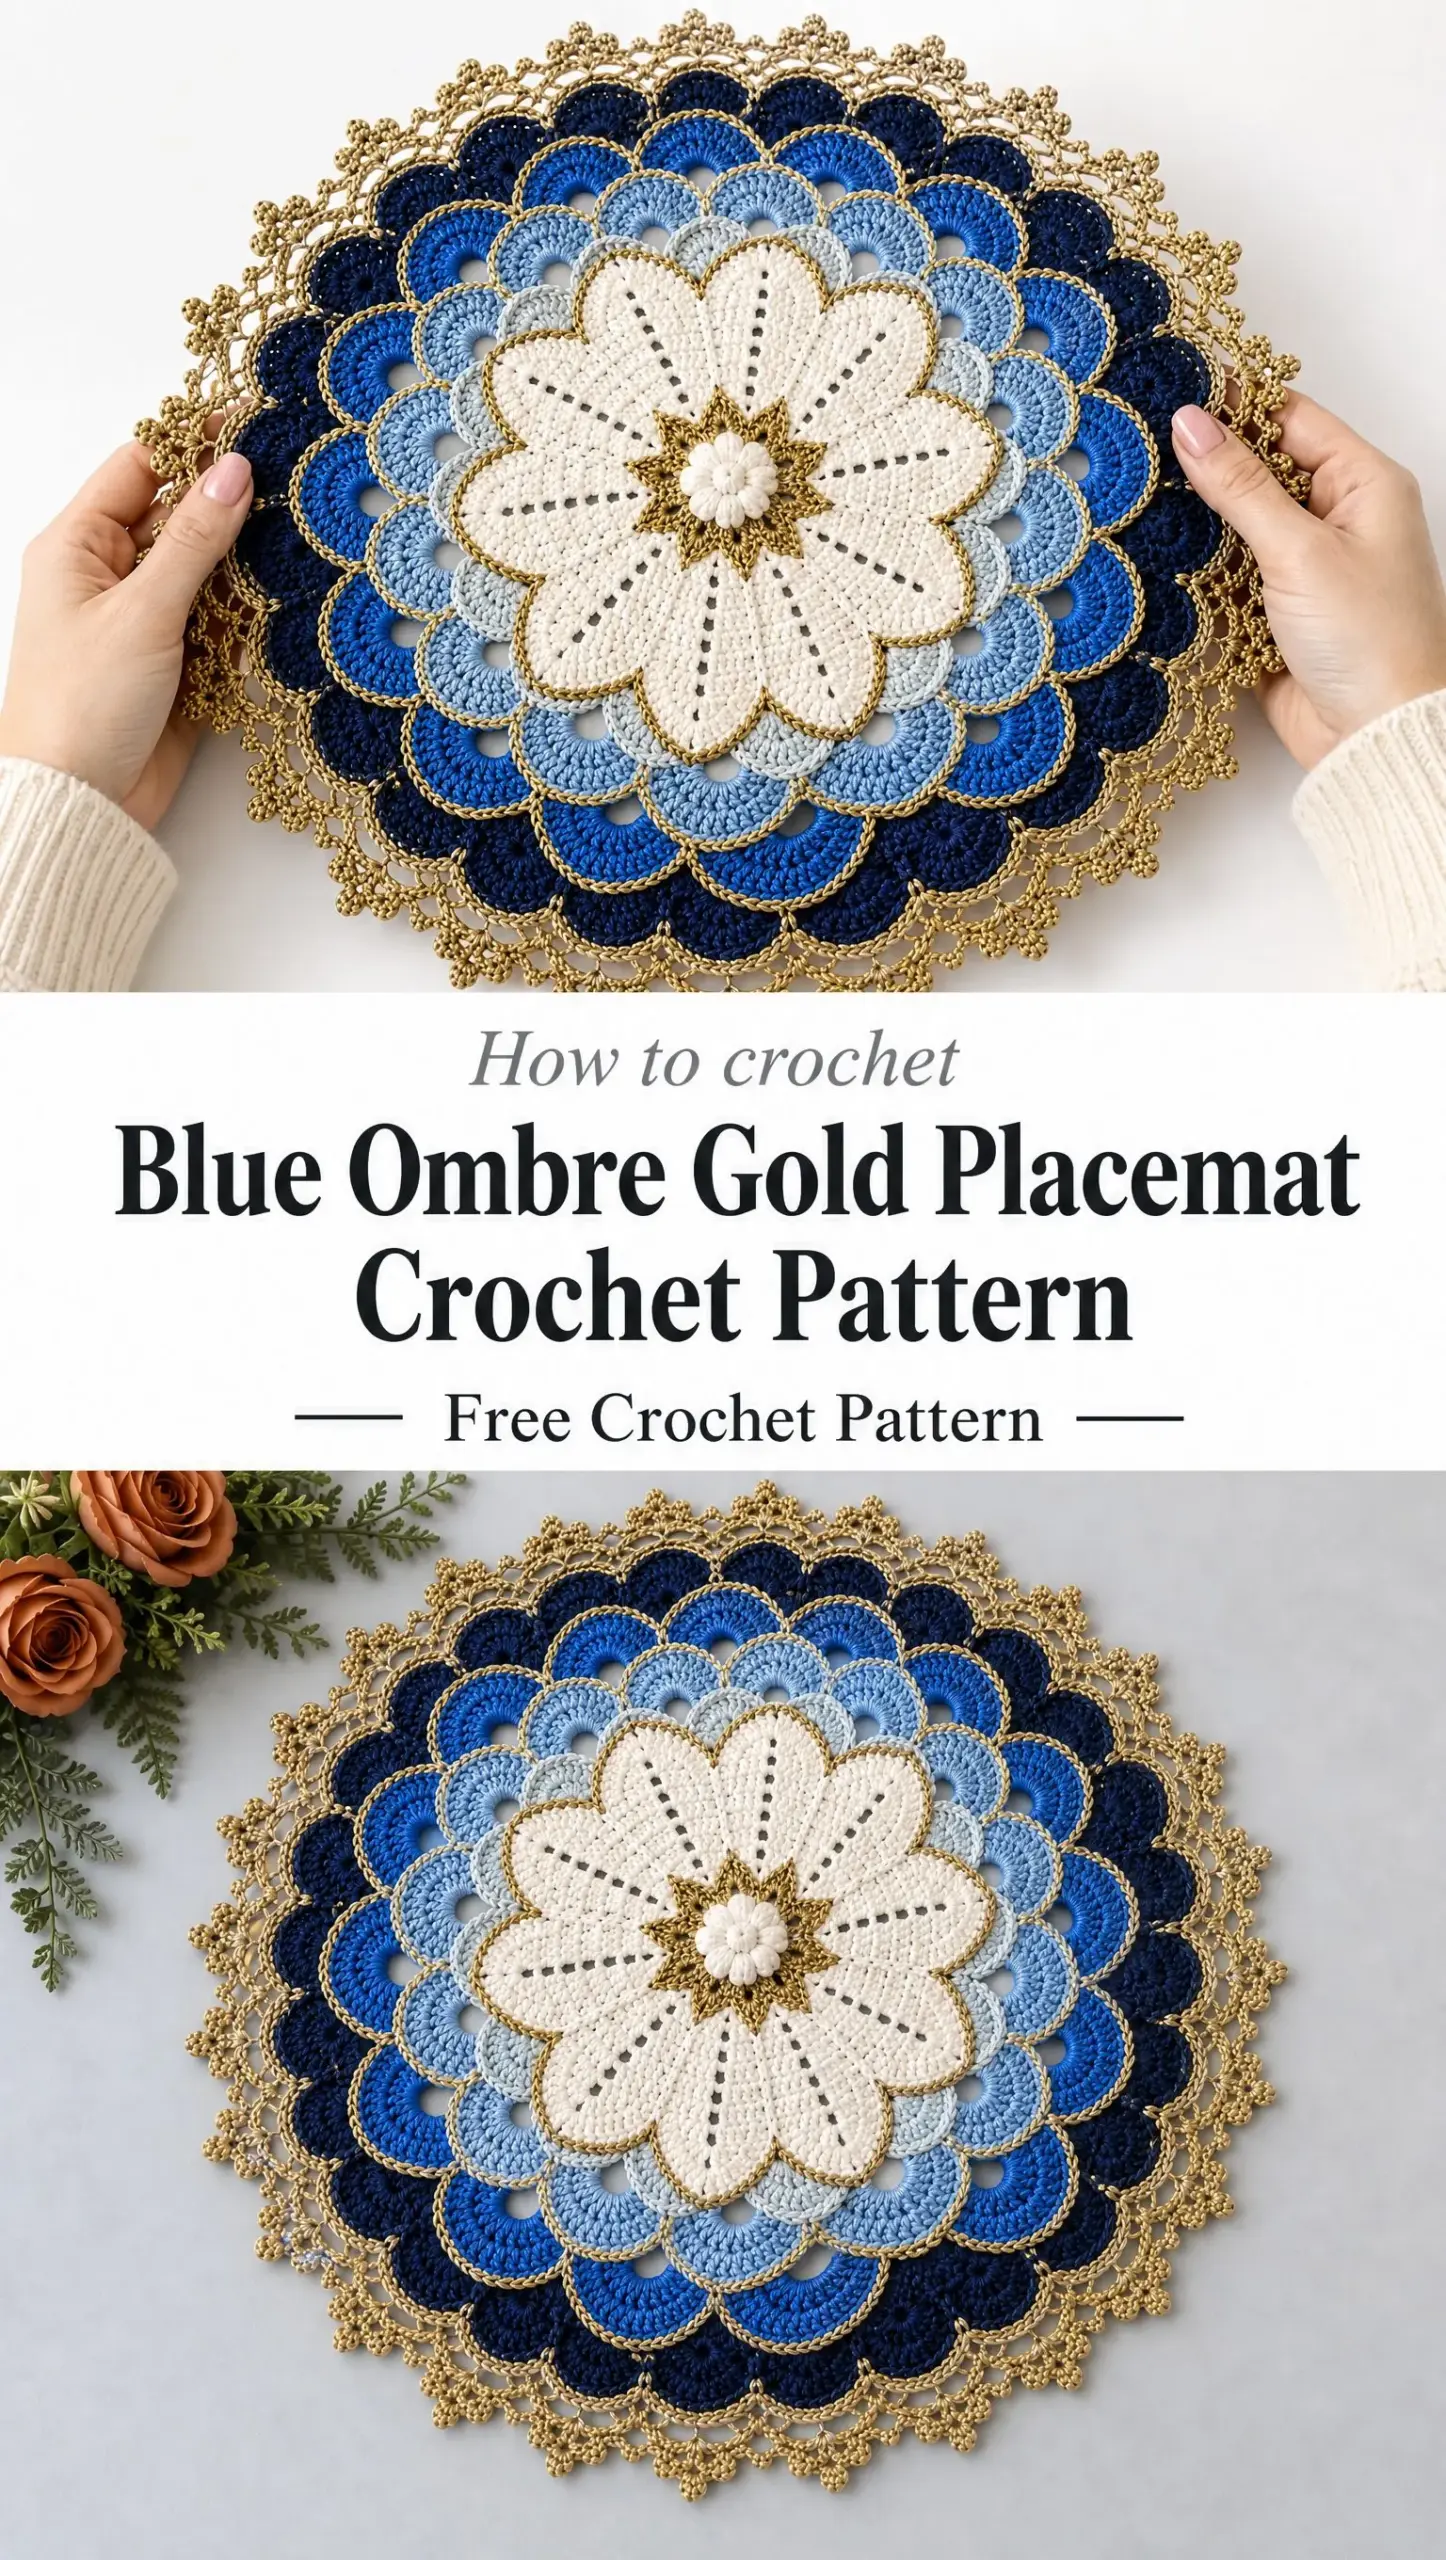
The blue ombre effect transitions from icy pale blue through bright sky blue, royal blue, and deep navy. Each layer is outlined in metallic gold thread, giving the whole piece a jewelry-like quality. Whether you display it under a vase, use it as a centerpiece, or frame it as fiber art, this placemat will get compliments.
It works up in about 28 rounds and makes an excellent project for intermediate crocheters ready to level up their skills. The finished size is approximately 18 to 20 inches across after blocking, perfect for a statement table piece.
Materials You Will Need
Gather these supplies before you begin. The pattern uses cotton crochet thread or smooth mercerized cotton in size 3 or light fingering weight.
Yarn amounts:
Tools:
Gauge and Tension
Exact gauge matters less than keeping your work flat. As a general guide, 10 double crochet stitches should measure about 1.8 to 2.0 inches (4.5 to 5 cm) across in the white center section.
If your work cups inward, try adding chain spaces or increasing stitches. If it ruffles, reduce your increases or switch to a smaller hook. The goal is a fabric that lies perfectly flat.
Abbreviations (US Terms)
Here are all the abbreviations used in this pattern. I have included plain English definitions so you know exactly what each stitch means.
Color Plan at a Glance
Understanding the color zones will help you visualize the project before you start.
| Zone | Color | Purpose |
|---|---|---|
| Center rosette | White | Raised focal point |
| Star ring | Metallic gold | Eight pointed star around rosette |
| Flower medallion | White with fine gold outline | Broad lobes, eyelet spokes |
| Shell ring 1 | Icy pale blue with gold | Soft transition |
| Shell ring 2 | Bright sky blue with gold | Higher contrast |
| Shell ring 3 | Royal blue with gold | Rich mid-dark ring |
| Shell ring 4 | Deep navy with gold | Outer blue frame |
| Final lace | Metallic gold | Open loops, fans, picots |
Construction Notes Before You Begin
A few tips will make this project much smoother.
Join each round with a slip stitch unless the instructions say otherwise. Move to the center of the next chain space with slip stitches when needed.
The pattern uses 12 main white petals or lobes. This number makes the later shell rounds easy to stagger and produces the balanced look you see in the photo.
The blue shell rounds are not solid circles. Each fan is worked around or into an open chain arch, so a small opening remains at the base of each fan. This creates that layered scale effect.
Gold outlining is added immediately after each major colored shell round. Work loosely enough that the metallic thread does not pull the fabric inward.
Count your repeats, not only individual stitches. The visual rhythm matters more than a rigid stitch count at the scalloped edges.
Step by Step Pattern Instructions
Section 1: White Puff Rosette
Round 1 (white): Make a magic ring. Chain 1, work 12 single crochet into the ring. Pull the ring snug. Join to the first single crochet. 12 sc.
Round 2: Chain 1. Work 1 puff stitch in each single crochet around, chain 1 after each puff. Join to the first puff. You should have 12 compact puff petals. Fasten off white and weave the tail securely to the back.
Section 2: Metallic Gold Pointed Star
Round 3 (gold): Join gold in any chain 1 space. Chain 4, slip stitch in 2nd chain from hook, single crochet in next chain, half double crochet in next chain. Slip stitch in next chain 1 space. Repeat around to form 12 small pointed rays. Join.
Round 4: Slip stitch to the tip area of the first ray. Chain 3, single crochet in the tip of the next ray, chain 3, single crochet in the valley between rays. Repeat around. This stabilizes the star and creates a foundation for the white medallion. Do not fasten off if you want the gold line to remain continuous. Otherwise, fasten off neatly.
Section 3: White Flower Medallion
The white center is made as 12 radiating wedges separated by narrow eyelet spokes. Each wedge gradually widens and finishes as a broad rounded lobe.
Round 5 (white): Join white in any chain 3 space. Chain 3 (counts as double crochet), 3 double crochet in same space, chain 1. 4 double crochet in next chain 3 space, chain 1. Repeat around. Join. 12 groups of 4 dc.
Round 6: Slip stitch to the first chain 1 space. Chain 3, 1 double crochet in same space, chain 1, 2 double crochet in same space. Chain 1. [2 dc, ch 1, 2 dc] in next chain 1 space, chain 1. Repeat around. Join. The center chain 1 within each group becomes the eyelet spoke.
Round 7: Slip stitch to center chain 1 of first wedge. Chain 3, 2 double crochet in same space, chain 1, 3 double crochet in same space. Chain 1. [3 dc, ch 1, 3 dc] in next center chain 1 space, chain 1. Repeat around. Join.
Round 8: In each wedge center: [4 dc, ch 1, 4 dc]. Between wedges chain 1. Join. Keep the spaces between wedges narrow.
Round 9: In each wedge center: [5 dc, ch 1, 5 dc]. Between wedges chain 1. Join.
Round 10: In each wedge center: [6 dc, ch 1, 6 dc]. Between wedges chain 1. Join. The 12 wedges should now read clearly as radiating petals.
Round 11 (shaping the lobes): Slip stitch to the first center chain 1 space. In each center space work 7 dc, ch 1, 7 dc. In the chain 1 valley between wedges work 1 single crochet. Repeat around. Join.
Round 12 (rounded petal tops): Over each 14 double crochet wedge work: single crochet in first dc, half double crochet in next, double crochet in next 2, treble crochet in next 2, 3 treble crochet in center chain 1 space, treble crochet in next 2, double crochet in next 2, half double crochet in next, single crochet in last dc. Slip stitch in valley single crochet. Repeat for all 12 lobes. Join and fasten off.
Gold Outline Around White Medallion
Round 13 (gold): Join gold at any valley. Chain 1, single crochet evenly around the entire shaped edge. Place 1 single crochet in each stitch and 2 to 3 single crochet around the apex of each lobe as needed to prevent pulling. At each valley, work 1 elongated single crochet into the valley stitch below. Join. The goal is a fine continuous gold tracing line, not a bulky border.
Foundation arch round: Chain 7, skip approximately 5 edge stitches, single crochet in next stitch. Repeat evenly around, adjusting by 1 skipped stitch when needed so you finish with 24 chain arches. Join. These arches begin the blue shell section.
Section 4: Four Ombre Shell Rings
Each shell round is worked over 24 arches. The next ring is staggered so its fan sits between the fans of the preceding ring. If your yarn changes the circumference slightly, preserve 24 evenly spaced repeat points and adjust chain lengths rather than forcing the fabric.
Shell Ring 1: Icy Pale Blue
Round 14 (pale blue): Join pale blue in any gold chain 7 arch. Chain 1. Single crochet in arch, chain 3, 9 double crochet around the same arch, chain 3, single crochet in same arch. Chain 2. Repeat in every arch. Join. You now have 24 thick curved fans with a small open base.
Round 15 (gold edging): Join gold at first single crochet. Single crochet in side chain 3 space, single crochet in each of 9 double crochet, placing [sc, ch 2, sc] in the top center double crochet to make a tiny point, single crochet in opposite side chain 3 space. Chain 2. Repeat around. Join. Fasten off gold.
Shell Ring 2: Bright Sky Blue
Round 16 (sky blue foundation): Join sky blue in a chain 2 gap between pale fans. Chain 9, single crochet in next chain 2 gap. Repeat around. The new arches should sit between the previous fans.
Round 17: In each chain 9 arch work: single crochet, chain 3, 11 double crochet around arch, chain 3, single crochet. Chain 2. Join. Fasten off sky blue.
Round 18 (gold edging): Edge each fan with single crochet across the fan stitches, using [sc, ch 2, sc] at the top center and chain 2 between fans. Join and fasten off.
Shell Ring 3: Royal Blue
Round 19 (royal blue foundation): Join in any gap between sky blue fans. Chain 10, single crochet in next gap. Repeat around.
Round 20: In each chain 10 arch work: single crochet, chain 3, 13 double crochet around arch, chain 3, single crochet. Chain 2. Join. Fasten off royal blue.
Round 21 (gold edging): Single crochet evenly around each royal fan. Make [sc, ch 2, sc] in the top center stitch. Chain 2 between fans. Join and fasten off.
Shell Ring 4: Deep Navy
Round 22 (navy foundation): Join navy in a gap between royal fans. Chain 11, single crochet in next gap. Repeat around.
Round 23: In each chain 11 arch work: single crochet, chain 3, 15 double crochet around arch, chain 3, single crochet. Chain 2. Join. Fasten off navy.
Round 24 (gold edging): Single crochet across each navy fan, adding [sc, ch 3, sc] at the center top of each fan for a sharper gold accent. Chain 2 between fans. Join.
Section 5: All Gold Lace Border
The outer border should look airy and jewelry-like, with open loops, small fans, and pointed picot clusters. Work this section loosely.
Round 25: With gold, chain 6, single crochet in the chain 2 gap between navy fans, chain 6, single crochet in the center top chain 3 point of the next fan. Repeat around. Join. This creates alternating outer and inner gold loops.
Round 26: Slip stitch into first chain 6 loop. [Sc, ch 4, 3 dc, picot, 3 dc, ch 4, sc] in loop. Chain 3. Single crochet in next chain 6 loop. Chain 3. Repeat around, alternating a decorative mini fan with a simple anchor loop.
Round 27: Chain 5, single crochet in next chain 3 space, chain 5, single crochet in picot at top of mini fan, chain 5, single crochet in next chain 3 space. Repeat around. Join.
Round 28 (pointed picot finish): In each chain 5 loop work single crochet, chain 3, picot, chain 3, single crochet. At the loop directly over a mini fan, substitute single crochet, chain 4, picot, chain 4, single crochet to create a slightly taller point. Join invisibly and fasten off.
Finishing Your Placemat
Weave in all ends on the wrong side, splitting the yarn plies where possible so metallic tails stay secure.
Wash or mist the placemat according to the cotton yarn label. Avoid aggressive wringing.
Pin the piece face up on a blocking mat. First pin the 12 main white lobes, then the 24 blue fan peaks, then every outer gold picot point. Measure across several axes to keep the circle symmetrical.
Allow to dry completely before removing pins. For a crisper display placemat, apply a very light fabric stiffener only to the outer gold lace, not the whole piece.
If the finished mat ruffles, re-block under slightly stronger outward tension. If it cups, dampen again and pin with more space between the outer points.
Troubleshooting Common Issues
| Problem | Likely Cause | Fix |
|---|---|---|
| White center cups | Too few increases or hook too small | Add 1 extra dc to each wedge on the next widening round, or move up a hook size |
| White center ruffles | Too many increases | Remove 1 dc from each wedge on the next round or use a smaller hook |
| Blue shells pull inward | Gold edging too tight | Redo gold sc edging with a larger hook or add occasional ch 1 between stitches |
| Outer border waves excessively | Loops too long | Reduce ch 6 and ch 5 loops by one chain each |
| Outer border feels tight | Loops too short | Add one chain to each outer loop and block firmly |
Optional Size Adjustments
Smaller mat (about 15 to 16 inches or 38 to 41 cm): Stop after royal blue Ring 3, then work the gold lace border directly into the royal blue gaps.
Larger centerpiece (about 22 to 24 inches or 56 to 61 cm): Add one extra navy shell round using chain 12 arches and 17 double crochet per fan before beginning the gold lace. Increase the first gold lace loops from chain 6 to chain 7.
Care Instructions
Hand wash or machine wash on a delicate cycle inside a mesh laundry bag. Use cool water and mild detergent. Reshape and dry flat. Metallic thread lasts best when not tumble dried or ironed directly.
Pattern Summary
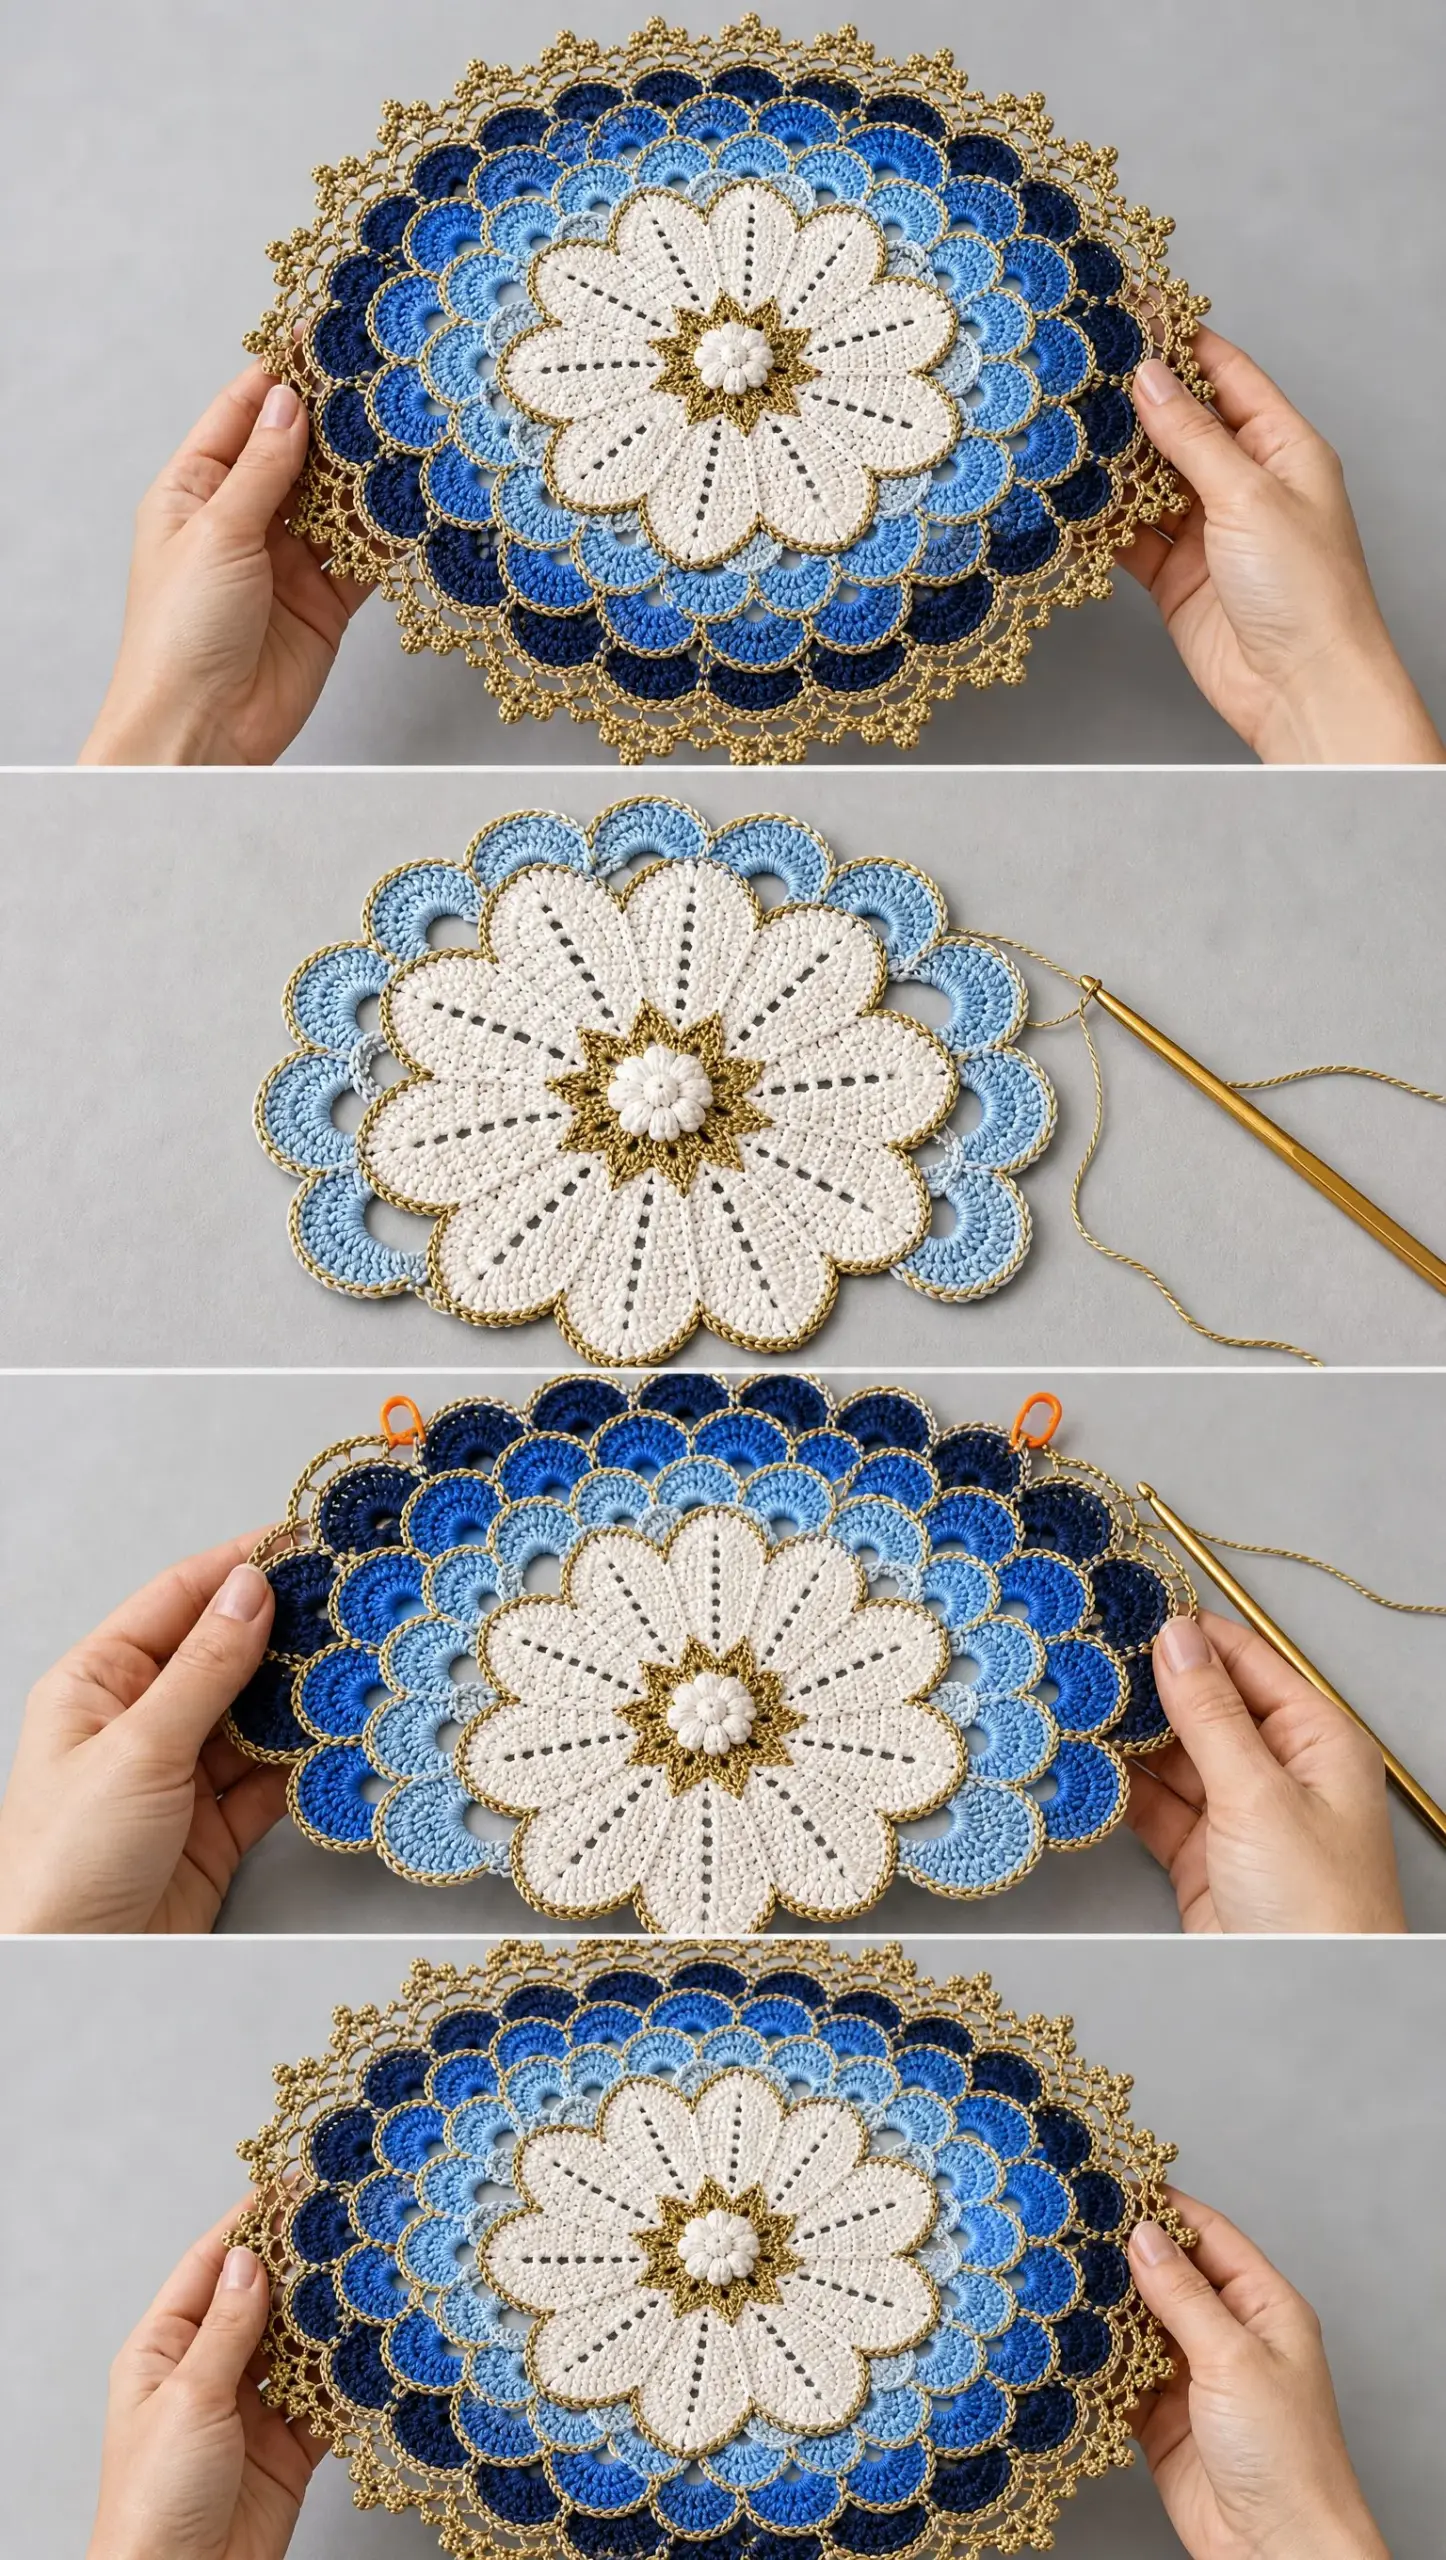
Center: 12 puff petals, then 12 gold star rays, then 12 white wedges and lobes.
Shell field: 24 staggered fans per colored ring.
Outer edge: Open gold loops, mini fans, and pointed picot clusters.
The most important visual cues are the oversized white floral medallion, the four step blue gradient, and the fine gold outline between every layer.
Thank you so much for choosing this Blue Ombre Gold Placemat crochet pattern. I hope you love making it as much as I loved putting this guide together. If you make one, I would absolutely love to see it! Tag me on Instagram or share a photo in my Facebook group.
Save this pattern to your Pinterest boards so you can find it whenever you are ready to start. And please drop a comment below if you give it a try. I always love hearing how your projects turn out!
Want a Quick & Easy Printable Version?
Get a clean, beautifully formatted PDF of this pattern — easy to follow step by step, ready to print or save on any device. No scrolling, no distractions, just the pattern.
Get the Printable PDF →