
Looking for a statement piece that actually flatters your figure? This crochet bodysuit delivers. The shell fan stitch creates a beautiful diamond lattice pattern across the entire body, while the built-in bust cups and sweetheart neckline give you genuine shape and support.
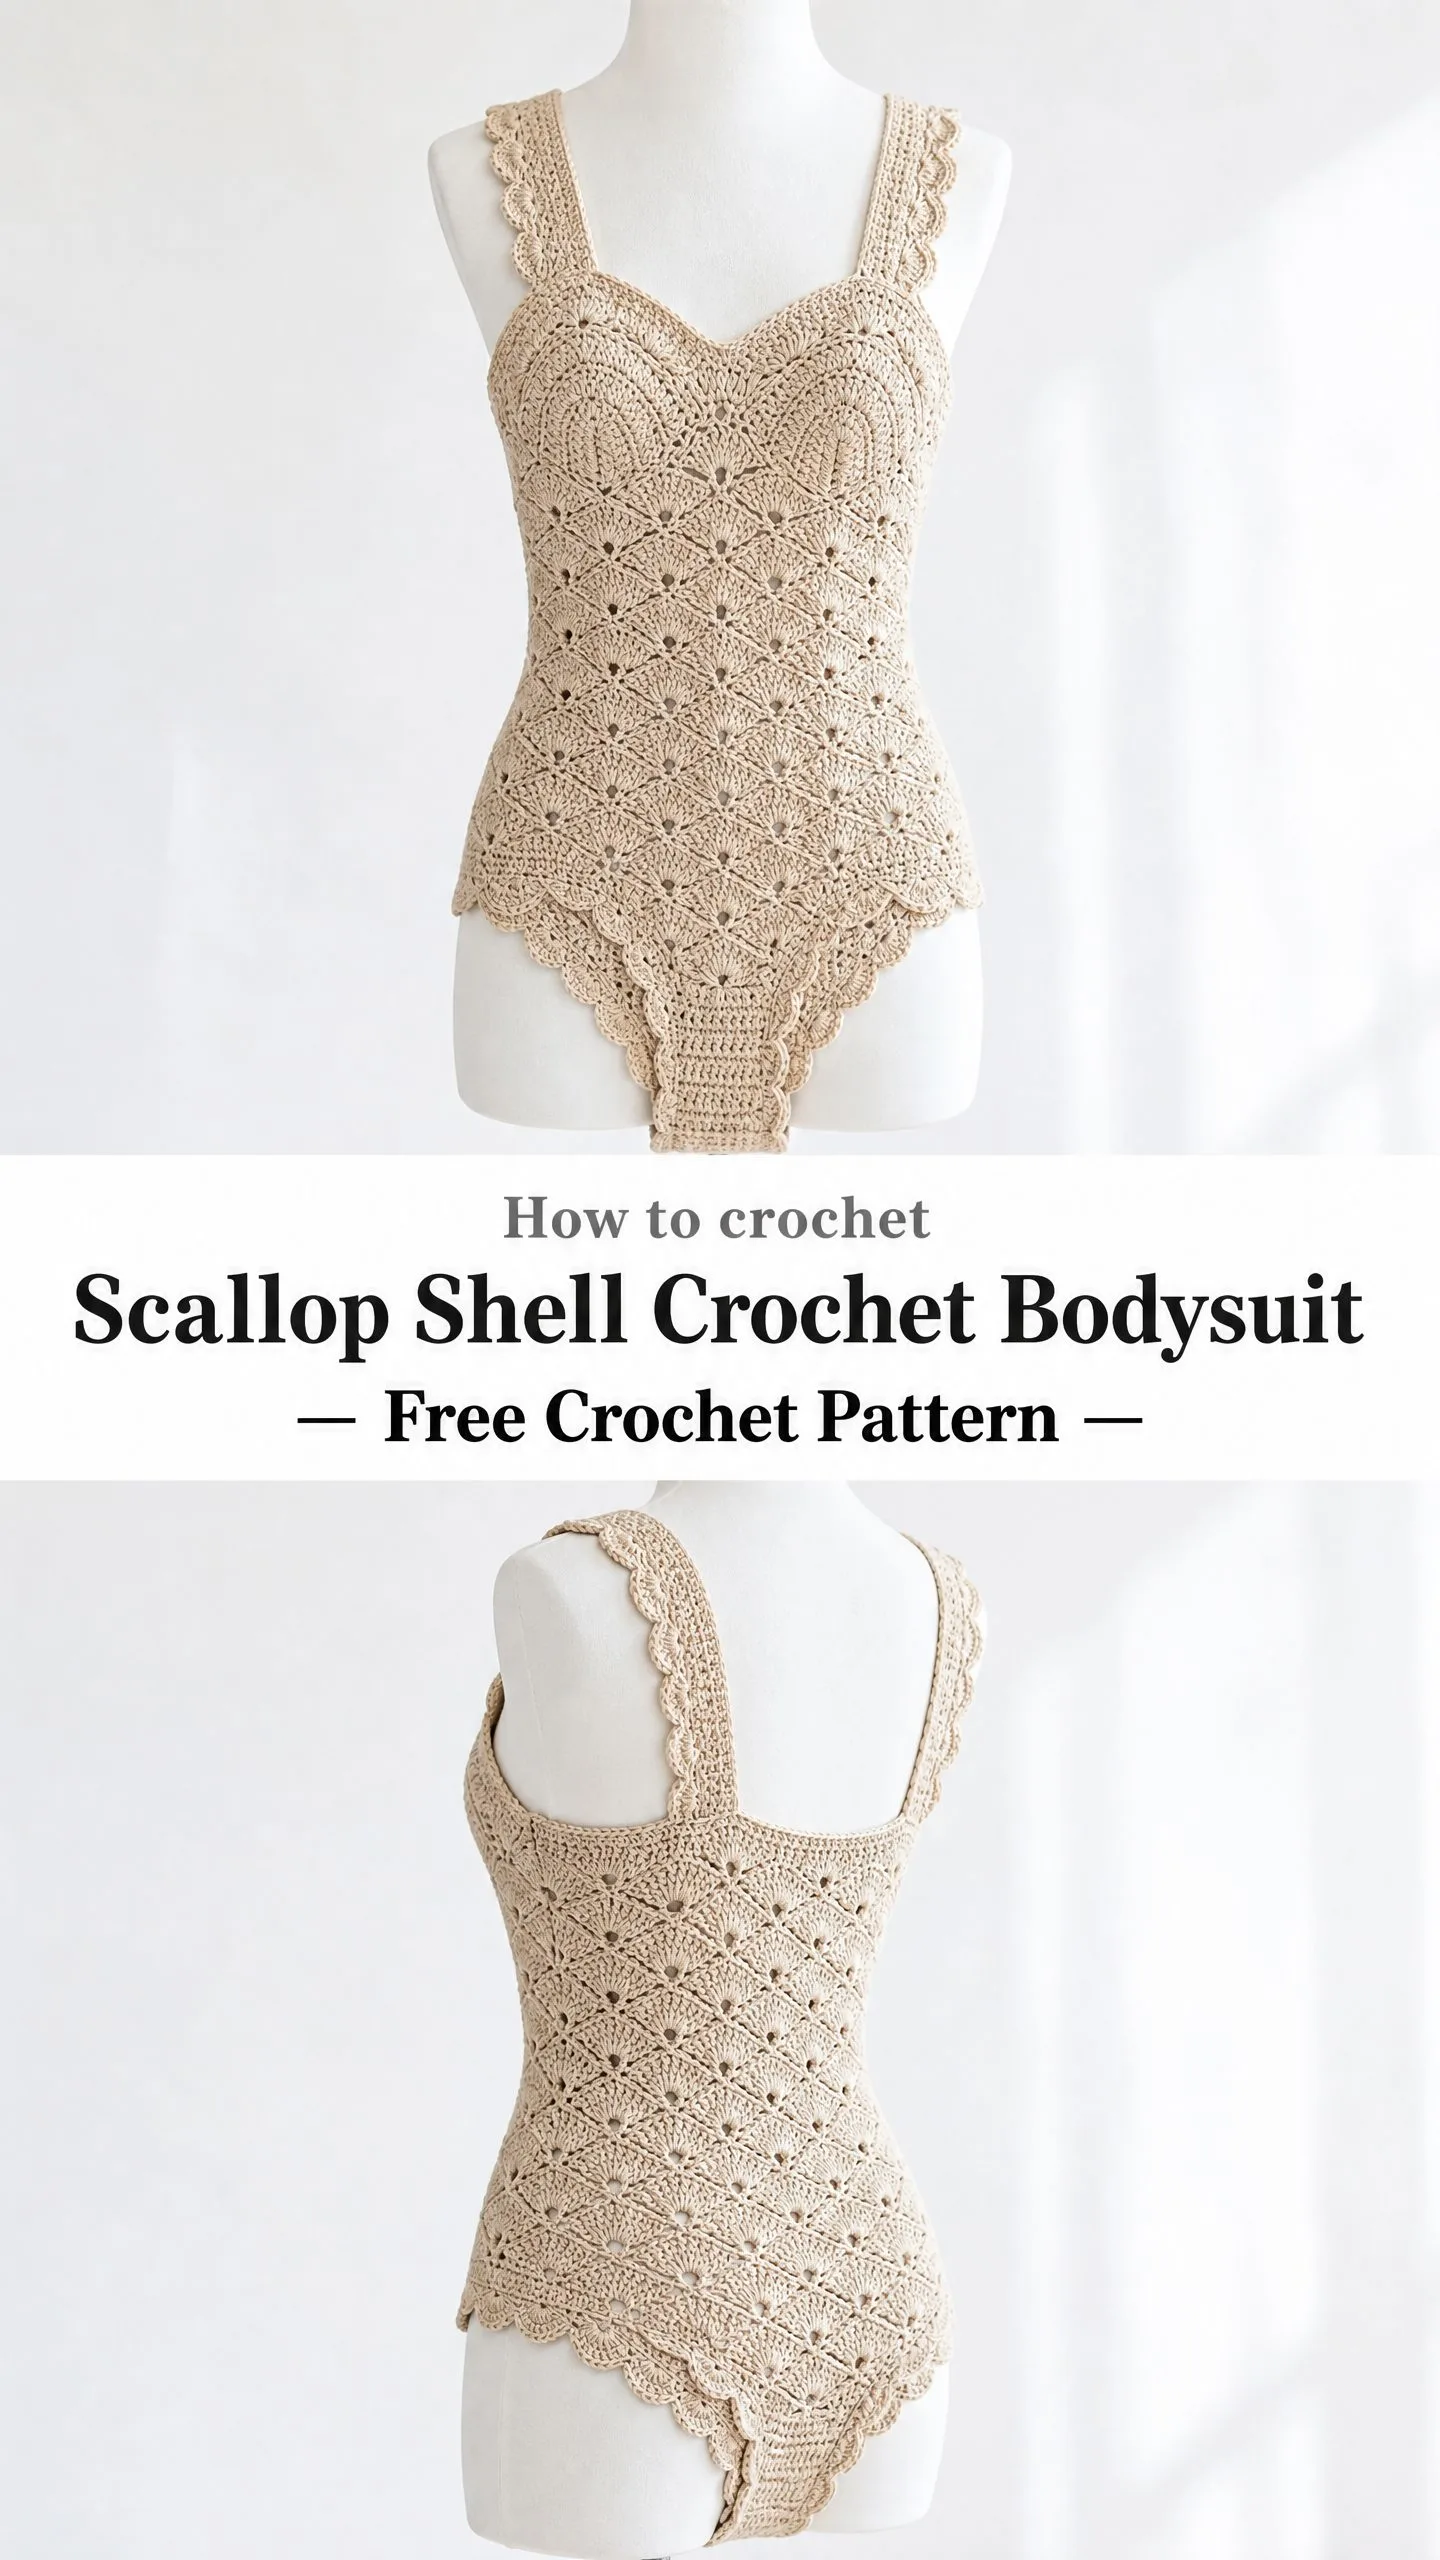
I designed this pattern to work for multiple sizes with clear adjustments throughout. The construction method, working flat pieces and seaming them together, gives you much better control over fit than working in the round. You will end up with a professional-looking garment that holds its shape beautifully.
This is an intermediate to advanced project, so I want to be upfront about that. But if you have experience with shell stitches and basic shaping, you can absolutely tackle this. I have included detailed checkpoints throughout so you can verify your progress as you go.
About This Crochet Bodysuit Pattern
This boho-inspired one-piece features everything you see in the photos: a repeating shell fan stitch body, integrated crocheted bust cups, scalloped edging on all straps and hems, and that gorgeous sweetheart neckline. The construction breaks down into manageable pieces: a front bodice panel with attached cups, a back panel, two shoulder straps, and a small crotch gusset.
Important note: This bodysuit is designed as a swimsuit cover or fashion piece. It is not meant for functional swimwear without a lined underlayer underneath.
The finished garment has a structured yet feminine silhouette with high-cut leg openings and either a deep V or square back neck, depending on how you style it. The shell pattern creates those beautiful little eyelet holes you see in the photos, giving the piece an airy, bohemian feel.
Skill Level
Intermediate to Advanced
You should be comfortable with:
If you have made garments before and feel confident with shaping, this pattern will challenge you in the best way.
Time Estimate
Plan for 25 to 35 hours depending on your gauge consistency and yarn choice. This is not a weekend project, but the results are absolutely worth the investment.
Finished Measurements
Size S: Bust 32 to 34 inches (81 to 86 cm), Waist 26 to 28 inches (66 to 71 cm), Hip 34 to 36 inches (86 to 91 cm), length shoulder to crotch approximately 22 inches (56 cm)
Size M: Bust 34 to 36 inches (86 to 91 cm), Waist 28 to 30 inches (71 to 76 cm), Hip 36 to 38 inches (91 to 97 cm), length shoulder to crotch approximately 22.5 inches (57 cm)
Size L: Bust 36 to 38 inches (91 to 97 cm), Waist 30 to 32 inches (76 to 81 cm), Hip 38 to 40 inches (97 to 102 cm), length shoulder to crotch approximately 23 inches (58 cm)
The pattern is written for Size S with Size M and Size L adjustments noted in parentheses as (M, L) throughout.
Materials Needed
Yarn: Approximately 700 (800, 900) yards or 640 (730, 820) meters of DK weight cotton or cotton-blend yarn in one color. A tightly twisted mercerized cotton works best for stitch definition and shape retention.
Hook: US size E-4 / 3.5 mm crochet hook, or size needed to obtain gauge
Notions:
Yarn Suggestions
1. Paintbox Yarns Cotton DK (100% cotton, 137 yards / 125 meters per 50 g skein). Excellent stitch definition and widely available in warm neutrals including the sand, rust, and chocolate tones shown in the photos. You will need approximately 6 (6, 7) skeins.
2. Drops Safran (70% cotton, 30% viscose, 164 yards / 150 meters per 50 g ball). The viscose content adds a subtle sheen that enhances the shell texture. You will need approximately 5 (5, 6) balls.
3. Lion Brand 24/7 Cotton DK (100% mercerized cotton, 186 yards / 170 meters per 100 g skein). The mercerized finish gives good drape without excess stretch. You will need approximately 4 (5, 5) skeins.
Substitution note: Choose a yarn with low elasticity and good stitch memory. Avoid high-stretch yarns, chenille, or fuzzy fibers because these will obscure the shell pattern and cause the garment to lose shape at the waist and hips. Always swatch in the shell stitch pattern, not just in single crochet.
Gauge
In Shell Fan Stitch pattern worked flat:
16 stitches = 4 inches / 10 cm
9 rows = 4 inches / 10 cm
Gauge is critical for this garment. A one-stitch-per-inch deviation across the body will result in a size discrepancy of 2 or more inches in finished circumference. Swatch at least a 6 inch / 15 cm square and wash and block before measuring.
Shell repeat unit = 8 stitches wide, 2 rows tall.
At gauge: each 8-stitch repeat = 2 inches / 5 cm wide.
Abbreviations
Special Stitches
Shell Fan Stitch (SFS)
This is the primary stitch pattern of the body. It consists of an 8-stitch repeat worked over two rows. The shells form a diamond lattice with small eyelet holes between each fan.
Setup: Any multiple of 8 stitches plus 4 for selvedge (ch multiple of 8 + 4 for foundation).
Row A (RS, shell row): ch 3 (counts as dc), dc in same st or first st. Skip 3 sts. Single crochet in next st. Ch 3. Skip 3 sts. Work 5 dc in next st (shell made). Rep from: skip 3, sc in next, ch 3, skip 3, 5 dc in next. End: skip 3, sc in last st, ch 1, dc in turning ch. Turn.
Row B (WS, connecting row): ch 1, sc in first dc. Ch 3. 5 dc in next sc (shell). Ch 3. Sc in center dc of next shell. Rep from: ch 3, 5 dc in next sc, ch 3, sc in center dc of next shell. End: ch 3, sc in top of t-ch. Turn.
Rep Rows A and B for pattern.
Note: Shells always land on single crochets from the previous row, and single crochets always land in the center of shells from the previous row. Do not skip extra stitches or the diamond alignment will break.
Scallop Edging Stitch
Used around all openings, neckline, and strap edges.
Working along an edge: (sl st, ch 2, 4 dc, ch 2, sl st) all into same stitch or ch-sp. This forms one scallop. Move along the edge and work one scallop into every other stitch or every ch-sp. Each scallop = 7 stitches total.
Bust Cup (worked in the round from center outward)
Worked in spiral rounds of single crochet and half double crochet with shaping increases.
Round 1: MR, 6 sc into ring. (6 sc)
Round 2: 2 sc in each st around. (12 sc)
Round 3: (sc in next st, 2 sc in next st) rep 6 times. (18 sc)
Round 4: (sc in next 2 sts, 2 sc in next st) rep 6 times. (24 sc)
Round 5: (sc in next 3 sts, 2 hdc in next st) rep 6 times. (30 sts)
Round 6: (hdc in next 4 sts, 2 hdc in next st) rep 6 times. (36 sts)
Round 7 (size S only): (hdc in next 5 sts, 2 hdc in next st) rep 6 times. (42 sts)
Round 7 (size M): (hdc in next 5 sts, 2 hdc in next st) rep 6 times. (42 sts)
Round 8 (size M): (hdc in next 6 sts, 2 hdc in next st) rep 6 times. (48 sts)
Round 7 (size L): same as M Round 7.
Round 8 (size L): same as M Round 8.
Round 9 (size L): (hdc in next 7 sts, 2 hdc in next st) rep 6 times. (54 sts)
After final cup round, do not fasten off. Sl st to join for a clean edge. Fasten off leaving a 12 inch / 30 cm tail for seaming to front bodice panel.
Cup dome measurement when flat: approximately 2.75 inches / 7 cm diameter for S, 3 inches / 7.6 cm for M, 3.25 inches / 8.3 cm for L.
Pattern Notes Before You Begin
1. The bodysuit is worked in separate pieces and seamed. This method gives better shape control than working in the round from the hem.
2. All turning chains are counted as stitches in this pattern except where stated otherwise. The ch-3 at the beginning of Row A counts as one dc. The ch-1 at the beginning of Row B counts as nothing and is simply a turning chain.
3. When shaping waist decreases and hip increases, maintain shell pattern alignment as much as possible. If a full repeat cannot be completed, work plain dc or sc at the selvedge to fill out the row.
4. Stitch counts given in parentheses at the end of each row reflect total number of structural stitches, counting each dc in a shell as one stitch and each ch-3 bridge as one chain unit (not counted in stitch total unless specified).
5. Work bust cups from the center of a magic ring. Make two identical cups per size.
6. The crotch is a worked rectangle attached at the base of the front and back panels.
7. Sizes M and L adjustments appear in parentheses (M, L) after the size S instruction. If only one number appears, it applies to all sizes.
8. Leave 18 inch / 46 cm tails when fastening off pieces intended for seaming.
9. All pieces are blocked flat before seaming.
10. The scallop edging is the very last step and unifies all edges.
Step-by-Step Crochet Bodysuit Instructions
Front Bodice Panel
The front panel is worked from the bottom (crotch edge) upward to the sweetheart neckline. It is worked flat.
Foundation chain: ch 68 (76, 84).
Row 1 (RS, setup row): sc in 2nd ch from hook and in each ch across. Turn. (67, 75, 83 sc)
Note: The sc foundation establishes an even base for the shell pattern to begin. Stitch count must be a multiple of 8 plus 3. Verify: 67 = 8 x 8 + 3. 75 = 8 x 9 + 3. 83 = 8 x 10 + 3. Correct.
Row 2 (WS): ch 1, sc across. Turn. (67, 75, 83 sc)
Now begin Shell Fan Stitch pattern. The stitch count will read differently once shells are in progress, but the structural stitch repeat of 8 stitches per shell unit is maintained throughout.
Row 3 (RS, Row A of SFS): ch 3 (counts as dc), dc in same st. Skip 3 sts. Sc in next st. Ch 3. Skip 3 sts. Work 5 dc in next st. (Skip 3, sc in next, ch 3, skip 3, 5 dc in next) rep to last 5 sts. Skip 3 sts, sc in next st. Ch 1, dc in last st. Turn. (8, 9, 10 shells plus partial at each edge)
Row 4 (WS, Row B of SFS): ch 1, sc in first dc. Ch 3. 5 dc in next sc. Ch 3. Sc in center dc of next shell. (Ch 3, 5 dc in next sc, ch 3, sc in center dc of next shell) rep across, ending sc in top of t-ch. Turn. (8, 9, 10 full shells)
Rows 5 through 10: Rep Rows 3 and 4 three more times, maintaining shell pattern.
CHECKPOINT: After Row 10, the panel should measure approximately 4.5 inches / 11.5 cm from foundation, and the shell diamonds should be clearly visible forming an even lattice.
Waist Shaping (Decrease Section)
The waist is shaped by reducing one shell repeat width on each side over the next 6 rows (Rows 11 to 16), creating 2 fewer shell repeats in width total (reducing by 16 stitches total, 8 each side).
Row 11 (RS, decrease row): sl st across first 4 sts (skip first partial shell), ch 3, dc in same st, cont in Row A shell pattern to last 4 sts of row, work final sc, ch 1, dc in next st, leave last 3 sts unworked. Turn. (59, 67, 75 sts, 7, 8, 9 shells)
Row 12 (WS): ch 1, sc in first dc. Cont in Row B shell pattern across. Sc in top of t-ch. Turn. (7, 8, 9 shells)
Rows 13 and 14: Rep Row A and Row B once more. (7, 8, 9 shells)
Row 15 (RS, decrease row): sl st across first 4 sts, ch 3, dc in same st, cont in Row A pattern to last 4 sts, sc, ch 1, dc in next st, leave last 3 sts unworked. Turn. (51, 59, 67 sts, 6, 7, 8 shells)
Row 16 (WS): ch 1, sc in first dc. Cont in Row B pattern across. Sc in top of t-ch. Turn. (6, 7, 8 shells)
CHECKPOINT: After Row 16, front panel should measure approximately 7 inches / 18 cm from foundation and 12.75 (13, 13.25) inches / 32.5 (33, 33.6) cm wide at the waist.
Hip and Bust Shaping (Increase Section)
Row 17 (RS, increase row): Ch 3, 2 dc in first st (half shell at edge). Work Row A shell pattern to last st. Work 2 dc in last st, ch 1, dc in same st. Turn. (added 4 sts, 55, 63, 71 sts)
Row 18 (WS): Ch 1, sc in first dc. Ch 3. 5 dc in next sc. Cont Row B shell pattern to end. Turn. (partial shells form at edges, 7 structural shell units, 6.5, 7.5, 8.5 effective)
Row 19 (RS, increase row): ch 3, dc in same st. Sk 3. Sc in next. Ch 3. Sk 3. 5 dc in next (full new shell added at edge). Cont Row A pattern. End with full new shell at right edge: 5 dc in st, sk 3, sc in next, ch 1, dc in same. Turn. (63, 71, 79 sts, 7, 8, 9 full shells)
Row 20 (WS): Row B pattern. (7, 8, 9 shells)
Rows 21 and 22: Rep Rows A and B once. (7, 8, 9 shells)
Row 23 (RS, increase row): Ch 3, dc in same st. Work Row A. At end work extra shell: 5 dc in last sc, sk 3, sc in last st, ch 1, dc in same. Turn. (71, 79, 87 sts, 8, 9, 10 shells, back to original hip width)
Row 24 (WS): Row B. (8, 9, 10 shells)
Rows 25 through 30: Rep Rows A and B three more times maintaining shell pattern. (8, 9, 10 shells throughout)
CHECKPOINT: After Row 30, front panel should measure approximately 13.5 inches / 34 cm from foundation and be at the full hip or bust width of approximately 17.75 (18.75, 21.75) inches / 45 (47.6, 55) cm.
Sweetheart Neckline Split
At Row 31, the front panel is divided in half to shape each side of the sweetheart neckline separately.
Stitch count total for Row 30: 67 (75, 83) structural sts. Each half gets 33 (37, 41) sts with a center 1-stitch gap (the point of the V).
Left Cup Side (as worn, worked first)
Row 31 (RS): Work Row A shell pattern across first 32 (36, 40) sts only. Stop. Turn. Leave remaining sts unworked. (4, 4, 5 shells in this half)
Row 32 (WS): Row B across left side only. Turn.
Rows 33 through 36: Rep Rows A and B twice more. No additional shaping yet. (4, 4, 5 shells)
Row 37 (RS, neckline decrease): Ch 3, dc in same st. Work shell pattern to last shell position. At inner (center front) edge, instead of 5 dc shell, work 3 dc half shell. Sc in next. Ch 1. Turn. (reduced by 1 shell unit at center edge, 3, 3, 4 full shells plus 1 partial)
Row 38 (WS): Ch 1, sc in first dc. Ch 3. 5 dc in sc. Ch 3. Sc in center dc of next full shell. Cont Row B. End at outer strap edge with sc in t-ch. Turn.
Rows 39 and 40: Rep Rows A and B. (3, 3, 4 full shells)
Row 41 (RS, second neckline decrease at center): Sl st across first 4 sts (removes one shell unit from inner edge). Ch 3, dc in same st. Cont Row A to outer edge. Turn. (2, 2, 3 shells plus selvedge)
Row 42 (WS): Row B. (2, 2, 3 shells)
Rows 43 and 44: Rep Rows A and B. (2, 2, 3 shells)
This creates the left strap section. The left side of the front bodice is complete. Fasten off.
Right Cup Side
Rejoin yarn at center of Row 30 with RS facing, leaving the center stitch free to form V point.
Rows 31 through 44: Mirror all instructions for left cup side, working from center to outer right strap edge. All shell counts mirror the left side. Fasten off.
CHECKPOINT: After completing both halves of front bodice neckline shaping, each strap section should be approximately 2 to 2.5 inches / 5 to 6.4 cm wide (matching 2 shell widths for S/M or 3 for L). The total front panel should measure approximately 19 inches / 48 cm from foundation chain to top of strap.
Back Panel
The back panel is worked identically to the front panel from foundation through Row 30 (full hip/bust width maintained). The back neckline is a straight V or wide scoop cut by simply stopping the work, rather than the sweetheart shaping of the front.
Foundation chain: ch 68 (76, 84).
Rows 1 through 30: Work exactly as front panel through Row 30 including all waist decreases (Rows 11 to 16) and hip increases (Rows 17 to 23). (8, 9, 10 shells at Row 30)
Back Neckline and Strap Division
Row 31 (RS): Work Row A shell pattern across first 32 (36, 40) sts. Fasten off. (left strap)
Rejoin at center stitch (1 st gap at center back) and work Row A shell pattern across remaining 32 (36, 40) sts. Fasten off. (right strap)
No additional rows are needed on the back straps. The back straps will connect to the front straps at the shoulder seam.
CHECKPOINT: Both front and back panels complete and blocked. Front panel measures approximately 19 inches / 48 cm tall. Back panel measures approximately 15 inches / 38 cm tall. Each strap section is approximately 4 inches / 10 cm wide (all sizes).
Shoulder Straps
Each strap is formed by seaming the corresponding front strap section to the back strap section at the top edge. Since both pieces end with the same stitch count and width, align them RS together and sl st seam along the top 4 to 6 rows (approximately 1.5 inches / 3.8 cm) to form the shoulder join. Do not sew the full strap length together as the front and back panels must remain separate for the side seams below.
Alternatively, if you prefer a cleaner finish, work an additional 2 rows of sc on the top of each back strap before seaming, so the strap heights match when the back is worn lower on the body.
Crotch Gusset
The gusset is a small rectangle that closes the base of the bodysuit.
Foundation chain: ch 12 (12, 16).
Row 1: sc in 2nd ch from hook and each ch across. Turn. (11, 11, 15 sc)
Rows 2 through 8: ch 1, sc in each st across. Turn. (11, 11, 15 sc)
The gusset should measure approximately 2.5 inches wide x 1.75 inches tall (6.4 x 4.5 cm) when blocked. Fasten off with long tails for seaming.
Bust Cups
Make 2 using Bust Cup instructions in Special Stitches section.
Size S: Work through Round 7. (42 sts)
Size M: Work through Round 8. (48 sts)
Size L: Work through Round 9. (54 sts)
Fasten off each with a 12 inch / 30 cm tail.
Placement: Lay front bodice panel flat RS up. Position each cup dome on the front bodice aligned with the upper portion of the front panel (approximately Rows 25 to 30 area), centering each cup between the side seam and the center front, spaced 1 inch / 2.5 cm apart at center. Use locking stitch markers to pin in place. Using the tail yarn and tapestry needle, whipstitch the outer rim of each cup to the WS of the front panel, sewing through the stitch loops of the outer cup round. The cup dome should protrude outward (toward the RS). Weave in tails on WS.
Assembly Instructions
Step 1, Side seams: With WS together, align front and back panels at side edges. Using a tapestry needle and matching yarn, mattress stitch from crotch edge upward to underarm, leaving top strap sections free. When working through lacework shells, stitch through the outermost dc of each shell row. Side seam length: approximately 19 inches / 48 cm.
Step 2, Shoulder seams: Seam front and back strap top edges together as described in Shoulder Straps section.
Step 3, Crotch gusset: With WS together, pin gusset rectangle to the crotch opening base (the raw edge at the foundation chain of both front and back panels). Whipstitch gusset to front panel base, then to back panel base. If you prefer an open-crotch design with a snap closure, attach a snap set to the gusset ends instead of permanently seaming the back edge.
Step 4, Cup attachment: If not already done, attach bust cups per Bust Cup instructions above.
Scallop Edging
The edging is worked last, after all seaming is complete. Work Scallop Edging Stitch (see Special Stitches) around the following edges in order:
Edging Pass 1, Each strap: Starting at the shoulder seam, work Scallop Edging along the entire inner (neckline-facing) edge of each strap from shoulder down to bodice split point, then along the outer (armhole-facing) edge back up to shoulder. Slip stitch at shoulder seam to join. Fasten off.
Edging Pass 2, Front neckline V: Starting at the left strap inner top edge, work Scallop Edging along the sweetheart neckline curve from left to right, working one scallop into each ch-sp or prominent stitch along the diagonal decrease rows. Join with sl st at right strap inner top edge. Fasten off.
Edging Pass 3, Back neckline: Starting at left back strap inner top, work Scallop Edging straight across the back neck opening (the unworked center sts from Row 31 onward). Fasten off.
Edging Pass 4, Leg openings: Starting at the side seam of each leg opening, work Scallop Edging entirely around each leg opening circle (through crotch gusset edges and lower front/back side shaping rows). Join with sl st at starting point. Fasten off.
Note: Space scallops evenly. On straight edges, place one scallop every 2 sts. On curved edges (sweetheart neckline, leg openings), increase density slightly by placing one scallop every st on tighter curves to prevent puckering.
Size Customization Tips
For a larger bust cup: work one additional increase round to the Bust Cup instructions before fastening off.
For a shorter torso: reduce Rows 25 to 30 (the upper body straight section) by 2 or 4 rows. Each 2-row reduction shortens the garment by approximately 0.9 inches / 2.3 cm.
For a longer torso: add 2 to 4 rows to Rows 25 to 30 section.
For a wider hip: add one full 8-stitch shell repeat to the foundation chain (ch 8 more) and carry it through all rows. Each additional shell adds approximately 2 inches / 5 cm to the hip circumference.
For a high waist vs low waist look: shift the decrease section (Rows 11 to 16) to start earlier (at Row 7) for a higher waist emphasis, or later (at Row 15) for a lower hip-fitting silhouette.
Finishing and Blocking
Before seaming: Block each piece flat on foam mats using rust-proof pins. Wet block by soaking in cool water for 10 minutes, gently press out water (do not wring), pin to measurements, and allow to dry completely (12 to 24 hours). Blocking opens the shell lace pattern and allows accurate measuring.
After seaming and edging: Give the completed garment a final gentle spray block to even out the seams and set the scallop edging shape. Pin scallops into individual points while damp for the crispest finish.
Weave in all ends on the WS using a tapestry needle, running each tail through at least 4 stitches in two directions and tying a small knot before trimming. Cotton yarn has minimal felting ability and ends must be secured thoroughly.
Care Instructions
Machine wash on gentle or delicate cycle in a mesh laundry bag, cold water only. Use a gentle detergent formulated for delicates or wool. Do not tumble dry. Lay flat to dry, reshaping gently by hand while damp. Do not iron directly. If needed, steam lightly from 1 inch distance. Do not bleach. Store folded flat, not on a hanger, to prevent stretching. If worn at the beach or pool as a cover-up, rinse immediately in cold fresh water after contact with salt water or chlorine to preserve yarn color and fiber integrity.
Final Thoughts on This Crochet Bodysuit Pattern
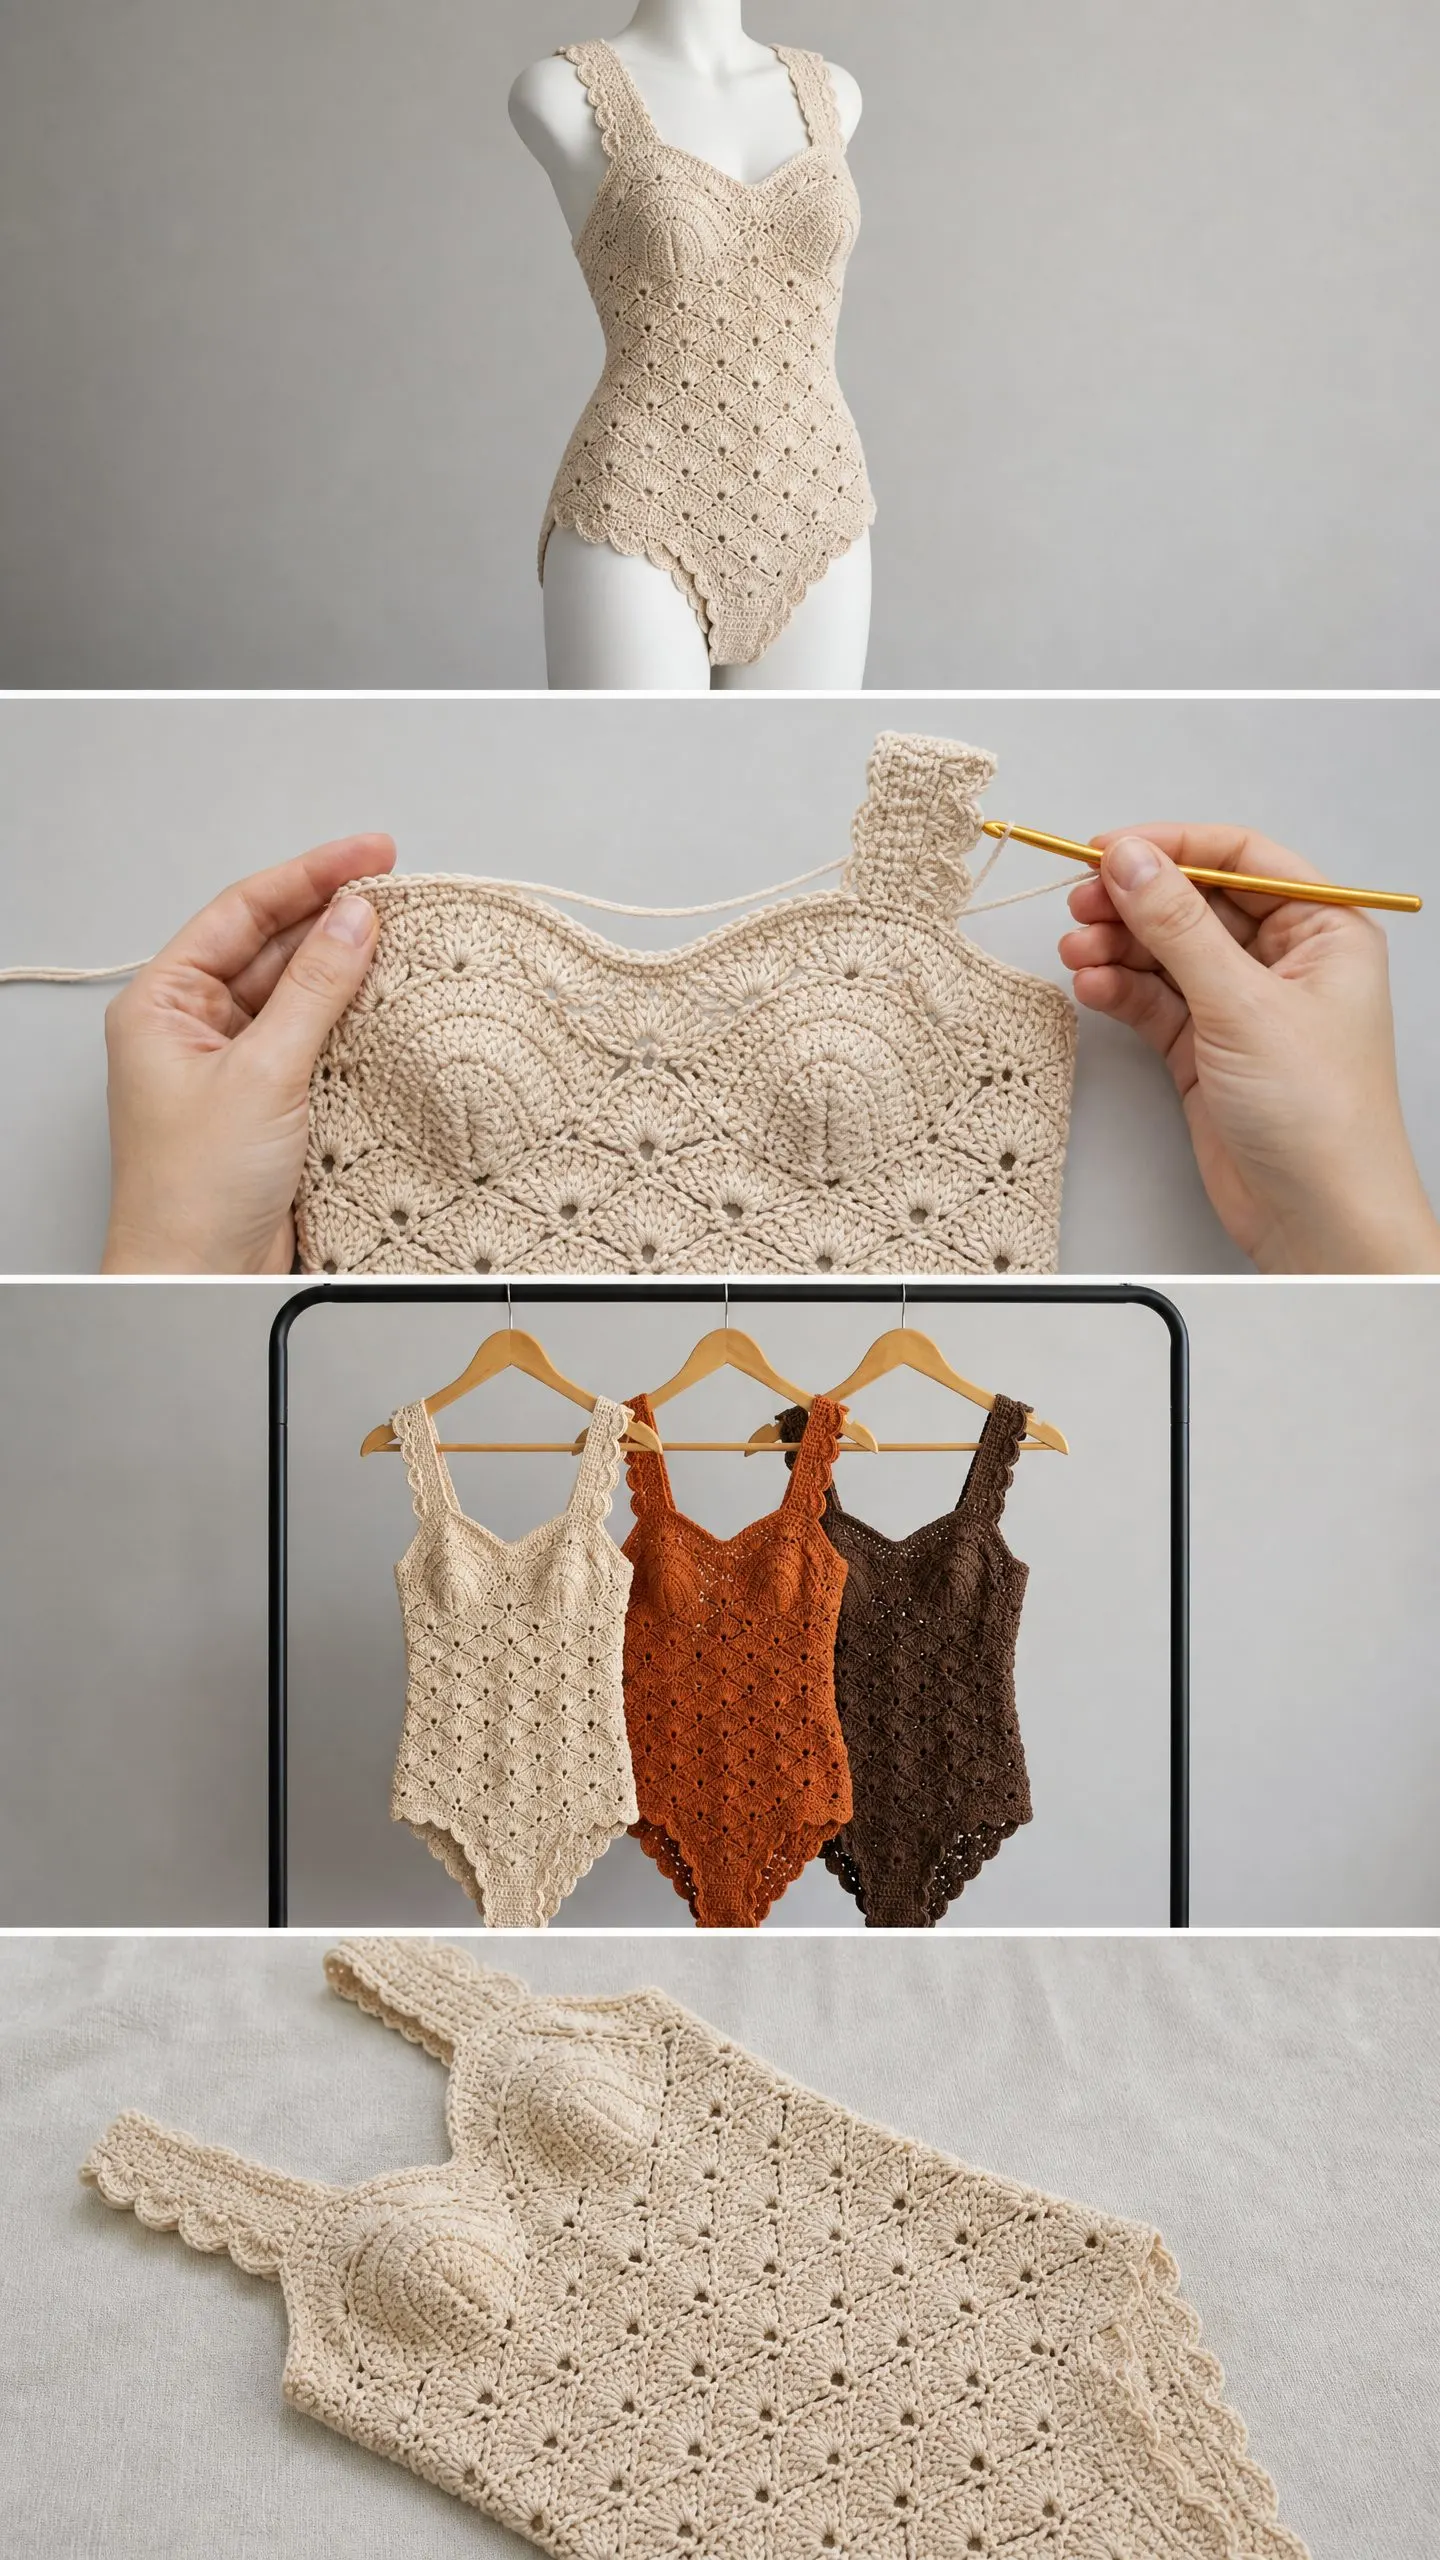
Thank you so much for choosing this pattern for your next project. I know it is a significant time investment, but when you slip on that finished bodysuit and see how the shell pattern flatters your shape, you will understand why this design is worth every stitch. The three colorways shown in the photos (cream, rust, and chocolate brown) are all stunning, but this pattern looks gorgeous in any solid color that lets the lacework shine.
If you make this bodysuit, I would absolutely love to see it! Tag me on Instagram or share your finished piece in our Facebook group. There is nothing better than seeing these patterns come to life in your hands.
Go ahead and save this pattern to your Pinterest boards so you can find it when you are ready to start. And please leave a comment below if you have any questions or when you finish yours. I love hearing from you and seeing your beautiful work!
