
I’ve been looking for the perfect summer romper pattern for toddlers, and this one has stolen my heart completely. The asymmetrical neckline, the color blocking, the adorable cuffed shorts with a matching belt. It checks every box.
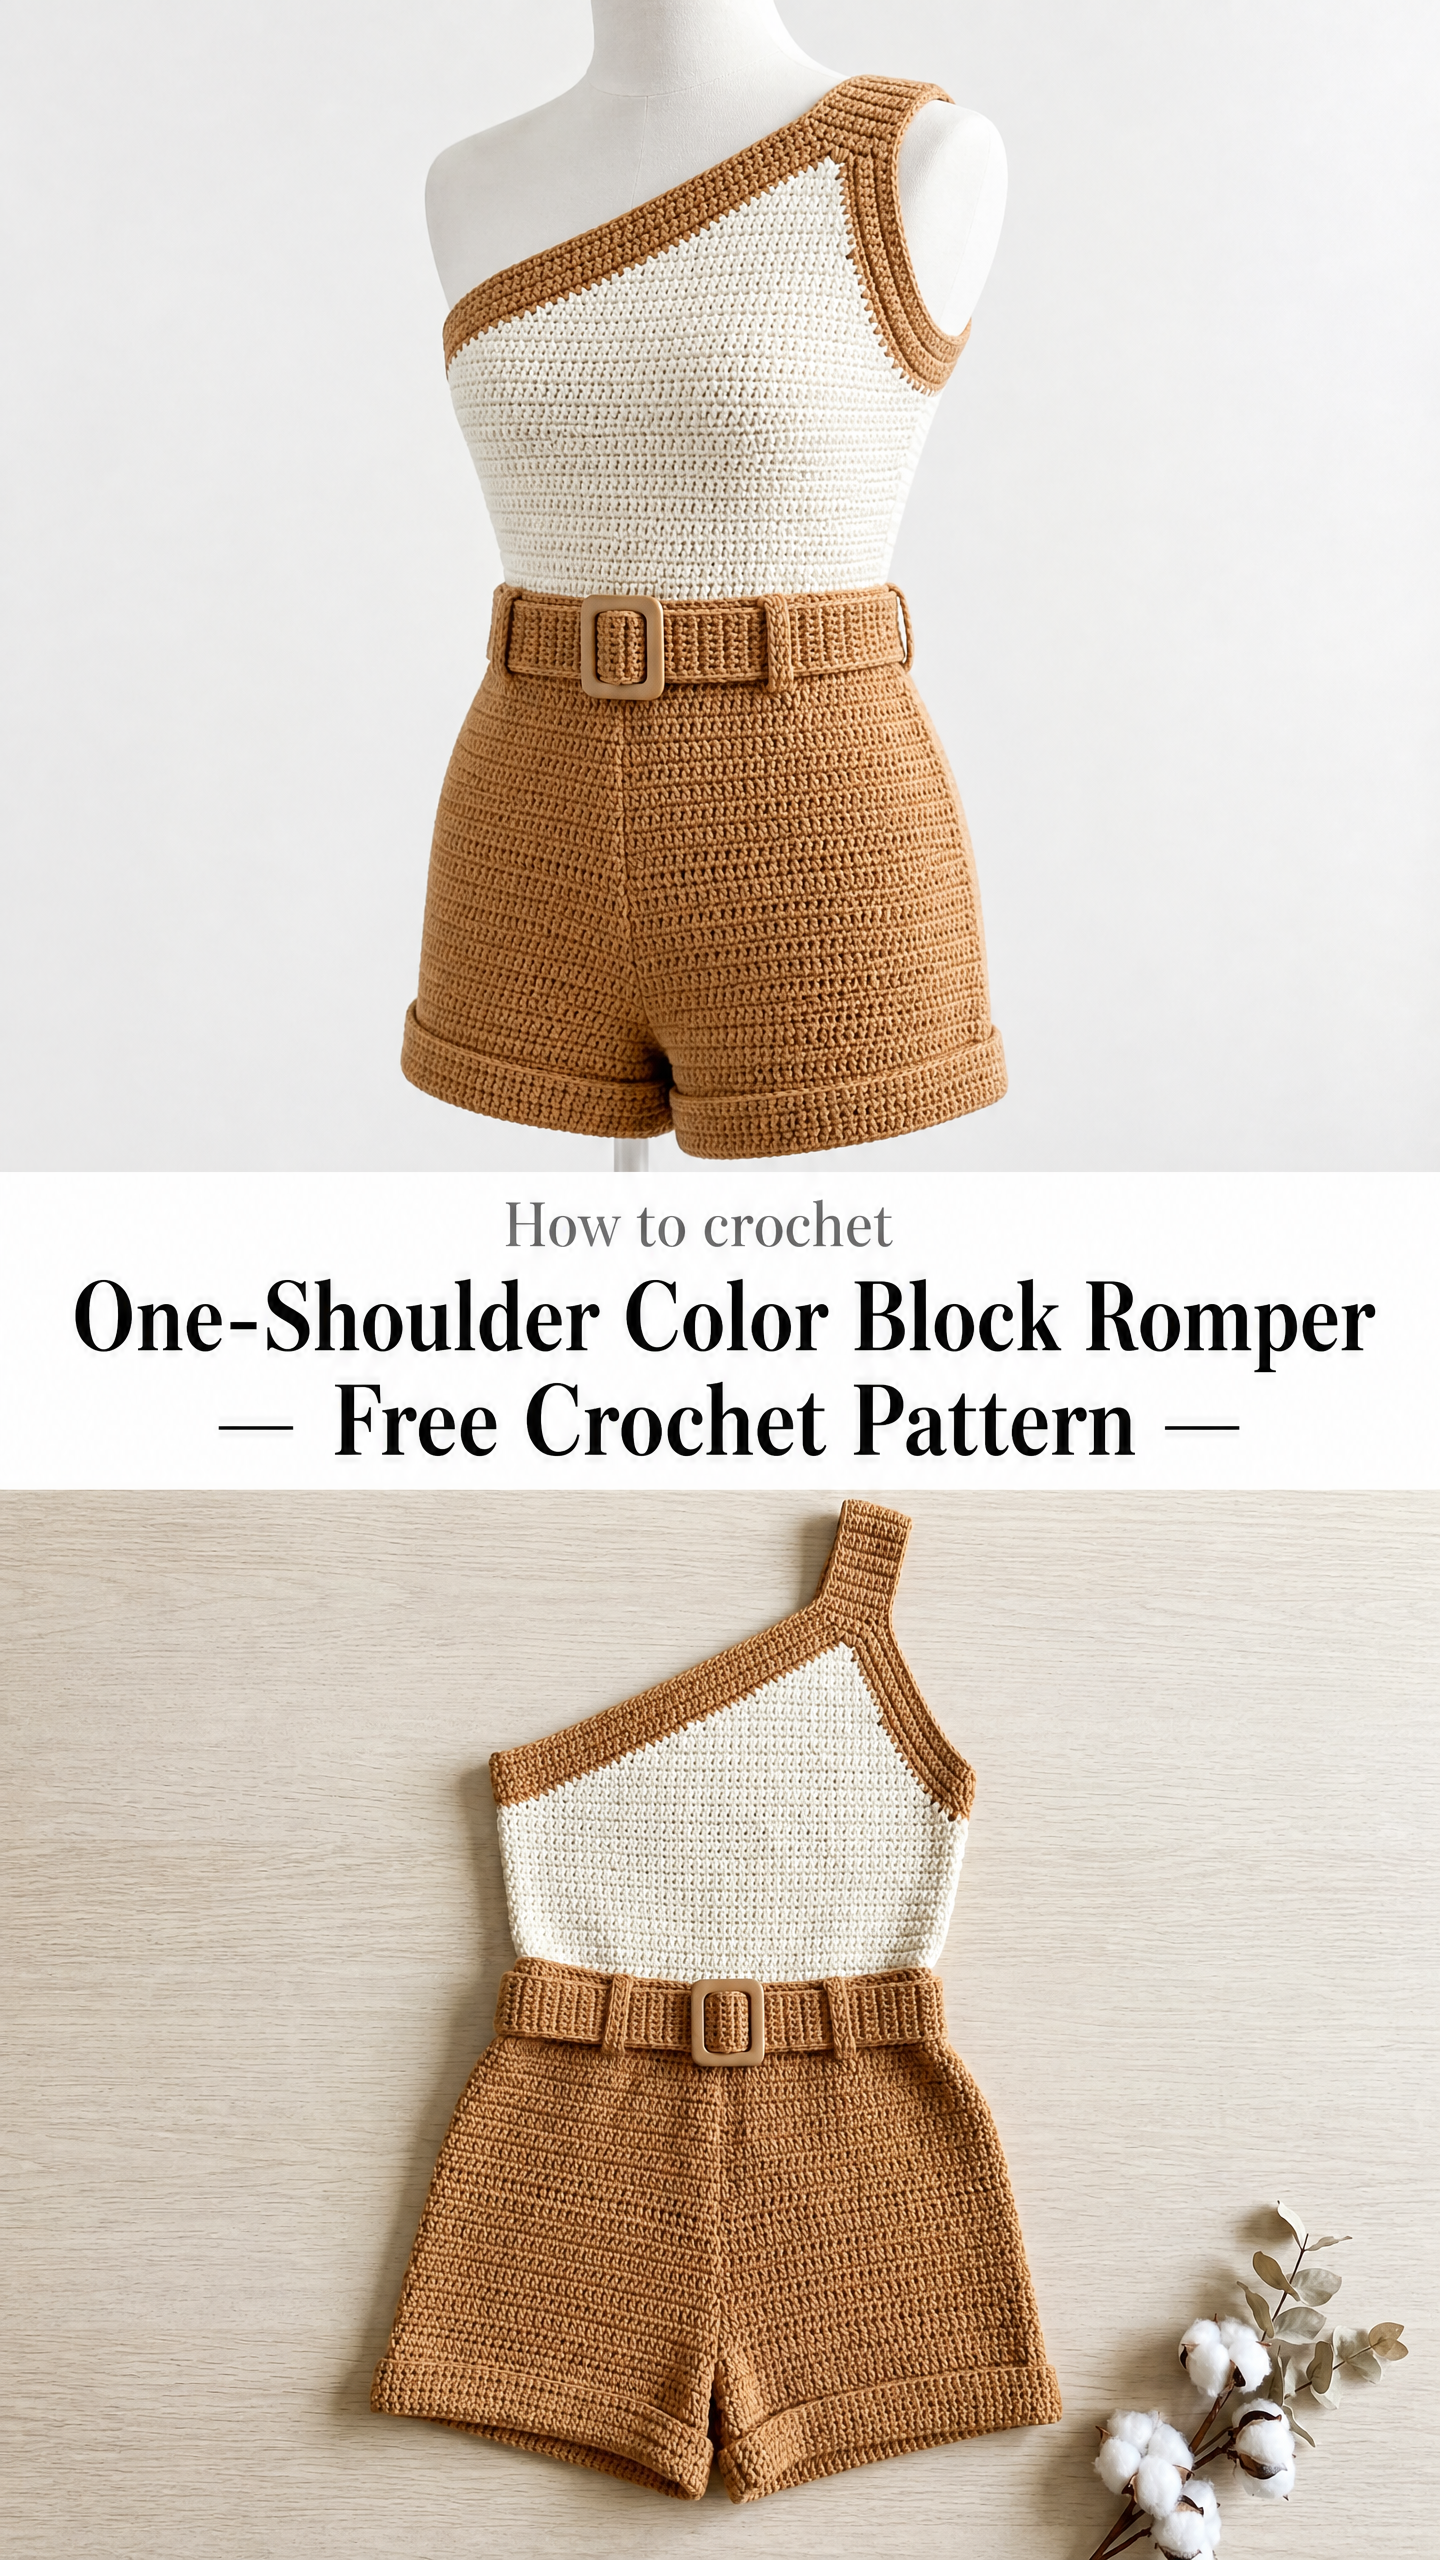
This is my favourite kind of project. It looks incredibly sophisticated, like something you’d find in a boutique, but the construction is straightforward once you break it down. The entire piece uses single crochet, so if you can work that stitch confidently, you’re ready.
Whether you’re making this for a special occasion, a gift, or just because that little one in your life deserves something handmade and beautiful, I think you’re going to love every step of this pattern.
About This Crochet Pattern
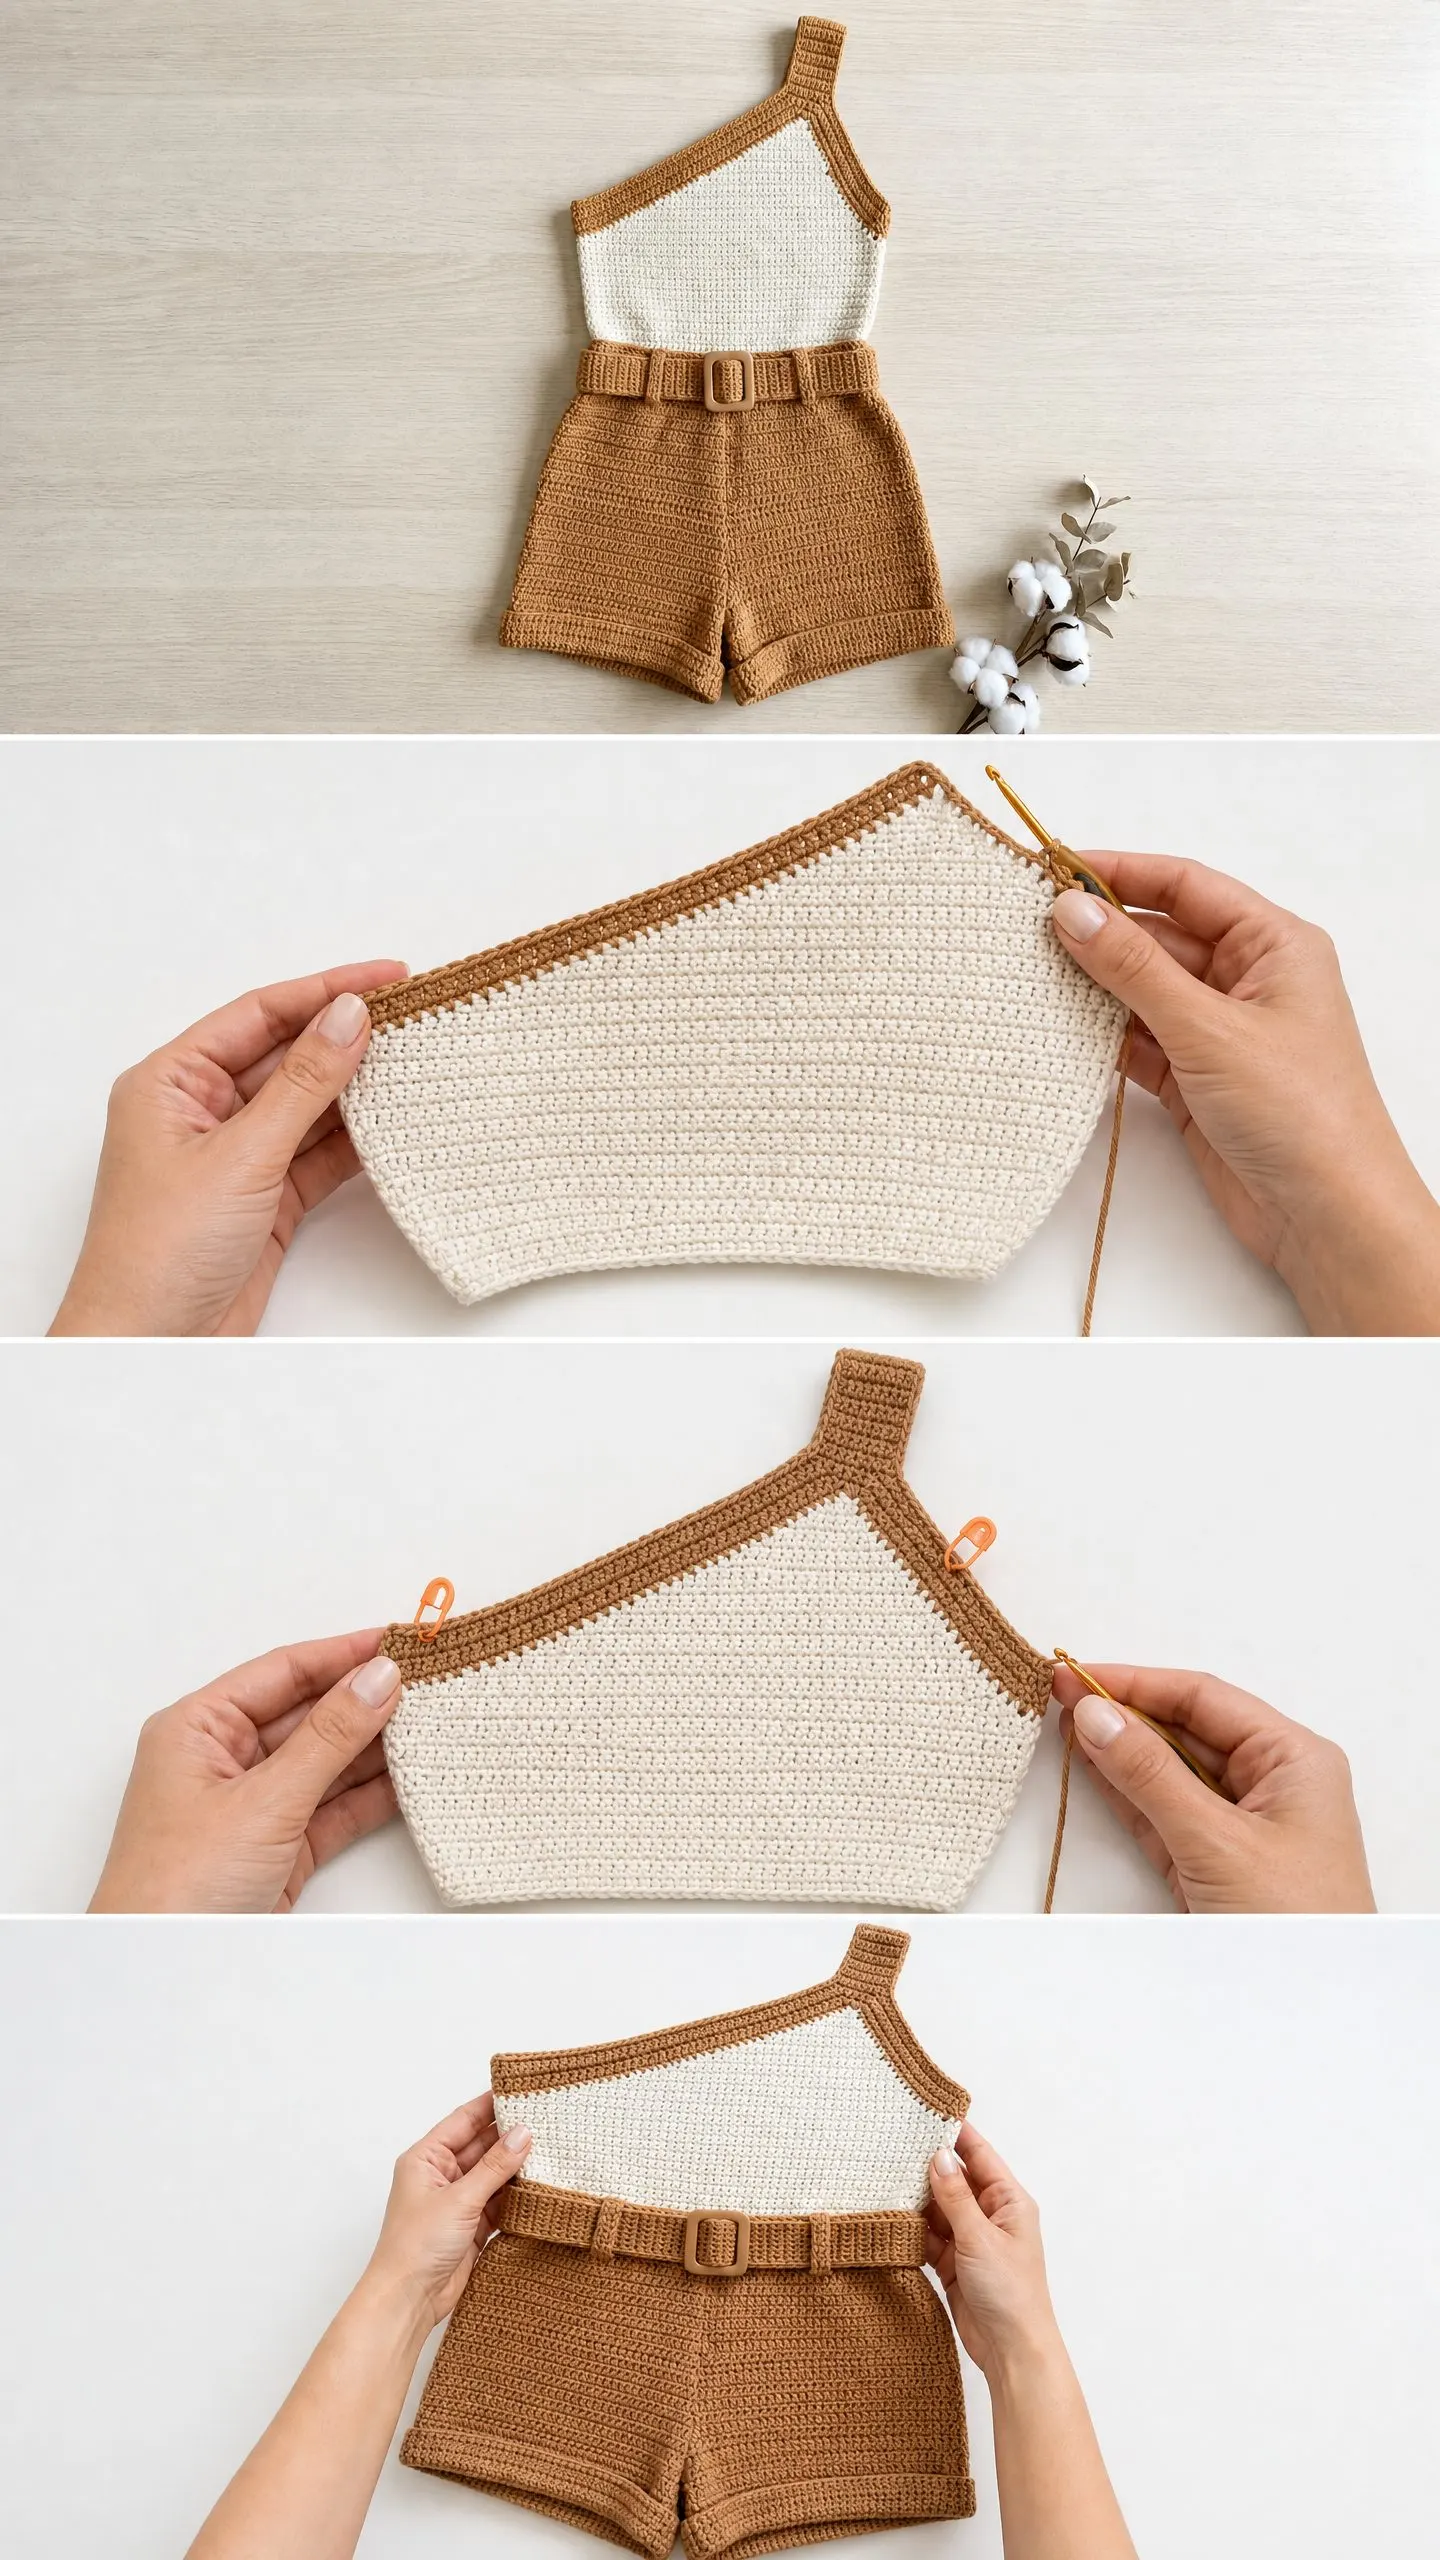
This one-shoulder color block romper combines a fitted bodice with high-waisted shorts in one seamless garment. The bodice features a cream center panel with a warm caramel border that sweeps diagonally across to form the single shoulder strap. The shorts section is worked entirely in caramel and includes a removable belt with a rectangular buckle accent.
The construction method is beginner-friendly despite the polished result. You’ll work the bodice front and back as flat pieces, join them at the sides, add the color border and strap, then work the shorts downward in the round from the waist. The legs are divided at the crotch and finished separately with sweet rolled cuffs.
Skill Level: Intermediate
This pattern requires comfort with working flat pieces, seaming, color changes, working in the round, and shaping through increases and decreases. No advanced techniques like cables or complex motifs are used, but precise stitch counts and clean seaming are essential for a professional finish.
Time Estimate: Approximately 8 to 12 hours for an experienced intermediate crocheter. Allow extra time for seaming and finishing.
Finished Measurements
This pattern is written for toddler size 12 to 18 months.
All measurements are of the finished, lightly blocked garment.
Materials Needed
Yarn:
Hook: US Size G-6 (4.00 mm) crochet hook
Notions:
Yarn Suggestions
Lion Brand Vanna’s Choice (100% acrylic, 170 yards per 3.5 oz skein) is a workhorse yarn with excellent stitch definition. It’s available in both honey/caramel and cream tones, easy to care for, and widely available.
Paintbox Yarns Simply DK used doubled (100% acrylic, 137 yards per 50 g skein) is a slightly lighter base that achieves worsted gauge when held double. It gives a softer drape suited to baby and toddler garments.
Cascade 220 Superwash (100% superwash wool, 220 yards per 3.5 oz skein) offers superior stitch definition and natural fiber breathability. It’s machine washable and ideal for heirloom-quality finish.
Substitution note: Any smooth worsted weight yarn that achieves the stated gauge is acceptable. Avoid highly textured or fuzzy yarns, which will obscure the single crochet (sc) stitch definition. Cotton or cotton-blend yarns work well and are suitable for warmer climates, though they have slightly less stretch than acrylic. Swatch carefully.
Gauge
18 sc x 22 rows = 4 inches (10 cm) in single crochet with US G-6 (4.00 mm) hook, worked flat, blocked.
Gauge swatch instructions: Chain (ch) 24. Work single crochet flat for 26 rows. Fasten off. Block lightly, then measure the center 4 inches by 4 inches of the swatch. Adjust hook size up or down until gauge is met.
Because this is a fitted garment, gauge is mandatory. Don’t skip this step. I know swatching isn’t the fun part, but it makes all the difference.
Abbreviations (US Terms)
Special Stitches
Single Crochet Decrease (sc2tog)
This decrease stitch combines two stitches into one. Insert hook into the next stitch, draw up a loop (2 loops on hook). Without completing the stitch, insert hook into the following stitch, draw up a loop (3 loops on hook). Yarn over and draw through all 3 loops. One stitch decreased.
Belt Loop Stitch
Chain 8. Row 1: sc in second ch from hook and in each ch across. (7 sc) Turn. Rows 2 to 4: ch 1, sc in each st across. (7 sc) Fasten off, leaving a sewing tail. Fold the strip into a loop and seam the short ends together. This creates a small tube that the belt passes through.
Pattern Notes
1. The romper is constructed in this order: bodice front panel, bodice back panel, side seams joined, color A border and shoulder strap added, shorts worked downward in the round from the waist edge, crotch divided, each leg worked separately and finished, belt worked flat, belt buckle crocheted or attached, finishing.
2. Turn at the end of every flat row unless otherwise noted. Turning chain of 1 counts as a chain only, never as a stitch, throughout this pattern.
3. When changing colors, complete the last yarn-over of the final stitch in the old color using the new color. Fasten off old color unless working a short section and carrying the yarn is practical.
4. Right side is the side facing you on Row 1.
5. Stitch counts in parentheses at the end of each row or round reflect the total working stitches.
6. The bodice front and back are slightly different in shape. The front has the one-shoulder diagonal neckline. The back has a straight neckline with two short straps.
7. The belt is optional as a functional closure but is shown as an aesthetic accent. It does not fasten the romper. The romper is a pullover. The belt slips through two small belt loops seamed at the side seams.
Step by Step Crochet Instructions
Bodice Front Panel
The front panel is worked flat in color B (cream), beginning at the lower edge and working upward. The lower edge will later join to the waistband of the shorts.
With color B, chain 42.
Row 1 (RS): sc in second ch from hook and in each ch across. Turn. (41 sc)
Row 2: ch 1, sc in each st across. Turn. (41 sc)
Rows 3 through 12: Rep Row 2. Turn after each row. (41 sc each row)
After Row 12 your piece should measure approximately 2.25 inches (5.7 cm) from the foundation chain.
Now begin the diagonal neckline shaping on the left side (as worn, the left shoulder remains bare; the right shoulder has the strap).
Row 13 (RS): ch 1, sc in first 38 sts. Leave last 3 sts unworked. Turn. (38 sc)
Row 14: ch 1, sc in first 35 sts. Leave last 3 sts unworked. Turn. (35 sc)
Row 15: ch 1, sc in first 33 sts. Leave last 2 sts unworked. Turn. (33 sc)
Row 16: ch 1, sc in first 31 sts. Leave last 2 sts unworked. Turn. (31 sc)
Row 17: ch 1, sc in first 29 sts. Leave last 2 sts unworked. Turn. (29 sc)
Row 18: ch 1, sc in first 27 sts. Leave last 2 sts unworked. Turn. (27 sc)
Row 19: ch 1, sc in first 25 sts. Leave last 2 sts unworked. Turn. (25 sc)
Row 20: ch 1, sc in first 24 sts. Leave last 1 st unworked. Turn. (24 sc)
Row 21: ch 1, sc in first 23 sts. Leave last 1 st unworked. Turn. (23 sc)
Rows 22 through 27: ch 1, sc in each st across. Turn. (23 sc each row)
Fasten off color B, leaving a 6-inch (15 cm) tail for weaving.
Checkpoint: After Row 27, the bodice front panel should measure approximately 6 inches (15 cm) tall from foundation chain to top edge. The right shoulder edge (23 sts wide) is where the strap will attach. The left side shows the diagonal stair-stepped neckline.
Bodice Back Panel
The back panel is a simple rectangle worked in color B. The back neckline is straight with two short strap tabs at the top.
With color B, chain 42.
Row 1 (RS): sc in second ch from hook and in each ch across. Turn. (41 sc)
Rows 2 through 20: ch 1, sc in each st across. Turn. (41 sc each row)
After Row 20 the back panel should measure approximately 3.75 inches (9.5 cm) tall.
Back right strap tab (right side as worn):
Row 21 (RS): ch 1, sc in first 10 sts only. Turn. (10 sc)
Rows 22 through 27: ch 1, sc in each st across. Turn. (10 sc)
Fasten off color B.
Rejoin color B with RS facing at the left edge of Row 20 (the last 10 sts of that row).
Back left strap tab:
Row 21: ch 1, sc in each of the 10 leftmost sts of Row 20. Turn. (10 sc)
Rows 22 through 27: ch 1, sc in each st across. Turn. (10 sc)
Fasten off color B.
Note: The 21 center sts of Row 20 are left unworked to form the back neckline opening.
Checkpoint: The back panel should measure approximately 6 inches (15 cm) tall from foundation chain to top of strap tabs.
Joining Side Seams
Hold the front and back panels with wrong sides together (right sides facing outward). Using color A and a yarn needle, whip stitch the two side edges together, matching rows. Leave the top open for the neckline and strap and leave the bottom open (this will become the waistband of the shorts).
After seaming, the joined bodice tube should measure approximately 9 inches (23 cm) in circumference at the waist opening.
Color A Border and Shoulder Strap
All border work is done with color A (caramel/tan) and US G-6 hook, worked as sc edging. Turn as needed when working flat sections.
Step 1: Bottom neckline and diagonal front edge border.
With RS of bodice front facing and color A, join with sl st at the bottom-right corner of the front diagonal neckline (at Row 13 right edge).
Work sc evenly along the entire diagonal stair-stepped neckline edge of the front panel, working 1 sc per row end. You will work approximately 14 sc along the diagonal. At the top of the diagonal, work 1 sc in the corner, then continue across the top right strap edge of the front panel (23 sts), placing 1 sc in each st. (approximately 38 sc total along this portion)
Fasten off color A.
Step 2: Left armhole and shoulder strap.
The single diagonal strap extends from the top right front corner up and across to the back right strap tab.
With color A, pick up and join along the top 23 sc of the front right strap, working a row of sc across. (23 sc)
Next, begin the strap: ch 1, sc in first 8 sts only. Turn. (8 sc)
Work even on these 8 sts for 24 rows (or until the strap reaches from the front right shoulder over to the back right shoulder when tried against the garment). Each row: ch 1, sc in each of 8 sts. (8 sc)
After the strap length is achieved, align the end of the strap with the top of the back right tab. Using color A, sl st or whip stitch the strap end to the tab top. Weave in ends.
Step 3: Back neckline border.
With RS of back facing and color A, join at the top of the back right strap tab. Work sc evenly across the top of both strap tabs and across the back neckline opening. Work 1 sc per st across the right tab top (10 sc), then work approximately 1 sc per st along the back neckline edge (approximately 21 sc), then 1 sc per st across the left tab top (10 sc). (41 sc total)
Do not turn. Sl st to first sc to close the round. Fasten off.
Step 4: Armhole and side border trim.
With RS facing and color A, work a single round of sc around each armhole opening: join at any point of the armhole, work sc evenly all around, sl st to join. Fasten off. Repeat for opposite armhole.
Shorts Waistband
With RS of bodice facing (bodice held upside down so the bottom opening faces up), join color A at one side seam.
Round 1: ch 1, work sc evenly around the entire bottom opening of the bodice, placing 1 sc per foundation chain stitch from front and back. You will have approximately 82 sc total. Join with sl st to first sc. (82 sc)
Rounds 2 and 3: ch 1, sc in each st around. Join with sl st to first sc. (82 sc each round)
Checkpoint: After Round 3 of the waistband, the waistband should measure approximately 0.5 inches (1.3 cm) deep.
Shorts Body
Rounds 4 through 14: ch 1, sc in each st around. Join with sl st to first sc. (82 sc each round)
Checkpoint: After Round 14 the shorts body should measure approximately 2.25 inches (5.7 cm) from the waist round. The piece should be a smooth open tube.
Crotch Shaping and Leg Division
At Round 15, divide the stitches into two legs. Place a stitch marker at the current position (this is the center back) and count 41 sts. Place a second marker at st 41 (center front). These two markers divide the tube into two equal halves of 41 sts each.
Right Leg:
Row 15 (flat): ch 1, sc in each of 41 sts across. Turn. (41 sc)
Row 16: ch 1, sc2tog, sc in each st to last 2 sts, sc2tog. Turn. (39 sc)
Row 17: ch 1, sc2tog, sc in each st to last 2 sts, sc2tog. Turn. (37 sc)
Rows 18 and 19: ch 1, sc in each st across. Turn. (37 sc each row)
Right Leg Cuff:
Row 20: ch 1, sc in each st across. Turn. (37 sc)
Row 21: ch 1, sc in back loop only (BLO) of each st across. Turn. (37 sc)
Row 22: ch 1, sc in each st across. Turn. (37 sc)
Fasten off color A. Seam the short side edges of the leg together (the two row-end edges from Row 15 through Row 22) using whip stitch and color A.
Fold the last two rows upward to form the cuffed hem as shown.
Left Leg:
Rejoin color A at the center front marker on the opposite side of the tube (the remaining 41 unworked sts).
Row 15 (flat): ch 1, sc in each of 41 sts across. Turn. (41 sc)
Row 16: ch 1, sc2tog, sc in each st to last 2 sts, sc2tog. Turn. (39 sc)
Row 17: ch 1, sc2tog, sc in each st to last 2 sts, sc2tog. Turn. (37 sc)
Rows 18 and 19: ch 1, sc in each st across. Turn. (37 sc each row)
Row 20: ch 1, sc in each st across. Turn. (37 sc)
Row 21: ch 1, sc in BLO of each st across. Turn. (37 sc)
Row 22: ch 1, sc in each st across. Turn. (37 sc)
Fasten off color A. Seam the short side edges of the left leg together. Fold the last two rows upward to form the cuffed hem.
Checkpoint: After both legs are complete and seamed, the shorts portion from waist round to bottom of cuff should measure approximately 5 inches (12.7 cm). The inseam should measure approximately 2.5 inches (6.5 cm).
Belt
The belt is worked flat in color A.
Foundation chain: ch 93.
Row 1: sc in second ch from hook and in each ch across. Turn. (92 sc)
Rows 2 through 4: ch 1, sc in each st across. Turn. (92 sc each row)
Fasten off, leaving a 10-inch (25 cm) tail for finishing.
The belt should measure approximately 20 inches (51 cm) long and 0.75 inches (1.9 cm) wide after blocking.
Belt Buckle (Crocheted Version)
If using a store-bought rectangular buckle, skip this section and proceed to attachment.
Outer Frame:
With color A, ch 14.
Row 1: sc in second ch from hook and in each ch across. (13 sc) Turn.
Rows 2 through 4: ch 1, sc in each st across. Turn. (13 sc each row)
Fasten off. Fold the strip into a rectangular loop and seam the short ends together to create the frame. Work a sc border around the entire outer and inner edge of the rectangular loop to firm it up. The center bar of the buckle is created by working 4 sc across the center of the frame on one side, anchoring a small strip across the inner opening. Fasten off and weave ends.
Alternatively, a 1-inch (2.5 cm) rectangular plastic or resin ring may be used directly.
Belt Attachment and Loops
Make two belt loop pieces using the Belt Loop Stitch described in Special Stitches. Seam one belt loop to the left side seam at the waist and one to the right side seam, positioned at the center of the waistband height.
Thread the belt through both loops and then through the buckle. Fold the end back and tack with a few hand stitches or weave the end through the back of the belt for a clean finish.
Size Customization Tips
To size up to 18 to 24 months: Add 4 stitches to the starting chain of both the front and back bodice panels (chain 46 instead of 42), giving 45 sc per panel and 90 sc around the waist. Work the shorts body for 16 rounds instead of 14 before the leg division. Add 2 extra rows to each leg before the cuff. Add approximately 1.5 inches (3.8 cm) to belt length.
To size down to 6 to 9 months: Remove 4 stitches from the starting chain of both panels (chain 38 instead of 42), giving 37 sc per panel and 74 sc around the waist. Work the shorts body for 10 rounds before the leg division. Work 1 fewer shaping row per leg.
General rule: 18 sc per 4 inches (10 cm), so each additional inch of circumference requires approximately 4 to 5 extra stitches per panel edge (added in pairs to front and back equally).
Finishing and Blocking
Step 1: Weave in all yarn ends securely using a yarn needle, working the tails back and forth through the wrong side of the fabric in different directions to prevent unraveling.
Step 2: Wet-block the finished romper. Submerge in cool water, gently squeeze out excess water (do not wring), and lay flat on a blocking mat or clean towel. Pin to the finished measurements. Allow to dry completely before removing pins.
Step 3: If any seams appear uneven after blocking, use a damp cloth and light steam to ease the fabric into alignment.
Step 4: Attach the buckle to the belt as described, then thread through the belt loops.
Step 5: Try the garment on the intended wearer (or a dress form) and adjust the strap length if needed before fastening off the strap permanently.
Care Instructions
For acrylic yarn: Machine wash on gentle cycle in cold water, tumble dry on low. Do not iron.
For superwash wool: Machine wash on wool/delicate cycle in cold water, lay flat to dry.
For cotton or cotton blend: Machine wash on gentle in cool water, lay flat to dry or tumble dry on very low.
Store folded rather than hung to prevent the strap from stretching under its own weight.
You Did It!
Thank you so much for choosing this pattern. I hope you enjoyed every stitch and that the little one who wears this romper gets all the compliments. I would absolutely love to see your finished project. Tag me on Instagram or share in my Facebook group so I can cheer you on!
If this pattern made your heart happy, save it to your Pinterest boards so you can find it again later or share it with a crochet-loving friend. And please drop a comment below if you make one. I read every single comment and it truly makes my day to see your creations come to life.
