
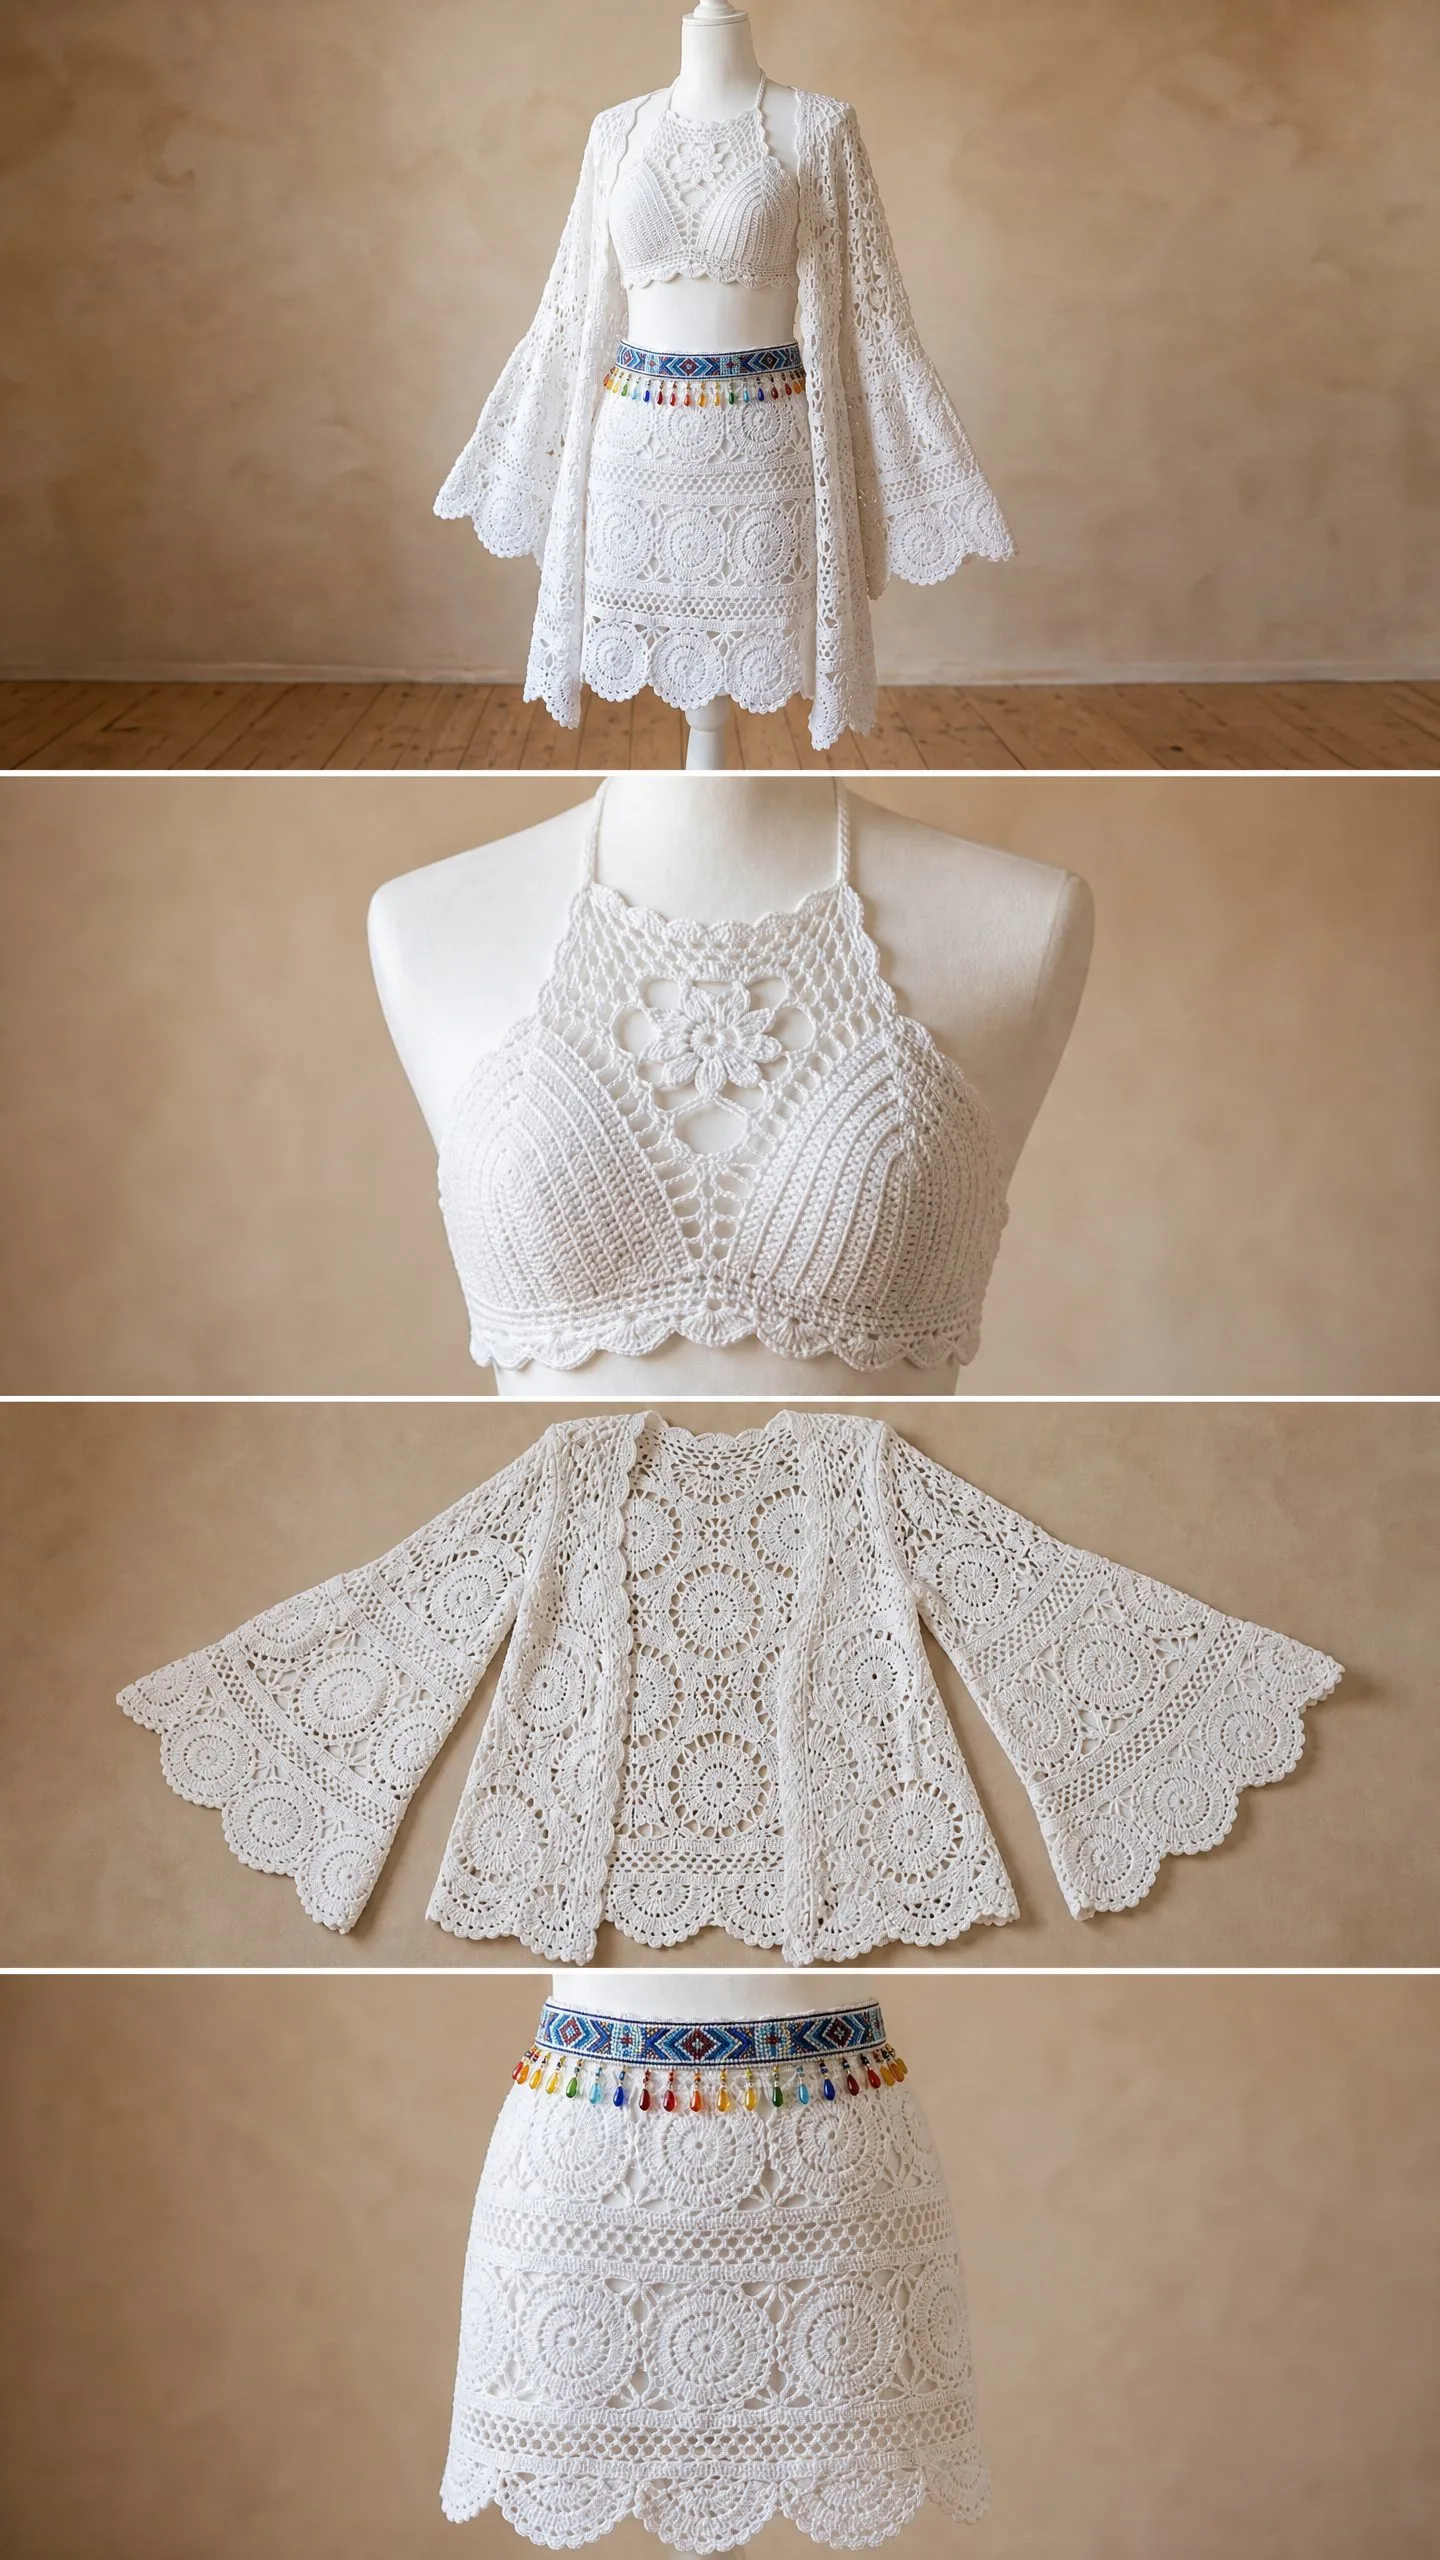
This is a coordinated bohemian three-piece set featuring a halter bralette, a circle motif mini skirt, and a dramatic bell-sleeve kimono cardigan. All three pieces are worked in white cotton yarn using a combination of lace stitches, granny-style circle motifs, and V-stitch patterns.
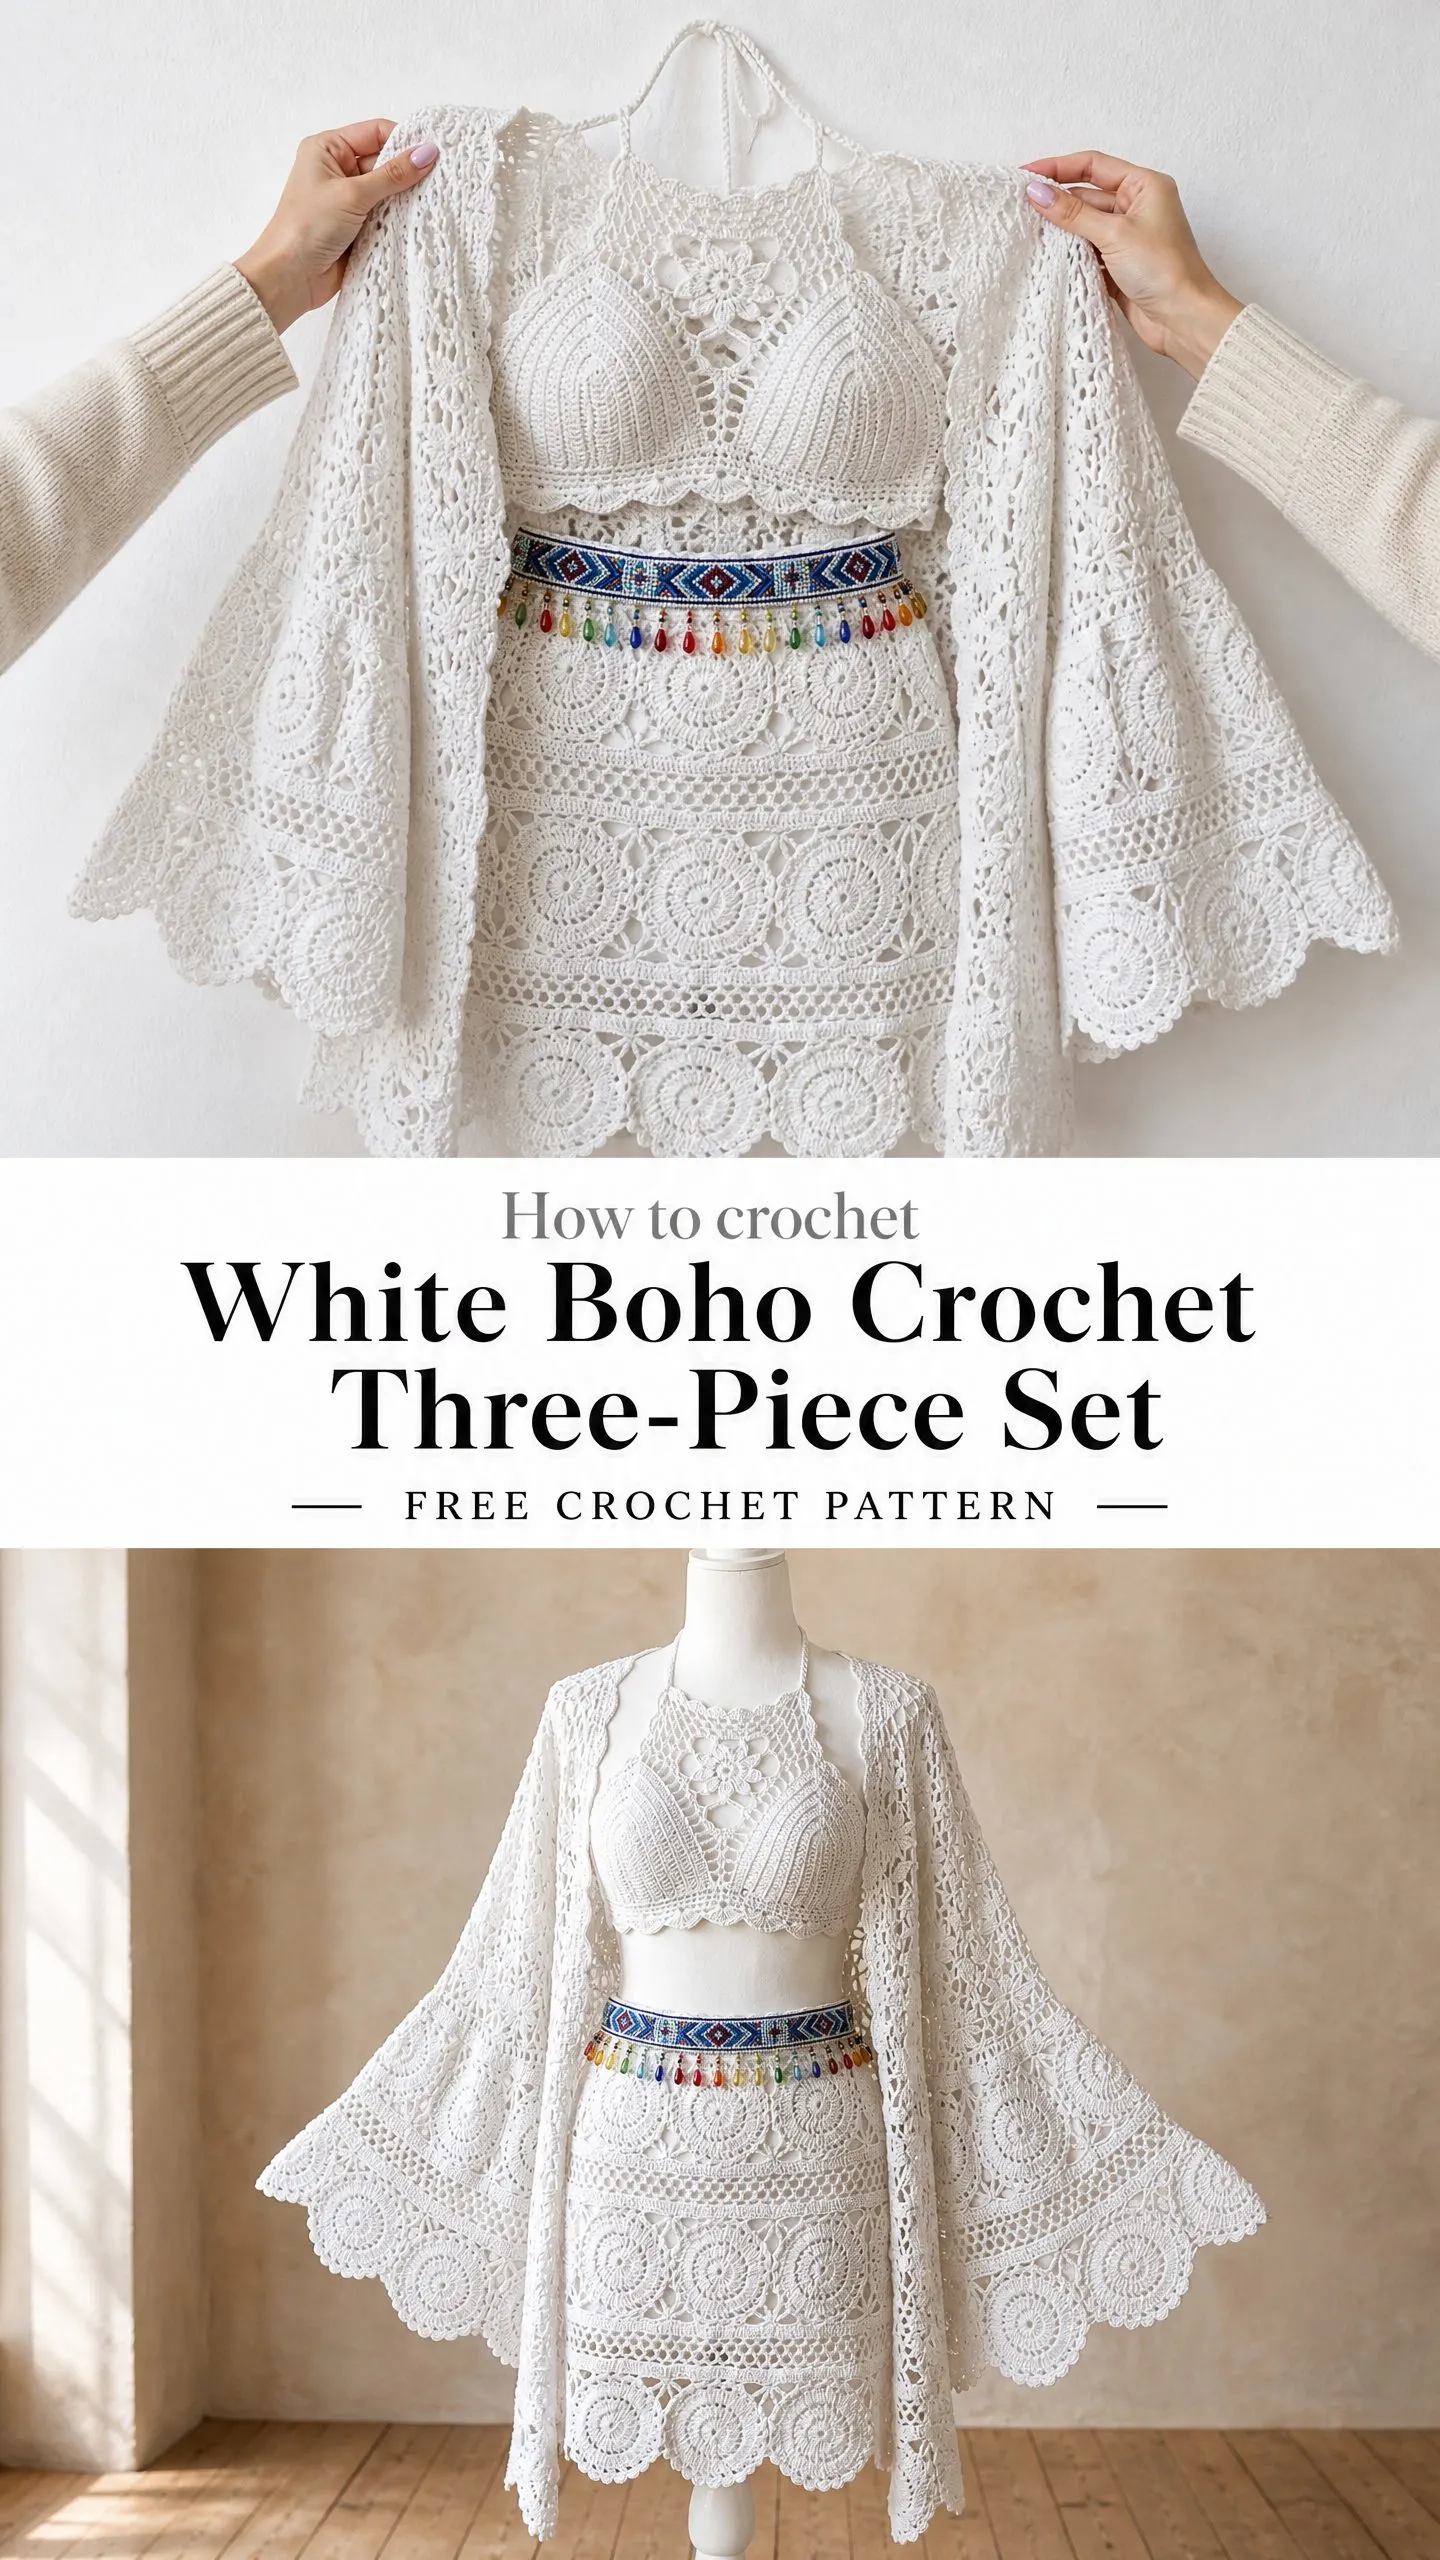
The set sits at an advanced intermediate skill level. You will need to be comfortable working joined motifs, shaping cups, picking up stitches for sleeves, and finishing with scallop borders. Each piece builds on fundamental crochet techniques but combines them in ways that create stunning results.
Total project time runs between 56 and 76 hours depending on your experience. The bralette takes 8 to 12 hours, the skirt takes 18 to 24 hours, and the kimono takes 30 to 40 hours. Let me walk you through every single step.
About This Boho Crochet Pattern
I love how this set comes together as a cohesive outfit while each piece also stands completely on its own. The bralette features a central flower motif at the bust with a scalloped lower edge and halter neck ties. The skirt is built from joined circle granny motifs with a ribbed waistband and a gorgeous scallop hem. The kimono cardigan has that dreamy open-front silhouette with flared bell sleeves that make everything feel effortlessly romantic.
The construction order matters here. Work the bralette first since the cups are made separately then joined. The skirt comes second with its motifs joined as you go. The kimono finishes the set with flat panels, shoulder seams, and sleeves picked up and worked outward.
All three pieces absolutely transform with proper wet blocking. The lace opens up beautifully and the motif joins become virtually invisible. Do not skip this step.
Finished Measurements
This pattern is written for size Small/Medium, which fits US size 4/6 with a bust of 34 to 36 inches, waist of 26 to 28 inches, and hip of 36 to 38 inches.
Bralette finished measurements:
Skirt finished measurements:
Kimono finished measurements:
Materials You Will Need
Yarn:
You will need approximately 2,800 yards total of a fine-weight (weight 2, sport or fingering) 100 percent mercerized cotton yarn in white or natural white.
Here is the breakdown by piece:
Specific yarn suggestions:
Option 1: Paintbox Yarns Cotton DK (100 percent cotton, 137 yards per 50g ball, weight 3 light DK). Use a 2.75mm hook to achieve sport-weight gauge. You will need approximately 21 balls total.
Option 2: Scheepjes Catona (100 percent mercerized cotton, 62 yards per 25g ball, weight 2 fine). This is ideal for the lace detail. You will need approximately 46 small balls in color Pure White (106) or Bridal White (105).
Option 3: Drops Safran (70 percent cotton, 30 percent polyamide, 175 yards per 50g ball, weight 2 to 3). This adds slight sheen and durability. You will need approximately 16 balls.
Choose a smooth, tightly plied mercerized cotton with good stitch definition. Avoid fluffy or hairy fibers since lace stitch definition will be lost.
Hooks:
Additional materials:
Gauge
Using US C-2 / 2.75mm hook and sport-weight cotton:
22 double crochet (dc) stitches and 10 rows equals 4 inches in standard double crochet, blocked.
One circle motif (as written in skirt instructions) equals 4.5 inches point to point after blocking.
Using US B-1 / 2.25mm hook:
24 single crochet (sc) stitches and 26 rows equals 4 inches in single crochet, blocked.
Gauge is critical for all three pieces. The bralette cup sizing depends on the tighter gauge. The skirt circumference depends on the number of motifs times motif width. The kimono fit across the back depends on dc gauge. Swatch before starting and block your swatch.
Abbreviations and Stitch Definitions
Let me define every stitch you will encounter in this crochet tutorial:
Brackets [ ] mean repeat the instructions within brackets the number of times indicated. Parentheses ( ) at the end of a row or round show the total stitch count for that row or round.
Special Stitches
Shell Stitch (shell):
Work 5 dc all in the same stitch or space. This creates a fan shape used in borders and the kimono body panels.
V-Stitch (V-st):
Work (dc, ch 2, dc) all in the same stitch or space. This creates an open, airy texture used throughout the kimono lace body.
Picot:
Chain 3, slip stitch into the first chain made. Used in scallop edging.
Joined Circle Motif:
Each motif begins with a magic ring, builds outward in rounds, and on Round 5 joins to adjacent motifs via slip stitch through the corner chain spaces. Full instructions are given in the skirt section.
Scallop Edging:
Skip 2 stitches, work 5 dc in next stitch (shell), skip 2 stitches, slip stitch or single crochet in next stitch. Repeat across. Used on the bralette lower edge, skirt hem, and kimono hem and cuffs.
Puff Stitch (puff):
Yarn over, insert hook in stitch, yarn over, pull up a loop to height of a dc. Repeat 3 times in same stitch. Yarn over and pull through all 7 loops on hook, chain 1 to close.
Important Pattern Notes Before You Begin
1. The bralette is worked in two identical cups that are then joined at the center. After joining, the scallop lower band and back band extensions are added. Halter ties are crocheted chains.
2. The skirt is worked as a field of joined circle motifs. Six motifs across make up the hip circumference. After all motifs are joined (two rows of six motifs each, totaling 12 motifs), stitches are picked up along the top edge for the waistband worked in ribbing via front and back post stitches. The lower edge of the motif field is extended with a lace mesh band, then the scallop hem border is added.
3. The kimono is worked flat. The back is a single rectangular panel. Each front panel is half the back width. Shoulder seams join front to back. Sleeves are worked by picking up stitches along the armhole edge and working outward with increases to create the bell flare.
4. All pieces are wet blocked after completion. Blocking significantly opens the lace and evens motif joins.
5. Stitch counts in parentheses at the end of each row or round reflect the total working stitches including chain spaces counted as stitches only when explicitly noted.
6. When counting V-stitches in the kimono, count each V-st as one unit (the dc-ch2-dc group).
7. The set is designed to be worn with a commercial beaded belt over the skirt waistband. Instructions for the belt are not included.
8. The right side of the bralette cups faces outward.
9. When joining motifs as you go, the join replaces the final chain of a corner chain-space on the new motif with a slip stitch into the corresponding corner chain-space of the adjacent already-completed motif.
PIECE 1: BRALETTE
Bralette Overview
Each cup begins at the center flower motif and is worked outward in increasing rounds of shell and lace stitches, then shaped with decreases along the upper edge and increases along the lower edge. The two cups are joined at the center front. The lower band is worked along the bottom and extended at each side for the back band.
Cup Instructions (Make 2)
Round 1 (Flower center): Using US B-1 / 2.25mm hook, make a magic ring. Chain 3 (counts as first dc). Work 11 dc into the ring. Slip stitch to top of beginning ch-3 to join. Pull ring closed. (12 dc)
Round 2: Chain 1, sc in same st. [Chain 5, skip 1 dc, sc in next dc] 5 times. Chain 5, skip 1 dc, slip stitch to first sc to join. (6 ch-5 loops, 6 sc)
Round 3: Slip stitch into first ch-5 sp. Chain 3 (counts as dc). Work (2 dc, ch 2, 3 dc) in same ch-5 sp. [Work (3 dc, ch 2, 3 dc) in next ch-5 sp] 5 times. Slip stitch to top of beginning ch-3. (36 dc, 6 ch-2 sps)
Round 4: Slip stitch to first ch-2 sp. Chain 3 (counts as dc). Work (dc, ch 2, 2 dc) in same ch-2 sp. Chain 1. [Work (2 dc, ch 2, 2 dc) in next ch-2 sp. Chain 1] 5 times. Slip stitch to top of beginning ch-3. (24 dc, 6 ch-2 corner sps, 6 ch-1 sps)
Round 5: Slip stitch to first ch-2 sp. Chain 3. Work (2 dc, ch 2, 3 dc) in same ch-2 sp. 3 dc in ch-1 sp. [(3 dc, ch 2, 3 dc) in ch-2 sp. 3 dc in ch-1 sp] 5 times. Slip stitch to top of beg ch-3. (54 dc, 6 ch-2 sps)
Round 6 (Begin cup shaping): Turn work. You will now work in ROWS across one half of the motif (3 of the 6 petals/sections) to form the cup face.
Row 6: Working along the bottom 3 sections of the flower, attach yarn at first ch-2 sp on the bottom half. Chain 3. Work (2 dc, ch 1, 3 dc) in same sp. [(3 dc, ch 1, 3 dc) in next ch-2 sp] twice. Turn. (18 dc, 3 ch-1 sps)
Row 7: Chain 3. Dc in next 2 dc. (3 dc, ch 1, 3 dc) in ch-1 sp. [3 dc. (3 dc, ch 1, 3 dc) in ch-1 sp] twice. Dc in last 3 dc. Turn. (24 dc, 3 ch-1 sps)
Row 8: Chain 3. Dc across to first ch-1 sp. (2 dc, ch 2, 2 dc) in ch-1 sp. [Dc across to next ch-1 sp. (2 dc, ch 2, 2 dc) in ch-1 sp] twice. Dc to end. Turn. (32 dc, 3 ch-2 sps)
Row 9: Chain 1. Sc in each dc and 2 sc in each ch-2 sp across. Turn. (38 sc)
Row 10: Chain 3. Dc2tog over first 2 sc (decrease at edge). Dc in each sc across to last 2 sc. Dc2tog. Turn. (36 dc)
Row 11: Chain 3. Dc2tog. Dc across to last 2. Dc2tog. Turn. (34 dc)
Row 12: Chain 3. Dc2tog. Dc across to last 2. Dc2tog. Turn. (32 dc)
Row 13: Chain 1. Sc in each st across. Do not decrease. Turn. (32 sc)
Row 14: Chain 3. Dc in each sc across. Turn. (32 dc)
Row 15: Chain 1. Sc in each st across. (32 sc). Fasten off, leaving a 12-inch tail for seaming.
Repeat Rows 6 through 15 for the second cup.
CHECKPOINT: Each finished cup should measure approximately 5 inches wide at the bottom and 4.5 inches tall. The flower center should be visible as the decorative focal point on the face of each cup.
Joining the Two Cups
Hold the two cups with right sides facing out, edges touching at the center. Using the tapestry needle and yarn tail, whip stitch the two cups together along their straight center edges (Row 15 edge of each cup, worked from top to bottom), joining approximately 1.5 inches from the top edge downward. Leave the upper portion open for the halter tie path.
Lower Band and Back Band Extensions
With right side facing and using US B-1 / 2.25mm hook, join yarn at the bottom right corner of the joined cup piece.
Row 1 (Lower band): Chain 1. Work sc evenly along the entire bottom edge of both cups, placing 1 sc in each stitch and 2 sc at each joining point to keep fabric flat. Total approximately 64 sc across the bottom. Turn. (64 sc)
Row 2: Chain 3 (counts as dc). FPdc around second st. [BPdc around next st. FPdc around next st] across. Dc in last st. Turn. (64 sts)
Row 3: Chain 1. [BPsc around next FPdc. FPsc around next BPdc] across. Turn. (64 sts)
Row 4: Repeat Row 2. (64 sts)
Row 5: Repeat Row 3. (64 sts). Do not fasten off.
Scallop Lower Edging on Band
Working directly from Row 5 of the lower band:
Chain 1. Sc in first st. [Skip 2 sts. 5 dc in next st. Skip 2 sts. Sc in next st] repeat across. End with sc in last st.
Note: 64 sts divided by 6 equals 10 complete repeats with 4 sts remaining. Work 10 full scallops and 1 partial. At the end, sc in last 4 sts for a clean end. Fasten off.
Back Band Extensions
Right back band: With RS facing, join yarn at the top right edge of the bralette (right side when worn). Chain 1. Sc in each st along the right vertical side edge of the cup. Approximately 15 sc. Turn. Work 4 rows of sc (chain 1, sc across, turn) for a band width of approximately 1 inch. Work 5 rows total. Fasten off.
Left back band: Repeat on left side. Fasten off.
The two back band ends will meet at center back and be secured with hook-and-eye closures. Sew one hook-and-eye set 0.5 inch from each end of the band.
Halter Neck Ties
At the top of the right cup (upper corner), join yarn and chain 70. Slip stitch back down the chain for a firm tie cord. Fasten off. Repeat on left cup. These ties cross at the neck and tie at the nape.
Optional Shoulder Strap Ties
At the top outer corner of each cup (the outer upper edges), join yarn and chain 40. Slip stitch back down chain. These optional straps go over the shoulder and can be tied to the neck tie or to each other at the back for extra security.
Bralette Edging (Upper Cup Edge)
With RS facing and US B-1 / 2.25mm hook, join yarn at the top left corner of the joined piece. Work 1 row of sc evenly along the top curved edge of both cups. Work approximately 60 sc total.
Next row: Chain 1. [Sc, picot, sc] in first sc. [Skip 1 sc. (Sc, picot, sc) in next sc] across. Fasten off. (approximately 30 picot groups)
PIECE 2: CIRCLE MOTIF MINI SKIRT
Skirt Overview
The skirt body is built from 12 joined circle motifs arranged in 2 horizontal rows of 6 motifs each. This creates the hip and upper thigh area. The motifs are joined as you go on the final round. After the motif field is complete, stitches are picked up along the top edge for a ribbed waistband. Stitches are picked up along the lower edge for a lace mesh band, then a scallop border finishes the hem.
Circle Motif Instructions
Make the first motif completely. Join all subsequent motifs to adjacent motifs on Round 5.
Round 1: Using US C-2 / 2.75mm hook, make a magic ring. Chain 4 (counts as dc + ch 1). [Dc in ring. Ch 1] 11 times. Slip stitch to 3rd ch of beg ch-4 to join. Pull ring tight. (12 dc, 12 ch-1 sps)
Round 2: Slip stitch into first ch-1 sp. Chain 3 (counts as dc). Work 2 dc in same sp. [3 dc in next ch-1 sp] 11 times. Slip stitch to top of beg ch-3. (36 dc)
Round 3: Chain 4 (counts as dc + ch 1). Skip 1 dc. Dc in next dc. Ch 1. [Skip 1 dc. Dc in next dc. Ch 1] 17 times. Slip stitch to 3rd ch of beg ch-4. (18 dc, 18 ch-1 sps)
Round 4: Slip stitch into first ch-1 sp. Chain 3. Work 2 dc in same sp. [3 dc in next ch-1 sp] 17 times. Slip stitch to top of beg ch-3. (54 dc)
Round 5: Chain 5 (counts as dc + ch 2). Skip 2 dc. Dc in next dc. Ch 2. [Skip 2 dc. Dc in next dc. Ch 2] 17 times. Slip stitch to 3rd ch of beg ch-5. (18 dc, 18 ch-2 sps)
This creates 18 spokes around the motif. The 18 spokes define 6 groups of 3 spokes each, with each group of 3 acting as one side of a hexagonal motif. For joining, the middle spoke of each group of 3 is the corner point.
Joining Motifs As You Go
On Round 5 of the second and subsequent motifs, when you reach a ch-2 space that is adjacent to an already-completed motif, replace the chain 2 with: chain 1, slip stitch into the corresponding ch-2 sp of the adjacent motif, chain 1.
Row 1 of motifs: Make Motifs 1 through 6 in a horizontal strip, joining each new motif to the previous one along one side (3 spokes).
Row 2 of motifs: Make Motifs 7 through 12, joining each to the motif directly above it in Row 1 (along one side) and to the adjacent motif in Row 2 (along one side). Corner junctions where 3 or 4 motifs meet: work a 3-way join by slip stitching into the previously worked junction chain space.
After all 12 motifs are joined, the motif field measures approximately 6 motifs wide by 2 motifs tall, forming a rectangle of approximately 27 inches wide and 9 inches tall.
CHECKPOINT: After completing and joining all 12 motifs, the motif field should measure approximately 27 inches across and 9 inches tall before blocking.
Waistband
With RS facing and US B-1 / 2.25mm hook, join yarn at the top right corner of the motif field.
Row 1 (pick-up row): Chain 1. Work sc evenly across the top edge of all 6 motifs. Place 1 sc per dc and 1 sc per ch-2 sp along the top edge. Work approximately 144 sc across. Turn. (144 sc)
Verify: 144 sts divided by 2-st ribbing repeat equals 72 repeats. Even. Correct.
Row 2: Chain 3 (counts as dc). [FPdc around next st. BPdc around next st] across to last st. Dc in last st. Turn. (144 sts)
Row 3: Chain 3. [BPdc around next FPdc. FPdc around next BPdc] across to last st. Dc in last st. Turn. (144 sts)
Rows 4 through 10: Repeat Rows 2 and 3 alternately, ending with a Row 3 repeat. (144 sts each row)
After Row 10, the waistband measures approximately 1.75 inches. Fasten off, leaving a long tail.
Close the waistband and skirt into a tube by seaming the left and right side edges of the motif field together. Use a flat mattress stitch or slip stitch seam along the WS. The seam runs from the top of the waistband down through the full motif field.
After seaming, fold the waistband down and tack the pick-up edge loosely to the inside for a double-layer waistband if desired, or leave single layer. Thread optional ribbon or twill tape through Round 2 of the waistband as a drawstring tie.
Lace Mesh Extension (Worked in the Round Below the Motif Field)
With RS facing and US C-2 / 2.75mm hook, join yarn at the bottom edge of the motif field, at the seam.
Round 1: Chain 1. Sc evenly around the bottom edge of all 12 motifs. Work approximately 144 sc. Slip stitch to first sc to join. (144 sc)
Round 2: Chain 5 (counts as dc + ch 2). Skip 2 sc. [Dc in next sc. Ch 2. Skip 2 sc] around. Slip stitch to 3rd ch of beg ch-5 to join. (48 dc, 48 ch-2 sps)
Round 3: Chain 1. Sc in first dc. 2 sc in ch-2 sp. [Sc in next dc. 2 sc in ch-2 sp] around. Slip stitch to first sc. (144 sc)
Round 4: Repeat Round 2. (48 dc, 48 ch-2 sps)
Round 5: Repeat Round 3. (144 sc)
Round 6: Repeat Round 2. (48 dc, 48 ch-2 sps)
Round 7: Chain 1. Sc in first dc. 2 sc in ch-2 sp. [Sc in next dc. 2 sc in ch-2 sp] around. Slip stitch to first sc. (144 sc)
CHECKPOINT: After the lace mesh extension, the total skirt length from waist to current lower edge should be approximately 13 inches.
Lower Circle Border Row
This replicates the look of a lower row of partial circle elements visible at the skirt hem.
Round 1: Chain 4. [Dc in next sc. Ch 1. Skip 1 sc] 71 times. Dc in next sc. Ch 1. Slip stitch to 3rd ch of beg ch-4. (72 dc, 72 ch-1 sps)
Round 2: Slip stitch into first ch-1 sp. Chain 3. 2 dc in same sp. [3 dc in next ch-1 sp] 71 times. Slip stitch to top of beg ch-3. (216 dc)
Round 3: Chain 4. Skip 2 dc. [Dc in next dc. Ch 1. Skip 2 dc] 71 times. Dc in next dc. Ch 1. Slip stitch to 3rd ch of beg ch-4. (72 dc, 72 ch-1 sps)
Round 4: Slip stitch into ch-1 sp. Chain 3. 2 dc in same sp. [3 dc in next ch-1 sp] 71 times. Slip stitch to top of beg ch-3. (216 dc)
Scallop Hem Border
Round 1 (foundation): Chain 1. Sc in each dc around. Slip stitch to first sc. (216 sc)
Verify: 216 divided by 6 equals 36 scallop repeats. Even. Correct.
Round 2: Chain 1. Sc in first sc. [Skip 2 sc. 5 dc in next sc. Skip 2 sc. Sc in next sc] 36 times, ending last repeat with slip stitch to first sc instead of final sc. (36 scallops)
Round 3 (picot finish): Slip stitch to center dc of first scallop (3rd dc of the 5-dc group). [Chain 3. Sl st in first ch of ch-3 (picot made). Sl st in center dc of next scallop] 36 times. Fasten off.
PIECE 3: BELL-SLEEVE KIMONO CARDIGAN
Kimono Overview
The kimono is an open-front cardigan worked flat in V-stitch lace throughout. The back panel and two front panels are worked separately from the bottom edge upward. Shoulder seams join the panels. The neckline/front edge and the hem and side edges are finished with a scallop border. Sleeves are picked up at the armhole and worked outward (top-down sleeves), increasing gradually to form the dramatic bell flare, then finished with a scallop border at the cuff.
V-Stitch Lace Pattern (Multiple of 3 + 2 Foundation Chain)
Foundation chain: Multiple of 3 + 4 for starting chain.
Row 1 (RS): Dc in 4th ch from hook (counts as first V-st). [Skip 2 ch. (Dc, ch 2, dc) in next ch] across to last 3 ch. Skip 2 ch. Dc in last ch. Turn.
Row 2: Chain 3 (counts as dc). [(Dc, ch 2, dc) in ch-2 sp of each V-st] across. Dc in top of turning ch. Turn.
Repeat Row 2 for pattern.
V-stitch count is stated at end of each row as (X V-sts).
Kimono Back Panel
Foundation chain: Chain 115.
Row 1 (RS): Dc in 4th ch from hook (first dc of edge). [Skip 2 ch. (Dc, ch 2, dc) in next ch] 37 times. Skip 2 ch. Dc in last ch. Turn. (37 V-sts, plus 1 edge dc each side)
Row 2: Chain 3. [(Dc, ch 2, dc) in ch-2 sp] 37 times. Dc in top of ch-3. Turn. (37 V-sts)
Rows 3 through 42: Repeat Row 2. (37 V-sts per row)
After Row 42, the back panel measures approximately 17 inches tall from foundation edge.
Armhole Shaping (Back Panel)
Row 43: Slip stitch across first V-st and into ch-2 sp of second V-st. Chain 3. [(Dc, ch 2, dc) in ch-2 sp] 33 times. Dc in ch-2 sp of next V-st. Leave last V-st and edge dc unworked. Turn. (33 V-sts)
Row 44: Slip stitch across first V-st and into ch-2 sp of second V-st. Chain 3. [(Dc, ch 2, dc) in ch-2 sp] 29 times. Dc in ch-2 sp of next V-st. Leave last V-st unworked. Turn. (29 V-sts)
Rows 45 through 60: Continue in V-st pattern with no further decreases. (29 V-sts per row)
After Row 60, fasten off. The back panel is complete.
Kimono Front Panels (Make 2)
Foundation chain: Chain 58.
Row 1 (RS): Dc in
