I pulled this pattern from an old notebook I’d been carrying around for ages. It started as a sketch during a coffee break, just me doodling granny squares and wondering what would happen if I made them bold and graphic instead of soft and vintage. The black and tan combination kept calling to me, and I finally sat down to bring it to life.
Get the Ad-Free PDF Pattern
You can find the free pattern below, or you can purchase the ad-free printable PDF from my shop.
Get the Printable PDF →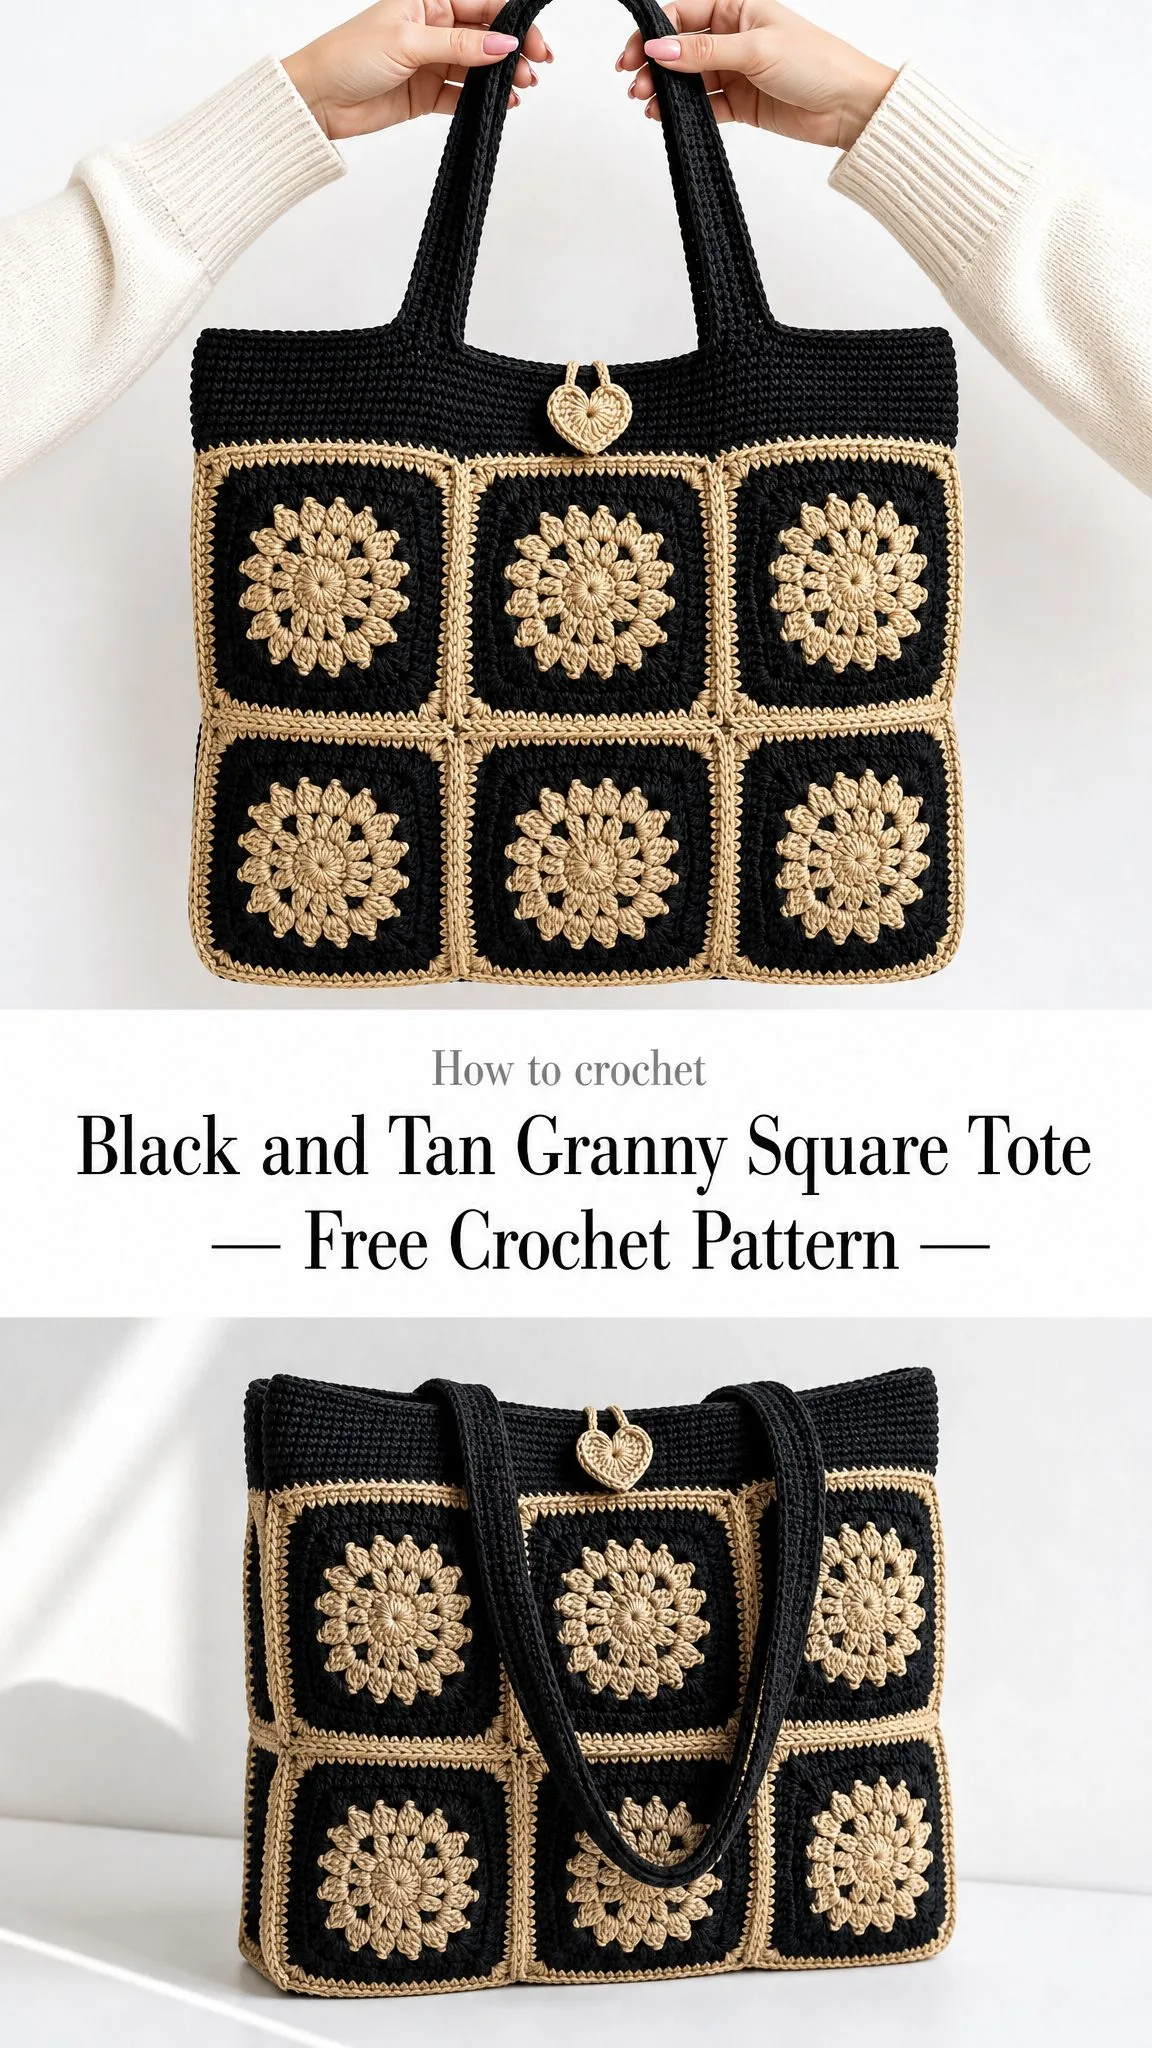
This tote is called the Black and Tan Granny Square Tote, and it has become one of my absolute favorites. The contrast between the deep black background and the warm tan flowers gives it a modern edge while still honoring that classic granny square charm we all love.
If you’ve been wanting to try a project that looks impressive but uses techniques you probably already know, this is the one. You’ll work in rounds, make simple granny squares, sew raised appliques, join motifs into a tube, and crochet a firm base and straps. The shaping is straightforward. The polished look comes from tidy finishing and even tension.
About This Crochet Pattern
This structured cotton tote features tan-trimmed black granny squares with raised floral appliques, a firm crocheted base, two sturdy shoulder straps, and a small heart charm at the front edge. The finished size measures approximately 12.75 inches wide by 10.5 inches tall by 4.25 inches deep (32.5 x 26.5 x 11 cm).
The skill level sits comfortably between adventurous beginner and intermediate. If you can work basic crochet stitches in the round and you’re willing to take your time with neat seaming, you can absolutely make this bag.
Time estimate: About 10 to 14 relaxed hours total. Plan for 5 to 6 hours making the motifs, 2 to 3 hours joining everything together, and 3 to 5 hours for the base, straps, charm, and finishing touches.
Materials You’ll Need
Gathering your supplies before you start makes the whole process smoother. Here’s exactly what you need:
Yarn: Worsted-weight cotton or cotton blend, weight category #4. You’ll need 420 yards (384 m) in black for the main color and 285 yards (261 m) in tan for the contrast color. Add 10% extra if you plan to lengthen the straps.
Yarn suggestions: Lily Sugar’n Cream, Paintbox Yarns Cotton Aran, or Lion Brand 24/7 Cotton all work beautifully. Choose a firm cotton with clear stitch definition. You can substitute any #4 cotton that reaches gauge and creates a sturdy fabric.
Hook: US G/6, 4.0 mm crochet hook, or whatever size you need to match gauge.
Tools: Tapestry needle, stitch markers, pins, blocking mat, ruler or tape measure. A fabric lining is optional but helpful if you plan to carry heavier items.
Gauge
Getting gauge right matters a lot for this project since you’re joining multiple squares together.
Granny square: 4.25 inches (11 cm) after blocking, measured across one side.
Single crochet fabric: 16 single crochet stitches by 18 rows equals 4 inches (10 cm) using a 4.0 mm hook.
Important: Each top edge square contributes 17 picked-up single crochet stitches to the top band.
Take time to make a gauge swatch before diving in. If your squares are too big, try going down a hook size. Too small? Go up a hook size.
Abbreviations and Stitch Guide
This pattern uses US crochet terms. If you typically work from UK patterns, remember that US single crochet (sc) equals UK double crochet (dc), US double crochet (dc) equals UK treble crochet (tr), and US treble crochet (tr) equals UK double treble crochet (dtr).
Petal Cluster
This special stitch creates the raised flower petals. Yarn over, insert your hook in the indicated stitch, yarn over and pull up a loop to about 0.5 inch (1.25 cm). Repeat from the same stitch 3 more times, so you have multiple loops on your hook. Yarn over and pull through all loops on hook. Chain 1 to close the petal.
Tip: Keep your petal loops even in height. Uneven loops make the flower look lopsided.
Flat Slip-Stitch Join
Hold two square edges with wrong sides together. Insert your hook through the outer loops of matching edge stitches, yarn over with contrast color, pull through both pieces and the loop on hook. Continue across without pulling tight.
Left-Handed Maker Note
Work all rounds in whichever direction feels natural to you. Placement, counts, and assembly order stay the same. Your join line may lean the opposite way, which is completely normal.
Pattern Notes
Chain 3 counts as 1 double crochet in granny square rounds. Chain 1 spaces between clusters are included in the written structure but not counted as double crochet stitches. Block every square before joining. Use locking markers to label front, back, and side sections before closing the tube.
Flower Square Instructions (Make 16)
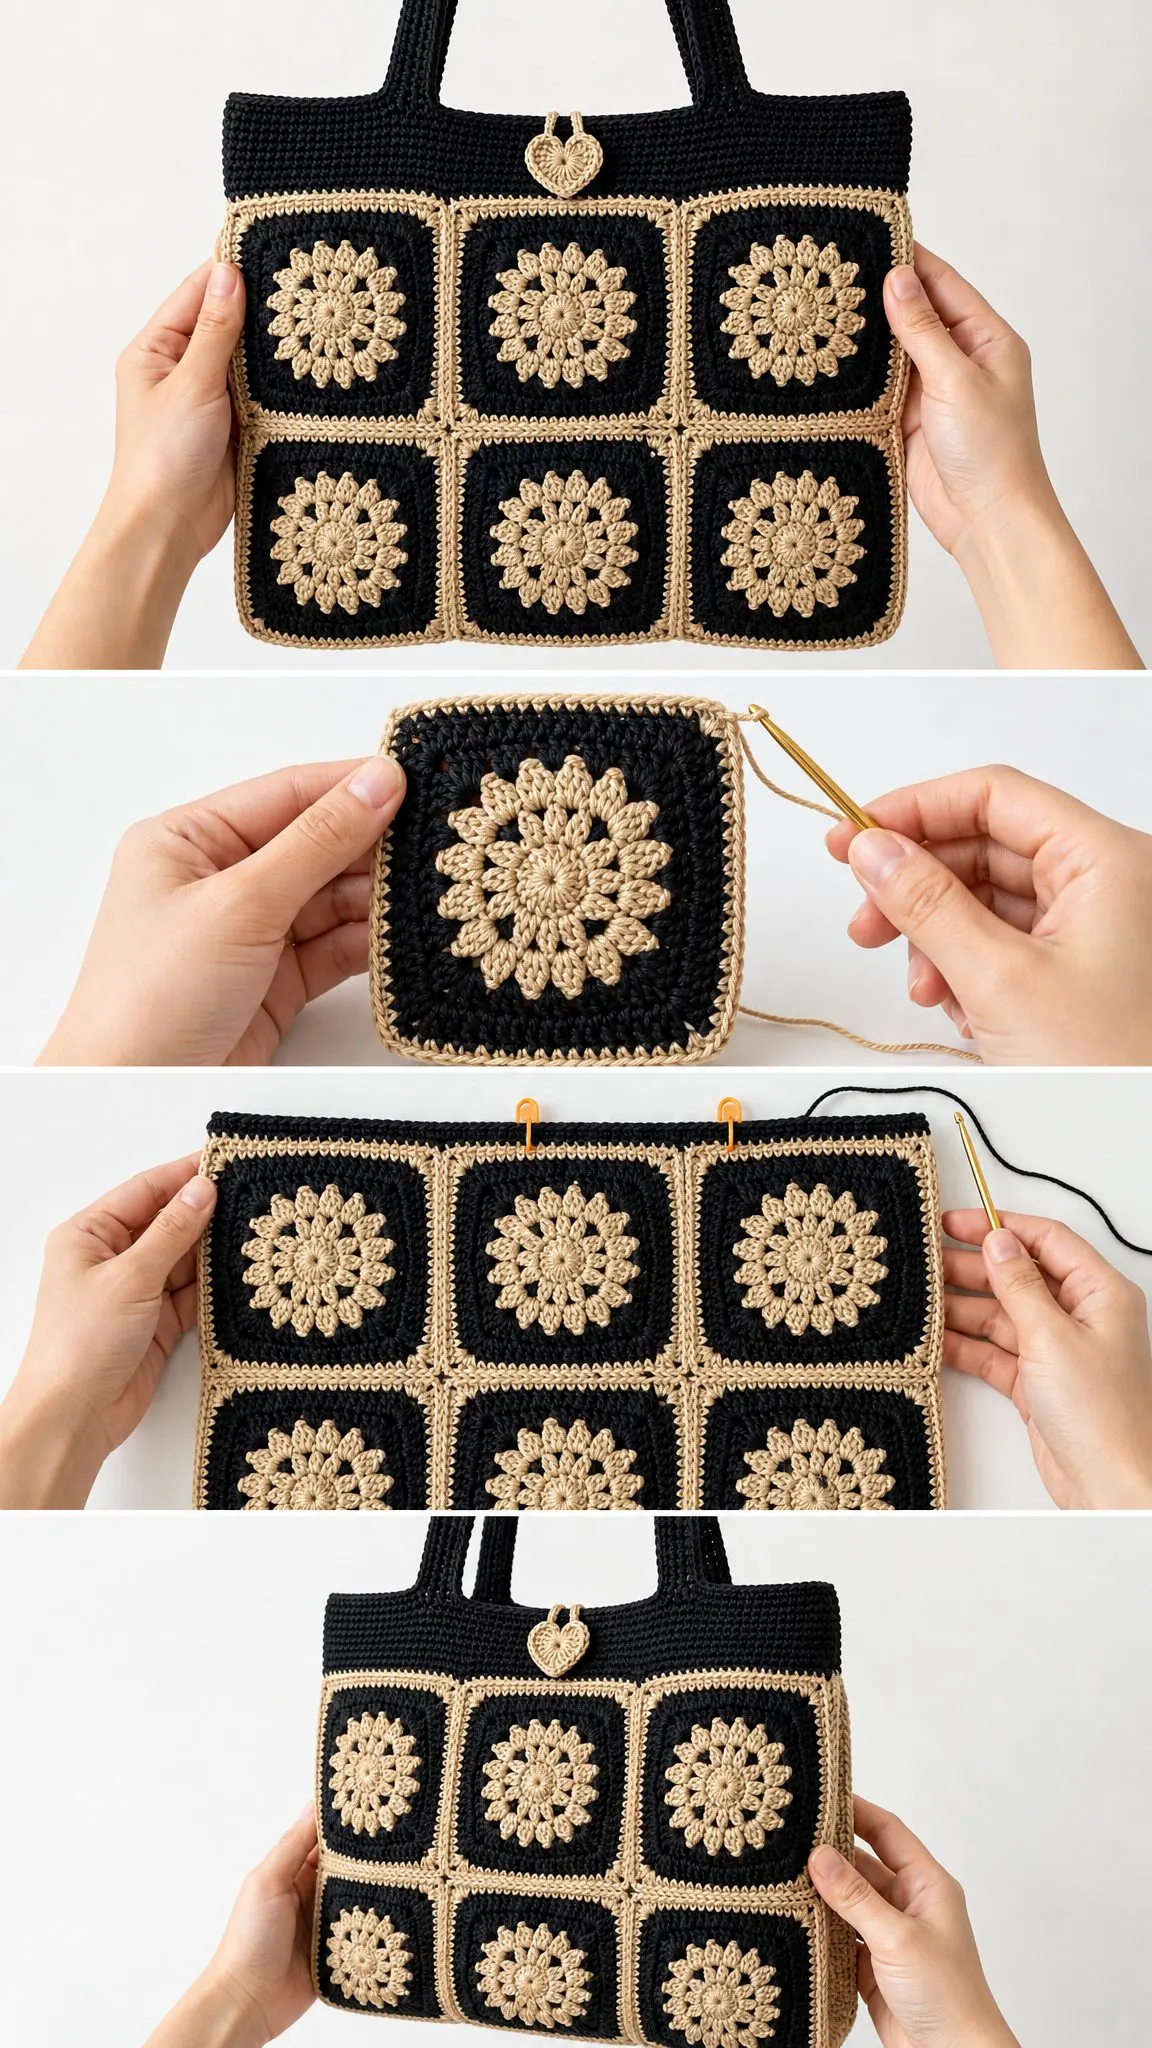
You’ll create 16 identical squares. Each square has a raised flower applique sewn onto a black granny square base with a tan border.
Flower Center (CC)
Round 1: Make a magic ring, chain 1, work 12 single crochet stitches into the ring, join with a slip stitch to the first single crochet. (12 sc)
Round 2: Chain 1, work 1 petal cluster in each single crochet around, join with a slip stitch to the top of the first petal. Fasten off, leaving a 10 inch (25 cm) tail for sewing later. (12 petals)
Black Granny Square Base (MC)
Round 1: Chain 4, join to form a ring. Chain 3, work 2 double crochet stitches in the ring, chain 2, [3 double crochet in ring, chain 2] 3 times, join to top of chain 3. (12 dc; 4 corners)
Round 2: Slip stitch into corner space. Chain 3, 2 double crochet, chain 2, 3 double crochet in the same corner, chain 1. In the next corner space work 3 double crochet, chain 2, 3 double crochet, chain 1; repeat from around, join. (24 dc; 4 corners)
Round 3: Slip stitch into corner space. Chain 3, 2 double crochet, chain 2, 3 double crochet in the same corner, chain 1, 3 double crochet in each side chain 1 space, chain 1. *Corner in next chain 2 space, chain 1, 3 double crochet in each side chain 1 space, chain 1; repeat around, join. (36 dc)
Round 4: Work as Round 3, adding one 3 double crochet cluster to each side. Join. (48 dc; 4 clusters per side)
Border (CC)
Round 5: Chain 1, single crochet evenly around, placing 3 single crochet in each corner space and enough single crochet along each side to create 17 single crochet from corner to corner. Join. (64 sc total)
Attach the Flower
Center the flower on the right side of the square. Sew through the flower center and the base of each petal, leaving the petal tips slightly raised so they have dimension. Weave in your ends securely.
Checkpoint
Each blocked square should measure about 4.25 inches (11 cm) across and have 17 single crochet stitches along each edge from corner to corner. Make all 16 matching squares before moving on to assembly.
Join the Tote Body
Now comes the satisfying part where all your squares become a bag.
Layout
Arrange 8 squares in a horizontal row: front 1, front 2, front 3, right side, back 1, back 2, back 3, left side. Make a second matching row beneath it.
Join Vertical Seams
With contrast color and the flat slip stitch join, connect the 8 squares of the top row edge to edge. Repeat for the bottom row. Each joined square edge uses 17 matched stitches.
Join Horizontal Seam
Join the top row to the bottom row across all 8 squares. Keep the flower centers aligned as you work. You now have 8 squares around by 2 squares high.
Close Side Seam
Join the left side edge to the first front edge to form a tube. The tube now has 8 squares around the circumference.
Body Checkpoint
Before adding the base, the tube should measure about 34 inches (86.5 cm) around, 8.5 inches (21.5 cm) tall, with a front panel 12.75 inches (32.5 cm) wide and side depth 4.25 inches (11 cm).
Firm Bottom Base
A solid base gives this tote its structure and helps it stand upright.
With main color, chain 52.
Row 1: Single crochet in the second chain from hook and in each chain across, turn. (51 sc)
Rows 2 through 19: Chain 1, single crochet in each stitch across, turn. (51 sc)
Do not fasten off. Chain 1 and single crochet around the entire rectangle: 51 single crochet across each long edge, 17 single crochet along each short edge, and 3 single crochet in each corner. Join and fasten off. (148 sc)
Pin the rectangle inside the lower edge of the tote and sew or slip stitch in place with main color. The finished base measures about 12.75 x 4.25 inches (32.5 x 11 cm).
Top Band, Straps, and Charm
Top Band (MC)
Join yarn at the back edge.
Round 1: Pick up and single crochet 17 stitches across the top edge of each of the 8 upper squares, join. (136 sc)
Rounds 2 through 8: Chain 1, single crochet in each stitch around, join. (136 sc)
Round 9: Chain 1, reverse single crochet in each stitch around, join and fasten off. The band height measures about 1.75 inches (4.5 cm).
Strap 1 (MC)
Mark 16 stitches centered over the left front square and 16 stitches centered over the matching back square. Join at the first front marker, chain 76, being careful not to twist, slip stitch to the first back marker. Work 1 single crochet in each chain back toward the front, slip stitch to base. (76 sc) Turn and work 2 more single crochet rows across the strap. (76 sc each row) Fasten off. Strap width measures about 0.75 inch (2 cm).
Strap 2
Repeat over the right front and right back squares. Finished drop measures about 12 inches (30.5 cm). Add or subtract chains in multiples of 2 for a different drop length.
Reinforce
Sew each strap base securely through several band rows using main color. A firm X-shaped stitching path inside the bag adds extra strength for carrying heavier loads.
Small Heart Charm (CC)
Make a magic ring, chain 2, work 3 treble crochet, 3 double crochet, chain 1, 1 treble crochet, chain 1, 3 double crochet, 3 treble crochet, chain 2 into the ring. Pull the ring tight and slip stitch into the ring center. Fasten off, leaving a long tail. (1 heart)
Attach the charm at the center front top band. Let the heart sit just below the handle opening.
Size Customization Options
Want to make this tote bigger or adjust the straps? Here are some easy modifications:
Wider tote: Add one square to the front and back panels. Add 17 picked-up stitches to the top band for each added square.
Taller tote: Add a third row of squares before the top band.
Longer straps: Add chains evenly to both straps. Each 4 added chains adds about 1 inch (2.5 cm) of drop.
Finishing, Blocking, and Care
Weave in All Ends
Secure flower, seam, strap, and charm ends on the wrong side. Trim only after tug-testing to make sure nothing will come loose.
Block
Steam lightly or wet block to square the seams. Pin front, back, and side panels so the grid lines are straight.
Optional Lining
A sewn cotton lining helps prevent stretch when carrying keys, wallet, or books. Attach lining just below the top band.
Care Instructions
Hand wash in cool water, reshape, and dry flat. Do not hang while wet because cotton grows under weight.
Troubleshooting Common Issues
Squares are different sizes: Re-block to 4.25 inches (11 cm) and pair similar sizes together.
Top edge waves: Pick up fewer stitches in the next round by skipping every 16th stitch once. Keep the final count even.
Top edge pulls in: Redo Round 1 of the band and add 1 extra single crochet over each square edge.
Straps stretch: Add one round of slip stitch along both strap edges or sew ribbon to the wrong side for extra stability.
Construction Overview
Here’s a quick summary of how this Black and Tan Granny Square Tote comes together:
1. Make 16 flower squares (flower center plus granny square plus border)
2. Join squares into two rows of 8 around the bag
3. Close the side seam to form a tube
4. Add the firm crocheted base rectangle
5. Work the top band upward from the squares
6. Add two straps
7. Finish with the small heart charm
8. Block and add optional lining
The whole construction flows logically from one step to the next. Take your time with the joining, and your bag will look polished and professional.
Final Thoughts on This Crochet Tote Pattern
This Black and Tan Granny Square Tote crochet pattern brings together classic techniques in a fresh, modern way. The raised flower appliques add beautiful texture and dimension, while the solid granny square base keeps everything structured and sturdy. It’s the kind of bag that gets compliments every time you carry it.
I hope you enjoy making this tote as much as I enjoyed designing it. The repetitive nature of making the squares is meditative, and watching them all come together into a finished bag feels incredibly satisfying.
Thank you so much for choosing this pattern. I’d absolutely love to see your finished tote! If you make one, please share a photo on Instagram or Facebook and tag me so I can admire your work.
If you loved this pattern, save it to your Pinterest boards so you can find it easily when you’re ready to start. And please drop a comment below if you make this tote. I always love hearing how projects turn out and seeing the color combinations you choose!
Want a Quick & Easy Printable Version?
Get a clean, beautifully formatted PDF of this pattern — easy to follow step by step, ready to print or save on any device. No scrolling, no distractions, just the pattern.
Get the Printable PDF →