I don’t know about you, but I’ve spent years searching for a crochet bikini pattern that actually looks like it belongs on a beach in the Maldives. All the mermaid vibes with none of the "homemade costume" energy. This stunning shell bikini finally delivers that dreamy, ocean-goddess aesthetic we’ve all been pinning but never quite finding in pattern form.
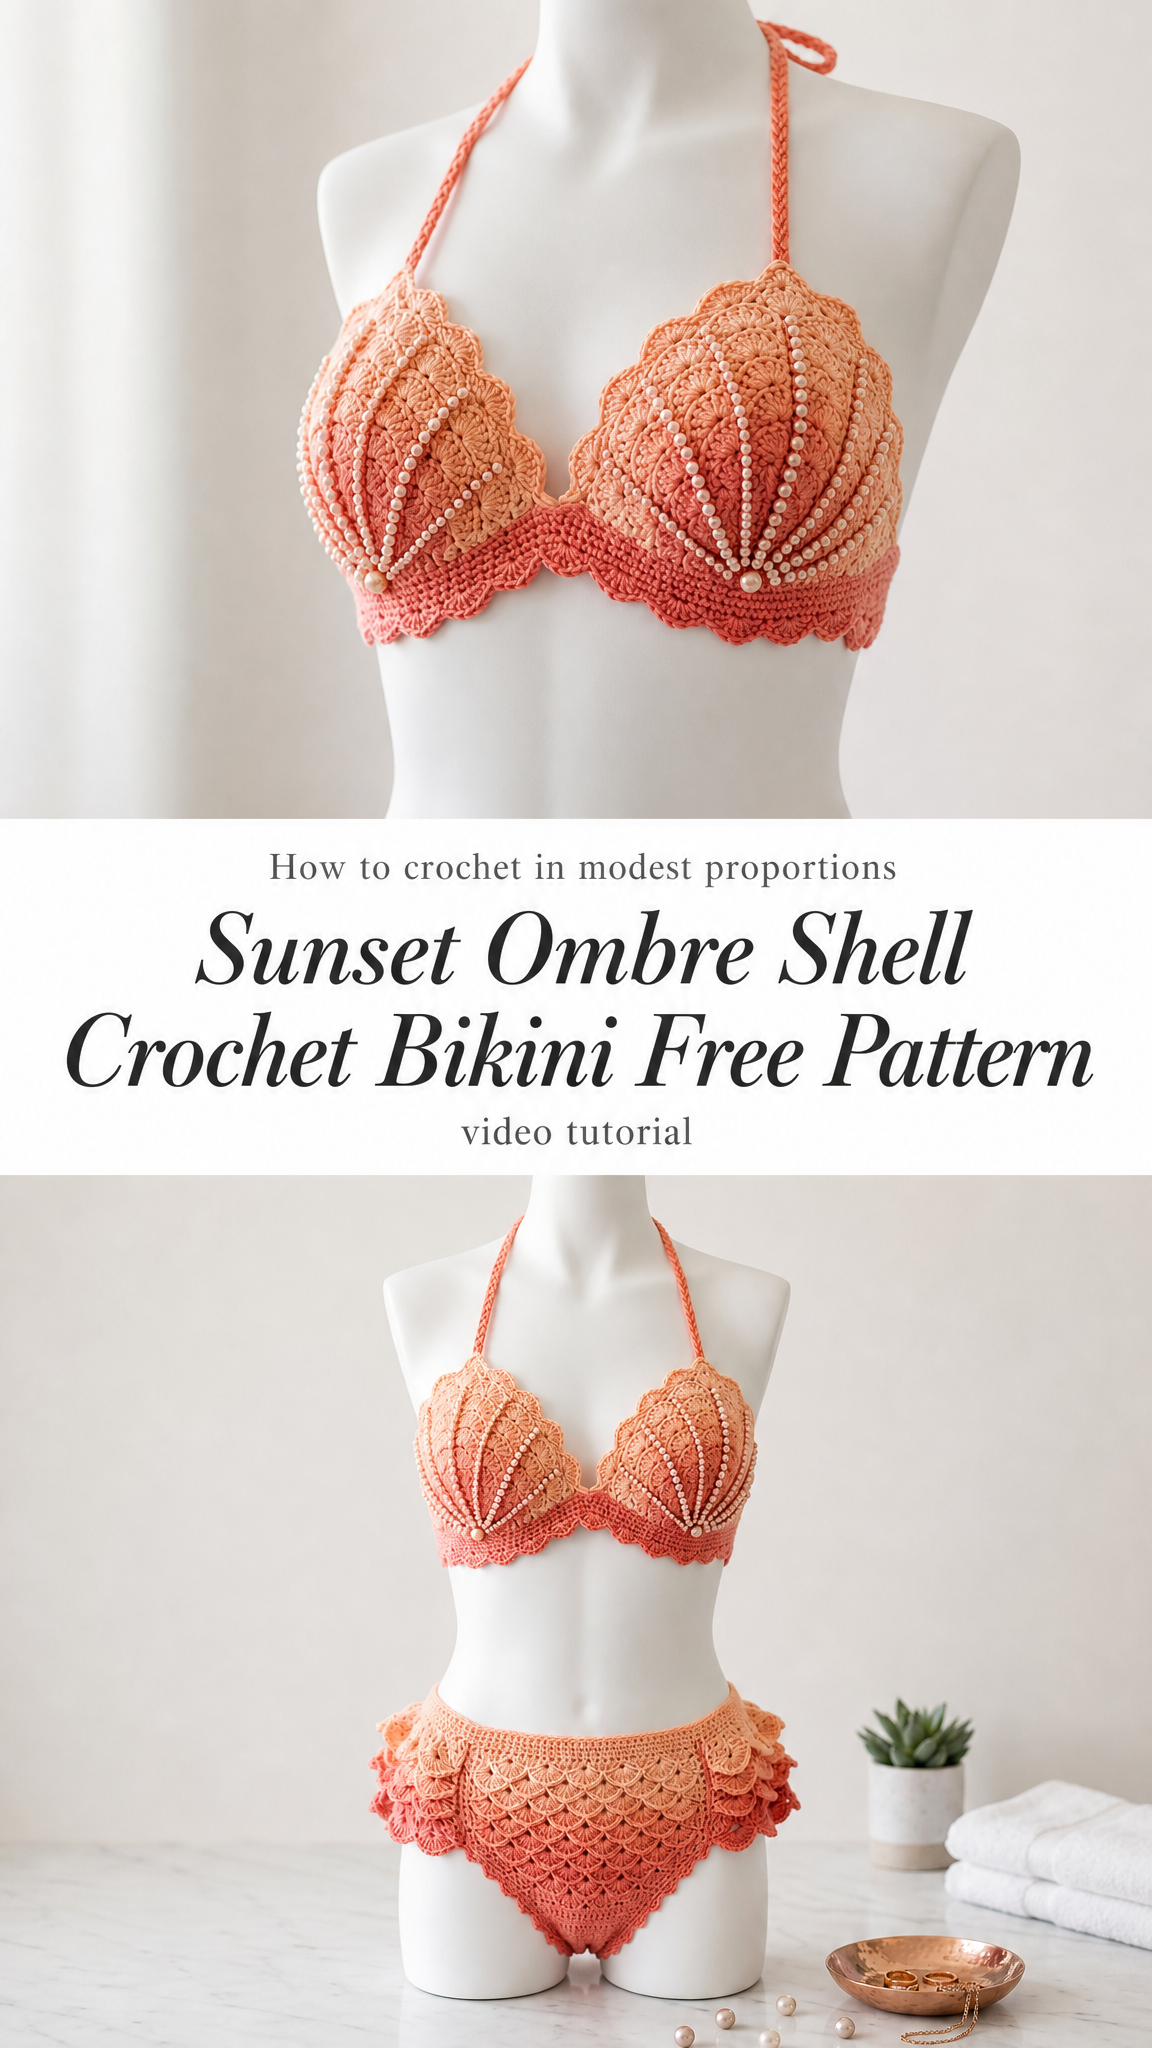
The gorgeous ombre effect moves from soft peach to deep coral, creating that perfect sunset-over-water look. And those scalloped shells on the bottom? They’re the crocodile stitch, which sounds intimidating but breaks down into simple, repetitive steps once you get the rhythm. Let me walk you through every detail so you can make your own mermaid moment this summer.
About This Crochet Bikini Pattern
This two-piece bikini set features a seashell-shaped halter top with delicate pearl bead embellishments and high-waisted bottoms covered in layered crocodile stitch scales. The construction combines several intermediate techniques, but I’ve broken everything down into manageable sections.
The top uses increases worked in a fan pattern to create that natural shell shape, with beads strung along the radiating lines for extra sparkle. The bottoms feature a solid crochet base with the dramatic crocodile stitch overlay creating those gorgeous, fish-scale scallops.
Skill Level: Intermediate. You should be comfortable with basic stitches, increasing, decreasing, and working in rows. The crocodile stitch is a specialty technique, but I’ll teach you step by step.
Finished Sizes:
Size adjustments are noted throughout the pattern.
Materials Needed for Your Crochet Shell Bikini
Yarn:
I recommend 100% cotton or cotton blend yarn for swimwear. Cotton holds its shape when wet, dries quickly, and softens beautifully with washing. Avoid acrylic for swimwear as it stretches when wet and doesn’t breathe well against skin.
Hook:
Notions:
Gauge
18 stitches x 20 rows = 4 inches in single crochet with 3.5mm hook
Take time to check your gauge. For swimwear especially, gauge matters for fit and coverage. If your gauge is loose, go down a hook size. Tight gauge? Go up a hook size.
Abbreviations and Stitch Definitions
Let me define every stitch you’ll need. Even if you know these, a quick refresher never hurts.
Ch = Chain. Wrap yarn over hook, pull through loop on hook. Creates your foundation.
Sl st = Slip stitch. Insert hook, yarn over, pull through stitch AND loop on hook in one motion. Used for joining and invisible movement.
Sc = Single crochet. Insert hook, yarn over, pull up loop (2 loops on hook), yarn over, pull through both. Your shortest, tightest stitch.
Hdc = Half double crochet. Yarn over, insert hook, yarn over, pull up loop (3 loops on hook), yarn over, pull through all 3. Medium height, slight drape.
Dc = Double crochet. Yarn over, insert hook, yarn over, pull up loop (3 loops on hook), yarn over, pull through 2 loops, yarn over, pull through remaining 2 loops. Taller stitch with more drape.
Tr = Treble crochet. Yarn over twice, insert hook, yarn over, pull up loop (4 loops), [yarn over, pull through 2] three times. Your tallest basic stitch.
Inc = Increase. Work 2 stitches in the same stitch to add width.
Dec = Decrease. Work 2 stitches together to remove width. For sc2tog: insert hook in next st, pull up loop, insert in following st, pull up loop (3 loops on hook), yarn over, pull through all 3.
Crocodile Stitch = A specialty stitch creating overlapping scales. Worked around the posts of dc pairs from previous row. Full tutorial included below.
Special Technique: The Crocodile Stitch Tutorial
Don’t let this stitch scare you. Once you understand the structure, it becomes almost meditative. Here’s how it works:
The crocodile stitch is built in two phases. First, you create a foundation row of double crochet pairs separated by chains. Then, you work scales around those dc posts, creating that layered, 3D effect.
Foundation Setup:
Work pairs of dc stitches with chain spaces between them. These pairs become the "posts" you’ll wrap your scales around.
Working a Scale:
1. Working down the post of the first dc in a pair, work 5 dc stitches around the post (not into a stitch, around the actual post)
2. Chain 1
3. Working up the post of the second dc in the pair, work 5 dc stitches around that post
4. This creates one complete scale
The scales naturally curl and overlap when you work subsequent rows. The ombre effect happens by changing colors between rows of scales.
Seashell Bikini Top Pattern
This top is worked flat in two identical shell pieces, then joined and finished with straps and edging.
Shell Cup (Make 2)
Bead Prep: Before starting, string 30-40 pearl beads onto Color A yarn using a beading needle. You’ll slide beads into position as you work.
With Color A and 3.5mm hook:
Row 1: Ch 4, 2 dc in 4th ch from hook, turn. (3 dc)
Row 2: Ch 3 (counts as dc), dc in first st, dc in next st, 2 dc in last st, turn. (5 dc)
Row 3: Ch 3, dc in first st, dc in each st across to last st, 2 dc in last st, turn. (7 dc)
Row 4: Ch 3, dc in first st, *dc in next 2 sts, slide bead up to hook, dc in next st locking bead in place*, repeat from * to last st, 2 dc in last st, turn. (9 dc, beads placed)
Rows 5-8: Continue increasing pattern (2 dc in first and last stitches of each row), adding beads every 3rd stitch along center radiating lines. Each row adds 2 stitches.
After Row 8: 17 dc
Transition to Color B:
Rows 9-12: With Color B, continue increasing pattern. Add beads along the same radiating lines established.
After Row 12: 25 dc
Rows 13-16: Continue with Color B, maintaining increases and bead placement.
After Row 16: 33 dc (37, 41 for Medium, Large)
Scalloped Edge:
Final Row: Ch 1, sc in first st, *skip 2 sts, 5 dc in next st (shell made), skip 2 sts, sc in next st*, repeat from * across. Fasten off.
This creates the distinctive shell-shaped scalloped bottom edge.
Joining the Cups
Hold both shell pieces with right sides facing you. Using Color C and slip stitches, join cups at center front, leaving approximately 1 inch of overlap for shaping.
Bikini Top Band
With Color C and 3.5mm hook:
Working along the bottom edge of joined cups:
Row 1: Join yarn at right side edge, ch 1, work approximately 70 (78, 86) sc evenly across entire bottom edge, turn.
Rows 2-4: Ch 1, sc in each st across, turn.
Row 5 (Scalloped edge): Ch 1, *sc, skip 1, 3 dc in next st, skip 1*, repeat across. Fasten off.
Halter Straps (Make 2)
With Color A and 3.0mm hook (smaller hook for sturdier straps):
Foundation: Ch 120 (130, 140) or desired length to tie at neck.
Row 1: Sl st in 2nd ch from hook, sl st in each ch across. Fasten off.
Attach straps to top outer corners of each shell cup, weaving in ends securely.
Back Tie
With Color C and 3.0mm hook:
Foundation: Ch 150 (160, 170) or desired length.
Row 1: Sl st in 2nd ch from hook, sl st in each ch across. Fasten off.
Attach at center back of band, leaving equal lengths on each side for tying.
High-Waisted Bikini Bottom Pattern
The bottoms are worked from the waistband down, with a solid crochet base and crocodile stitch overlay.
Waistband
With Color A and 3.5mm hook:
Foundation: Ch 120 (132, 144), join with sl st to form ring, being careful not to twist.
Round 1: Ch 1, sc in each ch around, sl st to join. (120, 132, 144 sts)
Rounds 2-4: Ch 1, sc in each st around, sl st to join.
Round 5 (Scalloped top edge): Ch 1, *sc, skip 1, 3 dc in next, skip 1*, repeat around, sl st to join.
Base Layer
Continue working in rounds below the waistband:
With Color A:
Rounds 6-10: Ch 1, sc in each st around (working into the base of Round 4, below the scallops), sl st to join.
Shaping for Hip Curve (Rounds 11-15):
Place markers at center front and center back.
Round 11: Ch 1, sc to 3 sts before front marker, sc2tog, sc, sc2tog, sc to 3 sts before back marker, sc2tog, sc, sc2tog, sc to end, sl st to join. (4 sts decreased)
Rounds 12-14: Ch 1, sc in each st around, sl st to join.
Round 15: Repeat Round 11 decreases. (4 sts decreased)
Continue until approximately 100 (112, 124) sts remain.
Crocodile Stitch Scale Overlay
This is where the magic happens. The scales are worked separately and attached to the base, creating that gorgeous layered effect.
Foundation for Scales (worked on base layer):
With Color A:
Round 1: Ch 3, dc in same st, *skip 2, (dc, ch 2, dc) in next st*, repeat around, sl st to join.
Round 2 (First Scale Row): Working into dc pairs from Round 1, work crocodile stitch scales as described in technique section. You’ll have approximately 20 (22, 24) scales around.
Change to Color B:
Round 3: Work foundation row below previous scales, offsetting so new scales overlap gaps.
Round 4: Work crocodile stitch scales with Color B.
Change to Color C:
Rounds 5-6: Repeat foundation and scale rows with Color C.
Continue ombre pattern until scales reach desired length, typically 4-5 rows of scales.
Leg Openings
Work sc edging around each leg opening with Color C, creating smooth, non-rolling edges:
Leg Edging: Join yarn, ch 1, work sc evenly around entire leg opening, sl st to join. Fasten off.
Finishing Your Crochet Bikini
Weaving Ends
You’ll have quite a few ends from color changes. Weave each end at least 2 inches through stitches of the same color, then trim close. For swimwear, I recommend weaving ends in two directions for extra security.
Blocking
Wet block your finished pieces by soaking in cool water for 15 minutes, then laying flat on a towel and shaping to measurements. This evens out stitches and helps the pieces lay properly. For the crocodile stitch scales, gently arrange them to overlap nicely while damp.
Optional Additions
Cup Inserts: Sew a small fabric pocket inside each shell cup to hold removable bikini inserts. This adds coverage and shaping support.
Elastic: For extra security in the waistband, thread thin swimwear elastic through Row 2 of the waistband using a safety pin.
Tips for Success with This Crochet Bikini Pattern
Yarn Choice Matters: Stick with cotton or cotton-bamboo blends. Test a small swatch in water before committing to your full project. Some yarns stretch dramatically when wet.
Try It On As You Go: Crochet swimwear should fit snugly because it will stretch with wear. Pin pieces to yourself or use a dress form to check fit during construction.
Bead Placement: The beads along the radiating lines create that beautiful sun-ray effect on the shells. Keep them evenly spaced and make sure they’re secured tightly in your stitches.
Scale Consistency: Your crocodile stitch scales should all have the same tension. If some look tighter or looser, adjust your technique. Consistent scales make the ombre gradient really pop.
Color Transitions: For the smoothest ombre effect, change colors at the start of scale rows, not in the middle. This keeps your color blocks clean and defined.
Caring for Your Handmade Crochet Bikini
Hand wash in cool water with mild soap after each wear. Salt water and chlorine can be harsh on cotton fibers, so rinse thoroughly. Lay flat to dry away from direct sunlight to prevent fading. Store flat rather than hanging to maintain shape.
I absolutely love how this crochet bikini pattern turned out, and I hope you’re excited to start your own sunset shell set. The combination of techniques creates something truly special, the kind of handmade piece that makes people stop and ask "where did you get that?" Save this pattern to your Pinterest boards so it’s there when you’re ready to cast on, and please drop a comment below if you make one. I’d love to see your color choices and hear how the crocodile stitch worked up for you!
