
Meet Rose Pearl. She’s the kind of dress that makes people stop mid-conversation and ask, "Wait, you made that?" With her romantic V-neckline, fitted bodice, and dreamy flared skirt, she carries herself with vintage elegance and modern confidence all at once.
Get the Ad-Free PDF Pattern
Scroll down for the full pattern, or get the ad-free printable PDF from the shop.
Get the Printable PDF →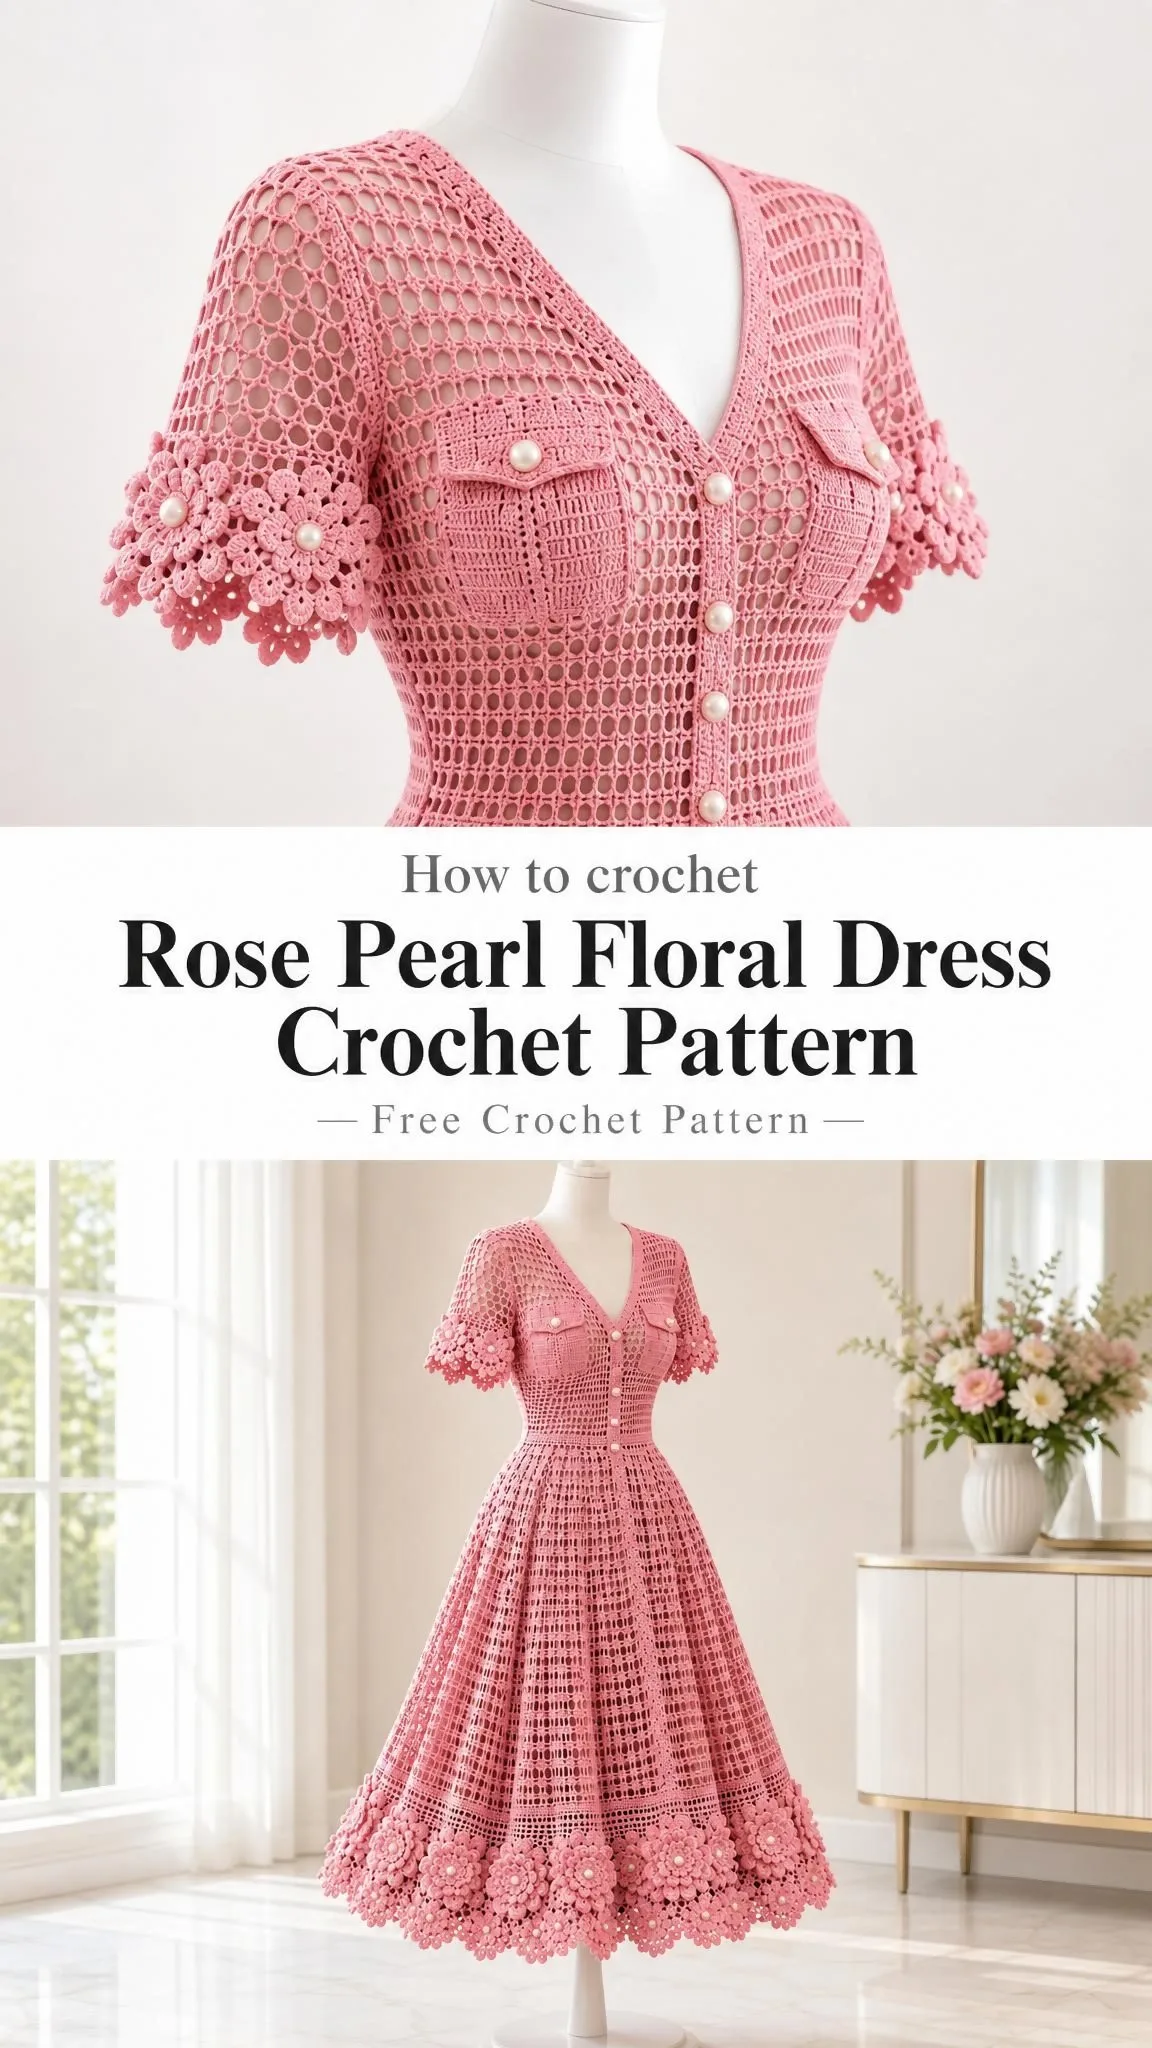
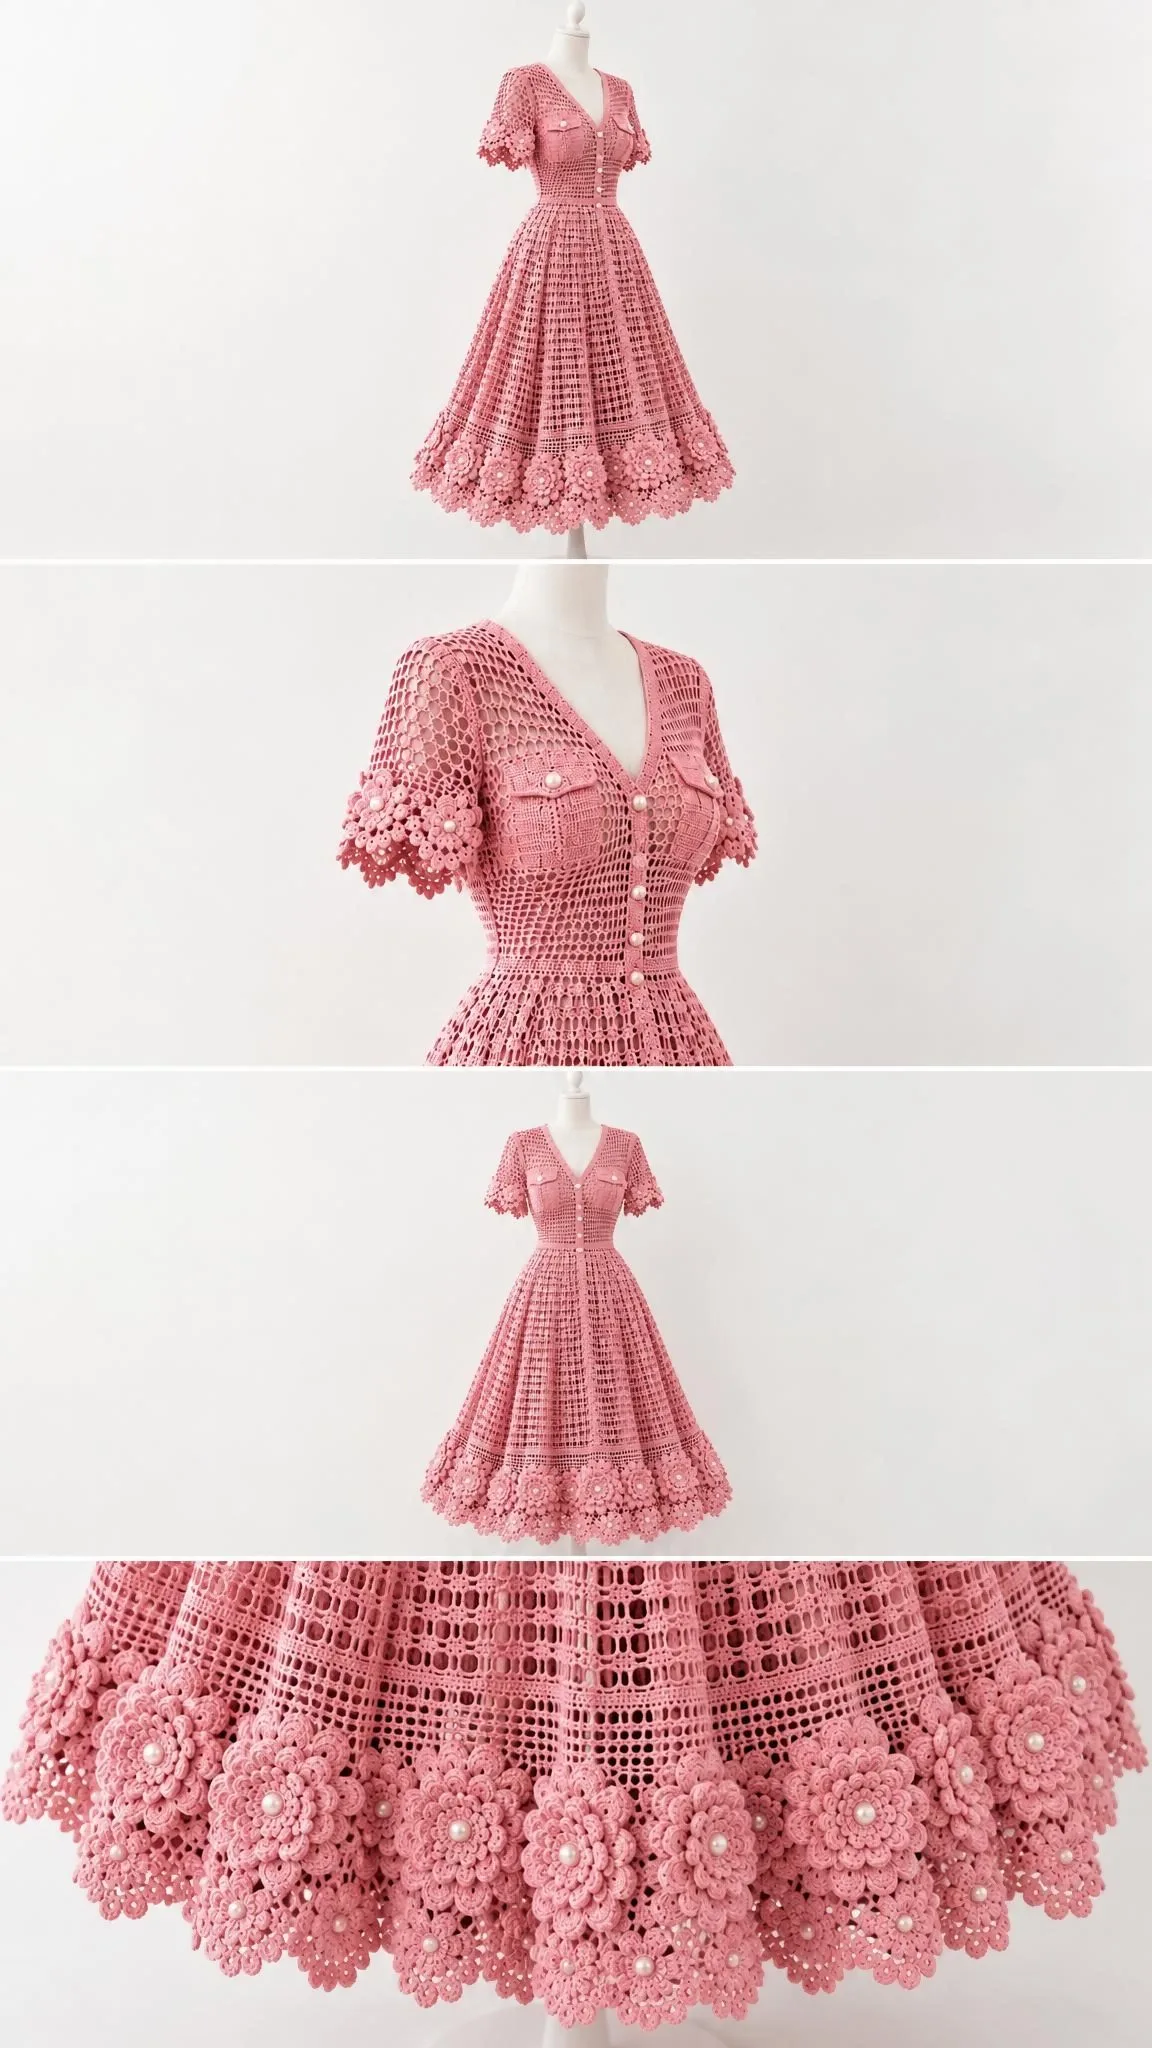
This rose pink beauty features delicate filet crochet openwork throughout, creating that classic lacy texture that catches the light beautifully. But the real showstoppers are those layered roses cascading around the hem and cuffs, each one topped with an optional pearl center. The overall effect is soft, feminine, and undeniably special.
Rose Pearl is an intermediate to advanced project that rewards patience with a truly wearable piece of art. The construction is straightforward, with flat panels joined at the waist, but the details like the V-neck shaping, decorative pockets, and pearl button placket elevate this dress into heirloom territory.
About This Pattern
This crochet dress pattern creates a stunning fitted bodice with a flared mid-calf skirt. The finished bust measures approximately 100 cm, designed for a body bust of 90 to 94 cm with 6 to 10 cm of ease. The untied waist sits at 100 cm and cinches down to 80 to 90 cm with the included belt. The skirt length is 70 cm, the bodice runs 40 cm from shoulder to waist, and the sleeves measure 18 cm.
The dress is worked as flat bodice and skirt panels, then joined at the waist. Sleeves are made separately and attached. A side zipper provides the closure for dressing, while the decorative button placket down the front is purely for style.
Important note: This is a draft AI-assisted pattern that has been reviewed for stitch counts and layout but has not been physically tested. The illustration is a styling reference, and exact texture, shaping, and fit may differ from the finished garment.
Materials and Tools
Yarn:
- Smooth sport-weight cotton, approximately 300 m per 100 g
- Main colour (rose pink): 860 g (2580 m)
- Accent colours (matching rose pink): 250 g (750 m) total, split evenly if two accents are used
These amounts include a planning allowance. Confirm by weighing your swatch. Use yarns of equal thickness throughout.
Hooks:
- 3.5 mm for main fabric
- 3.0 mm for firm borders and belt
Adjust hook size as needed to meet blocked gauge.
Notions:
- Tapestry needle
- Removable stitch markers
- Tape measure
- Scissors
- Blocking mats and rust-resistant pins
- Sewing needle and matching thread
- 40 cm dress zipper
- 1 m of 10 mm cotton tape for waist stabilization
- 8 front buttons plus 2 pocket buttons, approximately 10 mm
- Optional: 6 mm sew-on pearls for flower centers (omit if small parts are unsuitable)
- Separate opaque slip for wearing under the openwork
Gauge
Blocked main-stitch gauge: 5 filet cells and 10 rows = 10 x 10 cm
One repeat measures approximately 2.00 cm wide. Measure away from edges. This gauge governs every count in the pattern. Change your hook or yarn if you cannot achieve this gauge without distorting the fabric.
How to swatch: Use the stitch recipe in Section 3 of the pattern with N = 10. Work at least 20 rows. Wet-block, dry flat for 24 hours, then hang for 12 hours to check for cotton growth. Measure the central 10 cm and recheck length after hanging. Keep the swatch for washing and colourfastness tests.
Border gauge: 20 single crochet (sc) and 24 sc rows = 10 cm. Belt width is governed by measurement.
Abbreviations and Special Stitches
Before diving in, here are all the abbreviations you’ll encounter. Each one is defined so you can reference this section anytime you need a refresher.
- ch = chain
- sc = single crochet (insert hook, yarn over, pull up a loop, yarn over, pull through both loops)
- hdc = half double crochet
- dc = double crochet (yarn over, insert hook, yarn over, pull up a loop, yarn over, pull through 2 loops, yarn over, pull through remaining 2 loops)
- tr = treble crochet
- sl st = slip stitch
- st(s) = stitch(es)
- sp = space
- RS/WS = right side/wrong side
- BLO = back loop only
- rep = repeat
Parentheses group stitches worked in one place. Brackets identify a repeated sequence. N represents the number of horizontal motif repeats in a piece.
Understanding the Filet Cell
A filet cell consists of ch 1 followed by dc, spanning one skipped foundation chain or the previous ch-1 space. A row with N cells contains N+1 dc and N ch-1 spaces. The beginning ch 3 counts as the first dc.
Foundation Row
This is not counted as a pattern row. Chain 2N+2, then sc in the second ch and across, giving you 2N+1 sc.
Row 1
Ch 4, turn (this counts as dc + ch 1). Skip the first sc and the next sc, then dc in the next sc. Work [ch 1, skip 1 sc, dc in next sc] N-1 times. Count: N cells, N+1 dc.
Row 2 and All Plain Rows
Ch 4, turn (dc + ch 1). Dc in the next dc. Work [ch 1, dc in next dc] to end, placing the last dc into the third chain of the beginning ch-4. Count: N cells, N+1 dc.
Increasing One Cell at Row End
After the final dc, ch 1 and dc again in that same final stitch. Count: N+1 cells. On the next row, treat the added cell as a normal cell. Alternate increase edges by increasing only at the end of the designated row.
Pattern Notes
Read through all instructions before starting. Work flat and turn after every row. Mark Row 1 as the right side (RS). Count your stitches at the end of every row and check measurements after each 10 cm section. Fasten off with 20 cm tails for seaming. Seams consume only the edge loops.
All pieces use the row recipe described above. Where rows are listed as "plain," retain the same motif count and continue the correct recipe row. For neckline shoulders, restart yarn at a complete motif boundary. Do not carry yarn across the neck gap. The neckline shaping is deliberately stepped and smoothed with the border.
One measured size is provided, not a graded multi-size pattern. Before proceeding, compare bust, upper arm, armhole, and shoulder measurements to a well-fitting garment. Larger size adjustments require a new swatch and recalculated repeats. Do not tighten the belt enough to distort the openwork.
Construction Overview
Here’s the order of operations for building this dress:
- Make and block the two bodice panels, then work neckline shoulders
- Make six skirt panels
- Make two sleeve rectangles (if included)
- Join shoulders and sleeves
- Close side seams around the zipper opening
- Join skirt panels
- Distribute skirt fullness evenly into the bodice waist
- Add belt, borders, and decoration last
Back Bodice Instructions
With main colour and 3.5 mm hook, start the foundation with N = 25. Work upward from the waist.
Row 1: Work foundation row. Count: 25 filet cells.
Rows 2 through 37: Work the next plain recipe row. Count: 25 filet cells each row.
After Row 37, mark the central 9 repeats as the back neck opening. Work the outer 8 repeats at each side separately, restarting at the outer edge or neck edge as required by row direction. Leave the marked center unworked. At a lattice boundary, retain the border dc shared with the neighboring repeat.
Rows 38 through 40, each shoulder: Continue the recipe over the outer 8 repeats only. Count: 8 filet cells per shoulder.
Front Bodice Instructions
Begin as back with N = 25. The front is one panel. Any decorative button placket is applied later and does not open.
Row 1: Work foundation row. Count: 25 filet cells.
Rows 2 through 24: Work the next plain recipe row. Count: 25 filet cells each row.
Leave the center 1 repeat unworked. Work each side separately. Shape the neck by leaving one complete repeat unworked at the neck edge on the reduction rows listed below. Restart yarn at the new boundary to avoid dragging yarn across a step.
Rows 25 through 27, each shoulder: Continue next recipe row over this shoulder only. Count: 12 filet cells per shoulder.
Row 28, each shoulder: Omit one complete neck-edge repeat, rejoin yarn and work remaining motifs. Count: 11 filet cells per shoulder.
Rows 29 through 30, each shoulder: Continue next recipe row over this shoulder only. Count: 11 filet cells per shoulder.
Row 31, each shoulder: Omit one complete neck-edge repeat, rejoin yarn and work remaining motifs. Count: 10 filet cells per shoulder.
Row 32, each shoulder: Continue next recipe row over this shoulder only. Count: 10 filet cells per shoulder.
Row 33, each shoulder: Omit one complete neck-edge repeat, rejoin yarn and work remaining motifs. Count: 9 filet cells per shoulder.
Rows 34 through 35, each shoulder: Continue next recipe row over this shoulder only. Count: 9 filet cells per shoulder.
Row 36, each shoulder: Omit one complete neck-edge repeat, rejoin yarn and work remaining motifs. Count: 8 filet cells per shoulder.
Rows 37 through 40, each shoulder: Continue next recipe row over this shoulder only. Count: 8 filet cells per shoulder.
Skirt Panels (Make Six)
Work from waist downward. Start with N = 10. Each panel widens from 20 cm to 40 cm.
Row 1: Work foundation row. Count: 10 cells, 11 dc.
Rows 2 through 3: Work plain filet row. Count: 10 cells, 11 dc.
Row 4: Work recipe row, adding one cell at its end. Count: 11 cells, 12 dc.
Rows 5 through 7: Work plain filet row. Count: 11 cells, 12 dc.
Row 8: Work recipe row, adding one cell at its end. Count: 12 cells, 13 dc.
Continue this pattern of increasing one cell every 4 rows until you reach 20 cells at Row 40. Then work plain filet rows through Row 70.
Checkpoint: Block all six panels to 70 cm length, within one row of tolerance. Top measures 20 cm, lower edge measures 40 cm.
Sleeves (Make Two)
Use main colour, 3.5 mm hook, and N = 20. Work from shoulder edge to cuff. Both sleeve rectangles start 40 cm wide.
For a puff sleeve, gather the upper edge slightly while attaching. For a bell sleeve, leave the lower edge loose and add the scalloped border.
Sleeve Row 1: Work foundation row. Count: 20 filet cells.
Sleeve Rows 2 through 18: Continue the plain recipe row. Count: 20 filet cells each row.
Checkpoint: Each rectangle measures 40 cm wide and approximately 18 cm long before border. Ensure both sleeves match.
Waist Tie Belt
Belt Row 1: With 3.0 mm hook and belt colour, ch 8. Sc in second chain and next 6 chains. Count: 7 sc.
Belt Row 2 and every following row: Ch 1, turn, sc BLO in each stitch. Count: 7 sc per row.
Continue until belt measures 160 cm. Record your row total because row gauge varies with hook and yarn.
Checkpoint: Belt measures 160 x approximately 3.5 cm. Do not stretch while measuring. Make longer only if needed to tie comfortably.
Assembly
You’ll need: Rose pink yarn tails, tapestry needle, 3.5 mm hook for optional slip-stitch seams, zipper, sewing needle, thread, and cotton waist tape.
Join 1, Shoulders: Mattress-stitch corresponding outer shoulder edges. Align 8 complete motifs on each seam. Count: 2 shoulder seams, 8 motifs each.
Join 2, Sleeves: Mark 20 cm down each side of front and back. Match sleeve midpoint to shoulder seam, then sew its 40 cm upper edge around this opening. For puff styling, ease 2 cm at the sleeve midpoint. Count: 2 sleeves attached.
Join 3, Sides: Sew from waist to armhole on right side. On left side, leave the bodice portion of the 40 cm zipper opening. Continue that opening into the skirt below waist as needed. Close sleeve underarms if present. Count: 2 side seams, 1 zipper opening.
Join 4, Skirt: Align equal row ends and mattress-stitch six panels into a ring, retaining the left-side zipper gap. Count: 6 panel joins, including the partial zipper seam.
Join 5, Waist: Quarter-mark both bodice and skirt. Run two gathering threads through skirt foundation loops. Draw to 100 cm, matching quarter marks. Sew to bodice waist. Sew stabilizing cotton tape inside the waist without stretching. Count: 1 continuous 100 cm waist join.
Join 6, Closure: Hand-baste then backstitch zipper tapes to the inside of the left opening. Keep teeth clear of crochet loops. Secure top and lower stops. Count: 1 working zipper, 40 cm opening closed.
Checkpoint: Shoulders level, waist 100 cm before belt, armholes approximately 40 cm perimeter, zipper opens without catching. Try over the intended slip before trimming. Confirm adequate sitting and walking room.
Edgings and Details
You’ll need: Rose pink and matching rose pink yarn, 3.0 mm hook, tapestry needle, optional securely sewn pearls.
Neck Border
Neck Round 1: Join at back neck. Sc evenly around, approximately 2 sc per dc-row end and 1 sc per stitch. Adjust at steps to lie flat. At square inside corners, work sc2tog (pull up a loop in each of 2 stitches, yarn over and draw through all 3 loops) across the corner. Join with sl st.
Neck Round 2: Ch 1, sc in each sc, join. For V necks, work sc2tog at any remaining inner step.
Hem Border
Hem Round 1: Sc evenly along lower edge without drawing it in. For filet/lattice, work one sc per dc and one per chain. Do not count seam loops twice.
Hem Round 2: Starting at any sc, work [skip 2 sc, 5 dc in next sc, skip 2 sc, sl st in next sc] around. Work residual 0-5 sc as sl sts beside seam.
Armhole/Cuff Border
Round 1: Sc evenly around each opening, using about 2 sc per row end. Join.
Round 2: Sc in each sc for a plain edge, or use Hem Round 2 for a scalloped sleeve.
Layered Rose (Make 36)
Rose Round 1: 6 sc in magic ring, join. Count: 6 sc.
Rose Round 2: [Ch 3, sc in next sc] six times, join. Count: 6 arches.
Rose Round 3: [Sc, hdc, 3 dc, hdc, sc] in each arch. Count: 6 petals, 42 stitches.
Rose Round 4: Work behind petals, [ch 4, sl st around next Round-1 sc] six times. Count: 6 back arches.
Rose Round 5: [Sc, hdc, 5 dc, hdc, sc] in each back arch. Count: 6 outer petals, 54 stitches.
Make 36 layered roses total: 24 around hem, 6 per sleeve. For a sleeveless version, place the remaining 12 around waist. Arrange centres 10 cm apart at hem. Add optional pearls by sewing through each bead at least three times and anchoring on WS.
Leaf (Make 24)
Leaf Row 1: Ch 9. Sc in second ch, hdc in next, dc in next 4, hdc in next, 3 sc in last. Rotate and work opposite side: hdc, 4 dc, hdc, sc, join. Count: 17 stitches.
Sew each leaf behind a hem flower, attaching at its base and midpoint. Keep appliqués above the walking edge.
Pockets (Make 2)
Pocket Row 1: Ch 22. Sc in second chain and across. Count: 21 sc.
Pocket Rows 2 through 20: Ch 1, turn, sc in each stitch. Count: 21 sc per row.
Flap Rows 21 through 26: Ch 1, turn, sc in each stitch. Fold flap forward at Row 20. Count: 21 sc per row.
Decorative Placket
Placket Row 1: Ch 7. Sc in second ch and across. Count: 6 sc.
Placket Row 2 and following: Ch 1, turn, sc across until strip reaches waist-to-V depth. Count: 6 sc per row.
Sew placket centrally below V. Attach 8 evenly spaced buttons through the solid placket, not open mesh. Sew each pocket along bottom and sides, keeping flap loose, then add its button. These are decorative and do not replace the side zipper.
Finishing
Pass 1: Weave each end through at least 5 cm of solid stitches. Reverse direction twice and trim only after the first wash.
Pass 2: Soak according to yarn label. Lift supported, press between towels, and lay flat to finished measurements. Shape each scallop and flower gently.
Pass 3: After fully dry, hang for 12 hours. Remeasure length and check zipper, belt, and decoration.
Final measurements: Bust approximately 100 cm, bodice 40 cm, skirt 70 cm plus border, sleeves 18 cm plus any extra scallop depth. Cotton can grow in wear, so shorten only after the hanging check. Store folded, not suspended from shoulders.
Care and Safety
Follow the yarn care label. For cotton, cool gentle hand washing and flat drying are a conservative starting point. Test colours first. Support the full wet garment and avoid wringing. Remove detachable trim before washing. Openwork catches easily on jewellery and furniture.
This is an adult garment. Use an opaque slip for coverage. Secure pearls and buttons and check regularly. Small detached parts are a choking hazard around children and pets. Keep long belt ends clear of moving equipment and flames. Check the hem does not trip the wearer. This is not protective clothing.
Tips for Success
Take your time with gauge. This dress relies heavily on accurate measurements. The filet crochet creates a fabric that can stretch and grow, especially in cotton. Your swatch is your best friend here.
Block aggressively. Each piece should be blocked to measurements before assembly. This makes seaming much easier and ensures everything lines up properly.
Don’t skip the cotton tape. That stabilizing tape at the waist prevents the dress from stretching out and losing its shape over time. It’s a small step that makes a big difference in wearability.
Make extra roses. The pattern calls for 36, but depending on your blocked flower diameter, you may want a few more for a dense, lush border effect.
Who Will Love This Pattern
This dress is perfect for confident crocheters looking for a statement project. It requires patience and attention to detail, but the techniques themselves are well within reach for anyone comfortable with filet crochet and basic garment construction.
Rose Pearl would make an unforgettable piece for a garden party, summer wedding, or special celebration. The romantic aesthetic pairs beautifully with vintage-inspired accessories, and the fitted silhouette flatters while the openwork keeps things breathable.
Thank you so much for choosing this pattern for your next project. Rose Pearl is the kind of dress that becomes a treasured wardrobe piece, and watching her come together stitch by stitch is genuinely rewarding. If you make this dress, please share your photos on Instagram or Facebook. Seeing your finished creations is always the best part.
If this pattern caught your eye, save it to your Pinterest boards so you can find it when you’re ready to start. And if you do make Rose Pearl, leave a comment below. Your notes and photos help other makers so much, and there’s nothing better than celebrating finished projects together.
Want a Quick & Easy Printable Version?
Get a clean, beautifully formatted PDF of this pattern — easy to follow step by step, ready to print or save on any device. No scrolling, no distractions, just the pattern.
Get the Printable PDF →