Looking for a quick handmade gift that screams beach vibes? This ocean charm bracelet set is perfect for summer birthdays, beach vacations, or treating yourself to something cute and coastal. Using basic crochet stitches and crochet thread, you can whip up these adorable starfish, seashell, and seahorse charms in an afternoon. They work up fast, use tiny amounts of thread, and make fantastic friendship bracelets or party favors. This beginner friendly crochet pattern walks you through every step to create all three charming designs.
Why You Will Love This Ocean Charm Bracelet Crochet Pattern
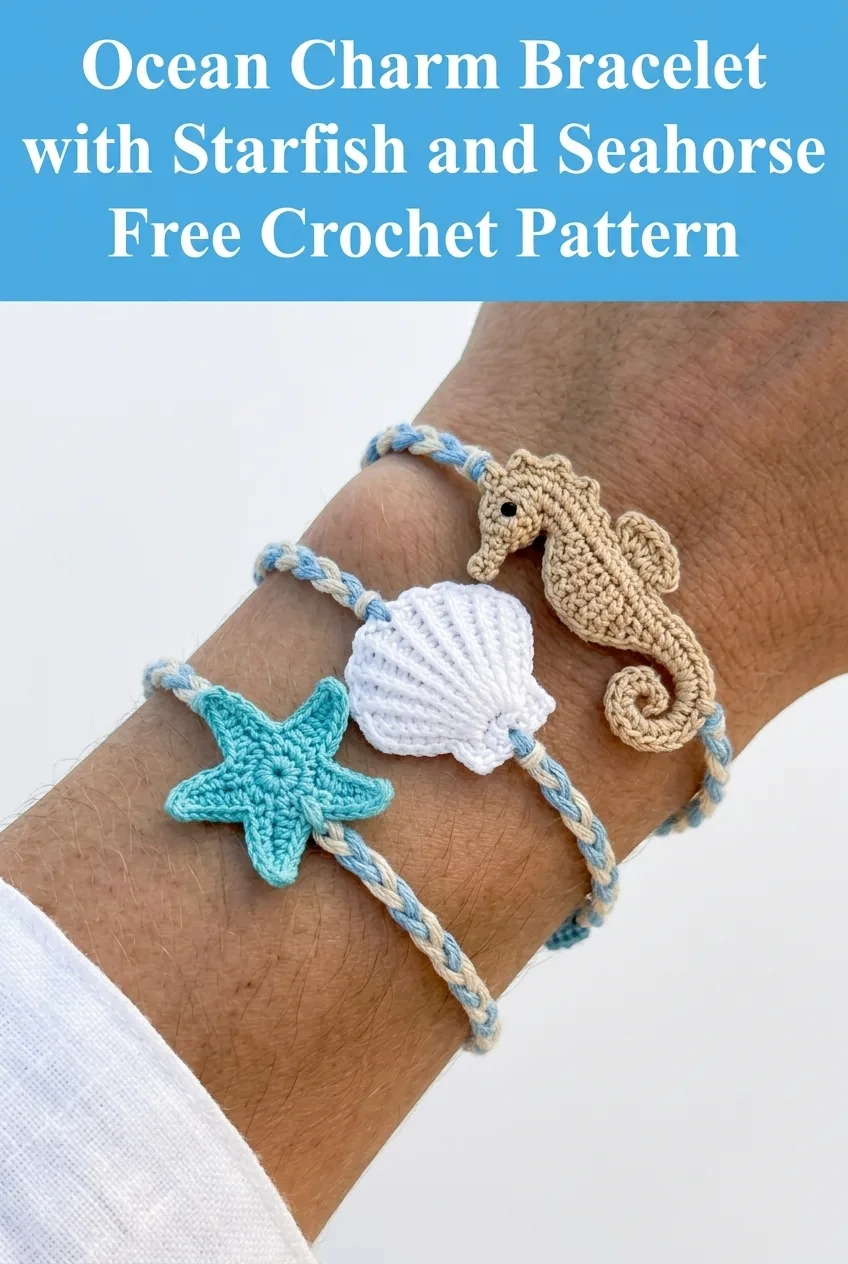
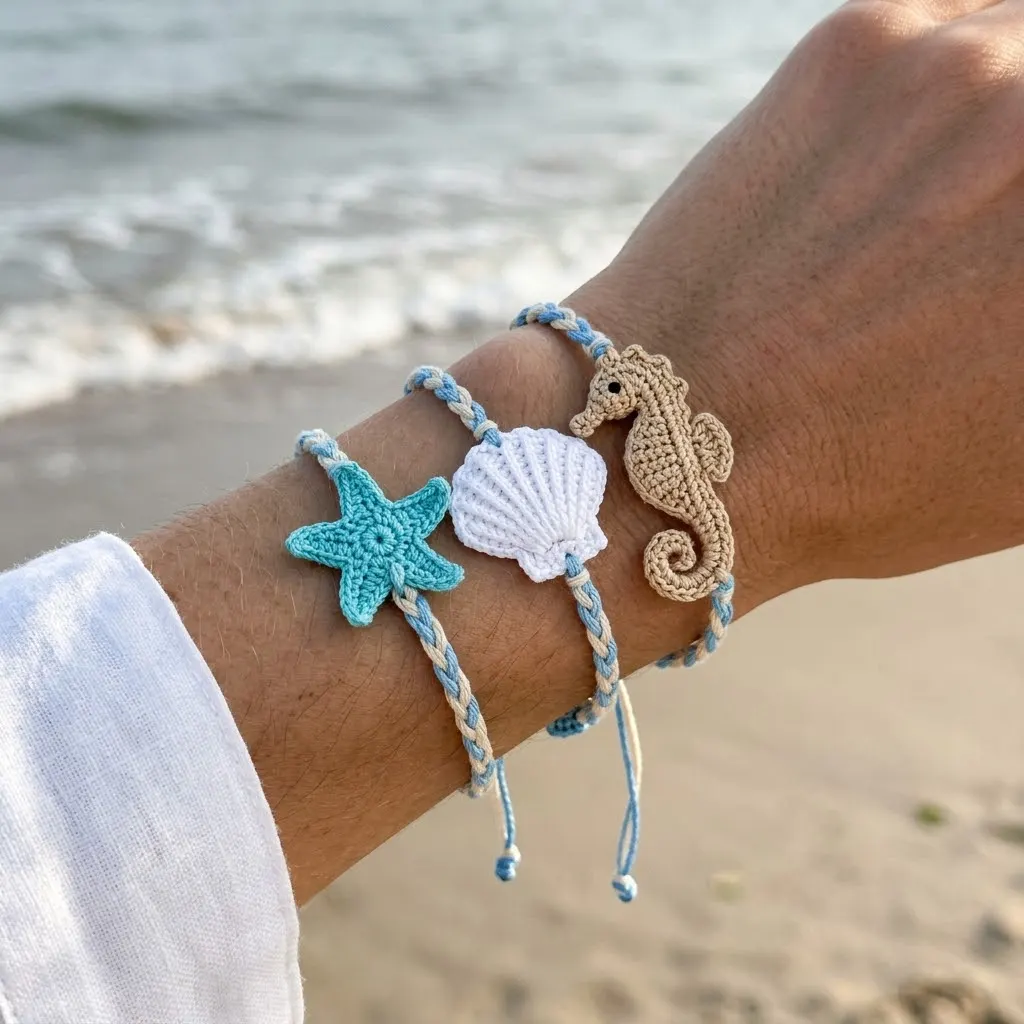
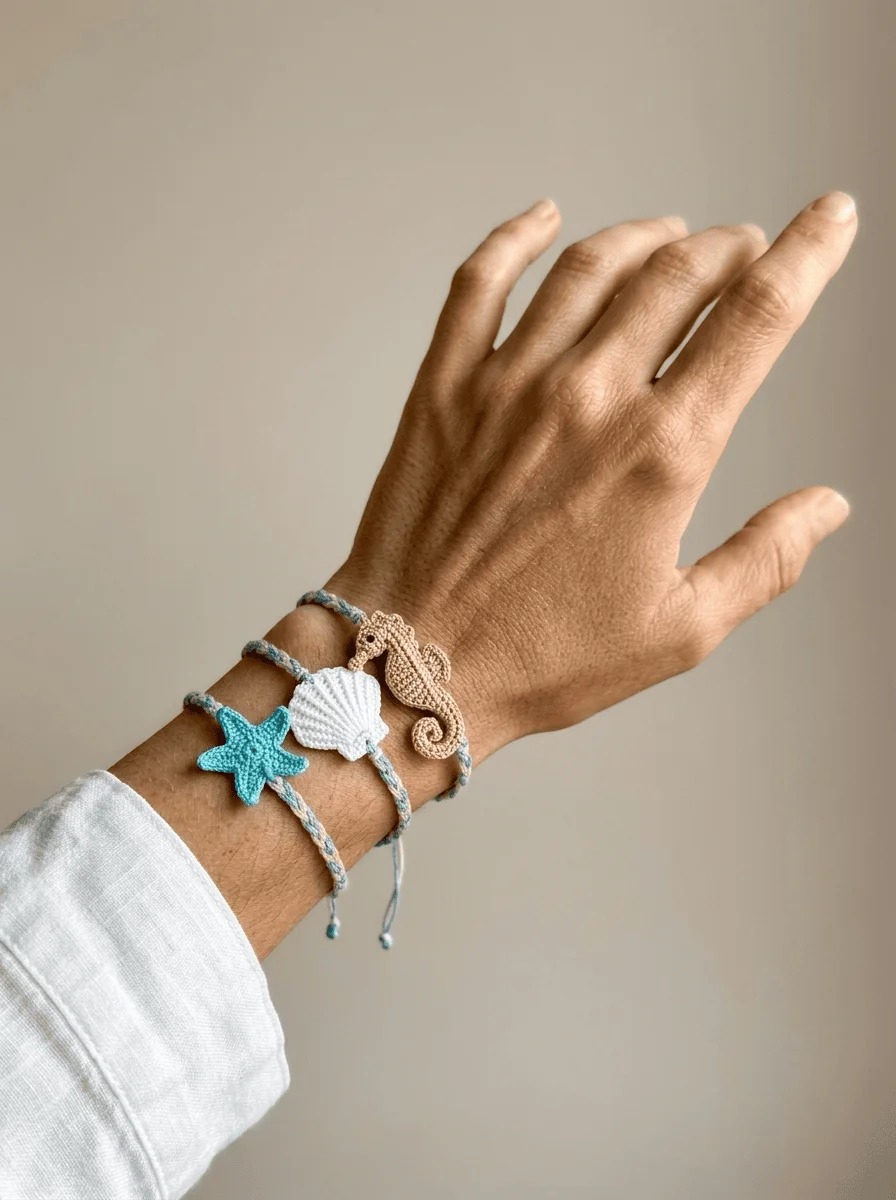
These tiny crocheted charms pack so much personality into such small pieces. Each bracelet features an adjustable sliding knot closure, so one size fits most wrists. The charms themselves measure roughly one inch, making them delicate without being too fragile for everyday wear.
What makes this crochet tutorial special is the variety. You get three distinct ocean themed designs in one pattern. The starfish uses a simple five point construction worked in the round. The seashell creates those iconic ridged lines using surface slip stitches. The seahorse is a bit more advanced but still very achievable with its clever shaping and curled tail.
These bracelets also make wonderful stash busters. Each charm uses less than 10 yards of crochet thread. If you have leftover thread from doily projects or other small makes, this is the perfect way to use it up.
Materials Needed for Your Ocean Bracelet Set
Yarn/Thread:
Hook:
Notions:
Gauge and Finished Measurements
Gauge is not critical for this project, but you want a tight fabric so the charms hold their shape. Work tighter than you normally would.
Finished charm sizes:
Finished bracelet length: Adjustable from 6 to 9 inches using sliding knot closure
Skill Level
Intermediate beginner to intermediate. The starfish and seashell are great for confident beginners who have mastered basic stitches and working in the round. The seahorse requires a bit more attention to shaping but is absolutely doable if you take it slowly.
Abbreviations and Stitch Definitions
Before we dive into the step by step instructions, let me break down every stitch you will need.
Ch = Chain. Wrap yarn over hook, pull through loop on hook. This creates the foundation for most crochet work.
Sl st = Slip stitch. Insert hook into stitch, yarn over, pull through both the stitch and the loop on your hook in one motion. Used for joining rounds and surface decoration.
Sc = Single crochet. Insert hook into stitch, yarn over, pull up a loop (2 loops on hook), yarn over, pull through both loops. This is your basic building block stitch.
Inc = Increase. Work 2 single crochet stitches into the same stitch. This adds one stitch to your count.
Dec = Decrease (invisible decrease preferred). Insert hook through front loops only of next 2 stitches, yarn over, pull through both front loops, yarn over, pull through both loops on hook. This removes one stitch cleanly.
Hdc = Half double crochet. Yarn over, insert hook into stitch, yarn over, pull up a loop (3 loops on hook), yarn over, pull through all 3 loops.
Dc = Double crochet. Yarn over, insert hook into stitch, yarn over, pull up a loop (3 loops on hook), yarn over, pull through 2 loops, yarn over, pull through remaining 2 loops.
FLO = Front loop only. Work into just the front loop of the stitch instead of both loops.
BLO = Back loop only. Work into just the back loop of the stitch.
Magic ring = An adjustable starting ring that pulls closed completely. Make a loop with your thread, insert hook, pull up a loop, chain 1, then work your first round stitches into the ring. Pull the tail to close the center hole.
Starfish Charm Crochet Pattern
The starfish is worked from the center outward. Each arm is created by working directly onto the central ring, then building outward.
Center Ring
Round 1: Using aqua thread, make a magic ring. Ch 1, work 5 sc into the ring. Do not join. Pull the ring closed tightly. (5 sc)
First Arm
Row 1: Ch 4, turn.
Row 2: Starting in 2nd ch from hook, sc in next 3 ch. Sl st into the same sc from Round 1 where you started the chain. (3 sc plus sl st)
You have now completed one starfish arm.
Remaining Arms (make 4 more)
Arm 2 through 5: Sl st into the next sc of the center ring. Ch 4, turn. Starting in 2nd ch from hook, sc in next 3 ch. Sl st into the same center sc where you began this arm.
Repeat for each of the 5 center stitches until you have 5 complete arms radiating from the center.
Finishing the Starfish
Fasten off, leaving a 6 inch tail for attaching to the bracelet cord. Weave in the starting tail at the center back. The starfish should lay flat with five even points.
If your starfish curls, try blocking it with a light mist of water and pinning it flat to dry. You can also use fabric stiffener for a crisper finish.
Seashell Charm Crochet Pattern
This scallop shell is worked flat in rows, then surface slip stitches create the signature ridged texture.
Shell Base
Row 1: Using white thread, ch 2. Work 3 sc in 2nd ch from hook, turn. (3 sc)
Row 2: Ch 1, inc in first st, sc in next st, inc in last st, turn. (5 sc)
Row 3: Ch 1, inc in first st, sc in next 3 sts, inc in last st, turn. (7 sc)
Row 4: Ch 1, inc in first st, sc in next 5 sts, inc in last st, turn. (9 sc)
Row 5: Ch 1, inc in first st, sc in next 7 sts, inc in last st, turn. (11 sc)
Row 6: Ch 1, inc in first st, sc in next 9 sts, inc in last st, turn. (13 sc)
Row 7: Ch 1, sc in each st across. (13 sc)
Scalloped Edge
Working along the top edge of Row 7:
Scallop round: Sl st in first st, *skip 1 st, 5 dc in next st (this creates a shell or scallop), skip 1 st, sl st in next st.* Repeat from * across. You should have approximately 3 scallops along the top edge.
Fasten off.
Adding the Ridge Lines
Thread a tapestry needle with a long strand of white thread. Starting at the bottom point of the shell, use surface slip stitches or simple straight stitches to create 5 to 7 vertical lines radiating from the point upward to the scalloped edge.
To make surface slip stitches: Insert your hook from front to back between stitches, pull up a loop, insert hook in the next spot along your line, pull up a loop through the fabric and through the loop on your hook. Continue up each ridge line.
Space these lines evenly across the shell face. They create that classic seashell look.
Finishing the Seashell
Fasten off all threads and weave in ends. Leave one tail at the bottom point for attaching to the bracelet cord.
Seahorse Charm Crochet Pattern
The seahorse is the most detailed of the three charms. Take your time with this one. It is worked in continuous rounds with strategic increases and decreases to create the curved body shape.
Head
Round 1: Using tan thread, make a magic ring. Work 6 sc into the ring. Do not join, work in continuous spiral. (6 sc)
Round 2: Inc in each st around. (12 sc)
Round 3: Sc in each st around. (12 sc)
Round 4: *Sc in next st, dec* repeat 4 times. (8 sc)
Snout
Row 1: Ch 5. Starting in 2nd ch from hook, sl st, sc, sc, sl st. Fasten off, leaving a tail. Sew the snout to the front of the head at Rounds 2 and 3.
Body
Reattach thread to the head at Round 4 if you fastened off for the snout, or continue working.
Rounds 5 through 7: Sc in each st around. (8 sc)
Round 8: *Sc in next 2 sts, dec* repeat twice. (6 sc)
Rounds 9 through 12: Sc in each st around. (6 sc)
Stuff the head and upper body lightly with a tiny amount of fiberfill. Do not overstuff. You want it slightly firm but still flexible.
Tail
Round 13: *Sc, dec* repeat twice. (4 sc)
Rounds 14 through 18: Sc in each st around. (4 sc)
The tail should naturally curl as you work these rounds. If it does not, you can shape it after finishing.
Fasten off. Weave the tail end inside the curled tail section.
Dorsal Fin
Reattach thread to the back of the seahorse body around Rounds 6 through 10.
Fin: Ch 1, work 5 sl st along the back of the body, working through the surface of the stitches. As you work each sl st, add a ch 2 between each one to create small spiky fins.
Fasten off and weave in ends.
Eye
Sew a tiny black seed bead to the side of the head, or embroider a French knot using black thread.
Finishing the Seahorse
Gently curl the tail into a spiral shape. You can use a tiny drop of fabric glue inside the curl to help it hold if needed. Leave a tail of thread at the top of the head for attaching to the bracelet cord.
How to Make the Adjustable Braided Bracelet Cord
Each bracelet uses a simple braided cord with sliding knot closures.
Braiding the Cord
Cut 3 strands of crochet thread, each approximately 24 inches long. You can use two colors as shown in the photos, combining light blue and cream for a beach inspired look.
Tie the strands together with a small knot at one end. Braid tightly until the braid measures approximately 12 inches. Tie off the other end.
Attaching the Charm
Fold the braided cord in half. Thread the folded loop through the charm’s attachment point. Pull the loose ends through the loop and pull snug. Your charm is now centered on the bracelet.
Creating Sliding Knot Closures
This is the clever part that makes the bracelet adjustable.
First sliding knot: Take the cord ends on the right side. Create a loop, wrap the end around both cords 3 to 4 times, then thread the end back through the loop. Pull tight but leave the knot loose enough to slide.
Second sliding knot: Repeat on the left side, wrapping in the opposite direction.
Trim the excess cord, leaving about half an inch. You can add a small knot or bead to each tail end for decoration.
To adjust the bracelet, slide both knots toward each other to make it larger, or away from each other to make it smaller.
Styling Tips for Your Ocean Charm Bracelets
These bracelets look adorable worn alone, but they are even better stacked together. Wear all three for full ocean vibes, or gift them as a matching set to friends.
The neutral colors shown work with almost any outfit, but feel free to experiment. Try coral pink for the starfish, pale purple for the seashell, or add sparkle with metallic thread accents.
For extra durability, especially if these will be worn daily or given to children, apply a light coat of fabric stiffener to the charms and let them dry completely before attaching to the cords.
Troubleshooting Common Issues
Charms are too floppy: Your tension may be too loose. Try going down a hook size and working tighter. Fabric stiffener also helps.
Starfish arms are uneven: Block your starfish by pinning each arm in place while damp, then let it dry completely.
Seahorse will not curl: Gently shape the tail while the piece is slightly damp. You can also insert a tiny piece of wire into the tail before closing for more control, though this is optional.
Sliding knots slip too easily: Wrap the cord more times, 4 to 5 wraps instead of 3, for more grip.
More Reasons to Love This Crochet Pattern
This ocean charm bracelet set is perfect for beach weddings, mermaid themed parties, summer camps, and vacation souvenirs. Make a batch ahead of time and package them in small organza bags for easy gifting.
Because they use such small amounts of thread, you can experiment with colors without committing to a whole project. Try ombre effects, variegated threads, or even glow in the dark thread for extra fun.
I hope you love making these sweet little ocean charms as much as I loved designing them. They really are the perfect portable project for beach days, road trips, or anytime you want something quick and satisfying to work on.
If you make this ocean charm bracelet set, I would absolutely love to see your creations. Tag me on Instagram or share a photo in my Facebook group. Seeing your finished projects is honestly the best part of sharing patterns.
Save this pattern to your Pinterest boards so you can find it whenever the mood for beachy crochet strikes. And please drop a comment below if you give these a try. I read every single one and love hearing how your projects turn out.
