Let me guess. You saw this bag and thought, "That braided texture looks way too complicated for me." I get it. Those woven, interlocking stitches look like they require some kind of advanced crochet wizardry. But here’s the truth: if you can work a basic single crochet and follow a simple repeating pattern, you can absolutely make this bag. The braided effect comes from a technique called the basket weave stitch, and once you understand the rhythm of it, your hands will take over and you’ll be amazed at how quickly this works up. Whether you’ve been crocheting for years or you’re still building confidence with textured stitches, this chunky braided crossbody bag is completely within your reach.
Why This Crochet Bag Pattern Works So Well
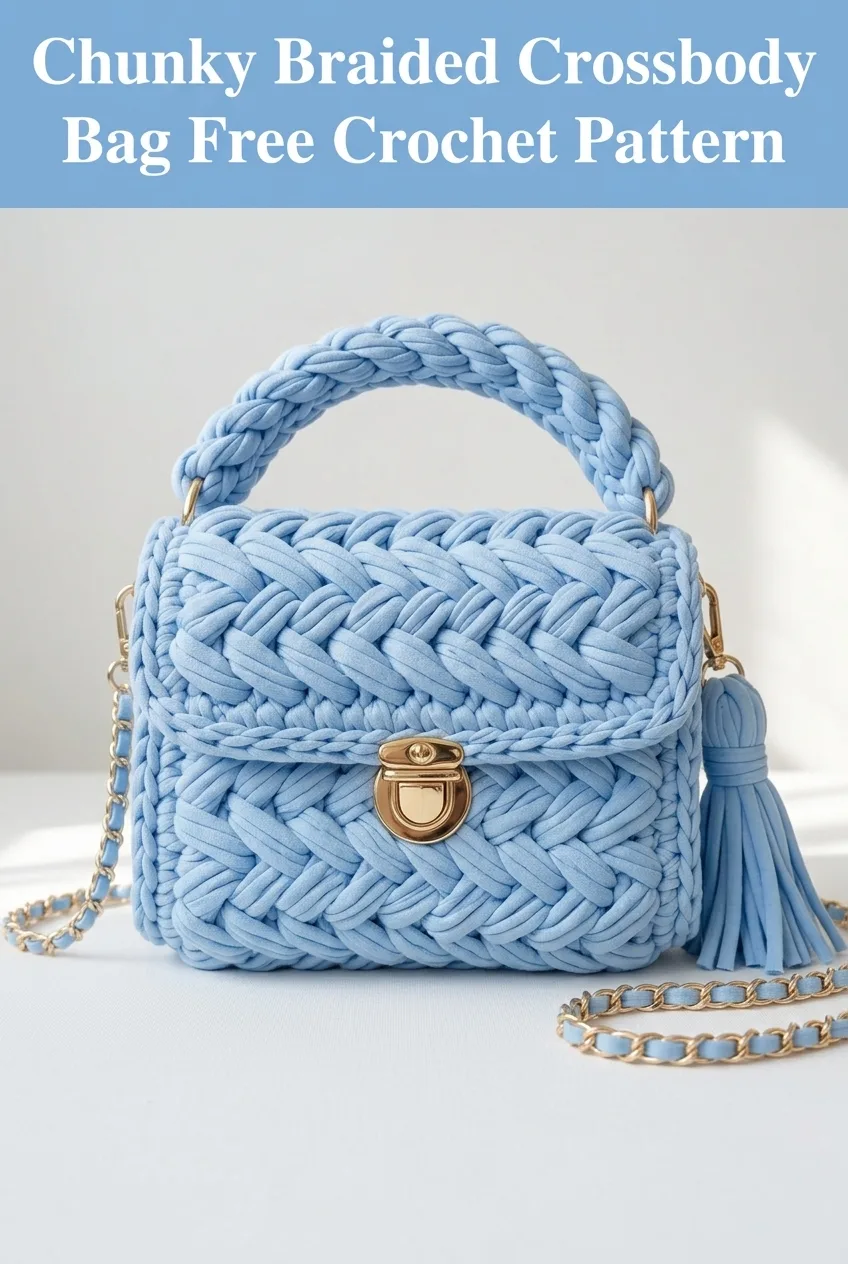
This chunky braided crossbody bag crochet pattern creates a structured, high-end looking accessory that rivals anything you’d find in a boutique. The secret is the combination of t-shirt yarn (also called tube yarn or trapillo) and the basket weave texture. The thick yarn makes every stitch pop, and because you’re working with such chunky material, the whole bag comes together in just a few hours.
The finished bag measures approximately 6 inches wide by 5 inches tall by 3 inches deep, making it the perfect size for your phone, wallet, keys, and a few essentials. It features a structured boxy shape, a braided top handle, a fold-over flap with a turn-lock clasp, and a decorative tassel. The chain strap with woven yarn threading gives it that designer look everyone will ask about.
This is an intermediate level project, but I’ve broken every step down so beginners who want to challenge themselves can follow along too.
Materials You’ll Need
Before you start, gather everything so you can work without interruptions. Trust me, there’s nothing worse than getting into a rhythm and realizing you’re missing a key supply.
Yarn:
Hook:
Hardware and Notions:
For the Tassel:
Abbreviations and Stitch Definitions
Let me walk you through every stitch you’ll use. Read this section before starting so nothing surprises you mid-project.
ch = chain: Wrap yarn over hook, pull through loop on hook. This creates your foundation.
sl st = slip stitch: Insert hook, yarn over, pull through stitch AND loop on hook in one motion. Used for joining and invisible movement.
sc = single crochet: Insert hook into stitch, yarn over, pull up a loop (2 loops on hook), yarn over, pull through both loops. One of the most basic stitches.
FPdc = front post double crochet: Yarn over, insert hook from front to back around the POST of the stitch below (not into the top), yarn over, pull up loop, complete as regular double crochet. This creates raised texture on the front.
BPdc = back post double crochet: Yarn over, insert hook from back to front around the POST of the stitch below, yarn over, pull up loop, complete as regular double crochet. This creates raised texture on the back.
dc = double crochet: Yarn over, insert hook, yarn over, pull up loop (3 loops on hook), yarn over, pull through 2 loops, yarn over, pull through remaining 2 loops.
The basket weave stitch alternates between FPdc and BPdc in groups to create that woven, braided appearance. Don’t worry, I’ll guide you through exactly when to switch.
How to Crochet the Chunky Braided Crossbody Bag
The Base
The base creates the rectangular bottom of your bag. We’ll work in rows first, then join to work in the round.
Row 1: Ch 15. Sc in 2nd ch from hook and in each ch across. (14 sc)
Row 2: Ch 1, turn. Sc in each st across. (14 sc)
Rows 3-8: Repeat Row 2. (14 sc each row)
You should now have a rectangle approximately 6 inches by 3 inches. This forms the sturdy bottom of your bag.
The Body
Now we’ll pick up stitches around the entire base and work upward in the round. This is where the magic happens.
Round 1 (Setup Round): Ch 1, do not turn. Working along the short edge, sc 8 sts evenly across. Rotate to work along the long edge (your starting chain), sc 14 sts across. Rotate to work along the next short edge, sc 8 sts evenly. Rotate to work along the remaining long edge (Row 8), sc 14 sts across. Sl st to first sc to join. (44 sc total)
Place a stitch marker at the join. This marks the start of your rounds.
Round 2 (Foundation for Basket Weave): Ch 2 (counts as dc here and throughout). Dc in each st around. Sl st to top of ch-2 to join. (44 dc)
Round 3 (Begin Basket Weave): Ch 2. *FPdc around each of the next 4 sts, BPdc around each of the next 4 sts.* Repeat from * to * around. Sl st to top of ch-2 to join. (44 sts)
This round establishes your basket weave pattern. You’re working 4 front post stitches followed by 4 back post stitches all the way around.
Round 4: Ch 2. *FPdc around each of the next 4 FPdc from previous round, BPdc around each of the next 4 BPdc.* Repeat from * to * around. Sl st to join. (44 sts)
Round 5 (Switch the Pattern): Ch 2. *BPdc around each of the next 4 sts, FPdc around each of the next 4 sts.* Repeat from * to * around. Sl st to join. (44 sts)
Here’s the key to the braided look: you’ve just switched which stitches get front posts and which get back posts. This creates the woven illusion.
Round 6: Repeat Round 5. (44 sts)
Rounds 7-8: Repeat Rounds 3-4 (FPdc first, then BPdc).
Rounds 9-10: Repeat Rounds 5-6 (BPdc first, then FPdc).
After Round 10, your bag body should measure approximately 4.5 to 5 inches tall. The basket weave texture should be clearly visible, creating that beautiful braided appearance.
Attaching the D-Rings
Before closing the top, we need to attach the D-rings that will hold your chain strap.
Round 11: Ch 1. Sc in each of the first 11 sts. Hold one D-ring against your work and sc around the straight edge of the D-ring while also working into the next stitch (this anchors it). Sc in next 20 sts. Attach second D-ring the same way. Sc in remaining sts. Sl st to join. (44 sc)
The D-rings should sit at opposite sides of the bag, centered on the short edges.
The Flap
The flap folds over the front of your bag. We’ll work in rows, attached to the back panel.
Identify the back of your bag (the side without D-rings centered in front of you). Count to find the center 14 stitches along the back edge.
Row 1: Join yarn to the first of these 14 center stitches. Ch 2, dc in same st and in each of the next 13 sts. (14 dc)
Row 2: Ch 2, turn. *FPdc around next 4 sts, BPdc around next 4 sts.* Repeat once more, ending with FPdc around last 2 sts. (14 sts)
Row 3: Ch 2, turn. Work in established basket weave pattern. (14 sts)
Row 4: Ch 2, turn. Switch pattern (if you worked FPdc, now work BPdc and vice versa). (14 sts)
Row 5: Repeat Row 4. (14 sts)
Row 6 (Decrease Row): Ch 2, turn. Skip first st, work in pattern to last 2 sts, skip next st, dc in last st. (12 sts)
Row 7: Ch 1, turn. Sc evenly around entire flap edge, working 3 sc in each corner to create a smooth curve. Fasten off.
The Braided Handle
The top handle gives this bag its structured, polished look. We’ll create three strands and braid them together.
Make 3 strands:
Ch 35. Sl st in 2nd ch from hook and in each ch across. Fasten off, leaving a 6-inch tail.
Repeat twice more so you have 3 identical strands.
Braid the strands: Holding all three strands together at one end, create a simple three-strand braid. Keep tension firm but not too tight.
Attach the handle: Position the braided handle on top of your bag, arching between the two short sides. Using your yarn needle and matching yarn, whip stitch each end securely to the inside top edge of the bag, approximately 1 inch from each D-ring.
The Tassel
The tassel adds that finishing designer touch.
Cut 12 strands of t-shirt yarn, each approximately 8 inches long. Fold the bundle in half. Thread a separate 10-inch strand through the fold and tie tightly, leaving long ends for attaching.
About 1 inch down from the fold, wrap another strand around the bundle several times and tie securely. Trim the bottom ends to create an even tassel, approximately 3 to 4 inches long.
Attach the tassel to the front corner of your flap using the long strands at the top, or attach it to a jump ring first for easy removal.
Installing the Hardware
Turn-lock clasp: Position the decorative front piece centered on your flap, approximately 1 inch from the bottom edge. Mark the prong placement. Use sharp scissors to carefully cut small holes through the yarn. Push prongs through and bend flat on the inside.
Position the back piece (the part that turns) on the front of your bag body, directly below where the front piece sits when flap is closed. Install the same way.
Chain strap: Simply clip the lobster clasps of your chain strap onto each D-ring. If your chain has open links, you can weave a strand of t-shirt yarn through the links for a coordinated look.
Finishing Tips for Your Crossbody Bag
Take a moment to weave in all ends securely. With t-shirt yarn, I recommend weaving through at least 3 to 4 inches of stitches to prevent unraveling.
If your bag feels floppy, you can cut a piece of plastic canvas or heavy cardboard to fit inside the base for extra structure. This is completely optional.
Block your bag by stuffing it with tissue paper and letting it sit overnight. This helps the basket weave texture settle into place.
Customization Ideas
This crochet bag tutorial works beautifully with personal touches:
Care Instructions
T-shirt yarn is typically machine washable. Remove all hardware first. Place the bag in a mesh laundry bag and wash on gentle cycle with cold water. Reshape while damp and air dry flat. Never put in the dryer, as the yarn may shrink or lose its shape.
You Did It!
I hope this chunky braided crossbody bag crochet pattern has shown you that stunning textured projects are absolutely achievable. That basket weave stitch that looked so intimidating? You’ve now mastered it. Every time you carry this bag, you’ll get compliments and get to say those magic words: "Thanks, I made it myself."
Thank you so much for choosing to make this project. It truly means the world to me when you trust my patterns for your creative time. I would absolutely love to see your finished bag! Tag me on Instagram or share a photo in my Facebook group so I can cheer you on.
If this pattern inspired you, go ahead and pin it to your favorite Pinterest board so you can find it whenever you’re ready to make another one. And please drop a comment below if you give this bag a try. I read every single one and love hearing about your color choices, your gift-giving plans, or even the little challenges you worked through. Happy hooking!
