Last summer, I found myself standing in front of my closet with that familiar "I have nothing to wear" feeling. You know the one. I had plenty of clothes, but nothing felt *right* for the garden party I was heading to. I wanted something romantic, something that felt special, something that would make me feel like the main character in my own story. So I did what any yarn-obsessed crafter would do. I grabbed my hooks and my favorite dusty rose yarn, and I designed exactly what I wanted. This feminine peplum top with those dreamy balloon sleeves and delicate lace trim became my new favorite piece, and now I’m sharing every single stitch with you.
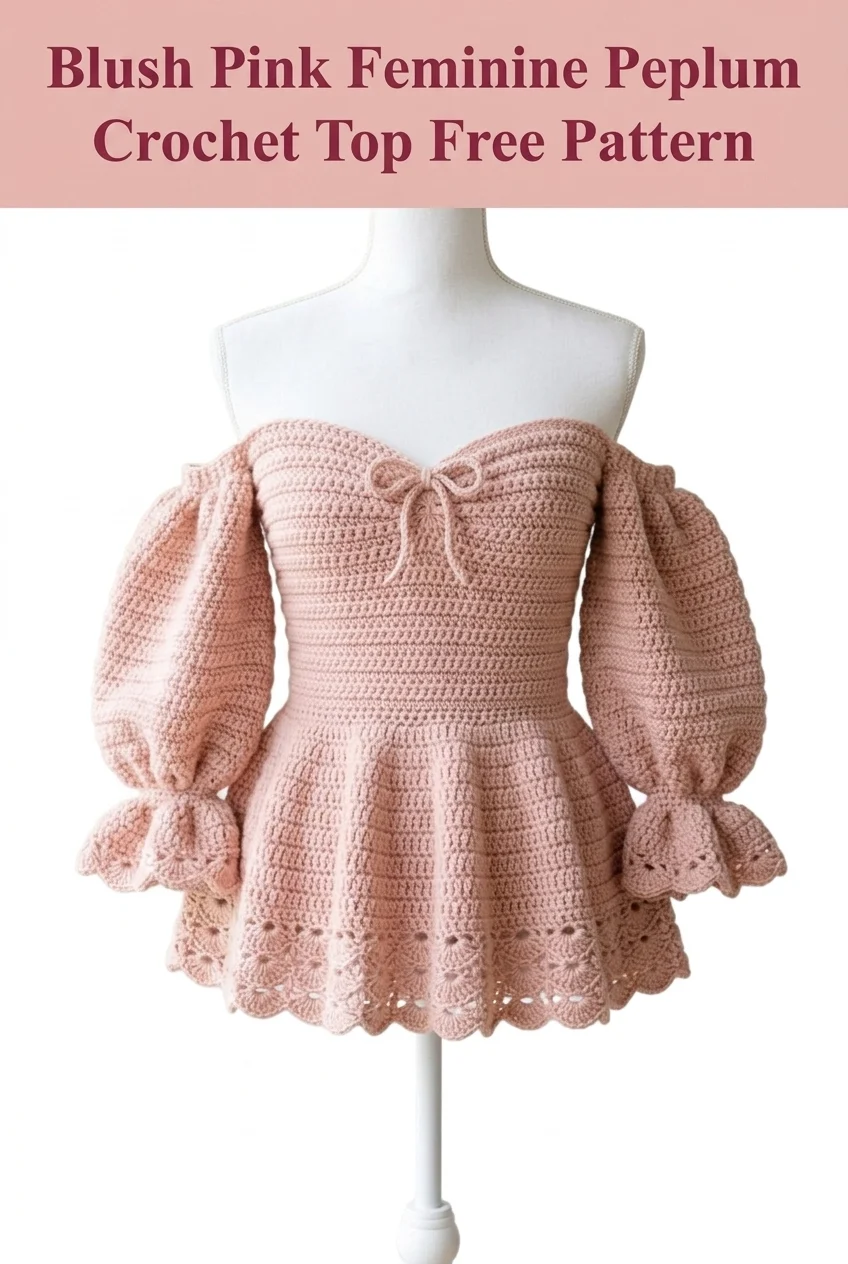
This crochet top pattern combines romantic off-the-shoulder styling with a flattering sweetheart neckline and the most gorgeous statement sleeves. The fitted bodice flows into a flirty peplum skirt, finished with a shell lace border that catches the light beautifully. It looks incredibly intricate, but I promise the construction is more straightforward than you might think.
Why You’ll Love This Crochet Peplum Top Pattern
This design hits all the right notes for anyone who wants a statement garment without overwhelming difficulty. The bodice uses basic stitches worked in rows, which means no complicated shaping math. The balloon sleeves are worked separately and attached, giving you complete control over the fit. And that lace border? It’s a simple shell repeat that looks far more advanced than it actually is.
Perfect for: Date nights, garden parties, bridal showers, summer weddings, or any occasion where you want to feel utterly feminine.
Skill level: Confident intermediate. If you can work basic stitches, increase, decrease, and follow a stitch pattern, you can absolutely make this top.
Materials You’ll Need
Yarn:
Recommended yarn qualities: Cotton, cotton blends, bamboo blends, or Tencel blends work beautifully. Avoid anything too fuzzy as you want those stitches to pop.
Hook:
Notions:
Gauge: 18 stitches and 20 rows = 4 inches in half double crochet worked flat. Please check your gauge! This garment needs to fit properly.
Size Information
This pattern is written for size Small with a finished bust measurement of approximately 32 to 34 inches. The fitted bodice should sit snugly while the peplum flares freely.
To adjust sizing: Add or subtract stitches in multiples of 4 for the bodice width. Add or subtract rows for length adjustments.
Abbreviations and Stitch Definitions
Before we begin, let me walk you through every stitch you’ll encounter. I’ll explain each one so there’s no confusion.
Ch = Chain. Wrap yarn over hook, pull through the loop on your hook. This creates the foundation for your work.
Sl st = Slip stitch. Insert hook, yarn over, pull through both the stitch and the loop on your hook in one motion. Used for joining and moving across stitches invisibly.
Sc = Single crochet. Insert hook into stitch, yarn over and pull up a loop (2 loops on hook), yarn over and pull through both loops. The shortest basic stitch.
Hdc = Half double crochet. Yarn over, insert hook into stitch, yarn over and pull up a loop (3 loops on hook), yarn over and pull through all 3 loops at once. Creates a medium-height stitch with nice drape.
Dc = Double crochet. Yarn over, insert hook into stitch, yarn over and pull up a loop (3 loops on hook), yarn over and pull through 2 loops (2 loops remain), yarn over and pull through remaining 2 loops. Taller than hdc.
Hdc2tog = Half double crochet two together (decrease). Yarn over, insert hook into first stitch, pull up a loop. Yarn over, insert hook into next stitch, pull up a loop. You now have 5 loops on your hook. Yarn over and pull through all 5 loops. This turns 2 stitches into 1.
Shell = A decorative grouping of stitches worked into one stitch. For this pattern, a shell is 5 dc worked into the same stitch.
Sk = Skip. Pass over the indicated number of stitches without working into them.
The Pattern: Step by Step Crochet Tutorial

Back Bodice Panel
This piece creates the back of your fitted bodice. We’ll work from the bottom up.
Foundation: Ch 73.
Row 1: Hdc in 3rd ch from hook (the skipped chains count as your first hdc), hdc in each ch across. Turn. (72 hdc)
Rows 2 through 28: Ch 2 (counts as first hdc here and throughout), hdc in each st across. Turn. (72 hdc)
*Note: If you want a longer bodice, add more rows here. Each row adds approximately 1/2 inch.*
Sweetheart Shaping (Upper Bodice):
Row 29: Ch 2, hdc in next 16 sts, hdc2tog, hdc in next 32 sts, hdc2tog, hdc in last 17 sts. Turn. (70 sts)
Row 30: Ch 2, hdc in next 15 sts, hdc2tog, hdc in next 32 sts, hdc2tog, hdc in last 16 sts. Turn. (68 sts)
Row 31: Ch 2, hdc in next 14 sts, hdc2tog, hdc in next 32 sts, hdc2tog, hdc in last 15 sts. Turn. (66 sts)
Row 32: Ch 2, hdc in next 13 sts, hdc2tog, hdc in next 32 sts, hdc2tog, hdc in last 14 sts. Turn. (64 sts)
Rows 33 through 36: Ch 2, hdc in each st across. Turn. (64 sts)
Fasten off and weave in ends.
Front Bodice Panel
Work the same as the Back Bodice Panel through Row 28.
Sweetheart Neckline Shaping:
The front needs a deeper curve for that beautiful sweetheart shape.
Row 29: Ch 2, hdc in next 16 sts, hdc2tog twice, hdc in next 28 sts, hdc2tog twice, hdc in last 17 sts. Turn. (68 sts)
Row 30: Ch 2, hdc in next 14 sts, hdc2tog twice, hdc in next 28 sts, hdc2tog twice, hdc in last 15 sts. Turn. (64 sts)
Row 31: Ch 2, hdc in next 12 sts, hdc2tog twice, hdc in next 28 sts, hdc2tog twice, hdc in last 13 sts. Turn. (60 sts)
Row 32: Ch 2, hdc in next 10 sts, hdc2tog, turn and work this side only. (11 sts)
Row 33: Ch 2, hdc2tog, hdc in remaining sts. Turn. (10 sts)
Row 34: Ch 2, hdc in each st to last 2 sts, hdc2tog. Turn. (9 sts)
Fasten off.
Rejoin yarn at center front, skip center 24 sts for neckline opening, work opposite shoulder to match.
Adding the Bow Tie:
Ch 120, fasten off. Thread this chain through the center front at row 31, creating a tie that cinches the sweetheart neckline together. Tie in a bow when wearing.
Peplum Skirt
The peplum is worked directly onto the bottom edge of the joined bodice. This creates that beautiful flared silhouette.
With right side facing, join yarn at side seam along the foundation chain edge of the bodice.
Round 1: Ch 2, hdc evenly around the entire bottom edge, working approximately 144 hdc total (72 front + 72 back). Sl st to join. (144 hdc)
Round 2: Ch 2, *hdc in next 5 sts, 2 hdc in next st.* Repeat from * around. Sl st to join. (168 hdc)
Round 3: Ch 2, hdc in each st around. Sl st to join. (168 hdc)
Round 4: Ch 2, *hdc in next 6 sts, 2 hdc in next st.* Repeat from * around. Sl st to join. (192 hdc)
Rounds 5 through 10: Ch 2, hdc in each st around. Sl st to join. (192 hdc)
Round 11: Ch 2, *hdc in next 7 sts, 2 hdc in next st.* Repeat from * around. Sl st to join. (216 hdc)
Rounds 12 through 15: Ch 2, hdc in each st around. Sl st to join. (216 hdc)
Shell Lace Border for Peplum
This is where the magic happens! That gorgeous scalloped edge is easier than it looks.
Round 16: Ch 1, sc in same st, *sk 2 sts, 5 dc in next st (shell made), sk 2 sts, sc in next st.* Repeat from * around. Sl st to join first sc. (36 shells)
Round 17: Ch 3 (counts as dc), 2 dc in same st (half shell), *sc in center dc of shell below, 5 dc in sc below.* Repeat from * around, ending with 2 dc in first st to complete final shell. Sl st to top of ch 3 to join.
Fasten off and weave in ends.
Balloon Sleeves (Make 2)
These dramatic sleeves are the showstopper of this design. They’re worked in the round from the cuff up.
Cuff:
Ch 36, being careful not to twist, sl st to first ch to form a ring.
Round 1: Ch 2, hdc in each ch around. Sl st to join. (36 hdc)
Rounds 2 through 4: Ch 2, hdc in each st around. Sl st to join. (36 hdc)
Round 5 (Ruffle Increase): Ch 2, *hdc in next st, 2 hdc in next st.* Repeat from * around. Sl st to join. (54 hdc)
Round 6: Ch 2, *hdc in next 2 sts, 2 hdc in next st.* Repeat from * around. Sl st to join. (72 hdc)
Rounds 7 through 25: Ch 2, hdc in each st around. Sl st to join. (72 hdc)
*This creates the balloon portion of the sleeve.*
Shoulder Decreases:
Round 26: Ch 2, *hdc in next 4 sts, hdc2tog.* Repeat from * around. Sl st to join. (60 hdc)
Round 27: Ch 2, *hdc in next 3 sts, hdc2tog.* Repeat from * around. Sl st to join. (48 hdc)
Round 28: Ch 2, hdc in each st around. Sl st to join. (48 hdc)
Fasten off, leaving a long tail for attaching.
Sleeve Cuff Lace Border
Join yarn at cuff edge.
Round 1: Ch 1, sc in same st, *sk 2 sts, 5 dc in next st, sk 2 sts, sc in next st.* Repeat from * around. Sl st to join. (6 shells)
Fasten off and weave in ends.
Assembly Instructions
Now comes the satisfying part where your pieces become a beautiful garment!
1. Seam the bodice: Place front and back panels with right sides together. Using your yarn needle and a length of matching yarn, whip stitch or mattress stitch the side seams from bottom to underarm.
2. Leave armholes open: Stop your side seams approximately 8 inches from the top edge to create armhole openings.
3. Work the peplum: Follow the peplum instructions above, working into the joined bodice bottom.
4. Attach sleeves: Pin the open edge of each sleeve into the armhole opening, distributing fullness evenly. The balloon portion should puff out from the armhole. Whip stitch in place securely.
5. Add the bow tie: Thread the chain tie through the center front neckline and adjust to your preferred fit.
6. Final touches: Weave in all remaining ends. Gently steam block if needed, being careful not to flatten the dimensional elements.
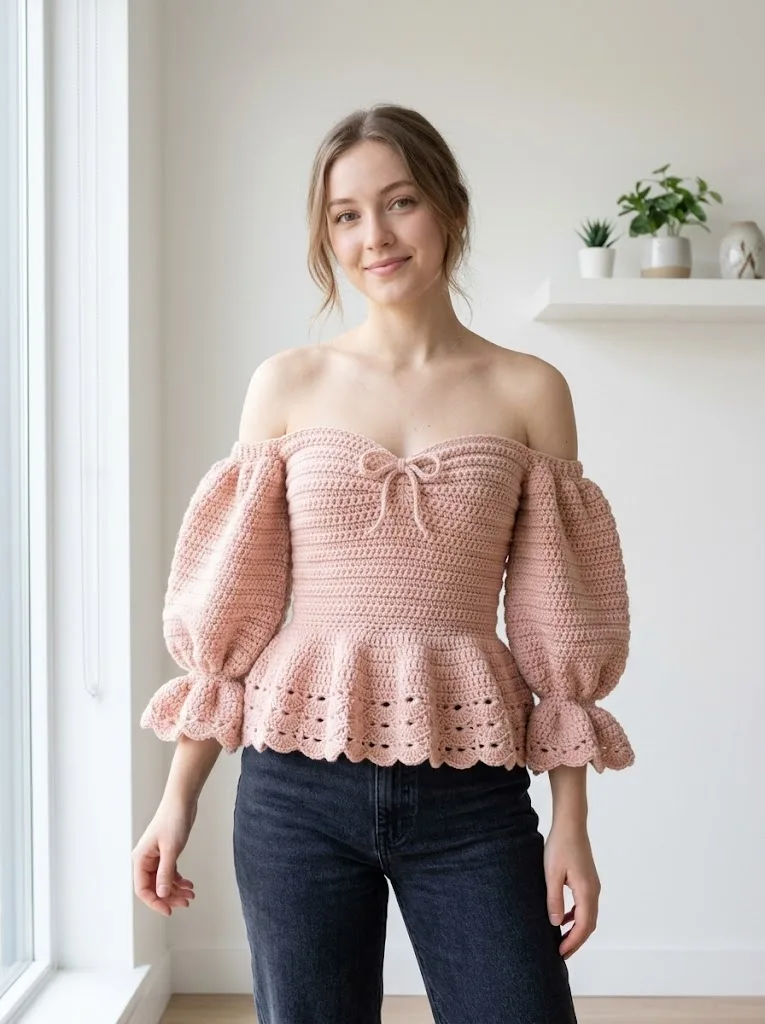
Styling Tips for Your Crochet Peplum Top
This romantic top pairs beautifully with high-waisted jeans for a casual look, or a fitted midi skirt for more formal occasions. The off-shoulder design means you can show off a pretty bralette underneath, or wear it with a strapless bra for seamless coverage.
Care instructions: Hand wash in cool water with mild detergent. Lay flat to dry, reshaping the balloon sleeves while damp.
Troubleshooting Common Issues
Sleeves too puffy? Reduce the increase rounds or work fewer plain rounds in the balloon section.
Bodice too tight? Go up a hook size or add stitches to your foundation chain in multiples of 4.
Peplum doesn’t flare enough? Add an extra increase round between rounds 10 and 11.
Shell border looks uneven? Make sure your stitch count is divisible by 6 before starting the lace rounds.
Final Thoughts on This Feminine Crochet Top Pattern
Creating this blush pink peplum top was such a joy, and I truly hope you love making it as much as I did. The combination of romantic sleeves, flattering silhouette, and delicate lace details makes this a piece you’ll reach for again and again. Whether you make it in this soft dusty rose or choose your own favorite shade, you’re creating something genuinely special.
I would absolutely love to see your finished tops! Save this crochet peplum top pattern to your Pinterest boards so you can find it when you’re ready to start. And please, please leave a comment below when you make yours. Nothing makes my day brighter than seeing your beautiful creations come to life.
