I call this one the "Daisy Pack" because I designed it during a weekend when daisies were blooming everywhere in my garden. The burgundy reminded me of the deep wine color I spotted in some wild flowers near my fence, and I knew right away it needed to be paired with something soft and neutral. I pulled out my old design notebook, the one with coffee stains and yarn samples taped to random pages, and started sketching what would become this structured little backpack.
Get the Ad-Free PDF Pattern
You can find the free pattern below, or you can purchase the ad-free printable PDF from my shop.
Get the Printable PDF →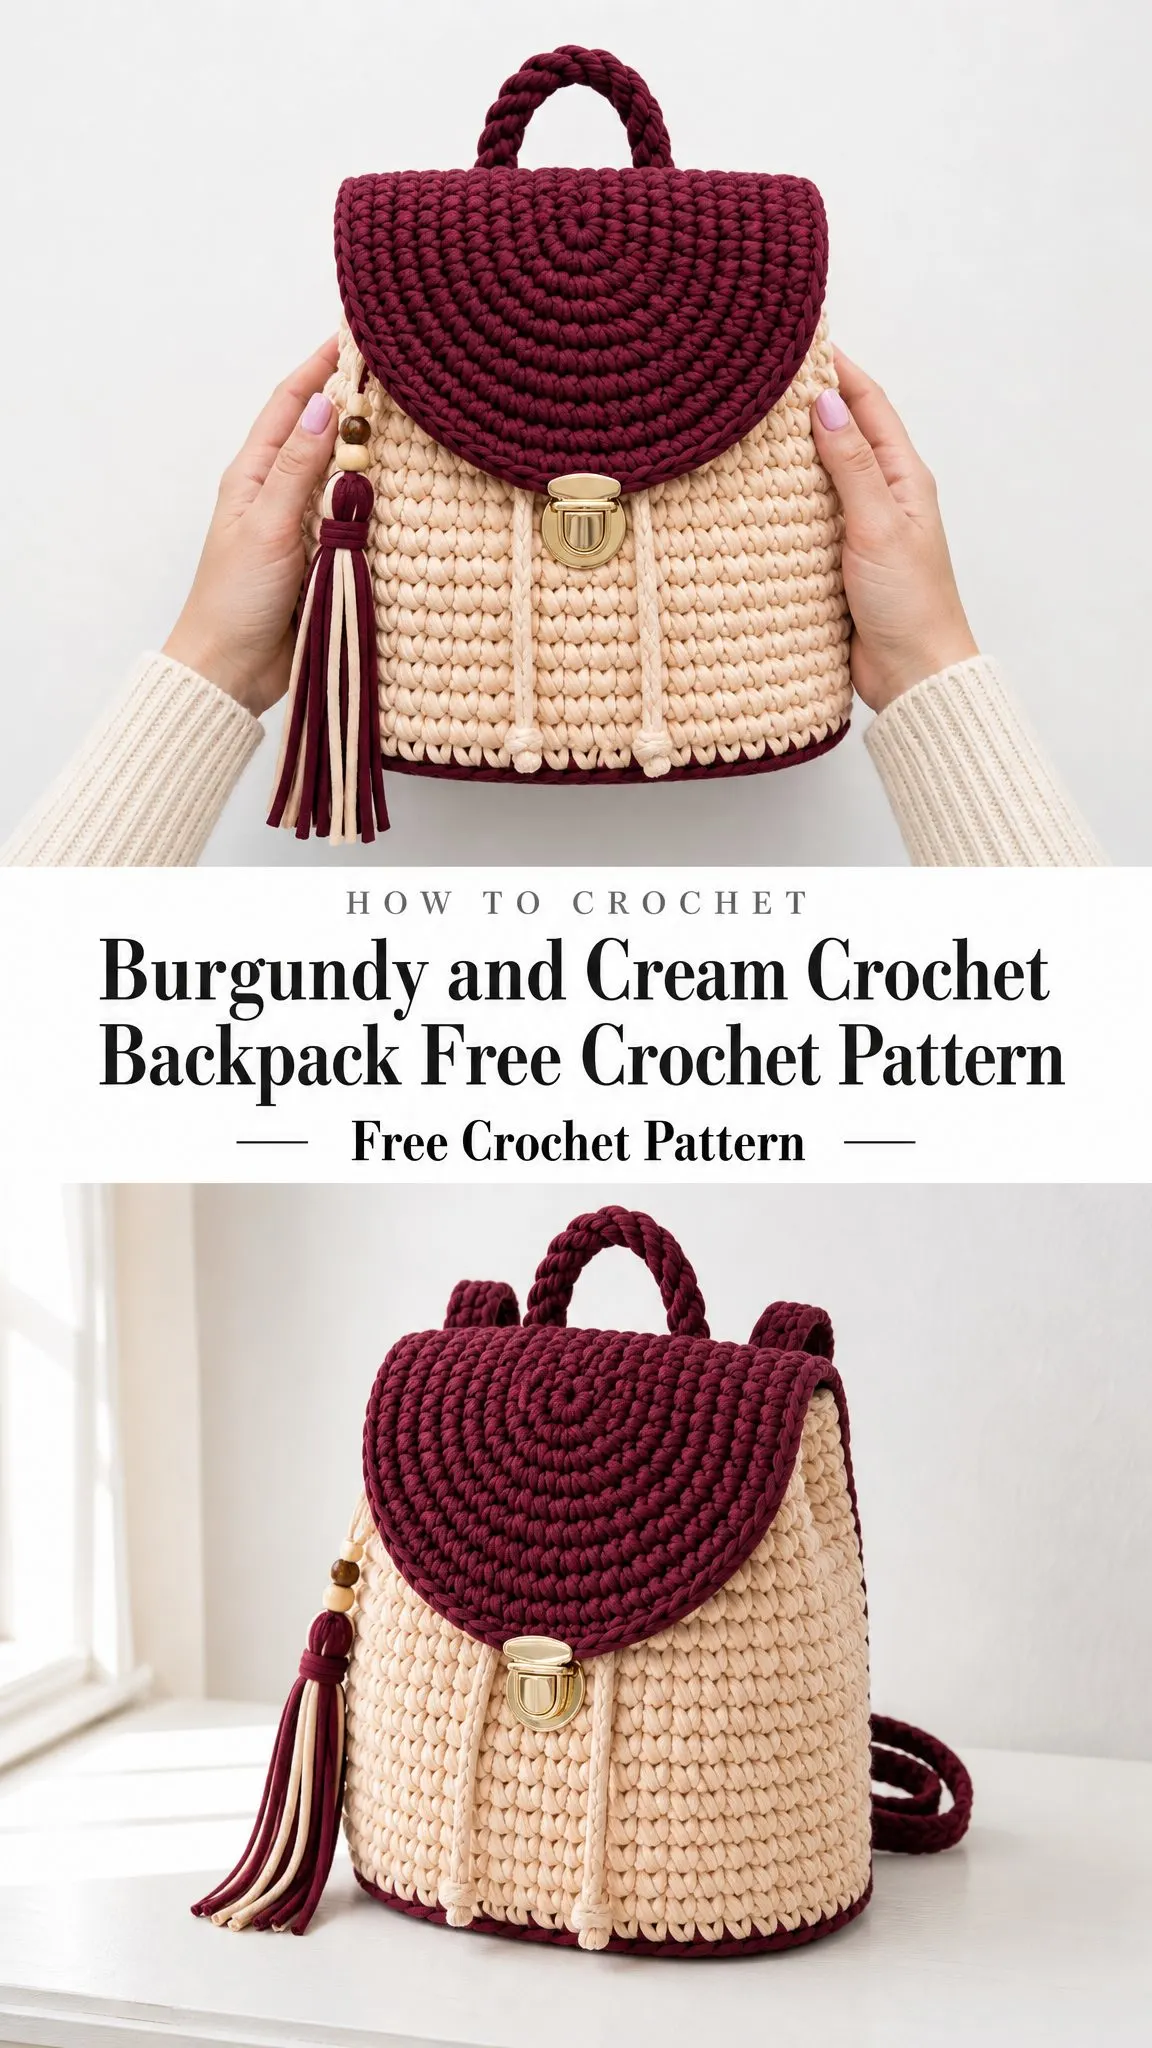
The original version was actually made for my niece who wanted something cute but practical for her weekend trips to the farmers market. She needed room for her phone, wallet, a book, and maybe a small snack. Not too big, not too small. Just right.
Now I am sharing it with you because this backpack has become one of my most requested patterns. It looks impressive with that rounded flap and those gorgeous concentric rings, but I promise the construction is more approachable than it appears. If you can work single crochet and follow a simple increase pattern, you can absolutely make this.
Why You Will Love This Crochet Backpack Pattern
This burgundy and cream crochet backpack combines structure with style in a way that feels polished and handmade at the same time. The cream body uses waistcoat stitch, which gives the fabric a firm woven appearance almost like knitting. The burgundy flap features back loop only (BLO) stitches that create those beautiful raised rings you see spiraling from the center.
What makes this crochet pattern special is the attention to finishing details. The braided handle, the drawcords hanging down the front, the side tassel with wooden beads, and that satisfying tuck lock clasp all come together to create something that looks store bought but is completely handmade by you.
The finished backpack measures approximately 9 inches wide by 10.5 inches tall by 4.25 inches deep, excluding the straps and handle. That is a perfect size for everyday essentials without being bulky. The body circumference at the top is about 26.5 inches, giving you plenty of room inside.
Skill Level
This crochet backpack pattern is rated Confident Intermediate. You will work with dense cord stitches, oval shaping for the base, a separate curved flap, surface stitch placement, hardware installation, straps, and clean finishing techniques.
If you have made amigurumi or structured bags before, you will feel right at home. If this is your first bag project, just take it slow and trust the process. I have included checkpoints throughout so you can measure your work and catch any issues early.
Materials Needed
Here is everything you will need to make this crochet backpack:
| Item | Details |
|---|---|
| Yarn A (Cream) | Super bulky cotton tube yarn or soft braided cord, approximately 150 yards / 137 meters |
| Yarn B (Burgundy) | Super bulky cotton tube yarn or soft braided cord, approximately 105 yards / 96 meters |
| Hook | US K/10.5 to L/11 (6.5 to 8 mm), use whichever meets gauge and gives a firm fabric |
| Hardware | 1 small tuck lock or magnetic clasp, 2 D-rings, 2 strap sliders or adjusters, optional bag feet |
| Extras | Tapestry needle, stitch markers, measuring tape, sharp scissors, sewing needle and strong thread, optional plastic canvas or foam base insert, optional lining fabric |
Yarn Suggestions
1. Hoooked Zpagetti or similar recycled T-shirt yarn for a chunky sculptural finish
2. Wool and the Gang Jersey Be Good for a plush modern backpack
3. Bernat Maker Home Dec for a softer, lighter bag with good stitch definition
Substitution tip: Choose a non-stretchy super bulky tube yarn, macrame cord, or doubled worsted cotton that meets gauge. A structured bag needs firm fabric. If your swatch bends too softly, go down a hook size.
Gauge
Getting gauge right is crucial for this project. Your bag needs to stand up on its own and hold its shape.
Body gauge: 9 stitches x 8.5 rounds = 4 inches / 10 cm in waistcoat stitch, worked in the round with Color A
Flap gauge: 8.5 single crochet x 9 rows = 4 inches / 10 cm in ridged single crochet with Color B
Making a Gauge Swatch
Work a 24-stitch tube for at least 12 rounds. Measure across a flat section and adjust your hook size until the fabric is dense but not painful to work. Match gauge before starting the actual backpack.
Abbreviations and Stitch Guide
This pattern uses US crochet terminology. UK makers, remember that US single crochet equals UK double crochet.
Special Stitches
Waistcoat Stitch (Center Single Crochet): Insert your hook into the center V of the next single crochet, not under the top loops like a regular stitch. Yarn over, pull up a loop, yarn over, pull through both loops. Keep your loops relaxed so the next round stays workable. This creates that beautiful woven texture on the cream body.
Back Loop Ridge: Work your stitch through the back loop only. This leaves a front ridge that creates those gorgeous concentric rings on the flap.
Surface Slip Stitch: Hold your working yarn behind the fabric. Insert hook from front to back where you want the line to sit, pull up a loop, then pull that loop through the loop on your hook. Keep the line loose enough that it does not pucker the fabric.
Crab Stitch (Reverse Single Crochet): Working left to right instead of the usual direction, insert hook into the previous stitch, yarn over, pull up a loop, yarn over, pull through both loops. This makes a beautiful corded edge.
Invisible Join: Cut yarn, pull tail through final stitch, thread needle, pass under both loops of first stitch, then down into final stitch to mimic a stitch top.
Left-Handed Note
Work all rounds in whatever direction feels natural to you. Placement is mirrored, so attach the side tassel to your preferred side and keep the clasp centered on the front. Surface slip stitch lines should remain relaxed in either direction.
Crochet Backpack Pattern Instructions
Backpack Base and Body
Work with Color A (Cream). Do not join body rounds unless instructed. Use a stitch marker in the first stitch of each round to keep track of where you are.
Round 1: Chain 17. Work 2 single crochet in the second chain from hook, single crochet in the next 14 chains, work 4 single crochet in the last chain. Now working across the opposite side of the foundation chain, single crochet in the next 14 chains, work 2 single crochet in the same chain as your first stitches. (36 sc)
Round 2: Increase in each of the next 2 stitches, single crochet 14, increase in each of the next 4 stitches, single crochet 14, increase in each of the next 2 stitches. (44 sc)
Round 3: [Single crochet 1, increase] twice, single crochet 14, [single crochet 1, increase] 4 times, single crochet 14, [single crochet 1, increase] twice. (52 sc)
Round 4: [Single crochet 2, increase] twice, single crochet 14, [single crochet 2, increase] 4 times, single crochet 14, [single crochet 2, increase] twice. (60 sc)
Round 5: Working in back loop only, single crochet in each stitch around to turn the base upward. (60 sc)
Round 6: Single crochet in each stitch around, working through both loops. (60 sc)
Rounds 7 through 22: Waistcoat stitch in each stitch around. (60 stitches each round)
Round 23: Single crochet in each stitch around. (60 sc)
Round 24: Change to Color B (Burgundy). Slip stitch loosely in each stitch around. (60 sl sts)
Round 25: Crab stitch around the top edge. Invisible join. (60 crab stitches)
Checkpoint
After Round 4, your base should measure about 9 x 4.25 inches / 23 x 11 cm. After Round 22, the body should measure about 9.5 inches / 24 cm tall from the base ridge. The top should measure about 26.5 inches / 67 cm around.
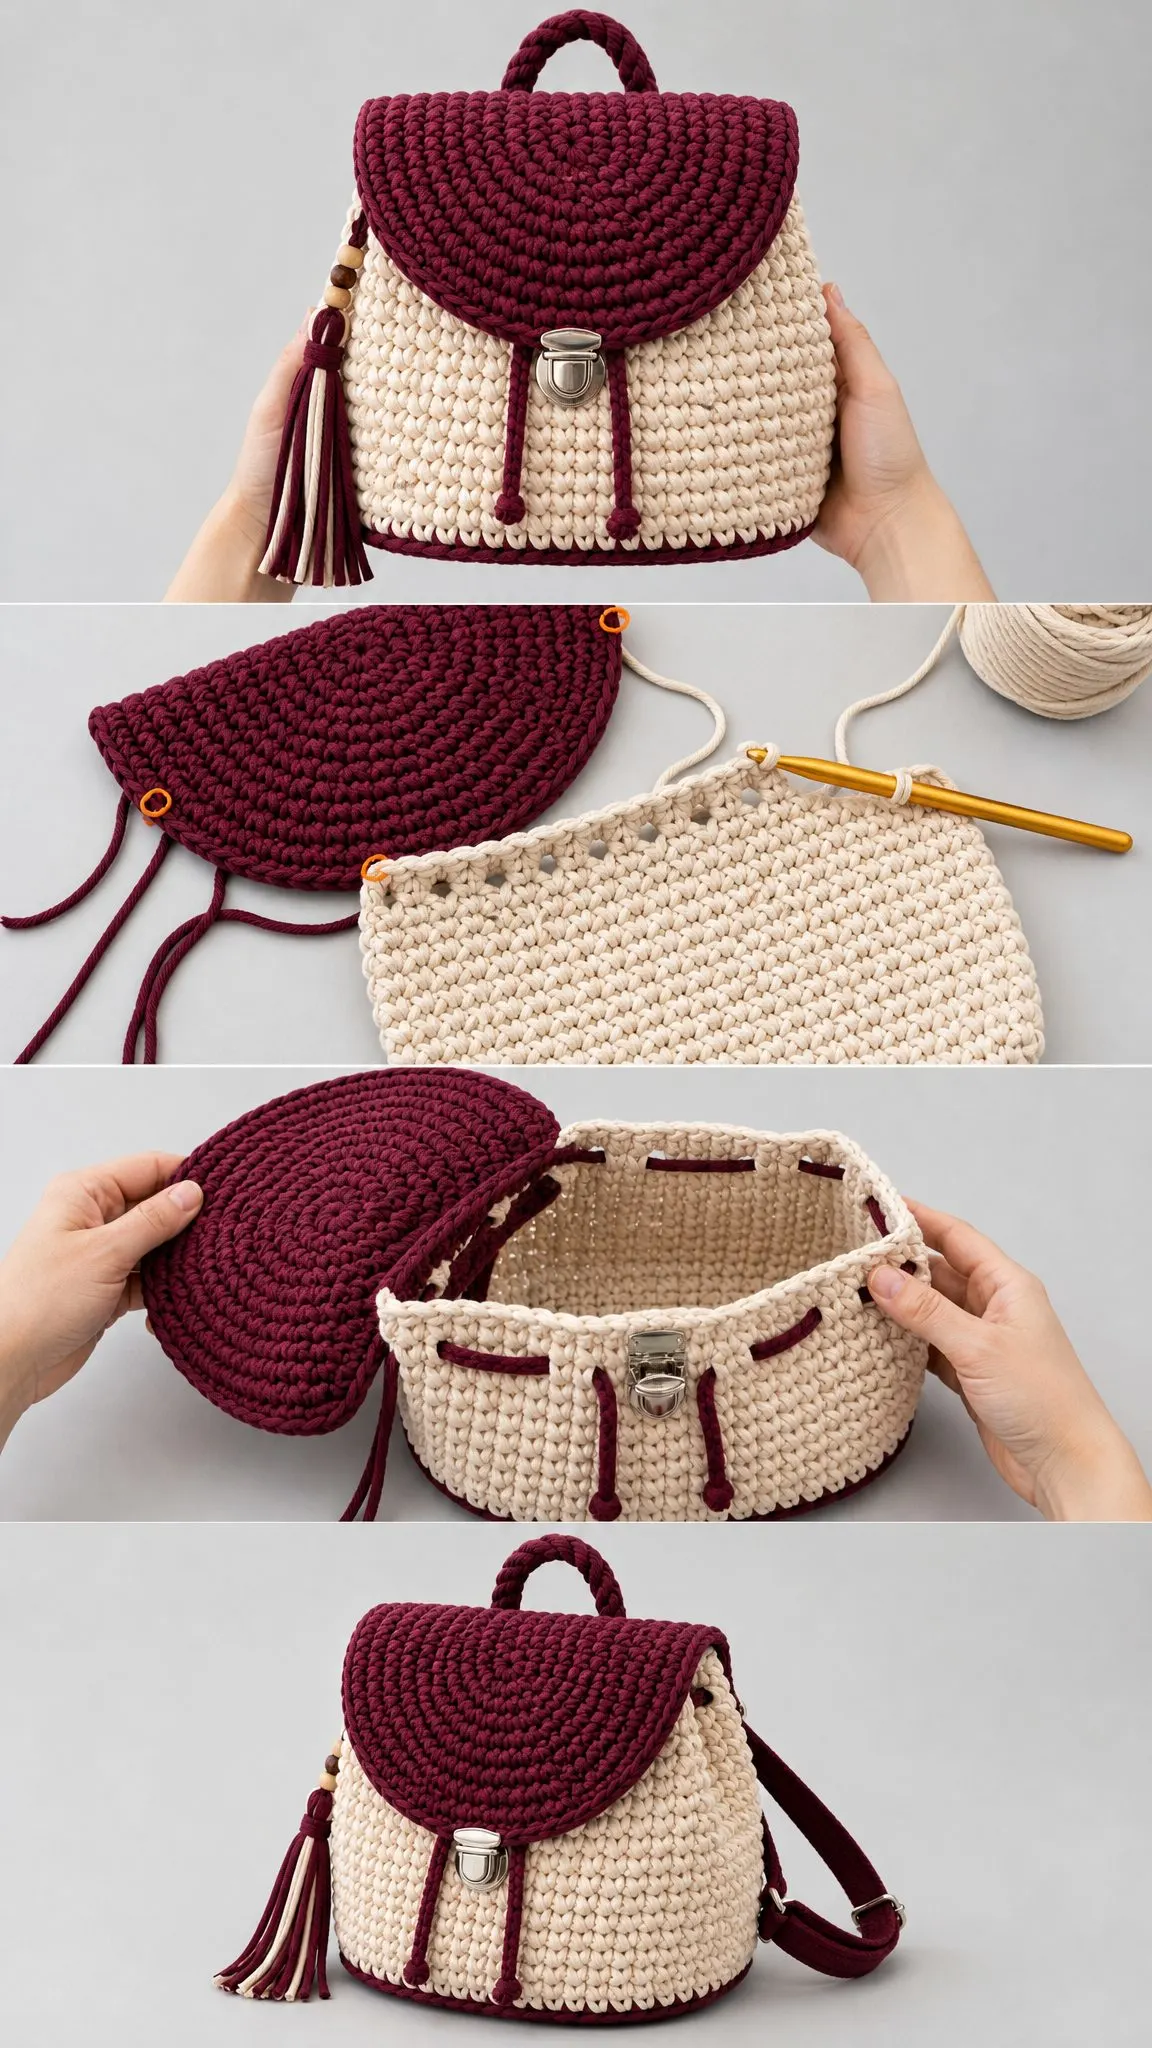
Rounded Burgundy Flap
Work with Color B (Burgundy) in turned rows. The chain 1 at the beginning of each row does not count as a stitch. Work Rows 2 through 8 in back loop only to create those beautiful raised rings on the right side.
Row 1: Make an adjustable ring. Chain 1, work 6 single crochet into the ring. Pull the ring almost closed, leaving a neat half-round center. Turn. (6 sc)
Row 2: Chain 1, increase in each stitch across. Turn. (12 sc)
Row 3: Chain 1, [single crochet 1, increase] 6 times. Turn. (18 sc)
Row 4: Chain 1, [single crochet 2, increase] 6 times. Turn. (24 sc)
Row 5: Chain 1, [single crochet 3, increase] 6 times. Turn. (30 sc)
Row 6: Chain 1, [single crochet 4, increase] 6 times. Turn. (36 sc)
Row 7: Chain 1, [single crochet 5, increase] 6 times. Turn. (42 sc)
Row 8: Chain 1, single crochet in each stitch across. Do not turn. (42 sc)
Edge: Work 1 round of single crochet evenly around the curved edge, placing 2 single crochet in each lower corner and 1 single crochet in each row end along the straight top. Join invisibly. Approximately 66 single crochet around.
Back Hinge: Along the straight top edge, mark the center 32 stitches or row-end spaces. Sew this section to the back top rim of the body, centered between where your strap anchors will go.
Flap Shape and Placement
Your finished flap should measure approximately 9.5 inches / 24 cm wide across the top and 5 inches / 13 cm deep at the center. It should cover the front upper third of the bag and sit just above where your clasp will go. If the curved edge cups, steam block it lightly over a towel.
Top Braided Handle
Cut 3 strands of Color B, each 28 inches / 71 cm long. Knot one end, braid firmly to 10 inches / 25.5 cm, then knot the other end.
Sew the ends 3 inches / 7.5 cm apart at the top back center of the bag. Cover each join with 8 to 10 tight wraps of Color B to create a clean finished look.
Back Straps (Make 2)
With Color B, chain 55.
Row 1: Single crochet in the second chain from hook and in each chain across. (54 sc)
Row 2: Chain 1, turn, slip stitch in each stitch across. (54 sl sts)
Fasten off, leaving long tails for sewing.
Strap Anchors
Thread each strap through a D-ring or slider if you are using them. Sew the top ends 2.25 inches / 5.5 cm from center back. Sew the bottom ends to the lower back corners just above the base ridge. Reinforce every join by stitching through twice.
Strap Length Note
For longer shoulder straps, add extra chains before Row 1. Every extra 4 chains adds about 1.75 inches / 4.5 cm before stretch. Keep both straps identical in length.
Front Drawcords (Make 2)
With Color B, chain 30. Slip stitch in the second chain from hook and in each chain across. (29 sl sts)
Fasten off. Sew one cord under each side of the flap so the tails hang down the front of the bag.
Side Bead Cord
Chain 24 with Color B and slip stitch back across. Add 3 to 4 wooden beads before attaching the tassel, or sew beads on afterward with strong thread.
Finishing, Closure, and Tassel
Optional Lining and Base Insert
Trace your base onto plastic canvas or thin foam. Trim it slightly smaller and place it inside the bag. This gives your backpack structure so it stands upright.
For a fabric lining, sew a simple pouch 0.5 inches / 1.25 cm smaller than your finished bag dimensions. Hand stitch it under the rim.
Clasp Placement
Close the flap naturally and mark the center front. Install the clasp plate on the flap 0.75 inches / 2 cm above the curved edge. Install the receiving side on the body directly below it. Reinforce the back of each clasp piece with felt or lining fabric.
Vertical Burgundy Lines
Use surface slip stitch or sewn cord to run two vertical burgundy lines from under the flap down to the base trim. Space them about 1.25 inches / 3 cm from center on each side. Keep the fabric flat as you work so you don’t create puckering.
Bottom Burgundy Trim
With Color B, surface slip stitch around the base ridge or sew on a corded trim. This frames the bottom of the bag and echoes the burgundy flap beautifully.
Side Tassel
Cut 8 strands each of Color A and Color B, each 11 inches / 28 cm long. Fold through the side bead cord, wrap the neck 8 to 10 times with Color B, knot securely, and trim to 5 inches / 13 cm.
Weave in All Ends
Use a yarn needle to bury tails through the inside of dense stitches. For cord yarn, split the tube or stitch through the lining so tails stay completely hidden.
Final Checkpoint
Your flap should lie centered. The clasp should close without pulling. The bag should stand upright when empty. If the front dips, add a base insert or tighten the top rim with an extra round of slip stitches.
Time Estimate
Plan for approximately 8 to 12 hours of work time, plus blocking and drying time. This is a perfect weekend project if you can dedicate a few focused sessions to it.
Customization Tips
To widen the bag: Add 2 chains to the starting chain for every approximately 0.9 inches / 2.3 cm of extra width. Keep the same end-increase structure. Your final body count should remain even.
To make the bag taller: Add body rounds before Round 23. Each extra round adds approximately 0.47 inches / 1.2 cm.
To make the flap wider: Work Row 8 as [single crochet 6, increase] 6 times for 48 single crochet, then work one even row. Attach only the center section to the back rim.
Troubleshooting Common Issues
Base ruffles: Your increases are too loose or your hook is too large. Go down a hook size.
Base cups: Increases are too tight or missing. Count each end carefully.
Waistcoat stitch is hard: Pull up the working loop taller and avoid over-tightening. It takes a few rounds to get comfortable with this stitch.
Flap curls: Steam lightly and add a relaxed single crochet edging.
Straps stretch: Line them with cotton webbing or work a second slip stitch row.
Care Instructions
Blocking: Shape the backpack with towels stuffed inside. Steam lightly from above without pressing the stitches flat. Let it dry completely before adding hardware stress or wearing.
Cleaning: Spot clean with cool water and mild soap. Lay flat to dry while stuffed to keep its shape. Avoid machine washing once hardware, lining, or a base insert is installed.
Storage: Store upright or stuffed with tissue. Keep away from prolonged direct sun to protect the burgundy color from fading.
You Did It!
This burgundy and cream crochet backpack pattern takes you through every step from that first foundation chain to attaching the final tassel. The combination of waistcoat stitch texture, those satisfying raised rings on the flap, and all the thoughtful finishing details creates something you will be genuinely proud to carry.
Whether you make it for yourself or as a gift for someone special, this backpack is the kind of handmade project that gets noticed and complimented. It is sturdy enough for everyday use and beautiful enough to show off.
Thank you so much for choosing this crochet tutorial for your next project. I truly hope you enjoy making it as much as I enjoyed designing it. If you want to save this pattern for later, pin it to your favorite Pinterest board so you can find it when you are ready to start. And if you make one, I would absolutely love to see it! Drop a comment below or tag me on social media with your finished backpack. Happy crocheting!
Want a Quick & Easy Printable Version?
Get a clean, beautifully formatted PDF of this pattern — easy to follow step by step, ready to print or save on any device. No scrolling, no distractions, just the pattern.
Get the Printable PDF →