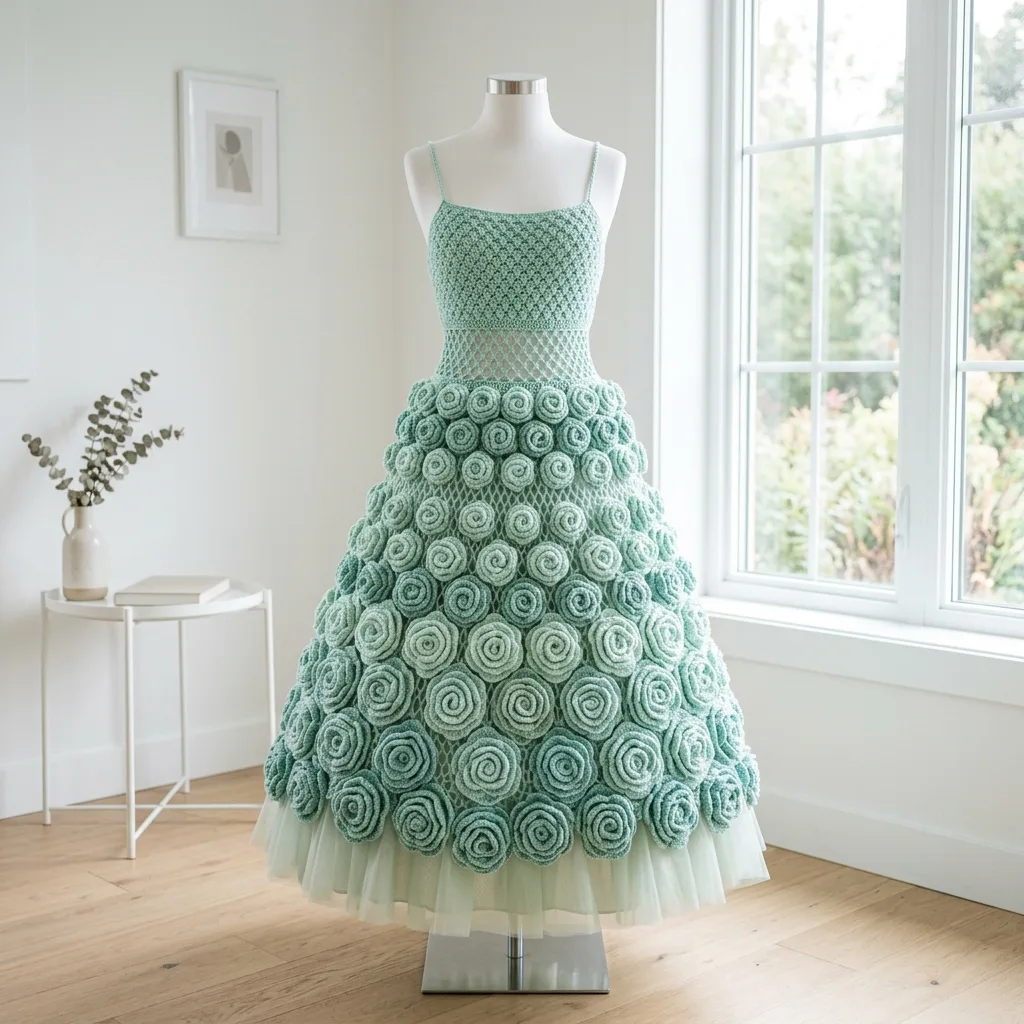
I set out to design a showstopper dress that would look absolutely stunning on a display form or crochet doll. My goals were ambitious: a textured shell stitch bodice that catches the light, an open mesh waist for visual interest, and a skirt completely covered in handmade spiral roses. I wanted that romantic garden party aesthetic with soft mint and seafoam greens, finished off with a dreamy tulle underskirt peeking out at the hem. After countless hours of tweaking rose sizes, adjusting the mesh flare, and getting those straps just right, I am SO pleased with how this turned out! The Mint Garden Party Crochet Dress is everything I envisioned and more.
Get the Ad-Free PDF Pattern
You can find the free pattern below, or you can purchase the ad-free printable PDF from my shop.
Get the Printable PDF →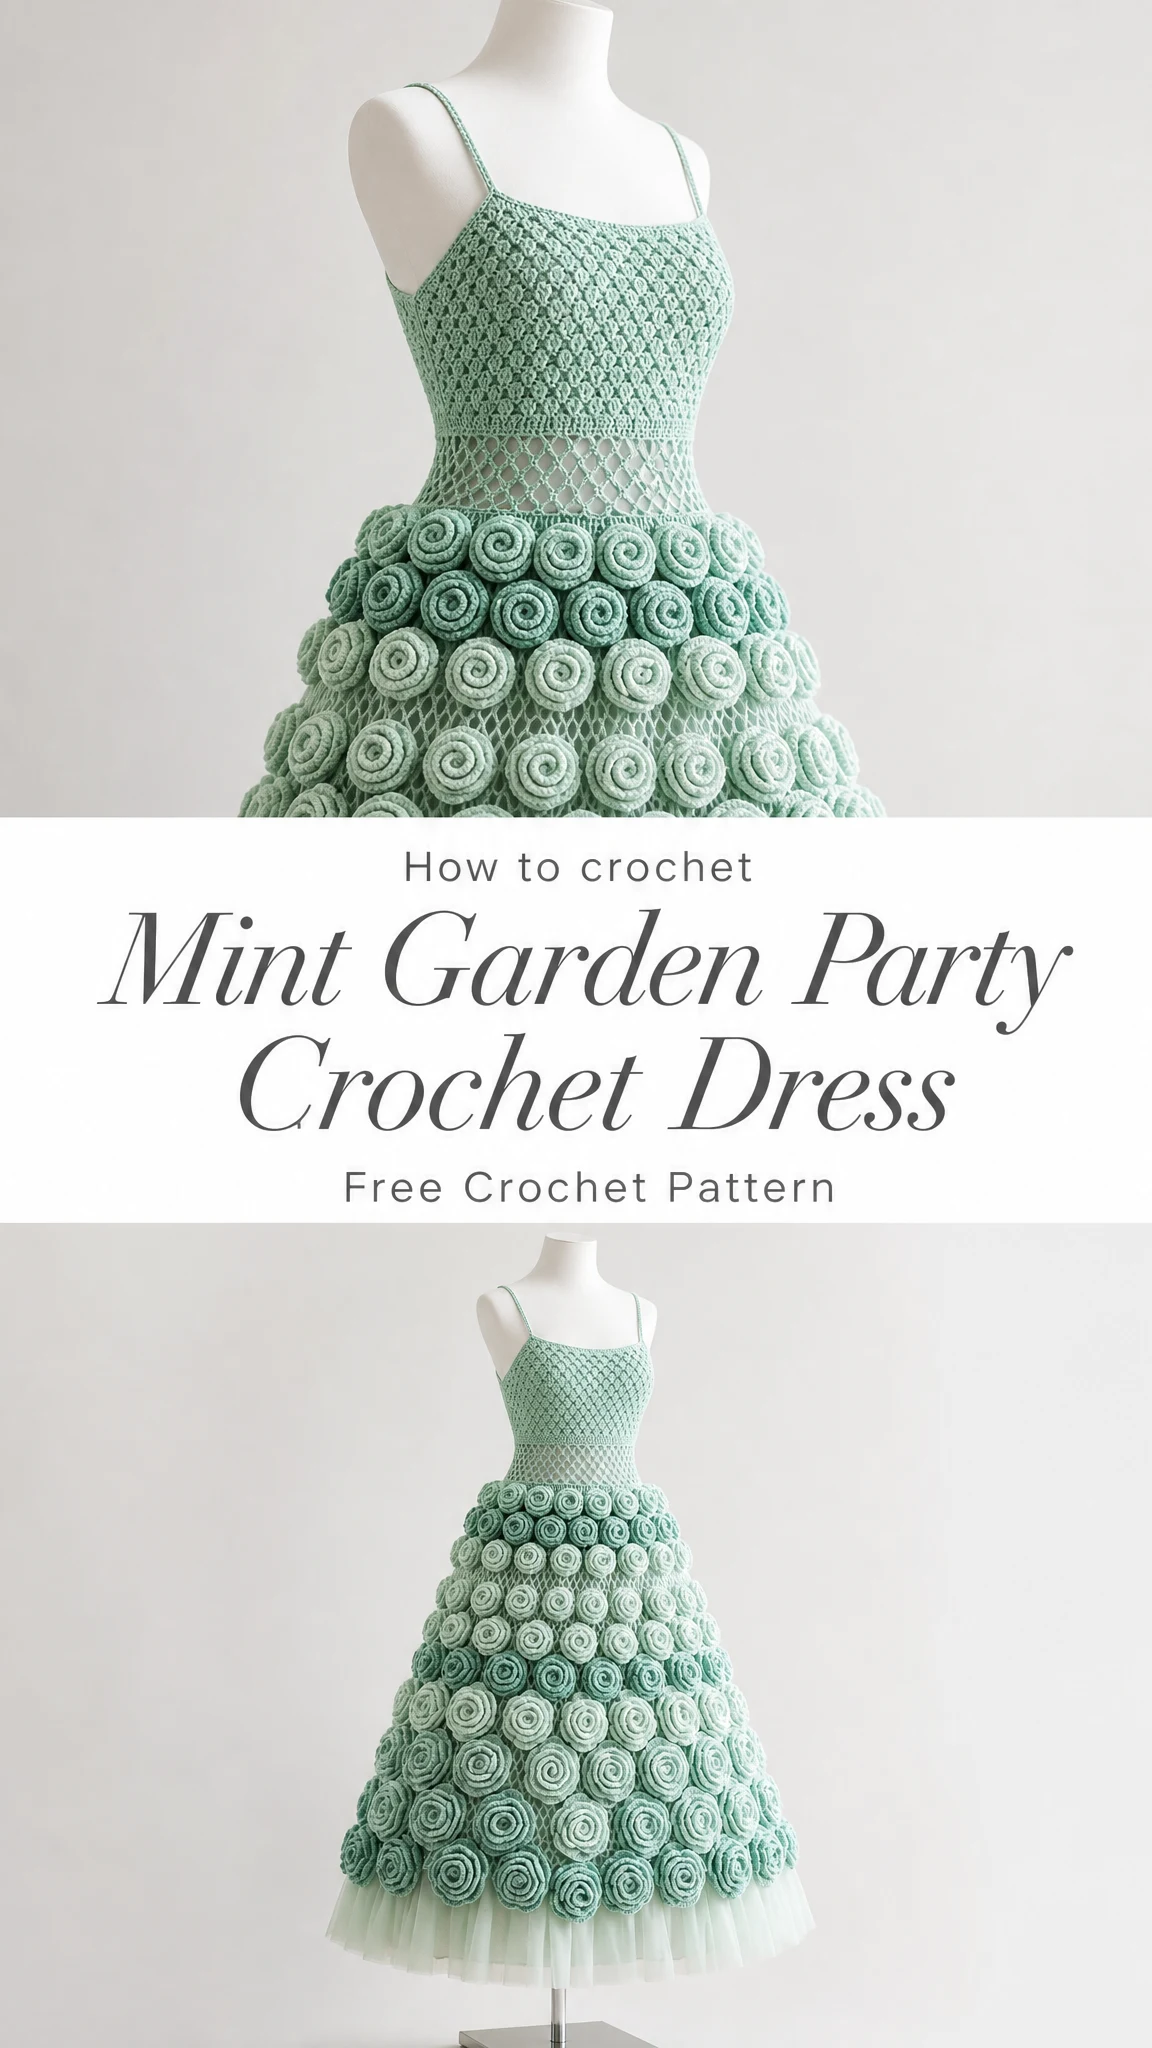
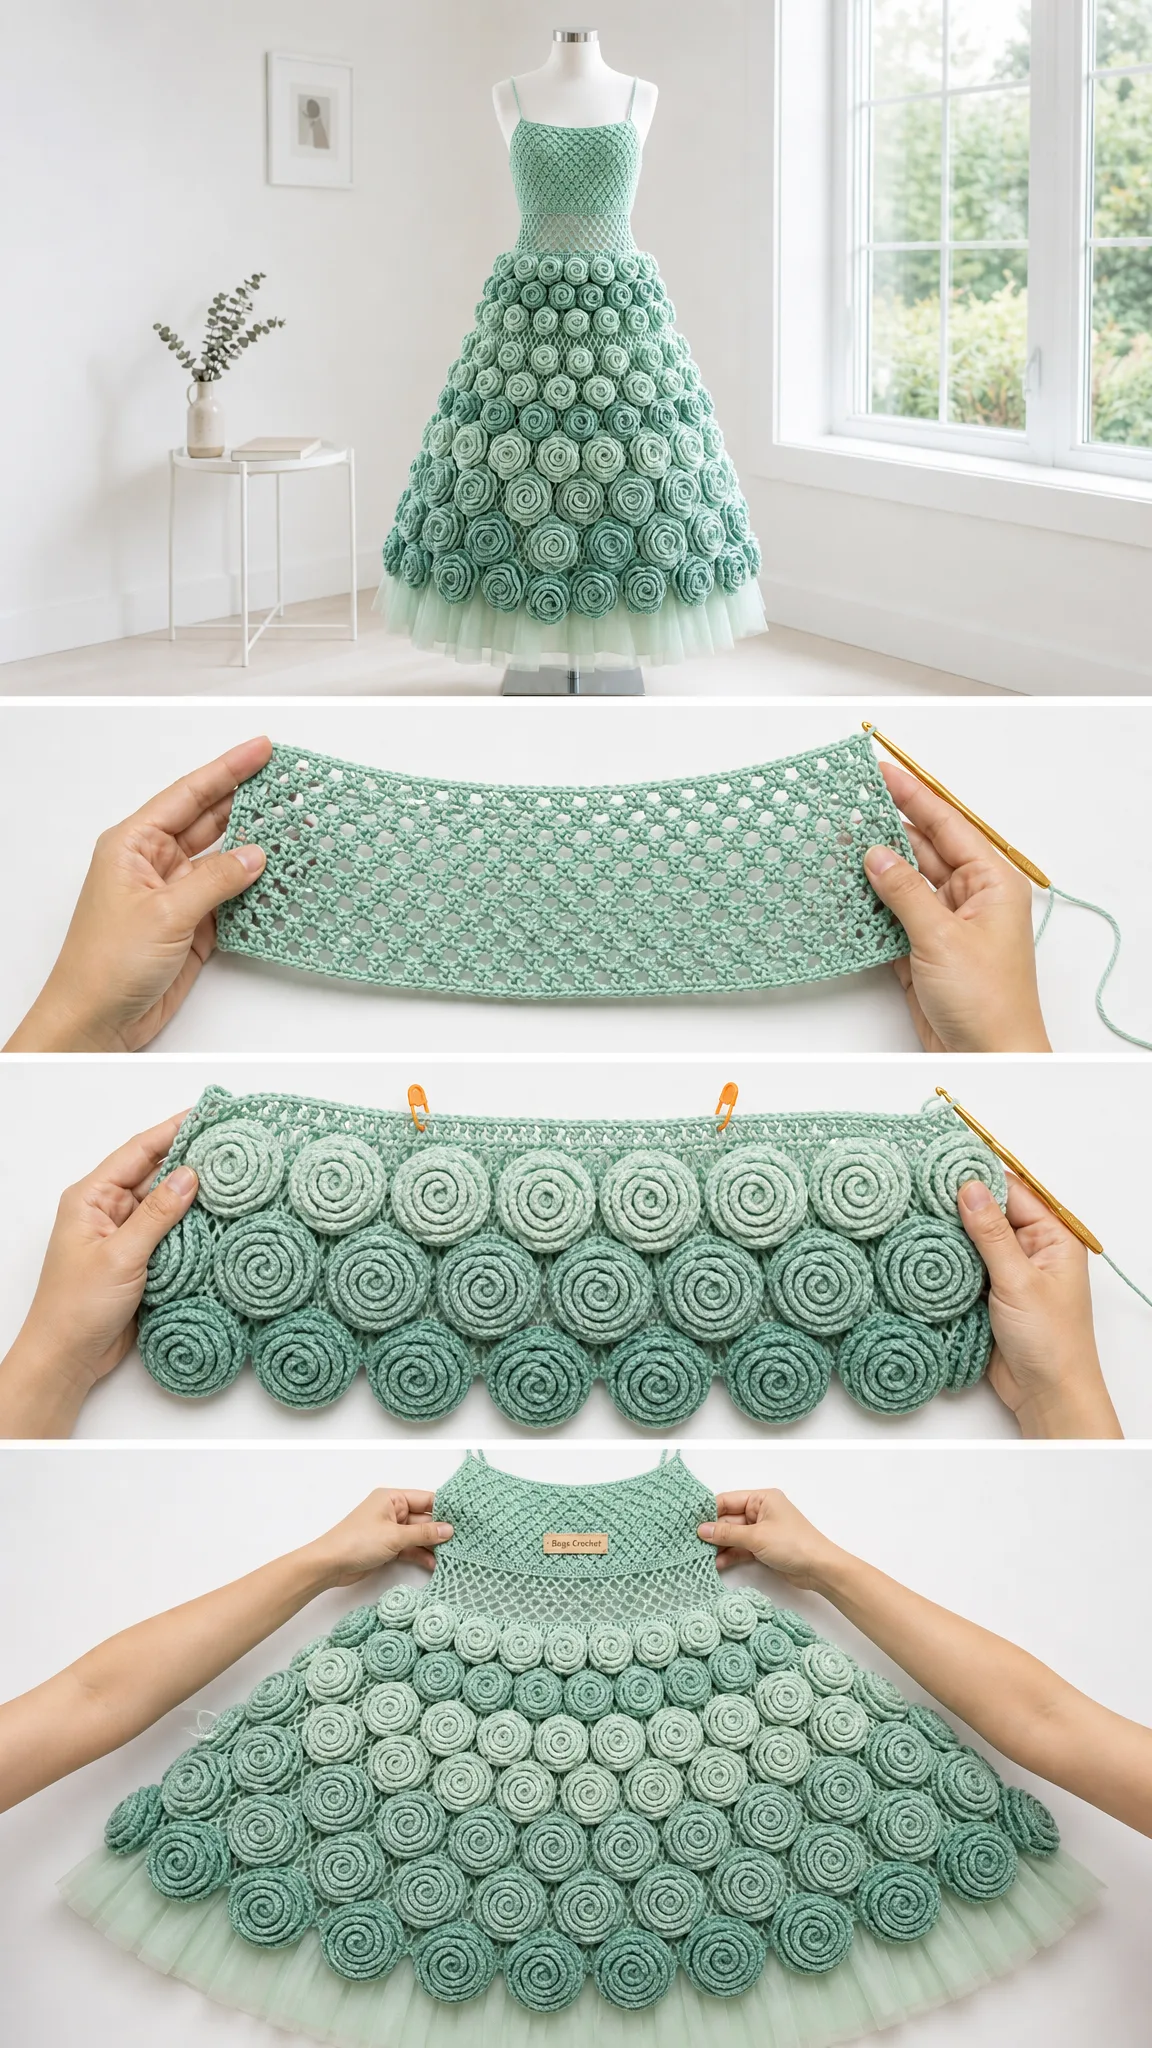
This pattern creates a stunning display piece measuring approximately 28 to 30 cm (11 to 12 inches) tall. The dress features four distinct sections: a fitted bodice with beautiful shell stitch texture, delicate chain mesh at the waist, a bell-shaped skirt base covered in 54 to 70 individually crocheted roses, and a soft gathered tulle layer underneath. It is an intermediate to advanced project that will take approximately 12 to 18 hours to complete, depending on how quickly you work those roses.
Materials You Will Need
Before you begin this crochet pattern, gather all your supplies. Having everything ready makes the process so much smoother.
Yarn A: Mint Green Worsted Weight (acrylic/cotton blend), 160 to 190 yards (146 to 174 meters). This is your main bodice and waist color.
Yarn B: Seafoam Green Worsted Weight, 140 to 170 yards (128 to 155 meters). You will use this for all the roses and the skirt base edging.
Yarn Suggestions: Paintbox Yarns Cotton DK in Pistachio or Mint, Lion Brand 24/7 Cotton DK in Mint, or Hobbii Friends Cotton 8/8 in Pastel Mint and Sage. Choose a smooth yarn with good stitch definition so your roses stay crisp and defined.
Tulle: Soft mint lightweight nylon tulle, 2 yards (1.8 meters)
Hook: 2.5 mm crochet hook, or the size needed to meet gauge
Notions: Yarn needle, stitch markers, pins, sewing needle and matching thread for the tulle
Optional: A 28 to 30 cm crochet body, doll, or display form for fitting and displaying
Substitution Note: DK weight yarn can be used for a smaller dress, while worsted weight makes a fuller rose skirt. If you change yarn weight, make the bodice to fit your doll first, then adjust the number of roses and rows on the skirt base accordingly.
Gauge
18 single crochet (sc) stitches by 20 rows equals 10 cm (4 inches) with a 2.5 mm hook after gentle blocking.
Gauge matters most for the bodice fit. I recommend making a small swatch and measuring before you begin. If your swatch is too big, try a smaller hook. If it is too small, go up a hook size.
Abbreviations and Stitch Guide
This pattern uses US crochet terminology. Here are all the abbreviations you will encounter:
ch = chain: Yarn over, pull through the loop on your hook
sl st = slip stitch: Insert hook, yarn over, pull through both the stitch and the loop on your hook in one motion
sc = single crochet: Insert hook, yarn over, pull up a loop (2 loops on hook), yarn over, pull through both loops
hdc = half double crochet: Yarn over, insert hook, yarn over, pull up a loop (3 loops on hook), yarn over, pull through all 3 loops
dc = double crochet: Yarn over, insert hook, yarn over, pull up a loop (3 loops on hook), yarn over, pull through 2 loops, yarn over, pull through remaining 2 loops
sk = skip: Pass over the indicated stitch without working into it
st/sts = stitch/stitches
rep = repeat
RS = right side
WS = wrong side
Special Stitches
Shell Stitch: Work [sc, hdc, dc] all in the indicated stitch, then skip 2 stitches. Repeat this sequence. On the following row, work the shell into the sc of the shell below to create a stacked texture.
Mesh Stitch: Chain 5, skip 2 stitches, single crochet in the next stitch. On the next round, single crochet in the chain space, chain 5, and repeat around.
Spiral Rose Motif: A long scalloped strip that you roll and stitch at the base to form a dimensional flower.
Construction Overview
This dress comes together in sections that you will join as you go:
1. Make a fitted shell stitch bodice panel and seam it at the back
2. Add thin shoulder straps
3. Work a short mesh waist band
4. Crochet a flared skirt base in mesh
5. Make 54 to 70 spiral roses and sew them onto the skirt in staggered rows
6. Add a gathered tulle underskirt for softness and fullness
Fit Check Tip: Try the bodice on your doll or form after every 4 rows. It should be snug but not stretched. You can add or remove 3 stitches at the foundation chain to change width while keeping the shell repeat neat.
Section 1: Bodice Front and Back
Using yarn A, chain 43.
Row 1: Single crochet in the 2nd chain from hook and in each chain across. Turn. (42 sts)
Row 2: Chain 1, sc in first st, *skip 2, [sc, hdc, dc] in next st; repeat from * to last 2 sts, skip 1, sc in last st. Turn.
Rows 3 through 12: Chain 1, sc in first st, work [sc, hdc, dc] into the sc of each shell below, sc in last st. Turn.
Shape Top Edge, Row 13: Chain 1, sc in first 5 sts, hdc across center 32 sts, sc in last 5 sts. Fasten off, leaving a 30 cm (12 inch) tail.
Wrap the bodice around your form with the seam at center back. Sew the back seam from the lower edge upward, leaving the top 1 cm (0.4 inches) slightly open if needed for fit.
Section 2: Shoulder Straps
Join yarn A at the back left top edge.
Chain 24 to 28, depending on your form’s shoulder height. Slip stitch to the matching front point. Work 1 row of slip stitch back along the chain for strength. Fasten off.
Repeat for the second strap on the right side.
Sew the strap ends firmly in place and weave in all ends.
Section 3: Mesh Waist Band
Join yarn A at center back lower bodice edge.
Round 1: Chain 1, work 42 sc evenly around the lower edge, slip stitch to first sc.
Round 2: Chain 5, skip 2, sc in next st, *chain 5, skip 2, sc in next st; repeat around. Adjust by skipping 1 instead of 2 near the end if needed. Slip stitch into first chain space.
Rounds 3 through 5: Chain 1, sc in first chain space, *chain 5, sc in next chain space; repeat around. Slip stitch to first sc.
Fasten off.
Section 4: Skirt Mesh Base
The mesh base supports all your roses and gives the dress its bell shape. Keep your tension firm, not loose.
Round 1: Join yarn B to lower edge of waist mesh. Work 48 sc evenly around. Slip stitch to join.
Round 2: Chain 1, *sc in next 3 sts, 2 sc in next st; repeat around. (60 sts)
Round 3: Chain 5, skip 2, sc in next st around, slip stitch into first chain space.
Round 4: Chain 1, sc in same space, *chain 5, sc in next space; repeat around.
Round 5 (Increase Round): *Chain 5, sc in next space, chain 5, sc in same next space; repeat every fourth space to widen the skirt.
Rounds 6 through 16: Continue working mesh stitch. Add 4 to 6 extra chain spaces every third round until the skirt measures 18 to 20 cm (7 to 8 inches) from waist to hem. Fasten off.
Optional Firmer Hem: Work 1 round of sc around the lower edge, placing 3 sc in each chain space.
Section 5: Spiral Rose Motif
Make 54 to 70 roses. The sample layout uses 7 to 8 roses per row and 8 to 9 staggered rows. I recommend making 10 extra roses so you can fill any small gaps at the end.
With yarn B, chain 31.
Row 1: Double crochet in 4th chain from hook, 2 dc in each chain across. The strip will naturally curl. Turn.
Row 2: Chain 1, *sc in next st, 5 dc in next st, sc in next st; repeat across. Fasten off with a 25 cm (10 inch) tail.
To Form the Rose: Roll the strip from the smaller inner end outward, keeping the scalloped edge on top. Sew through the base several times to secure. Your finished rose should measure approximately 2.5 to 3 cm (1 to 1.2 inches) wide.
Left-Handed Crocheters: Work the same stitch counts. Your rose spirals may turn the opposite direction, and that is perfectly fine. Just keep all roses facing the same way for a polished skirt appearance.
Section 6: Attach Roses to Skirt
Place the dress on your form for this step. It makes placement so much easier.
Pin the first row of roses around the lower hem, touching edge to edge. Sew each rose to the mesh base through the rose base only. This keeps the spiral top dimensional and fluffy.
Row 2: Place roses between the roses below, slightly overlapping. Continue upward in staggered rows. Use smaller or tighter rolled roses near the waist. Keep the top two rows close together so the transition from waist to skirt looks lush and full.
After sewing all roses in place, steam from a distance or pat into shape with damp hands. Do not flatten the roses.
Section 7: Tulle Underskirt
Cut 3 strips of tulle, each 18 cm (7 inches) tall by 60 cm (24 inches) wide.
Layer the strips together. Sew a running stitch along the top long edge and gather to match the waist circumference.
Place the tulle inside the skirt with 1.5 to 2 cm (0.6 to 0.8 inches) showing below the roses. Stitch the gathered edge to the inside lower waist or upper skirt mesh. Trim the lower edge evenly.
Section 8: Final Finishing
Now for those important finishing touches:
Troubleshooting Common Issues
Bodice too loose: Seam deeper at the back or restart with 3 fewer foundation chains.
Skirt too narrow: Add more mesh increases on rounds 5, 8, and 11.
Roses look flat: Roll less tightly and sew only the base, not the top petals.
Hem uneven: Pin the dress on the form, then trim the tulle after the rose skirt is complete.
Tips for Success
This pattern rewards patience. The roses are repetitive, but each one you complete brings you closer to that stunning finished piece. I like to crochet roses while watching TV or listening to podcasts. Before you know it, you will have a whole pile ready to attach.
When attaching roses, work from the bottom up. This lets each row slightly overlap the one below, creating that gorgeous cascading effect you see in the reference images.
The mesh sections require attention to your tension. Too loose and the skirt will not hold its shape. Too tight and you will struggle to attach the roses. Aim for firm and even throughout.
Thank you so much for choosing this pattern! I truly hope you love making the Mint Garden Party Crochet Dress as much as I loved designing it. If you make one, I would absolutely love to see your finished dress. Tag me on Instagram or share a photo on Facebook.
If this pattern inspired you, save it to your Pinterest boards so you can find it easily when you are ready to start. And please drop a comment below if you give it a try. I read every single one, and your finished projects bring me so much joy!
Want a Quick & Easy Printable Version?
Get a clean, beautifully formatted PDF of this pattern — easy to follow step by step, ready to print or save on any device. No scrolling, no distractions, just the pattern.
Get the Printable PDF →