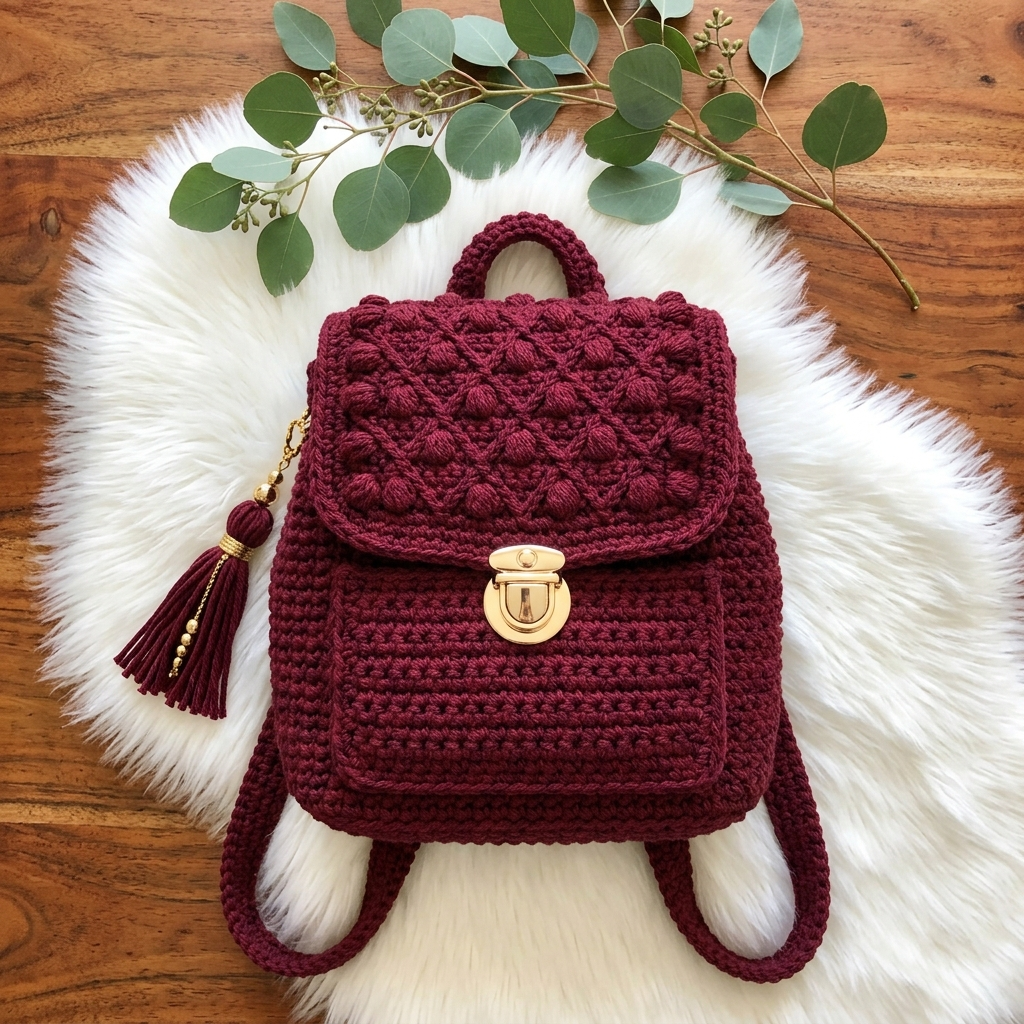
I have been dreaming about designing a mini backpack for ages, and I finally sat down to make it happen. My goals were clear: I wanted something structured enough to hold its shape, stylish enough to wear out, and achievable for anyone comfortable with basic stitches. The bobble stitch flap was non-negotiable because I love texture, and I knew gold hardware would make the whole thing feel polished. I am SO pleased with how this turned out! The Bordeaux Mini Backpack is everything I hoped for, and I cannot wait for you to make one too.
Get the Ad-Free PDF Pattern
You can find the free pattern below, or you can purchase the ad-free printable PDF from my shop.
Get the Printable PDF →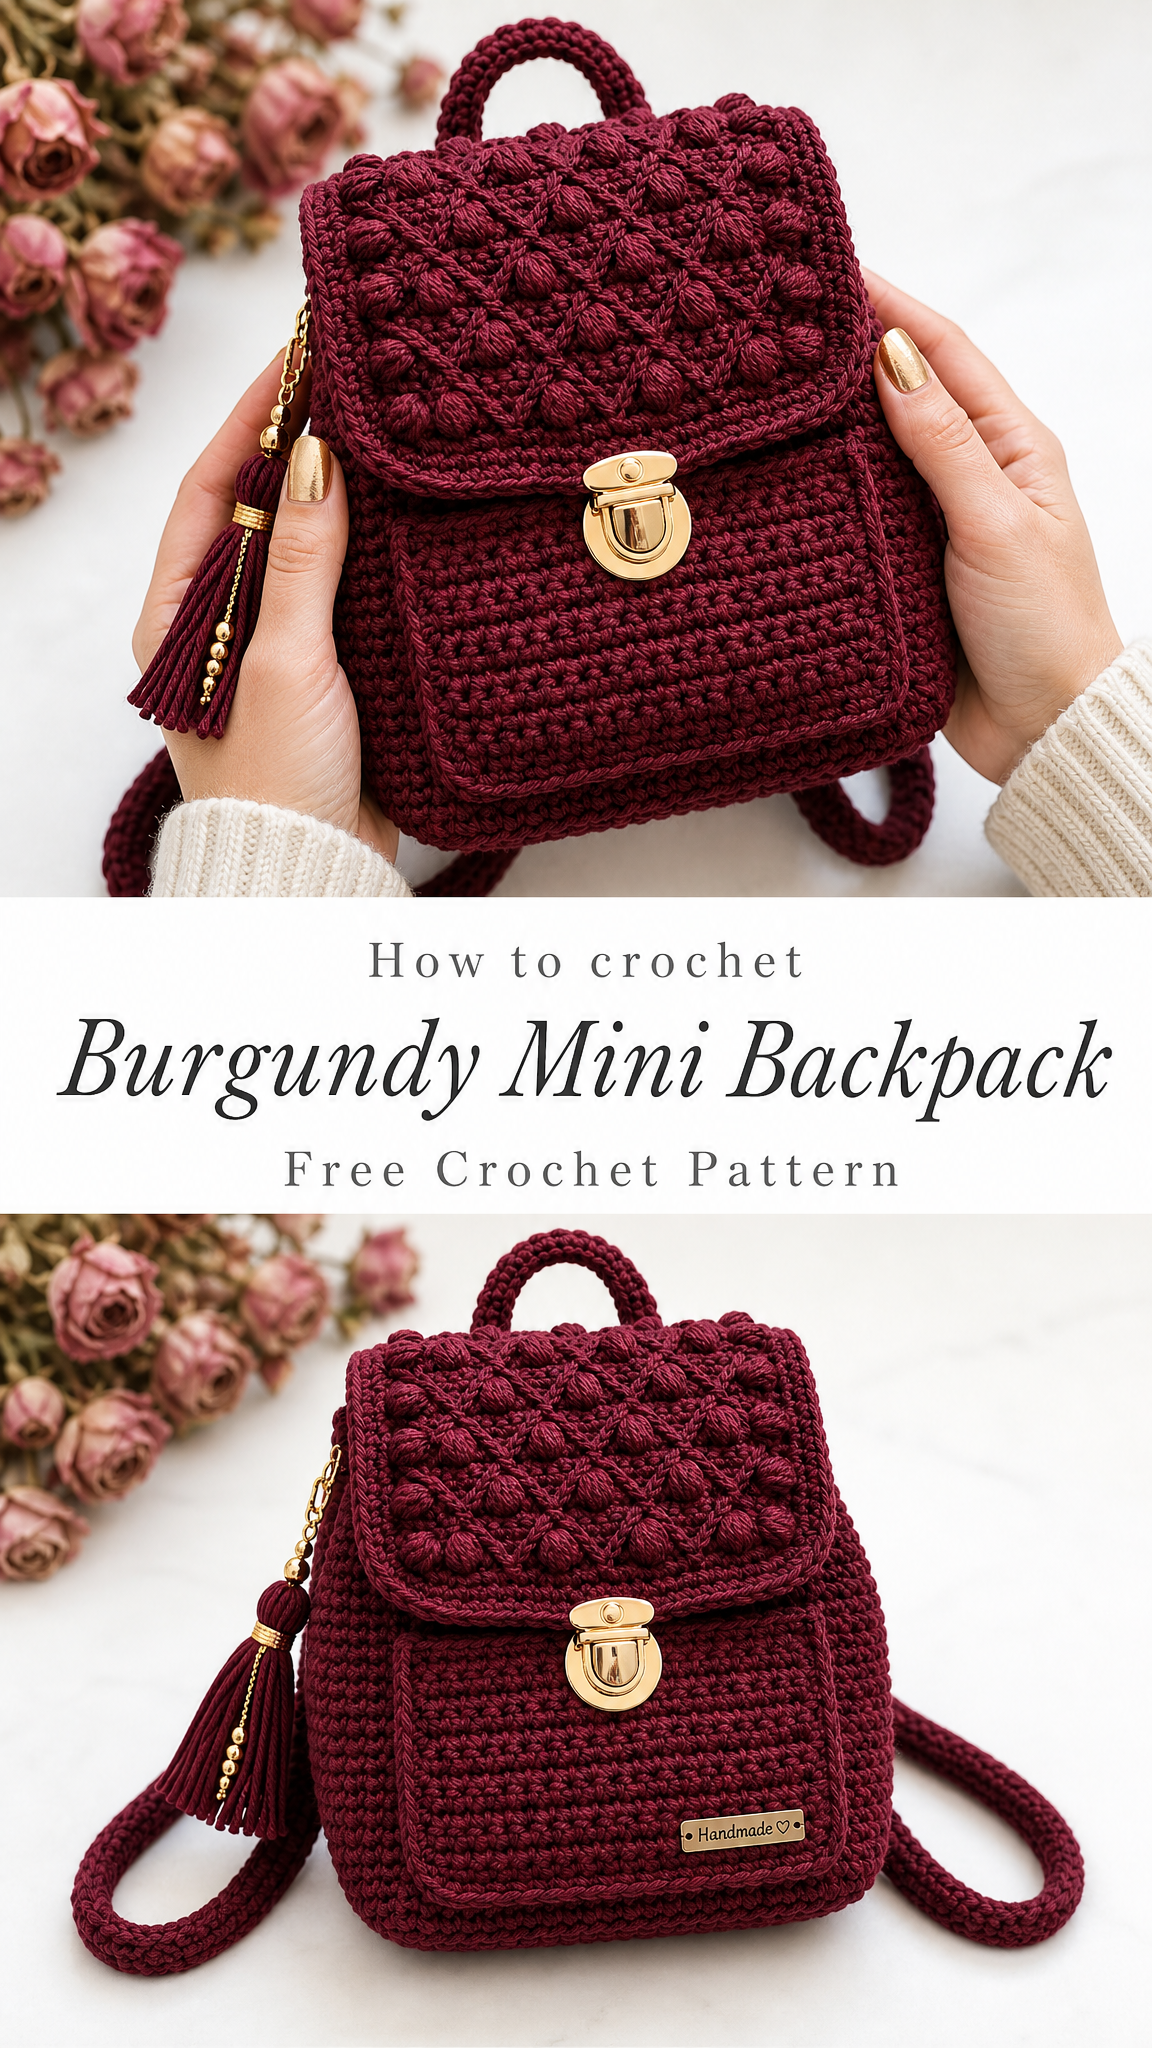
This little bag started as a love letter to deep autumn color. That rich burgundy against warm gold hardware just feels *right*. The best part? It works up in flat panels that you seam together, so you always know exactly where you are in the pattern. No complicated shaping, no confusing increases. Just tidy stitches and patient assembly.
Why You Will Love This Pattern
Let me tell you what makes this backpack special. First, it is surprisingly beginner-friendly for how impressive it looks. If you can single crochet (sc), which means inserting your hook, pulling up a loop, and drawing through both loops, you can make most of this bag. The bobble stitch on the flap is the only "fancy" part, and I promise it is easier than it looks.
Second, this bag has real structure. Cotton yarn holds its shape beautifully, and the dense single crochet fabric creates a sturdy body. Add blocking before assembly, and you get that crisp, boxy silhouette that makes handmade bags look professional.
Third, the details elevate everything. The gold turn-lock clasp, adjustable shoulder straps with real buckles, and a beaded tassel give this backpack a boutique feel. People will not believe you made it yourself.
Finished Measurements
Your completed backpack will measure:
This is a true mini backpack, perfect for essentials like your phone, wallet, keys, and a small makeup bag.
Materials You Will Need
Gather everything before you start. There is nothing worse than getting halfway through and realizing you need a trip to the craft store.
Yarn:
Suggested Yarns:
Hook:
Hardware:
Notions:
A Note About Yarn Substitutions
Any smooth worsted or aran weight 100% cotton that meets gauge will work. Mercerized cotton adds a subtle sheen and sharpens the bobble texture. Matte cotton reads softer and more rustic. Cotton blends with acrylic are fine and lighter on the shoulders, but avoid very drapey or fuzzy yarns. They blur the bobbles and the bag loses its shape. Whatever you choose, always make a gauge swatch first.
Gauge
14 sc x 16 rows = 10 x 10 cm (4 x 4 inches) with a 3.5 mm hook
Work a swatch of at least 18 stitches by 20 rows, block it, and measure the center. If your swatch is too tight, size up your hook. Too loose? Size down. Gauge controls the finished size and how structured the bag feels, so please do not skip this step.
Abbreviations
Let me define every stitch and term before we begin:
Special Stitch: The Bobble
This is the showpiece stitch for your flap, and it is easier than it looks. The bobble is worked into one stitch and closed at the top so it pops forward. Bobbles form on the wrong side rows and push out to the right side as you work.
To make a bobble: [Yarn over, insert hook in indicated stitch, yarn over and pull up a loop, yarn over and draw through 2 loops] 5 times in the same stitch. You now have 6 loops on your hook. Yarn over and draw through all 6 loops.
Gently nudge the bobble to the right side with your thumb. Work the single crochet on either side firmly so the bobble stands proud.
If you have never made bobbles before, practice a few on scrap yarn first. Once you get the rhythm, they work up quickly.
Reading the Pattern
Each piece begins with a foundation chain. Row 1 is worked into that chain. Turn after every row. The chain 1 to turn does not count as a stitch. Stitch counts at the end of a row are shown for reference. All measurements are given in both metric and imperial.
For left-handed makers: The pattern is written right-handed. To follow it left-handed, simply work each row in the opposite direction (right to left becomes left to right) and read any left/right placement as its mirror. The stitch counts, repeats, and bobble technique are all identical. Only your direction of travel flips.
The Body Panels
All panels are worked flat in single crochet. Keep your tension even and your edges straight. Count stitches at the end of every row. Straight panels make seaming painless and give the finished bag its crisp, boxy silhouette.
A. Front Panel (Make 1)
Foundation: Ch 26.
Row 1: Sc in 2nd ch from hook and in each ch across. Ch 1, turn. (25 sc)
Rows 2 through 28: Sc in each st across. Ch 1, turn. (25 sc)
Finish: After Row 28, fasten off. Panel measures approximately 18 x 17.5 cm (7.1 x 6.9 inches).
B. Front Pocket (Make 1)
Foundation: Ch 19.
Row 1: Sc in 2nd ch from hook and in each ch across. Ch 1, turn. (18 sc)
Rows 2 through 18: Sc in each st across. Ch 1, turn. (18 sc)
Finish: Fasten off, leaving a long tail for sewing. Pocket measures approximately 13 x 11 cm (5.1 x 4.3 inches). This patch pocket sits on the front panel and anchors the lower half of the turn-lock clasp.
C. Back Panel (Make 1)
Foundation: Ch 26.
Row 1: Sc in 2nd ch from hook and in each ch across. Ch 1, turn. (25 sc)
Rows 2 through 28: Sc in each st across. Ch 1, turn. (25 sc)
Finish: Do not fasten off the working yarn if you would like a tidy top edge. Instead, work one more row of sc, then fasten off. The flap and handle will attach to this top edge. Straps attach to the back face.
Gusset and Bobble Flap
D. Side and Bottom Gusset (Make 1)
One long strip wraps from the top of one side, down across the bottom, and up the other side.
Foundation: Ch 12.
Row 1: Sc in 2nd ch from hook and in each ch across. Ch 1, turn. (11 sc)
Next rows: Sc in each st across. Ch 1, turn. Repeat until the strip measures 53 cm / 21 inches (about 84 rows). (11 sc)
Finish: Fasten off. Strip measures approximately 8 cm / 3.15 inches wide.
E. Bobble Flap (Make 1)
A 4-row repeat creates the offset bobble field. Bobble rows are worked on the wrong side so the bobbles pop to the front.
Foundation: Ch 26.
Row 1 (WS): Sc in 2nd ch from hook and in each ch across. Ch 1, turn. (25 sc)
Row 2 (RS): Sc in each st. Ch 1, turn. (25 sc)
Row 3 (WS): Sc 2, *bo in next st, sc 3; rep from * 4 more times, bo in next st, sc 2. Ch 1, turn. (6 bobbles)
Row 4 (RS): Sc in each st (sc into the top of each bobble). Ch 1, turn. (25 sc)
Row 5 (WS): Sc 4, *bo in next st, sc 3; rep from * 3 more times, bo in next st, sc 4. Ch 1, turn. (5 bobbles)
Row 6 (RS): Sc in each st. Ch 1, turn. (25 sc)
Repeat Rows 3 through 6 until the flap measures approximately 13 cm / 5.1 inches, ending after a Row 6.
Border: Sc 2 rows even, then fasten off. (25 sc)
Optional: Sc evenly around the three free edges for a clean finish.
Bobble Tip: Work the sc on each side of a bobble snugly and push the bobble to the right side as you close it. Even bobbles come from even tension on the wraps. Go slowly on the first repeat, and the rest will follow.
Handle, Straps, and Tassel
F. Top Handle (Make 1)
Foundation: Ch 7.
Row 1: Sc in 2nd ch from hook and in each ch across. Ch 1, turn. (6 sc)
Next rows: Sc in each st until the strip measures 14 cm / 5.5 inches. (6 sc)
Finish: Fasten off, leaving a long tail. Fold into an arch and sew both ends to the top of the Back Panel, about 5 cm / 2 inches apart. Finished arch height is approximately 4 cm / 1.6 inches.
G. Shoulder Straps (Make 2)
Foundation: Ch 8.
Row 1: Sc in 2nd ch from hook and in each ch across. Ch 1, turn. (7 sc)
Next rows: Sc in each st until the strap measures 65 cm / 25.5 inches (or your preferred length). (7 sc)
Strap measures approximately 5 cm / 2 inches wide.
Anchor Tabs (Make 2): Ch 8, sc 7, work until the tab measures 8 cm / 3.1 inches, then fasten off. Each tab folds through a buckle and sews to a bottom back corner.
Adjustable Assembly: Sew the top of each long strap to the top of the Back Panel. Thread the free end of the strap through the slide buckle. Loop the anchor tab through the buckle’s lower bar and sew the tab securely to the bottom back corner. Sliding the buckle shortens or lengthens the strap. Adjustable range: 60 to 100 cm / 23.6 to 39.4 inches.
H. Beaded Tassel (Make 1)
1. Cut a piece of cardboard approximately 9 cm / 3.5 inches tall. Wrap yarn around it about 30 times.
2. Slide a long strand under the top of the wraps and tie tightly. This becomes the hanging cord.
3. Cut the bottom loops and remove the cardboard. Wrap a separate strand around the "neck" several times, knot it, and bury the ends inside.
4. Thread gold beads onto the hanging cord, then attach to the flap edge or clasp loop with a small chain loop or a lobster clasp. Trim the tassel ends level.
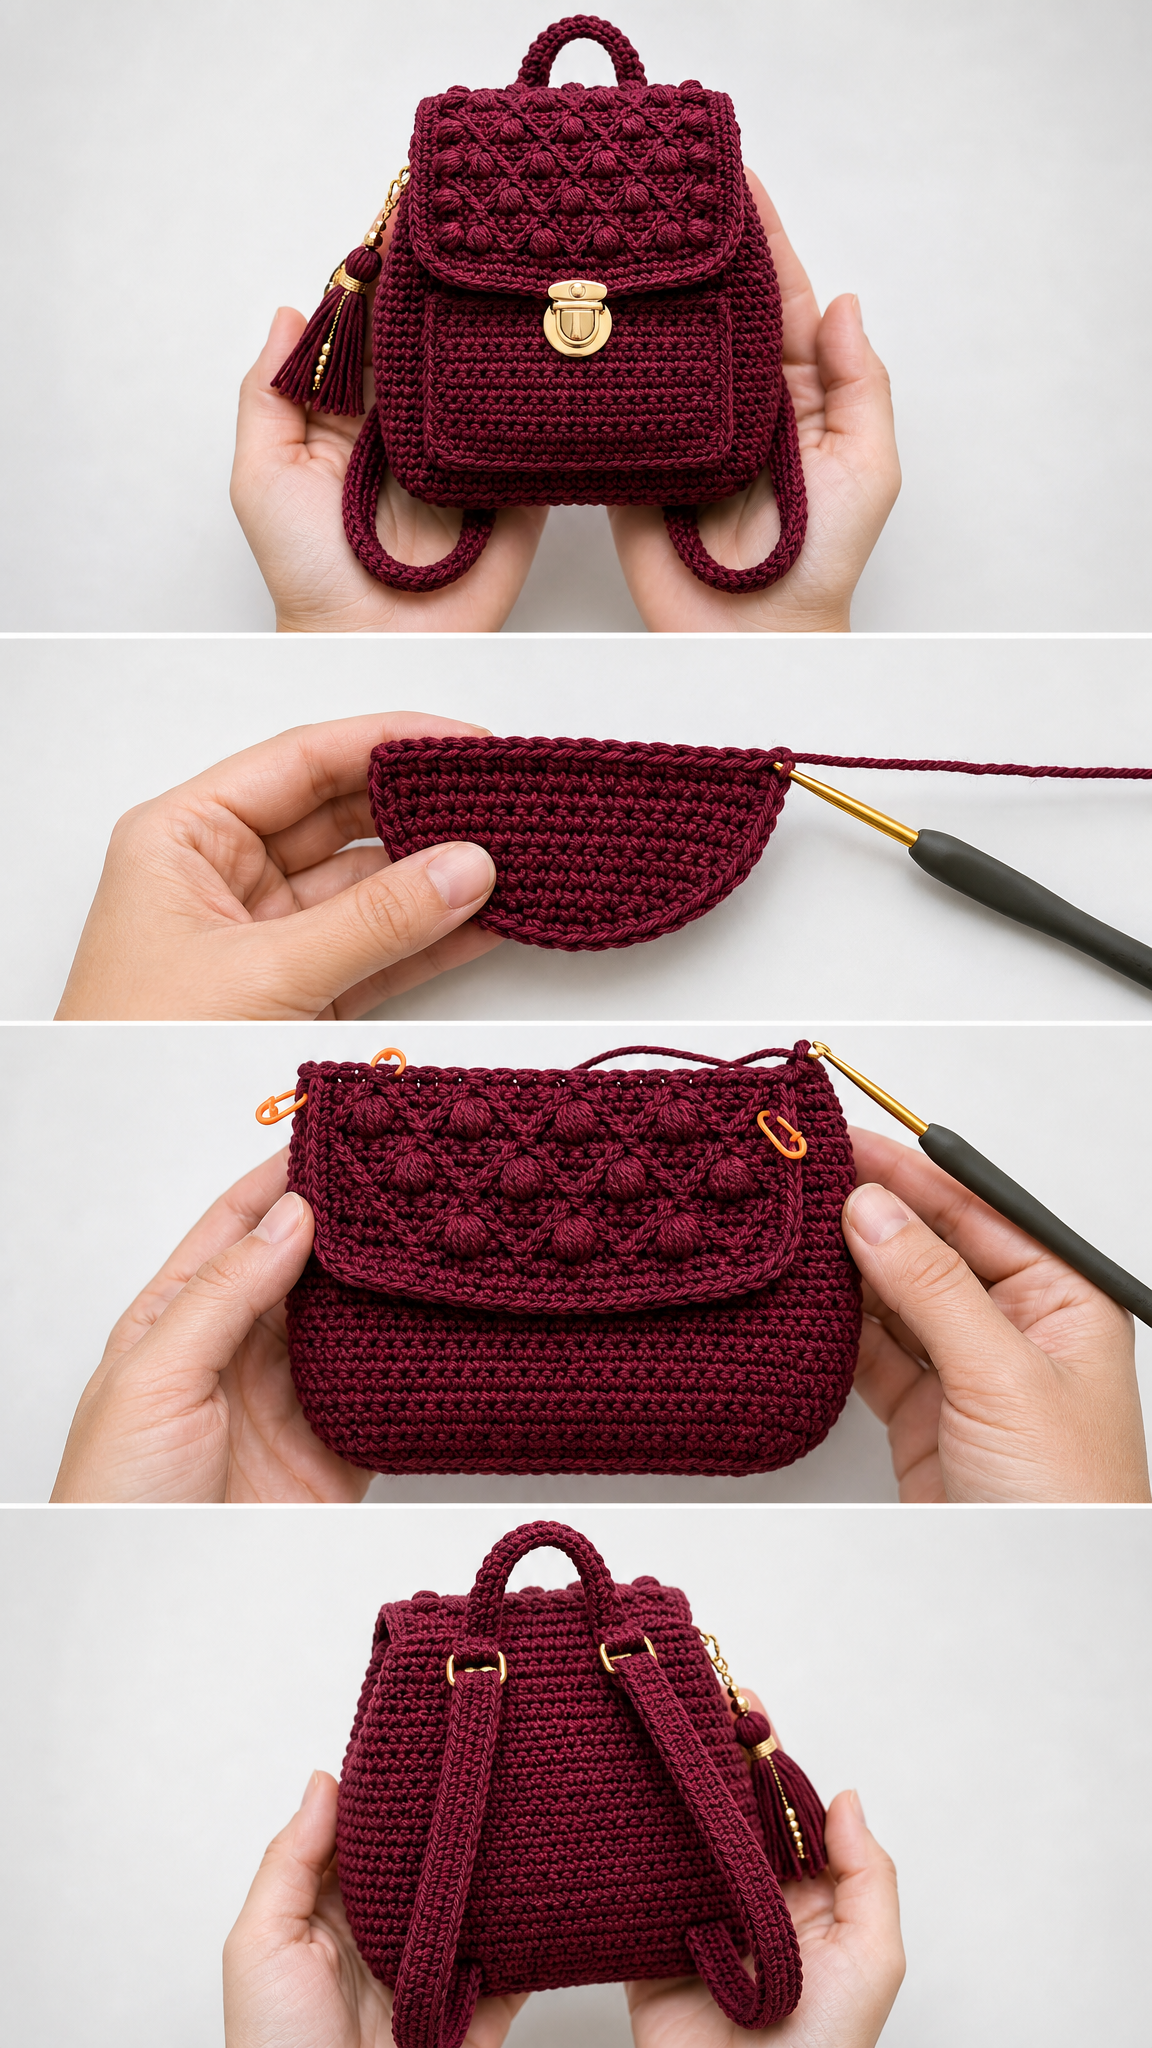
Assembly and Finishing
Block every piece first. It makes seaming far easier and gives the bag its crisp shape. Seam with a tapestry needle using whip stitch, or with sc worked wrong sides together, matching stitch for stitch.
Order of Work
1. Block all panels to size and let them dry fully.
2. Sew the Gusset to the Front Panel around three sides: up one side, across the bottom, up the other. Work wrong sides together.
3. Sew the Gusset to the Back Panel the same way. You now have an open box with the top free.
4. Sew the Front Pocket centered on the Front Panel. Sew sides and bottom only, leaving the top open.
5. Sew the Flap to the top edge of the Back Panel so it folds forward over the opening.
6. Sew the Handle arch to the top of the Back Panel, about 5 cm / 2 inches apart.
7. Attach Straps, buckles, and anchor tabs with reinforced stitching.
8. Install the turn-lock clasp (see below).
9. Insert the optional lining and slip-stitch it to the opening.
10. Attach the beaded tassel, then give the whole bag a final light steam.
Installing the Turn-Lock Clasp
Mark the center of the Front Pocket approximately 2 cm / 0.8 inches below its top edge. Fold the flap closed and mark the matching point on the flap underside. Fit the receiver (base) plate to the pocket and the tongue piece to the flap per your hardware’s instructions. Reinforce behind each with felt or lining so the weight is spread evenly.
Optional Lining
Measure the assembled bag. Cut fabric for front, back, and gusset, adding 1 cm / 0.4 inches seam allowance all around. Stitch into a box, press the top edge under, slip it inside, and hand-sew to the opening. A lining adds body and hides your seams beautifully.
Blocking Tips
Cotton holds its shape beautifully once blocked. Pin panels square, mist or steam, and let dry before seaming for the crispest, most professional result.
Seaming Tip: Work seams firmly but not so tight that the fabric puckers. Matching your stitch counts panel to panel (they were written to line up) keeps every corner square and the box neat.
Skill Level and Time Estimate
This pattern is rated Intermediate. You should be comfortable with basic crochet stitches, working flat in rows, and seaming pieces together. The bobble stitch is taught within the pattern, so do not worry if you have never tried it before.
Time to complete: 12 to 18 hours, depending on your speed and how many breaks you take. I suggest working on the panels over several evenings and saving assembly for a dedicated afternoon when you can really focus.
Tips for Success
Count your stitches. I know it is tedious, but counting at the end of every row catches mistakes early. A dropped stitch in row 3 is much easier to fix than one you discover in row 25.
Use stitch markers generously. Mark the first and last stitch of every row. Mark the center of your panels for pocket and clasp placement. Markers are your best friends.
Block before seaming. This step makes everything easier. Your panels will lie flat, your edges will be straight, and your seams will practically work themselves.
Take your time with the bobbles. The first few feel awkward, but by the third row, you will have the rhythm down. Do not rush them.
Reinforce your hardware attachments. The turn-lock clasp and strap buckles take stress every time you use the bag. Double-stitch these areas or add a small piece of felt behind them for extra stability.
Make It Your Own
While I love the classic burgundy and gold combination, this backpack looks stunning in any color. Consider sage green with silver hardware, navy with antique brass, or cream with rose gold accents. Stick to solid colors for the bobble flap so the texture really shows.
You can also skip the tassel if that is not your style, or make multiple tassels in coordinating colors. Some makers add a small interior pocket by sewing in a second piece of lining fabric. Make this bag truly yours.
Wrapping Up Your Burgundy Mini Backpack Crochet Pattern
There you have it: a gorgeous handmade backpack that looks far more complicated than it actually is. The combination of simple single crochet panels, textured bobble stitching, and polished gold hardware creates something truly special. Whether you make this for yourself or as a gift, you can feel proud of every stitch.
Thank you so much for choosing this pattern. I genuinely hope you enjoy every moment of creating your Bordeaux Mini Backpack. If you make one, I would absolutely love to see it! Tag me on Instagram or share a photo in my Facebook group. Seeing your finished projects is the best part of designing.
If you loved this pattern, go ahead and save it to your Pinterest boards so you can find it easily when you are ready to start. And please leave a comment below if you make one. I read every single comment and love hearing how your projects turn out. Happy hooking!
Want a Quick & Easy Printable Version?
Get a clean, beautifully formatted PDF of this pattern — easy to follow step by step, ready to print or save on any device. No scrolling, no distractions, just the pattern.
Get the Printable PDF →