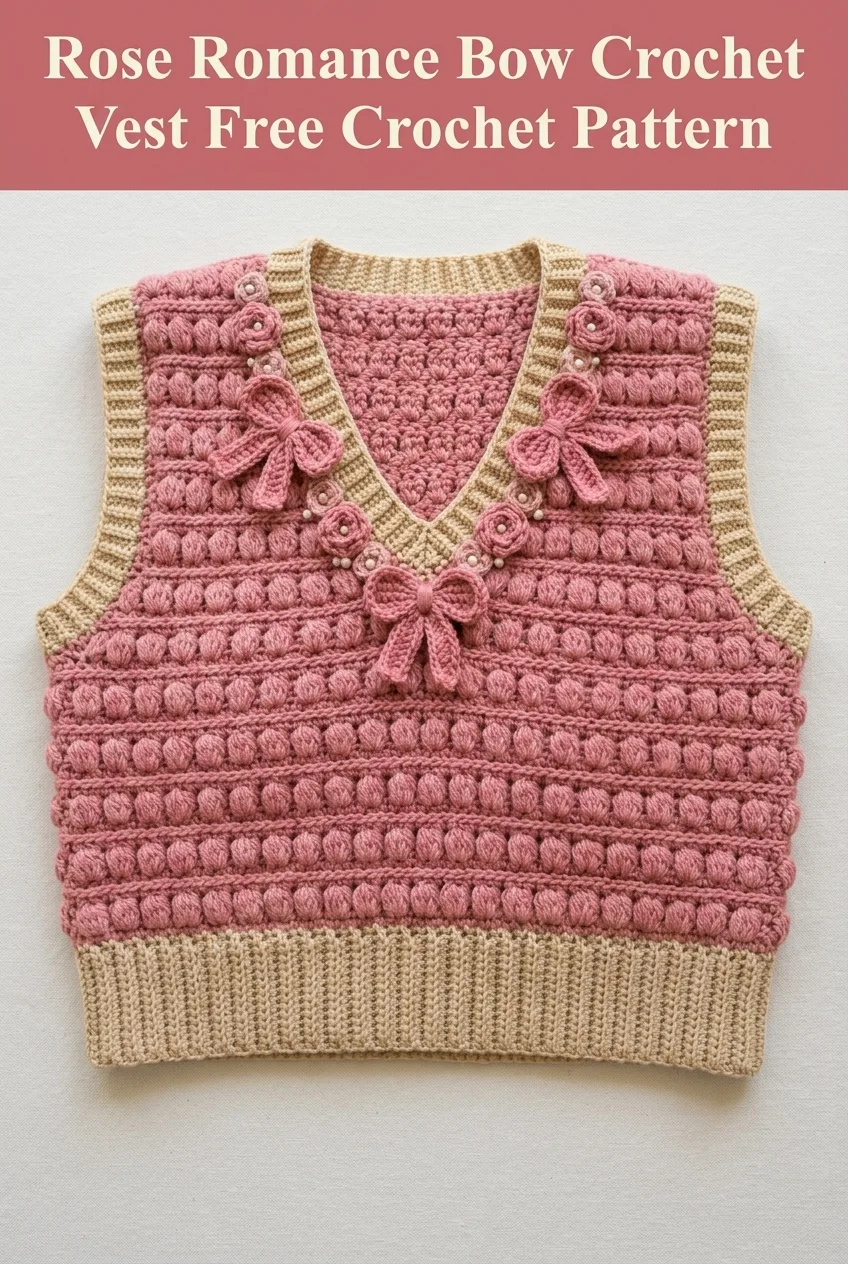
I have been dreaming about designing a vest that feels vintage yet completely fresh, and this one checks every single box. My goal was to create something with striking texture, romantic details, and a flattering V-neckline that works beautifully layered over blouses or worn alone in warmer months. The combination of bobble stitches in dusty rose with that soft sage ribbing took some experimenting to get just right. And those little crocheted bows with pearl centers? They add the most darling finishing touch. I am SO thrilled with how this turned out, and I cannot wait for you to make your own.
About This Rose Romance Bow Crochet Vest Pattern
This crochet vest pattern combines classic techniques with romantic embellishments for a truly eye-catching garment. The body features rows of bobble stitches that create gorgeous dimensional texture, while the contrasting sage green ribbing at the hem and neckline frames everything beautifully. The star of the show is definitely the decorative trim along the V-neck, which includes crocheted bows and small rosettes accented with pearl beads.
The construction is more approachable than it looks. You will work the front and back panels flat, then seam them together at the shoulders and sides. The ribbed hem is worked first, then you build upward with the bobble pattern. The neckline shaping happens gradually through decreases, and the finishing trim gets added last.
Skill level: Intermediate. If you have made a basic sweater or worked bobble stitches before, you are ready for this project. If bobbles are new to you, practice a small swatch first. I promise they become rhythmic and almost meditative once you get going.
Materials Needed
Yarn:
I recommend a smooth yarn with good stitch definition like a cotton blend or acrylic. The bobbles really pop when your yarn has a bit of structure to it.
Hook:
Notions:
Gauge
16 stitches and 12 rows = 4 inches in bobble stitch pattern using 5.0mm hook.
Please, please check your gauge. I know it feels tedious, but garments need to fit. Make a swatch at least 5 inches square, wash and block it, then measure. Adjust your hook size up or down as needed.
Finished Measurements
This pattern is written for size Small with a finished bust of approximately 34 inches. The length from shoulder to hem is approximately 18 inches.
To adjust sizing, add or subtract stitches in multiples of 4 for the bobble pattern to remain consistent.
Stitch Glossary and Abbreviations
Let me walk you through every stitch you will need. Even if you know these, a quick refresher never hurts.
Ch = Chain. Wrap yarn over hook, pull through loop. This is your foundation.
Sl st = Slip stitch. Insert hook, yarn over, pull through stitch AND loop on hook in one motion. Used for joining and moving across stitches invisibly.
Sc = Single crochet. Insert hook, yarn over, pull up a loop (2 loops on hook), yarn over, pull through both loops. A short, tight stitch.
Hdc = Half double crochet. Yarn over, insert hook, yarn over, pull up a loop (3 loops on hook), yarn over, pull through all 3 loops. Slightly taller than single crochet.
Dc = Double crochet. Yarn over, insert hook, yarn over, pull up a loop, (yarn over, pull through 2 loops) twice. A taller stitch that works up quickly.
BLO = Back loop only. Instead of inserting your hook under both loops of the stitch below, go under only the back loop (the one farther from you). This creates ribbed texture.
Bobble = A cluster of stitches worked into the same stitch, then joined at the top for a puffy dimensional effect. For this pattern: (Yarn over, insert hook, yarn over, pull up loop, yarn over, pull through 2 loops) 5 times all in same stitch (6 loops on hook), yarn over, pull through all 6 loops. Give it a little push to the front so it pops out on the right side.
Dec = Decrease. For single crochet decrease (sc2tog): Insert hook in next stitch, pull up loop, insert hook in following stitch, pull up loop (3 loops on hook), yarn over, pull through all 3.
St(s) = Stitch(es)
RS = Right side (the pretty side that faces out)
WS = Wrong side
Pattern Instructions
Ribbed Hem (Make 2, One for Front and One for Back)
The ribbing is worked sideways, then you pick up stitches along the long edge to start the body. This creates that lovely stretchy vertical rib texture.
Using CC (sage green) and 4.5mm hook:
Row 1: Ch 11. Sc in 2nd ch from hook and in each ch across. (10 sts)
Row 2: Ch 1, turn. Sc in BLO of each st across. (10 sts)
Rows 3 through 68: Repeat Row 2.
This creates approximately 17 inches of ribbing. Adjust row count for different sizes by adding or subtracting rows in sets of 4.
Do not fasten off. Rotate your ribbing 90 degrees so the long edge faces up.
Back Panel
Switch to 5.0mm hook and MC (dusty rose).
Foundation Row: Working along the long edge of ribbing, ch 1, work 68 sc evenly across. (68 sts)
Row 1 (WS): Ch 1, turn. Sc in each st across. (68 sts)
Row 2 (RS, Bobble Row): Ch 1, turn. Sc in first 3 sts, *bobble in next st, sc in next 3 sts*. Repeat from * to * across, ending with sc in last st. (68 sts, 16 bobbles)
Row 3: Ch 1, turn. Sc in each st across. (68 sts)
Row 4: Ch 1, turn. Sc in first st, *bobble in next st, sc in next 3 sts*. Repeat from * to * across, ending with bobble in next st, sc in last 2 sts. (68 sts, 17 bobbles)
This offsets your bobbles so they nestle between each other like little bricks.
Row 5: Ch 1, turn. Sc in each st across. (68 sts)
Rows 6 through 33: Repeat Rows 2 through 5 seven more times.
You should have approximately 14 rows of bobbles at this point.
Armhole Shaping:
Row 34: Ch 1, turn. Sl st in first 4 sts, ch 1, sc in next 60 sts, leave remaining 4 sts unworked. (60 sts)
Row 35: Ch 1, turn. Sc2tog, sc across to last 2 sts, sc2tog. (58 sts)
Rows 36 through 37: Repeat Row 35. (54 sts after Row 37)
Rows 38 through 49: Continue in established bobble pattern (alternating bobble rows with plain sc rows) on 54 sts.
Shoulder Shaping:
Row 50: Ch 1, turn. Sc in first 16 sts. Fasten off. Skip center 22 sts for back neck. Join yarn in next st, sc in remaining 16 sts. Fasten off.
Front Panel
Work ribbed hem same as back.
Work Foundation Row and Rows 1 through 33 same as back.
Armhole and V-Neck Shaping:
Row 34: Ch 1, turn. Sl st in first 4 sts, ch 1, sc in next 26 sts for first side. Leave remaining sts unworked. (26 sts on first side)
You will now work each side of the V-neck separately.
Right Front:
Row 35: Ch 1, turn. Sc2tog (neck edge), sc across to last 2 sts, sc2tog (armhole edge). (24 sts)
Row 36: Ch 1, turn. Sc across to last 2 sts, sc2tog at neck edge. (23 sts)
Rows 37 through 49: Continue in bobble pattern, decreasing 1 st at neck edge every other row. (16 sts remain)
Row 50: Sc across. Fasten off. (16 sts)
Left Front:
Join yarn at center front on Row 34.
Row 34: Ch 1, sc in next 26 sts, leave last 4 sts unworked. (26 sts)
Work same as right front, reversing shaping (decrease at opposite edges).
Shoulder Seams
Place front and back panels with right sides together. Using yarn needle and CC, whip stitch or mattress stitch shoulder seams together, joining the 16 sts on each side.
Side Seams
With right sides together, seam side edges from bottom of ribbing up to armhole shaping. Leave armholes open.
Armhole Edging
Using CC and 4.5mm hook, join yarn at underarm seam.
Round 1: Ch 1, sc evenly around armhole opening, working approximately 56 sc. Join with sl st to first sc.
Round 2: Ch 1, sc in BLO of each st around. Join. Fasten off.
Repeat for second armhole.
V-Neck Trim
This is where the magic happens. Using CC and 4.5mm hook, join yarn at center back neck.
Round 1: Ch 1, sc evenly around entire neckline, working approximately 90 to 100 sts. Place a stitch marker at the center front V point. Join with sl st.
Round 2: Ch 1, sc in each st around, working sc2tog at the V point to keep it lying flat. Join. Fasten off.
Crocheted Bows (Make 4 to 5)
These sweet little bows are what give this vest its romantic personality.
Using MC and 5.0mm hook:
Center Band:
Ch 6, sc in 2nd ch from hook and in each ch across. (5 sts)
Rows 2 through 4: Ch 1, turn. Sc in each st. (5 sts)
Fasten off, leaving a long tail.
Bow Loops (make 2 per bow):
Ch 16, sl st in first ch to form loop. Fasten off.
Assembly:
Stack two loops slightly overlapping in the center. Wrap the center band around the middle tightly, use tail to sew closed in back. You now have an adorable tiny bow.
Small Rosettes (Make 2 to 3)
Ch 20.
Row 1: Dc in 4th ch from hook, 2 dc in each ch across. Fasten off.
This creates a naturally spiraling strip. Roll it up from one end, securing with needle and thread as you go, to form a small rosette.
Finishing and Embellishment
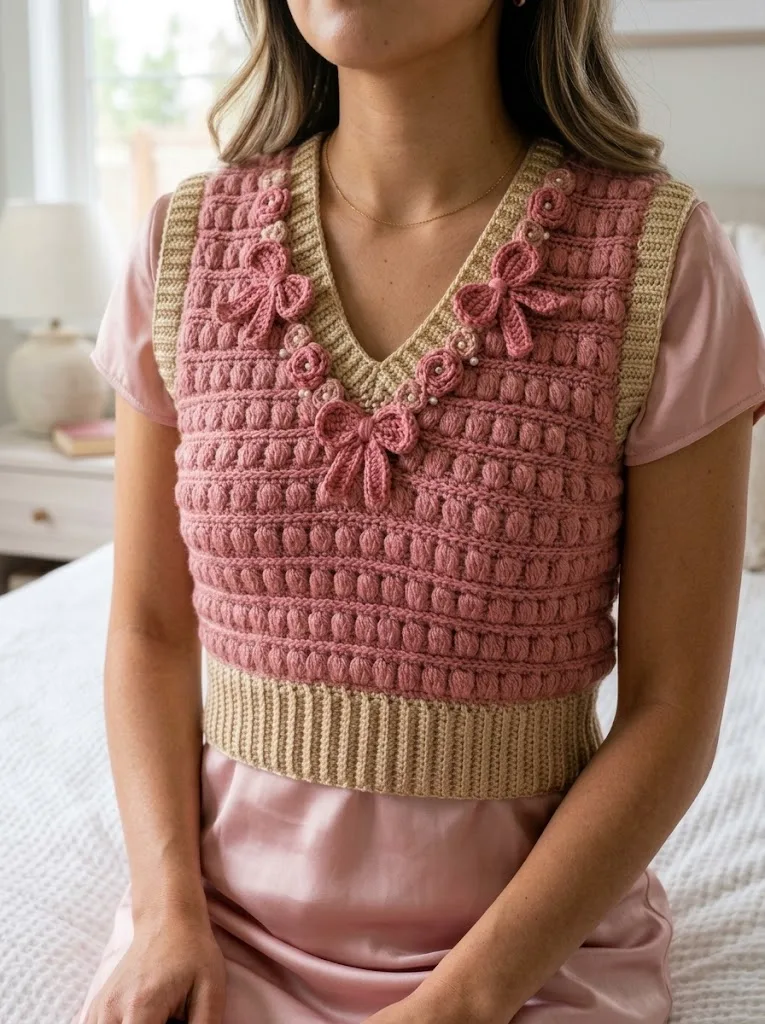
Position your bows and rosettes along the V-neck trim, spacing them evenly. I placed one bow at the center V, one on each side about 2 inches up, and rosettes filling in between. Use yarn needle and matching yarn to tack them in place securely.
Sew a pearl bead to the center of each rosette and the knot of each bow. This is optional but adds such a lovely polished detail.
Weave in all ends. Block gently if needed, being careful not to flatten your bobbles. I recommend wet blocking laid flat rather than steaming.
Styling Tips for Your Finished Vest
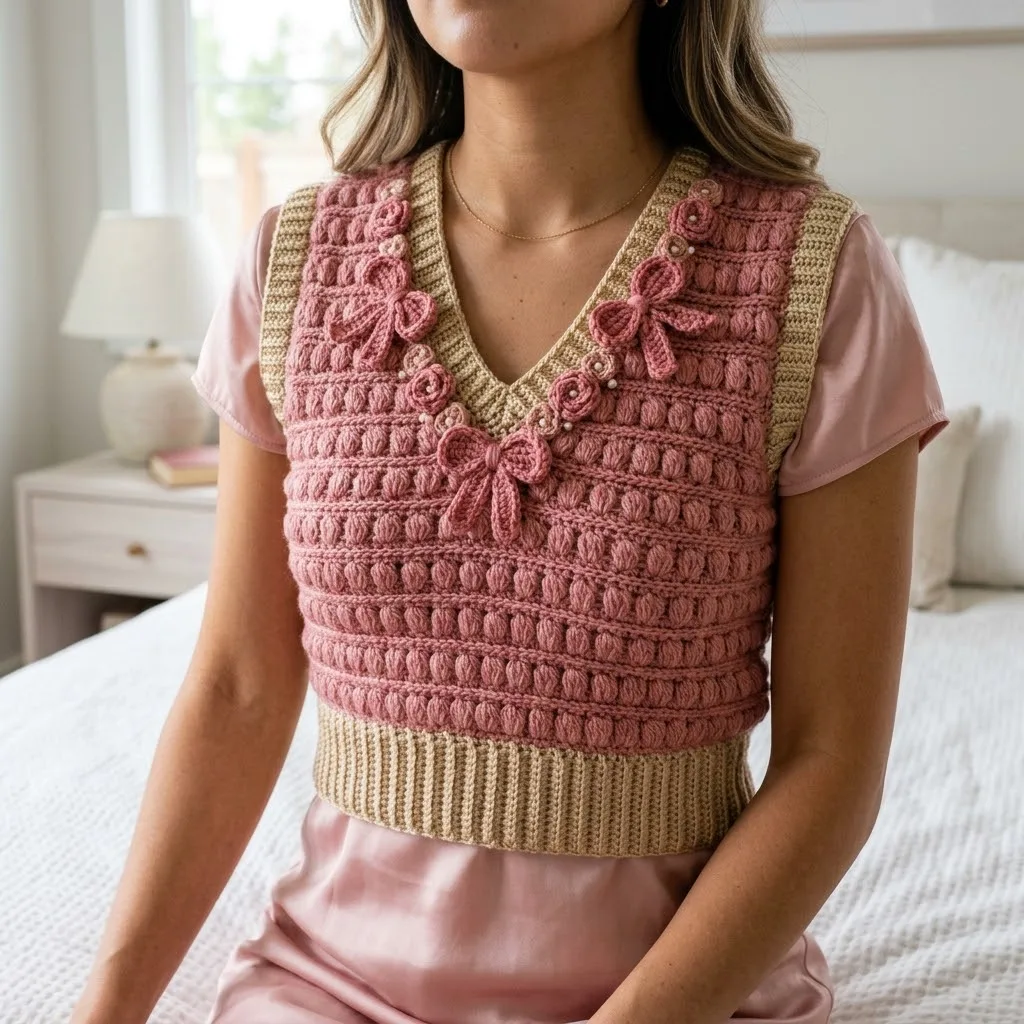
This vest looks absolutely stunning over a silky blouse like in the photo. The contrast between the textured crochet and smooth fabric is chef’s kiss. Try it with:
The color combination of dusty rose and sage is very on trend right now, but you could absolutely swap in burgundy and cream, navy and blush, or even go monochromatic for a more modern look.
Helpful Tips for Success
Bobble troubleshooting: If your bobbles feel too loose or floppy, try using a hook one size smaller just for the bobble portion of the stitch. Some crocheters naturally work bobbles more loosely.
Keeping track: Use a row counter or tally marks on paper. With repeating patterns like this, it is easy to lose your place. Ask me how I know.
Try it on as you go: After completing the armhole shaping, slip the piece over your head to check fit. Much easier to adjust now than after seaming.
Yarn substitution: If using cotton, expect less drape. If using a wool blend, expect more stretch. Both work beautifully, just adjust your gauge accordingly.
Why Crocheters Love This Vest Pattern
The Rose Romance Bow Crochet Vest has that perfect balance of impressive results without overwhelming complexity. The bobble stitch is one of those techniques that looks incredibly intricate to non-crocheters but is actually just a series of simple steps repeated. Your friends will think you are a crochet wizard.
This step by step crochet tutorial gives you everything you need to create a garment you will reach for again and again. It is the kind of project that feels special while you make it and even more special when you wear it.
I really hope you enjoy making this vest as much as I enjoyed designing it. If you complete your Rose Romance Bow Crochet Vest, I would absolutely love to see it. Tag me on Instagram or share a photo in our Facebook group. Seeing your finished projects genuinely makes my whole day.
If you want to come back to this crochet pattern later, go ahead and save it to your Pinterest boards so it is easy to find when you are ready to cast on. And please drop a comment below if you have any questions or just want to share how yours turned out. I read every single one and love hearing from you.
