
This is a top-down baby dress with a fitted bodice and four tiered lace skirt layers. The set includes a matching beanie hat. You will use half double crochet for the bodice and a fan shell stitch for the skirt. The ombré effect comes from changing colors between tiers, moving from cream through tan and dusty mauve to chocolate brown.
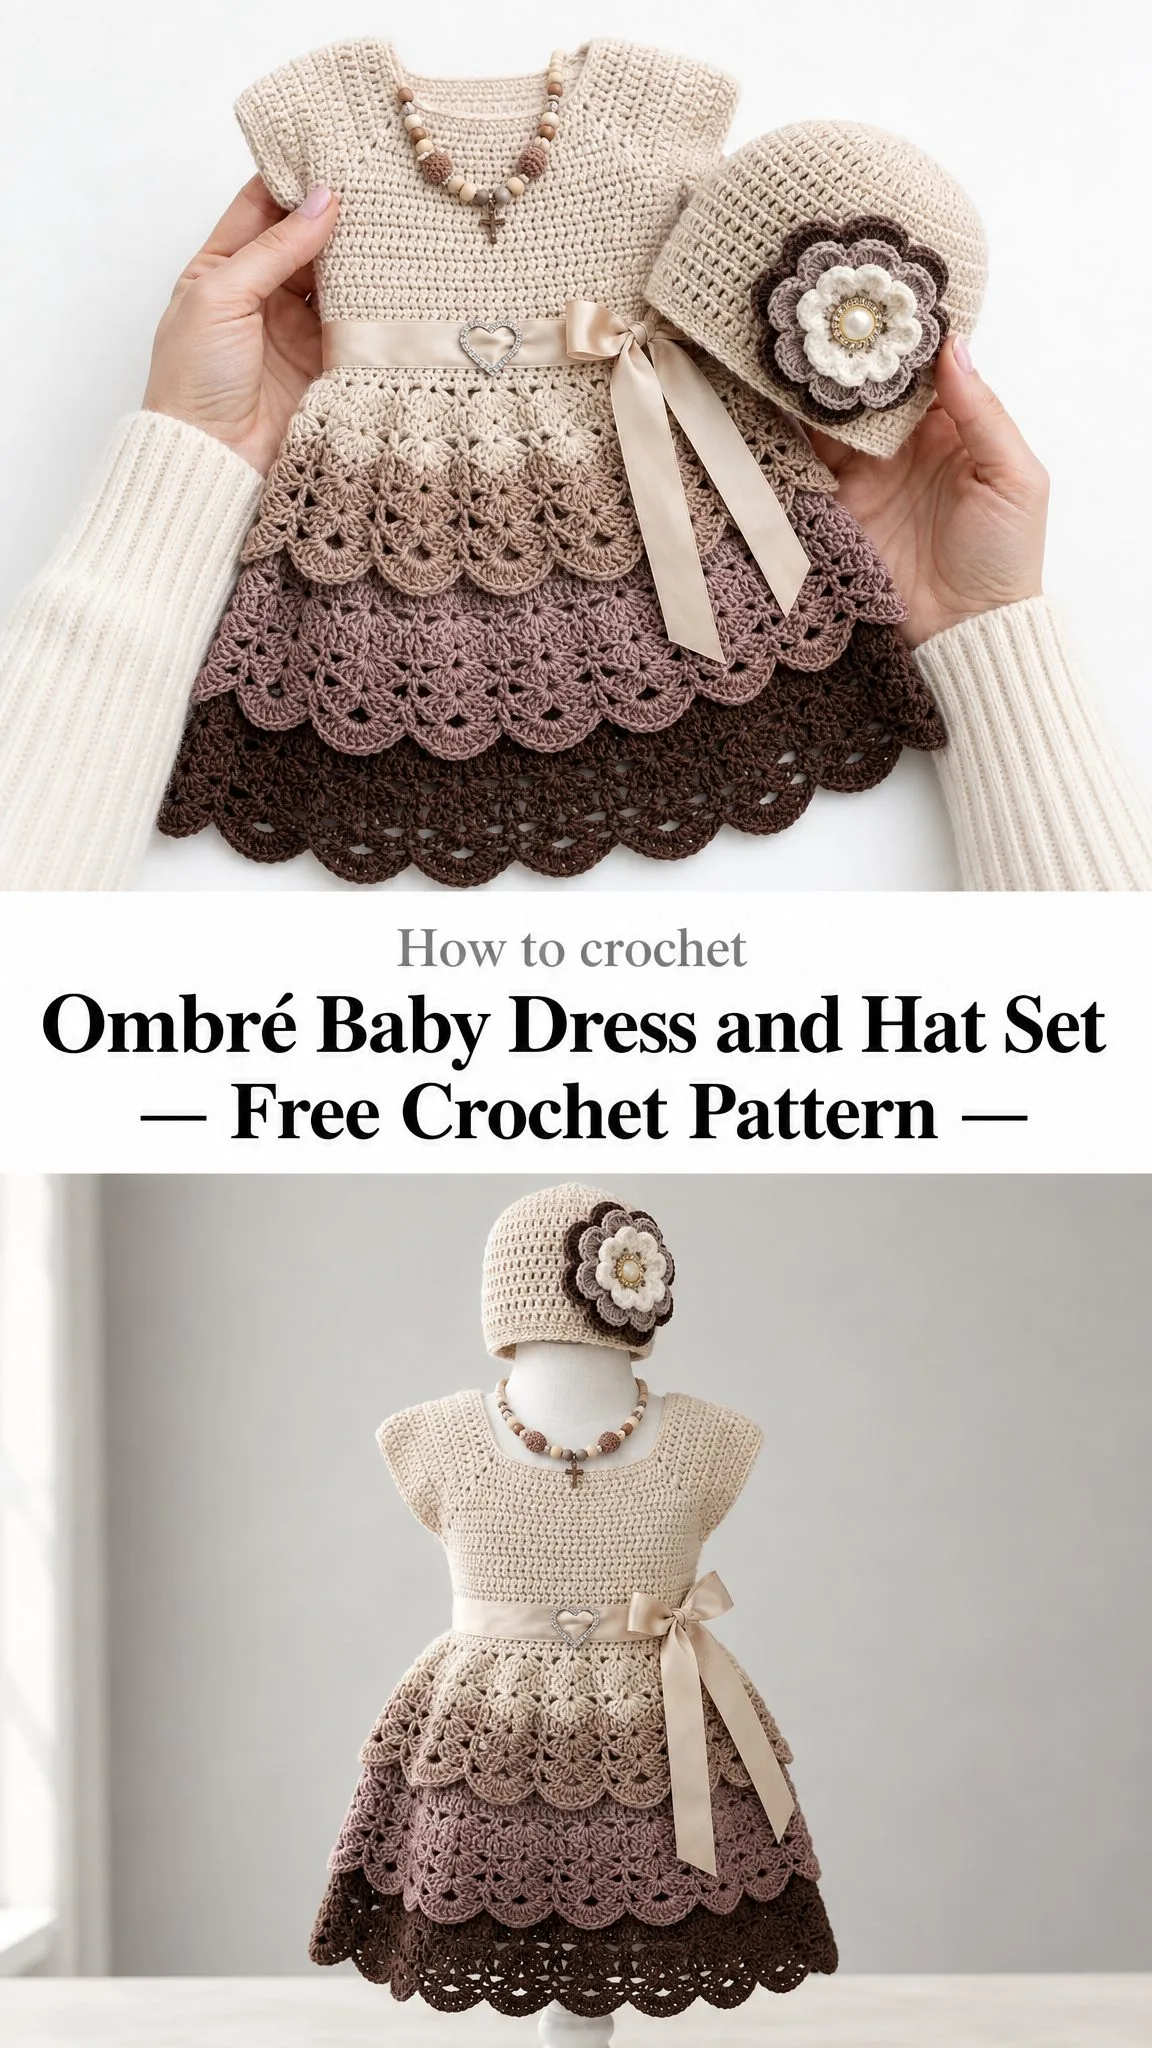
I designed this set for special occasions. Baptisms, first birthdays, portrait sessions. The kind of moments you want to remember forever. The dress fits a 12 to 18 month baby girl and works up in about 13 to 19 hours total.
If you have made at least two garments before, you can handle this pattern confidently. The bodice is straightforward. The skirt tiers require some attention to stitch placement, but I will walk you through every single step.
Why This Ombré Baby Dress Pattern Works So Well
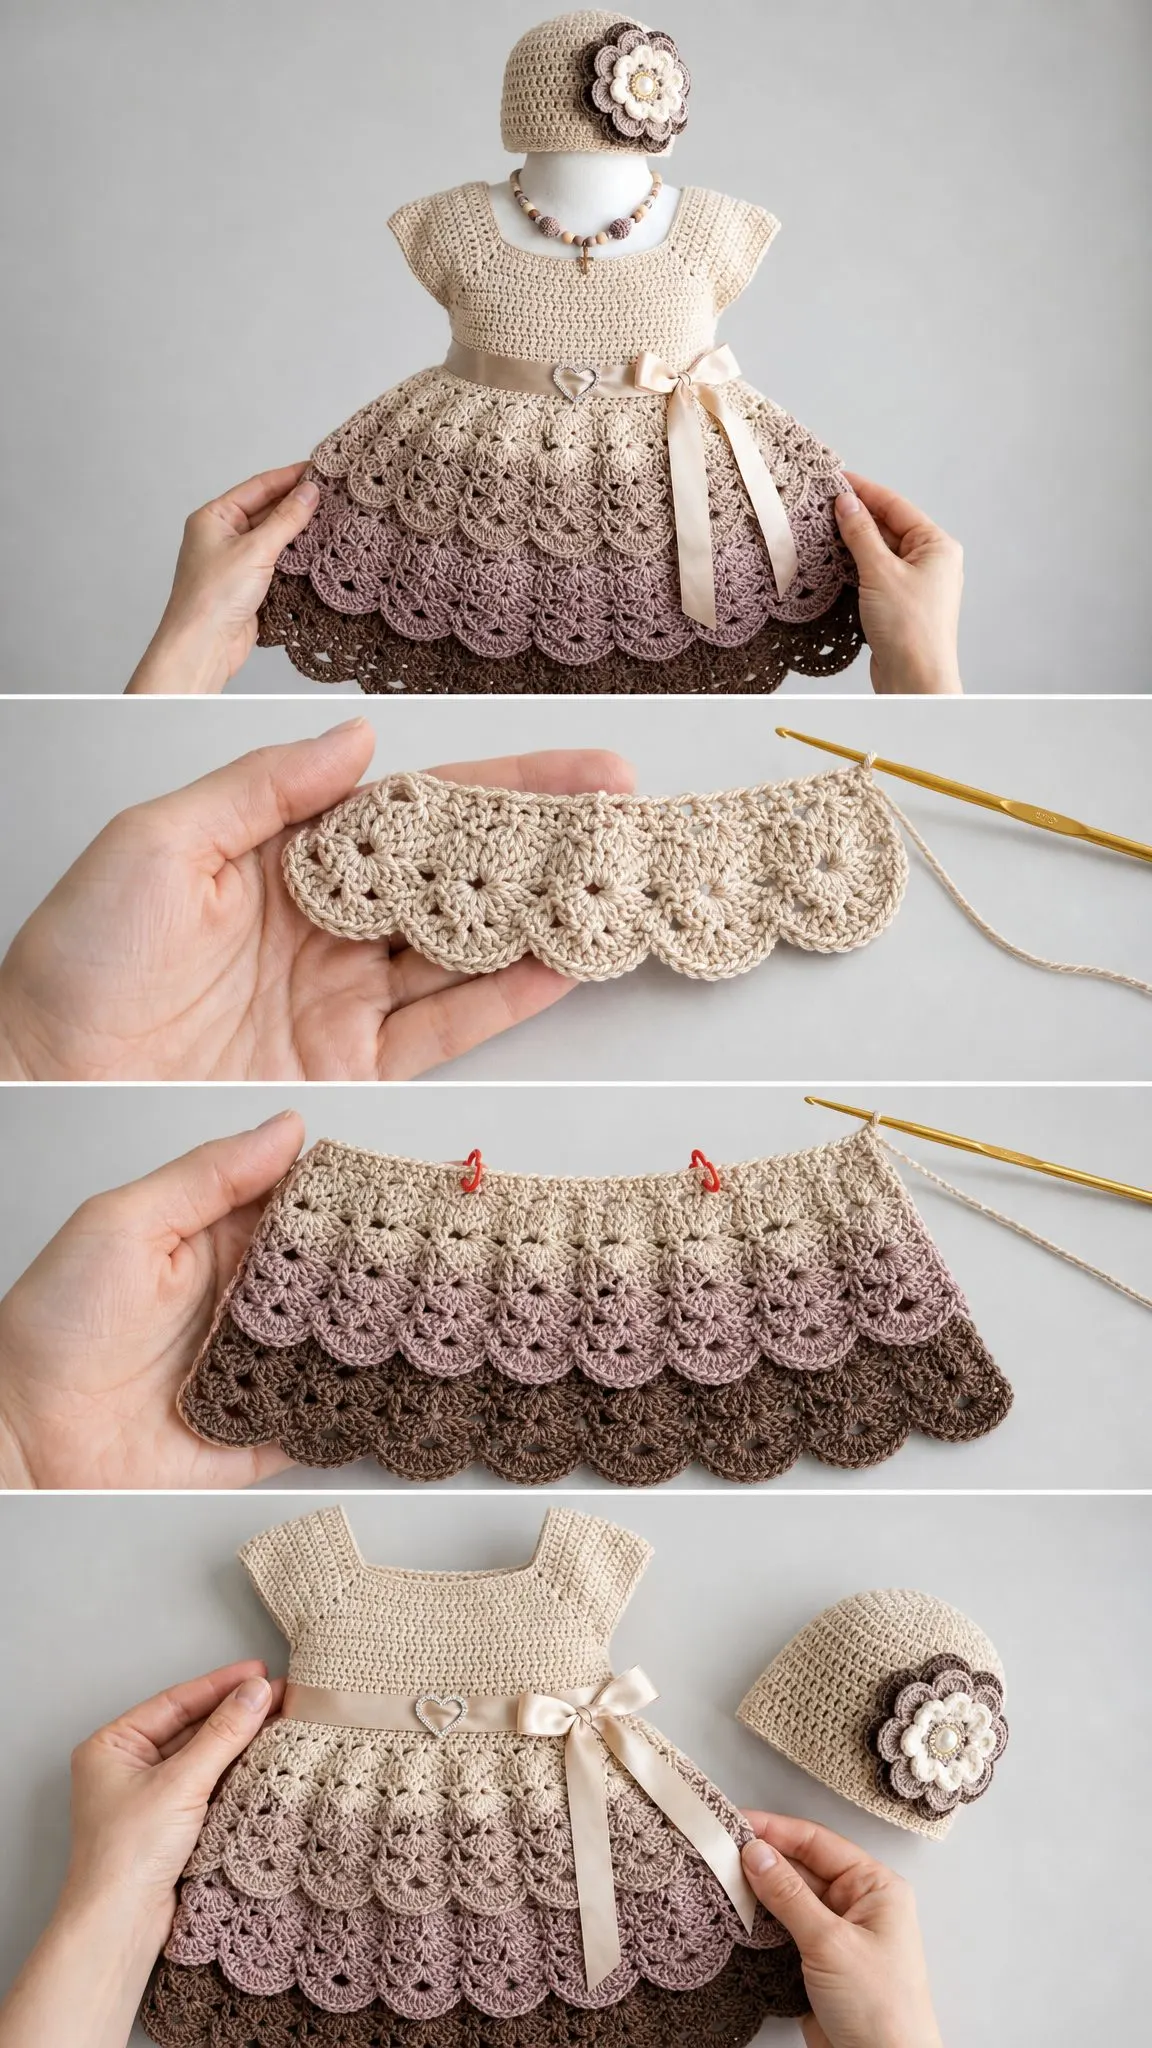
The beauty of this design lies in how the tiers layer over each other. Each skirt tier attaches to the back loops of the tier above it. This creates that gorgeous ruffled effect you see in the finished piece. The scalloped edges on each tier add extra dimension and movement.
The fan shell stitch creates the lace pattern in the skirt. Seven double crochets worked into the same space form each fan. It sounds fancy, but once you get the rhythm, it flows quickly.
The color changes happen between tiers, not within rounds. This means no complicated colorwork. You simply fasten off one color and join the next at the back seam. Clean and simple.
Materials You Will Need
Yarn (DK weight, approximately 590 yards / 540 meters total):
Suggested Yarns:
Paintbox Yarns Simply DK works beautifully for this project. The stitch definition shows off the lace tiers perfectly. Try Vanilla Cream, Soft Fudge, Dusty Rose, and Coffee Bean.
Lion Brand Feels Like Butta DK is another excellent choice. The microfiber texture feels incredibly soft against baby skin.
For an heirloom piece, Drops Safran in 100 percent Egyptian cotton gives the lace wonderful structure.
Hooks:
The larger hook on the skirt creates a more open, drapey lace. This is intentional, so do not skip it.
Notions:
Finished Measurements
Dress (fits 12 to 18 months):
Hat (fits head circumference 17 to 18 inches / 43 to 46 cm)
Gauge
Getting gauge right matters for garments. Take time to swatch before you begin.
With D-3 hook in half double crochet:
18 hdc x 12 rows = 4 inches / 10 cm
With E-4 hook in fan shell stitch:
1 fan shell repeat = approximately 1.5 inches / 3.8 cm wide
3 rows of fan shell lace = approximately 2.25 inches / 5.7 cm tall
If your swatch is too small, go up a hook size. Too large, go down.
Abbreviations and Stitch Definitions
Let me walk you through every stitch you will use. Even if you know these, read through for my specific definitions.
ch = chain. Wrap yarn over hook, pull through loop on hook.
sl st = slip stitch. Insert hook, yarn over, pull through stitch and loop on hook in one motion.
sc = single crochet. Insert hook, yarn over, pull up a loop (2 loops on hook), yarn over, pull through both loops.
hdc = half double crochet. Yarn over, insert hook, yarn over, pull up a loop (3 loops on hook), yarn over, pull through all 3 loops.
dc = double crochet. Yarn over, insert hook, yarn over, pull up a loop (3 loops on hook), yarn over, pull through 2 loops, yarn over, pull through remaining 2 loops.
st(s) = stitch(es)
sp(s) = space(s)
sk = skip
pm = place marker
sm = slip marker
rnd = round
BLO = back loop only. Work into only the back loop of the stitch, leaving the front loop unworked.
ch-sp = chain space. The gap created by a chain in the previous row/round.
Special Stitches for This Pattern
Fan Shell Stitch
Work 7 dc into the same chain space or stitch. This creates a fan shape. You will use this throughout the skirt tiers.
Scallop Edging
Sl st into first ch-sp. Ch 3 (counts as first dc). Work 4 more dc into same ch-sp (5 dc total). Sl st into next ch-sp. Repeat around. This decorates the bottom of each tier.
Crochet Flower (for hat)
You will make three layers and stack them.
Layer 1, largest, Color D: Ch 4, join with sl st to form ring. Ch 1. Work (sc, ch 2, dc, ch 2) 6 times into ring. Sl st to first sc. Fasten off. (6 petals)
Layer 2, medium, Color C: Ch 4, join with sl st. Ch 1. Work (sc, ch 2, dc, ch 2) 5 times into ring. Sl st to first sc. Fasten off. (5 petals)
Layer 3, small, Color A: Ch 4, join with sl st. Ch 1. Work (sc, ch 2, dc, ch 2) 4 times into ring. Sl st to first sc. Fasten off. (4 petals)
Stack largest to smallest. Thread a pearl bead through the center and secure from the back.
Pattern Instructions
Dress Bodice
The bodice is worked top down in continuous rounds using Color A and D-3 hook.
Foundation: Ch 68. Taking care not to twist, sl st to first ch to join. (68 ch)
Rnd 1: Ch 2 (counts as hdc), hdc in each ch around. Sl st to top of ch-2. (68 hdc)
Rnds 2-3: Ch 2, hdc in each st around. Sl st to join. (68 hdc)
Rnd 4 (raglan setup): Ch 2, hdc in next 14 sts (right front), pm in last st, hdc in next 6 sts (right sleeve), pm in last st, hdc in next 28 sts (back), pm in last st, hdc in next 6 sts (left sleeve), pm in last st, hdc in next 13 sts (left front), hdc in first ch-2 sp. Sl st to join. (68 hdc total)
Rnd 5 (raglan increase): Ch 2, hdc to 1 st before first marker, 2 hdc in next st, sm, 2 hdc in next st. Repeat this increase pattern at each marker. Hdc to end. Sl st to join. (76 hdc)
Rnd 6: Ch 2, hdc in each st around. Sl st. (76 hdc)
Rnd 7: Repeat Rnd 5 increase pattern. (84 hdc)
Rnd 8: Ch 2, hdc in each st around. Sl st. (84 hdc)
Rnd 9: Repeat Rnd 5 increase pattern. (92 hdc)
Rnd 10: Ch 2, hdc in each st around. Sl st. (92 hdc)
Rnd 11: Repeat Rnd 5 increase pattern. (100 hdc)
Rnd 12: Ch 2, hdc in each st around. Sl st. (100 hdc)
Rnd 13 (join body): Ch 2. Hdc in next 18 sts (right front). Ch 4 (underarm bridge), skip next 14 sleeve sts. Hdc in next 36 sts (back). Ch 4 (underarm bridge), skip next 14 sleeve sts. Hdc in next 16 sts (left front). Sl st to join. (70 hdc plus 8 ch)
Rnd 14: Ch 2, hdc in each hdc and each ch around. Sl st. (78 hdc)
Rnds 15-16: Ch 2, hdc in each st around. Sl st. (78 hdc)
Rnd 17: Ch 2, hdc in next 12 sts, 2 hdc in next st. Repeat (hdc in next 12 sts, 2 hdc in next st) 5 more times. Sl st. (84 hdc)
Rnds 18-19: Ch 2, hdc in each st around. Sl st. (84 hdc)
Rnd 20 (eyelet waistband): Ch 3 (counts as dc), sk 1 st, (dc in next st, ch 1, sk 1 st) around. Sl st to top of ch-3. (42 dc, 42 ch-1 sps)
Rnd 21: Ch 2, hdc in each dc and each ch-1 sp around. Sl st. (84 hdc)
Checkpoint: Bodice should measure approximately 6 inches from neckline to waist and 19 inches around.
Back Opening
The bodice needs a button closure at the back. Identify center back, then count 7 sts left and 7 sts right. Mark these 14 sts.
Work the back panel flat for 2 rows of hdc (turning, ch 2 each row). Fasten off.
Rejoin yarn to front panel. Work 2 rows of hdc flat. Fasten off.
Button loops: Join Color A at top right corner of back opening.
Row 1: Sc evenly down edge (approximately 8 sc).
Row 2: Sc in first st, (ch 3, sk 1 st, sc in next 2 sts) 3 times, sc to end. Fasten off. (3 button loops)
Sew 3 buttons to left back edge, aligned with loops.
Skirt Tier 1 (Color B)
Switch to E-4 hook. Join Color B to any st of Rnd 21.
Setup Rnd: Ch 1. Work 2 sc in each hdc around. Sl st. (168 sc)
Tier 1 Rnd 1: Ch 4 (counts as dc plus ch 1). Sk 2 sc, dc in next sc, (ch 1, sk 2 sc, dc in next sc) around. Sl st. (56 dc, 56 ch-1 sps)
Tier 1 Rnd 2 (fan shells): Sl st into first ch-1 sp. Ch 3. Work 6 more dc into same sp. Sk next ch-1 sp. (7 dc fan in next ch-1 sp, sk next ch-1 sp) around. Sl st. (28 fans, 196 dc total)
Tier 1 Rnd 3: Ch 1. Sc in center dc of first fan. Ch 5. (Sc in center dc of next fan, ch 5) around. Sl st. (28 sc, 28 ch-5 sps)
Tier 1 Rnd 4 (scallop edge): Sl st into first ch-5 sp. Ch 3. Work 4 more dc into same sp. Sl st into next ch-5 sp. (5 dc into same ch-5 sp, sl st into next ch-5 sp) around. Sl st. Fasten off Color B.
Skirt Tier 2 (Color C)
Join Color C to the BLO of any center dc in Tier 1 Rnd 2 fans.
Setup Rnd: Ch 1. Sc into BLO of each dc of every fan around. Sl st. (196 sc)
Tier 2 Rnd 1: Ch 4. Sk 2, dc in next, (ch 1, sk 2, dc in next) around. Sl st. (66 dc, 66 ch-1 sps)
Tier 2 Rnd 2: Sl st into first ch-1 sp. Ch 3. Work 6 more dc. Sk next ch-1 sp. (7 dc fan in next ch-1 sp, sk next ch-1 sp) around. Sl st. (33 fans, 231 dc)
Tier 2 Rnd 3: Ch 1. Sc in center dc of first fan, ch 5. Repeat around. Sl st. (33 sc, 33 ch-5 sps)
Tier 2 Rnd 4: Work scallop edge as Tier 1. Fasten off Color C. (33 scallops)
Skirt Tier 3 (Color C)
Join Color C to BLO of any center dc in Tier 2 Rnd 2 fans.
Setup Rnd: Ch 1. Sc into BLO of each dc of every fan. Sl st. (231 sc)
Tier 3 Rnd 1: Ch 4. Sk 2, dc in next, (ch 1, sk 2, dc in next) around. Work 1 extra dc with ch 1 to reach 78 sps. Sl st. (78 ch-1 sps)
Tier 3 Rnd 2: (7 dc fan in next ch-1 sp, sk next ch-1 sp) 39 times. Sl st. (39 fans, 273 dc)
Tier 3 Rnd 3: Ch 1. Sc in center dc, ch 5. Repeat around. Sl st. (39 sc, 39 ch-5 sps)
Tier 3 Rnd 4: Work scallop edge. Fasten off Color C. (39 scallops)
Skirt Tier 4 (Color D)
Join Color D to BLO of any center dc in Tier 3 Rnd 2.
Setup Rnd: Ch 1. Sc into BLO of each dc of every fan. Sl st. (273 sc)
Tier 4 Rnd 1: Ch 4. Sk 2, dc in next, (ch 1, sk 2, dc in next) around. Add 1 extra dc/ch to reach 92 sps. Sl st. (92 ch-1 sps)
Tier 4 Rnd 2: (7 dc fan in ch-1 sp, sk next ch-1 sp) 46 times. Sl st. (46 fans, 322 dc)
Tier 4 Rnd 3: Ch 1. Sc in center dc, ch 5. Repeat around. Sl st. (46 sc, 46 ch-5 sps)
Tier 4 Rnd 4: Work scallop edge. Fasten off Color D. (46 scallops)
Checkpoint: Dress should measure 15 inches from shoulder to bottom scallop.
Hat
Work in Color A with D-3 hook.
Crown: Magic ring or ch 4, sl st to form ring.
Rnd 1: Ch 2, work 9 hdc into ring. Sl st. (10 hdc)
Rnd 2: Ch 2, 2 hdc in each st around. Sl st. (20 hdc)
Rnd 3: Ch 2, (hdc in next st, 2 hdc in next st) around. Sl st. (30 hdc)
Rnd 4: Ch 2, (hdc in next 2 sts, 2 hdc in next st) around. Sl st. (40 hdc)
Rnd 5: Ch 2, (hdc in next 3 sts, 2 hdc in next st) around. Sl st. (50 hdc)
Rnd 6: Ch 2, (hdc in next 4 sts, 2 hdc in next st) around. Sl st. (60 hdc)
Rnd 7: Ch 2, (hdc in next 5 sts, 2 hdc in next st) around. Sl st. (70 hdc)
Rnd 8: Ch 2, (hdc in next 6 sts, 2 hdc in next st) around. Sl st. (80 hdc)
Rnds 9-15: Ch 2, hdc in each st around. Sl st. (80 hdc)
Rnd 16 (brim): Ch 1. Sc in each st around. Sl st. Fasten off. (80 sc)
Attach assembled flower to left side of brim.
Finishing Your Baby Dress Set
Ribbon Sash: Thread the 36 inch ribbon through the eyelet round (Rnd 20), weaving in and out of each ch-1 sp. Begin and end at front center. Tie a large bow at front right side. Trim ends diagonally or seal with a lighter to prevent fraying.
If using the heart buckle, thread ribbon through the buckle hardware before tying.
Blocking: Pin the dress and hat to blocking mats. Mist with water and allow to dry completely. This opens up the lace and evens out your stitches.
Weave in all ends with your tapestry needle. Take extra care around the tier connections.
Size Customization Tips
For 6 to 9 months (chest 17 inches): Start bodice with ch 60. Begin Tier 1 with 144 sc. Shorten bodice to 5 inches.
For 2T to 3T (chest 21 inches): Start bodice with ch 76. Begin Tier 1 with 192 sc. Extend bodice to 7 inches.
I hope you love making this ombré baby dress and hat set as much as I loved designing it. The layered tiers create such a stunning effect, and watching the colors shift from cream to chocolate brown is genuinely satisfying.
If you make this set, I would absolutely love to see it. Tag me on Instagram or share your photo on Facebook. Seeing your finished projects makes my whole week.
Save this pattern to your Pinterest boards so you can find it when you are ready to start. And please drop a comment below if you have any questions or when you finish your dress. I read every single one.
