
This project is SERIOUSLY one of the most impressive doll clothes patterns I have ever made. Three cascading ruffled tiers, a perfectly fitted bodice, tiny puff sleeves, and adorable decorative buttons. It looks like it belongs in a boutique window.
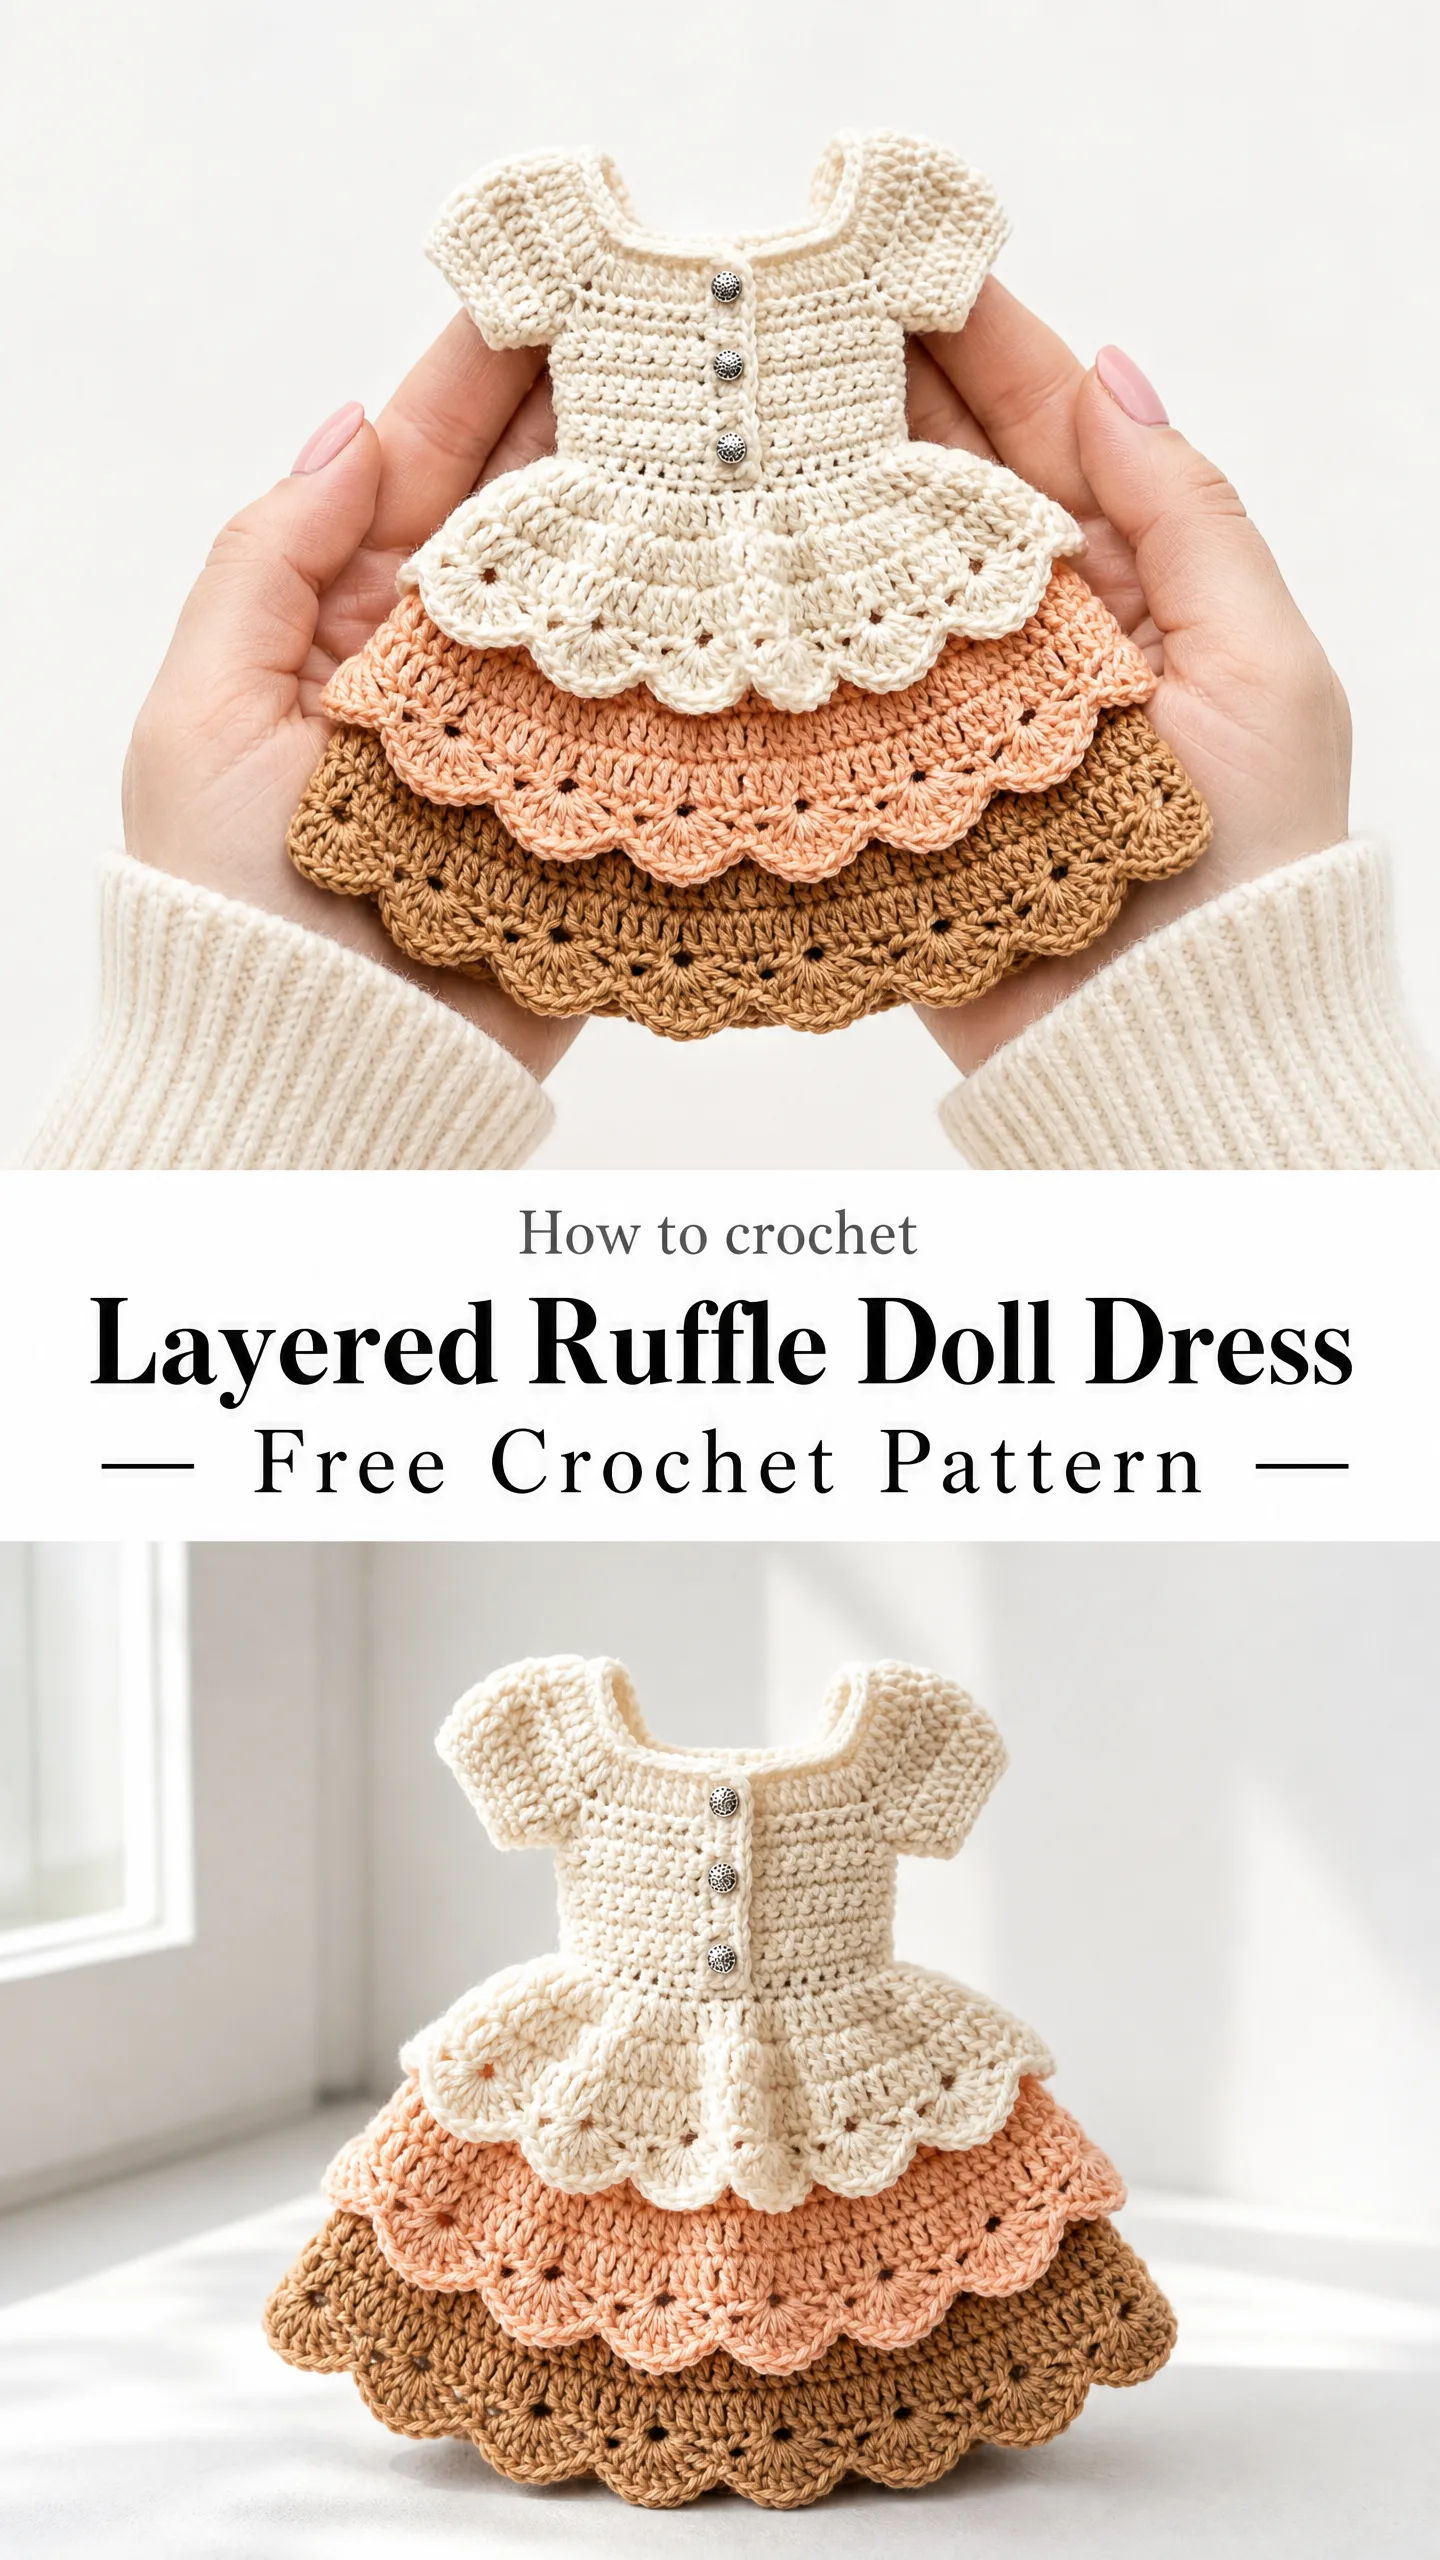
Here is the best part. If you can single crochet and double crochet, you can absolutely make this. The construction is straightforward once you understand the steps. Each tier builds on the last, and the scalloped edges happen almost like magic with a simple shell stitch repeat.
This layered ruffle doll dress crochet pattern takes about six to nine hours for an experienced crocheter. A bit longer if it is your first time working at this scale. The finished dress fits standard 11 to 12 inch fashion dolls and makes an incredible gift for any little one who loves dressing up their toys.
Why This Doll Dress Pattern Stands Out
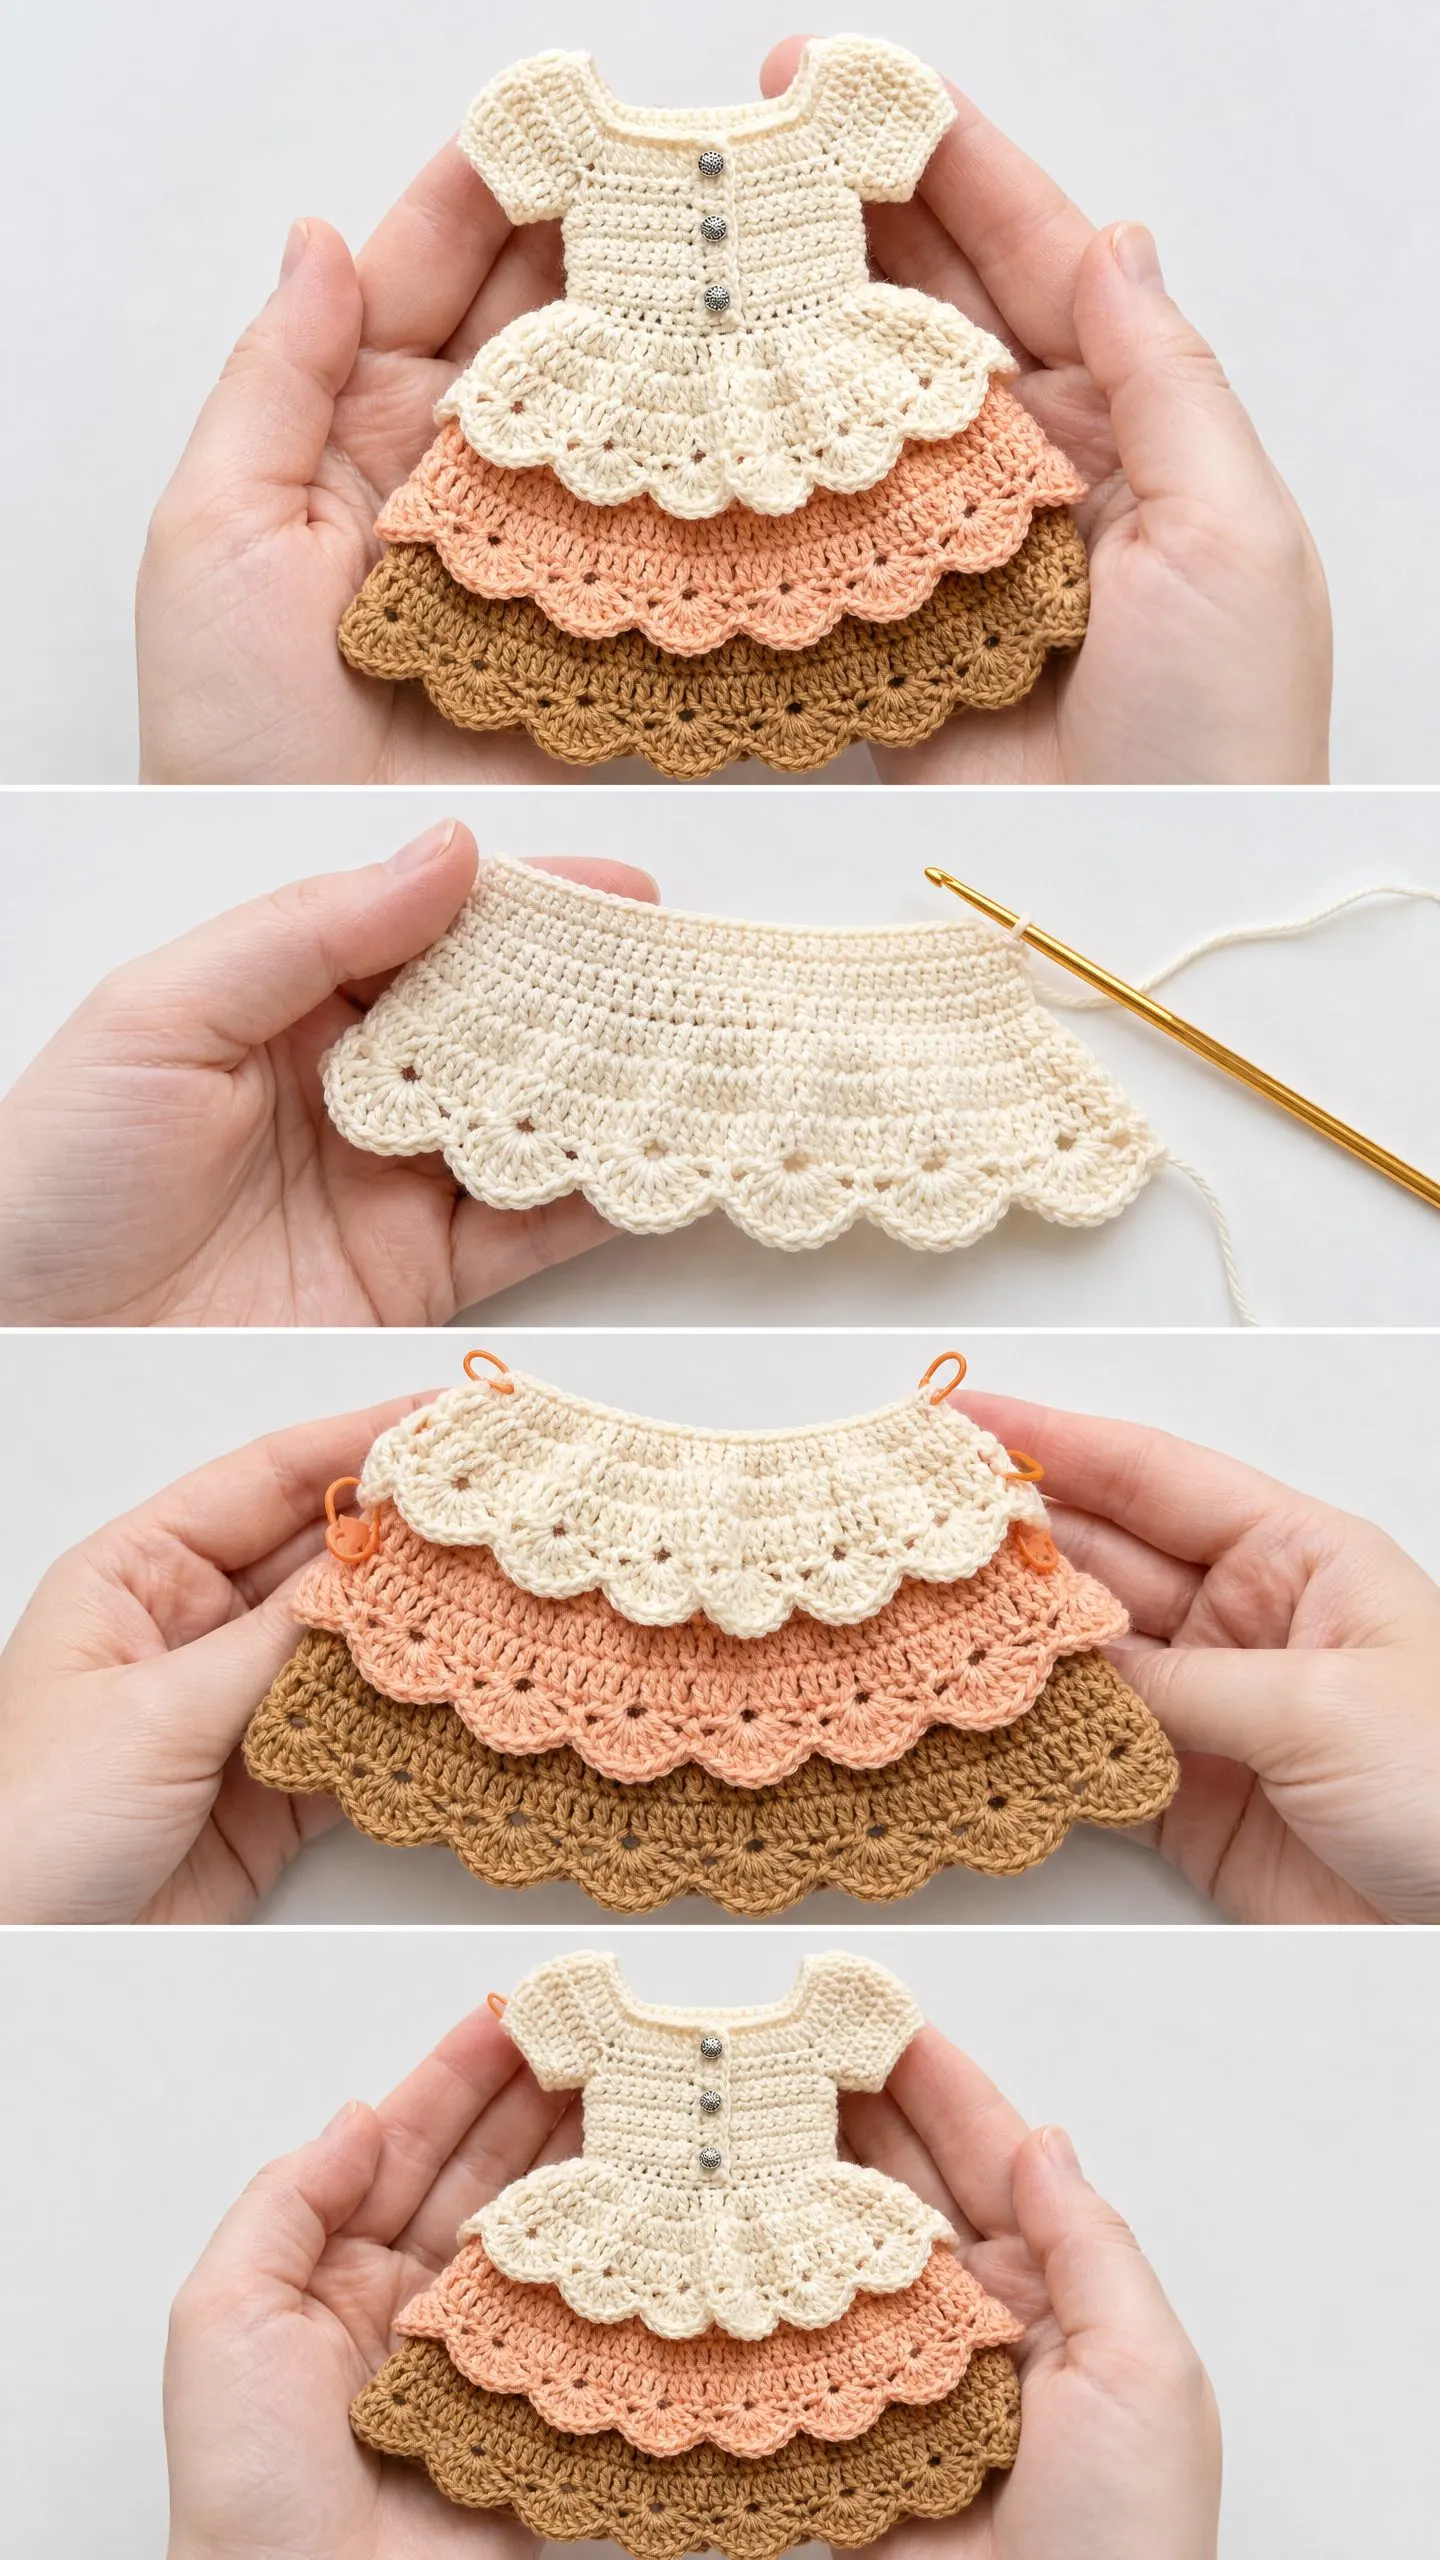
The secret to this design is the tiered construction. Instead of working one big skirt, you create three separate ruffled layers that attach at different points. This gives you that gorgeous cascading effect where each tier peeks out below the one above it.
The color palette moves from cream at the bodice and top tier, through soft peach at the middle, down to warm tan at the bottom. It creates an earthy ombre effect that looks sophisticated but still playful. Of course, you can swap these colors for anything you like. Pastels, brights, or even a monochrome look in different shades of the same color would be stunning.
Each tier ends with a scalloped shell stitch edge that fans out into little points. These details make the dress look far more complicated than it actually is. That is the kind of payoff I love in a crochet project.
Materials You Will Need
Gather these supplies before you start. Having everything ready makes the process so much smoother.
Yarn: Size 3 light DK weight or heavy fingering weight cotton or cotton blend yarn in three colors.
Hook: US B-1 / 2.25 mm crochet hook, or size needed to achieve gauge
Notions:
Recommended Yarn Options
Paintbox Yarns Simply DK in Champagne White, Blush Pink, and Caramel Brown works beautifully. It has excellent stitch definition and holds its shape on small pieces.
Lion Brand 24/7 Cotton in Ecru, Rose, and Camel is widely available and easy to care for.
Drops Safran in Off White, Powder Pink, and Sand produces a slightly firmer fabric that is ideal for doll garments.
Avoid fuzzy or textured yarns because they will obscure your pretty scalloped stitch detail. Stick with smooth cotton or cotton blends for the best results.
Gauge
18 single crochet (sc) stitches by 22 rows equals 2 inches by 2 inches (5 cm by 5 cm) in single crochet with US B-1 / 2.25 mm hook, blocked.
Gauge matters a lot at this scale. A difference of even one stitch per inch will throw off the fit significantly. Take the time to check your gauge before starting.
To check: Chain 20 with Color A and work 22 rows of single crochet (sc). Block lightly. Measure the center 18 stitches and center 22 rows. Adjust your hook size as needed.
Finished Measurements
These measurements fit standard 11 to 12 inch fashion dolls with a chest circumference of approximately 8.5 to 9.5 inches.
Abbreviations and Stitch Definitions
Before we dive into the instructions, let me explain every stitch and term you will encounter.
ch = chain. Wrap yarn over hook and pull through the loop on your hook.
sl st = slip stitch. Insert hook, yarn over, pull through both the stitch and the loop on your hook in one motion.
sc = single crochet. Insert hook into stitch, yarn over, pull up a loop (two loops on hook), yarn over, pull through both loops.
hdc = half double crochet. Yarn over, insert hook into stitch, yarn over, pull up a loop (three loops on hook), yarn over, pull through all three loops.
dc = double crochet. Yarn over, insert hook into stitch, yarn over, pull up a loop (three loops on hook), yarn over, pull through two loops, yarn over, pull through remaining two loops.
st(s) = stitch(es)
sp(s) = space(s)
sk = skip
rep = repeat
pm = place marker
rm = remove marker
RS = right side (the pretty side that faces outward)
WS = wrong side (the inside of the garment)
beg = beginning
sc2tog = single crochet two together. This is a decrease stitch. Insert hook in first stitch, yarn over, pull up a loop. Insert hook in next stitch, yarn over, pull up a loop. You now have three loops on your hook. Yarn over, pull through all three loops at once.
[ ] = work instructions within brackets the number of times indicated
( ) = stitch count at end of row or round
Special Stitches Explained
Shell Stitch (shell): Work 5 double crochet (dc) all into the same stitch or space. This creates the fan shaped scallop you see at the bottom of each skirt tier.
Here is how to do it step by step:
1. Insert hook into the designated stitch or space
2. Yarn over, pull up a loop, yarn over, pull through two loops twice to complete the first dc
3. Work four more dc into that same stitch without moving to a new stitch
4. You now have 5 dc clustered together fanning outward
5. This counts as one shell
Scallop Edging (sc-scallop): This creates the decorative edge on each tier.
1. Slip stitch into first stitch
2. Chain 1, sc into same stitch
3. Skip 2 stitches
4. Work 5 dc (one shell) into the next stitch
5. Skip 2 stitches
6. Sc into the next stitch
7. Repeat steps 3 through 6 around
This repeat uses 6 stitches and produces one scallop point. Your tier’s final round stitch count must be a multiple of 6 for this edging to work out evenly.
Pattern Notes Before You Begin
Read through these tips first. They will save you confusion later.
1. The bodice front and back are worked flat in rows, then seamed at the shoulders and sides.
2. The buttons are decorative only. The dress slips on over the doll’s head due to its small scale. If you want functional buttonholes, you can work chain 2 buttonholes by replacing 2 sc with ch 2, skip 2 in rows 3, 6, and 9 of the front bodice.
3. Each skirt tier is worked separately and attached. Tier 1 (cream) goes at the waist. Tier 2 (peach) attaches below Tier 1. Tier 3 (tan) attaches below Tier 2.
4. When changing colors between tiers, fasten off cleanly and weave in ends before attaching the next tier.
5. All turning chains in single crochet rows count as 0 stitches unless specifically noted.
6. Mark the right side (RS) of your bodice front on Row 1 with a stitch marker. This is the smooth face of the fabric.
7. The sleeves are small and worked separately, then sewn into the armhole openings.
Step by Step Instructions
Bodice Front
Using Color A and US B-1 / 2.25 mm hook.
Row 1 (RS): Ch 43, sc in 2nd ch from hook and in each ch across. Turn. (42 sc)
Row 2 (WS): Ch 1, sc in each st across. Turn. (42 sc)
Rows 3 through 10: Ch 1, sc in each st across. Turn. (42 sc each row)
After Row 10, your bodice front should measure approximately 2 inches from the starting chain. Now we shape the armholes and neckline.
Armhole Shaping
Row 11: Ch 1, sl st across first 3 sts, ch 1, sc in next 36 sts. Leave last 3 sts unworked. Turn. (36 sc)
Row 12: Ch 1, sc2tog, sc in next 32 sts, sc2tog. Turn. (34 sc)
Row 13: Ch 1, sc2tog, sc in next 30 sts, sc2tog. Turn. (32 sc)
Rows 14 and 15: Ch 1, sc in each st across. Turn. (32 sc each row)
Neckline Shaping (Right Shoulder)
Row 16 (RS): Ch 1, sc in first 10 sts. Leave remaining sts unworked. Turn. (10 sc)
Row 17: Ch 1, sc in each st across. Turn. (10 sc)
Row 18: Ch 1, sc2tog, sc in next 8 sts. Turn. (9 sc)
Row 19: Ch 1, sc in each st across. Turn. (9 sc)
Row 20: Ch 1, sc2tog, sc in next 7 sts. Turn. (8 sc)
Row 21: Ch 1, sc in each st across. Fasten off. (8 sc)
Neckline Shaping (Left Shoulder)
Return to Row 15. Skip center 12 sts for the front neck opening. Join Color A in next st.
Row 16 (RS): Ch 1, sc in first 10 sts. Turn. (10 sc)
Row 17: Ch 1, sc in each st across. Turn. (10 sc)
Row 18: Ch 1, sc in next 8 sts, sc2tog. Turn. (9 sc)
Row 19: Ch 1, sc in each st across. Turn. (9 sc)
Row 20: Ch 1, sc in next 7 sts, sc2tog. Turn. (8 sc)
Row 21: Ch 1, sc in each st across. Fasten off. (8 sc)
Your bodice front should measure approximately 2.75 inches from starting chain to shoulder edge. Set it aside.
Bodice Back
Using Color A and US B-1 / 2.25 mm hook.
Row 1 (RS): Ch 43, sc in 2nd ch from hook and in each ch across. Turn. (42 sc)
Rows 2 through 13: Ch 1, sc in each st across. Turn. (42 sc each row)
Armhole Shaping (Back)
Row 14: Ch 1, sl st across first 3 sts, ch 1, sc in next 36 sts. Leave last 3 sts unworked. Turn. (36 sc)
Row 15: Ch 1, sc2tog, sc in next 32 sts, sc2tog. Turn. (34 sc)
Row 16: Ch 1, sc2tog, sc in next 30 sts, sc2tog. Turn. (32 sc)
Note: The back has two extra plain rows before armhole shaping because the back neckline sits higher than the front. This creates the correct garment proportion.
Rows 17 and 18: Ch 1, sc in each st across. Turn. (32 sc each row)
Neckline Shaping (Right Shoulder, Back)
Row 19: Ch 1, sc in first 10 sts. Leave remaining sts unworked. Turn. (10 sc)
Row 20: Ch 1, sc2tog, sc in next 8 sts. Turn. (9 sc)
Row 21: Ch 1, sc in each st across. Turn. (9 sc)
Row 22: Ch 1, sc2tog, sc in next 7 sts. Turn. (8 sc)
Row 23: Ch 1, sc in each st across. Fasten off. (8 sc)
Neckline Shaping (Left Shoulder, Back)
Return to Row 18. Skip center 12 sts for back neck opening. Join Color A in next st.
Row 19: Ch 1, sc in first 10 sts. Turn. (10 sc)
Row 20: Ch 1, sc in next 8 sts, sc2tog. Turn. (9 sc)
Row 21: Ch 1, sc in each st across. Turn. (9 sc)
Row 22: Ch 1, sc in next 7 sts, sc2tog. Turn. (8 sc)
Row 23: Ch 1, sc in each st across. Fasten off. (8 sc)
Sleeves (Make 2)
Using Color A and US B-1 / 2.25 mm hook.
Row 1 (RS): Ch 23, sc in 2nd ch from hook and in each ch across. Turn. (22 sc)
Row 2: Ch 1, 2 sc in first st, sc in next 20 sts, 2 sc in last st. Turn. (24 sc)
Row 3: Ch 1, 2 sc in first st, sc in next 22 sts, 2 sc in last st. Turn. (26 sc)
Rows 4 and 5: Ch 1, sc in each st across. Turn. (26 sc each row)
Row 6: Ch 1, sc2tog, sc in next 22 sts, sc2tog. Turn. (24 sc)
Row 7: Ch 1, sc2tog, sc in next 20 sts, sc2tog. Turn. (22 sc)
Row 8: Ch 1, sc2tog, sc in next 18 sts, sc2tog. Turn. (20 sc)
Row 9: Ch 1, sc2tog, sc in next 16 sts, sc2tog. Fasten off. (18 sc)
The widest point (Rows 3 through 5) forms the puff cap. The narrowest edge (Row 1) is the sleeve hem. The tapered top (Row 9) gets sewn into the armhole.
Sleeve Edging
With RS facing, join Color A at Row 1 starting chain. Working along the foundation chain edge, work 1 sc in each chain stitch across. Fasten off. (22 sc)
This stabilizes the sleeve hem and gives it a clean edge.
Bodice Assembly
Step 1: Pin the right sides of bodice front and back together at both shoulder seams. Align the 8 stitch shoulder edges.
Step 2: Using Color A and your tapestry needle, whip stitch or mattress stitch each shoulder seam closed. Weave in ends.
Step 3: Pin sleeves into armhole openings. The widest part of the sleeve cap sits at the top of the armhole. The Row 1 edge aligns with the base of the armhole shaping.
Step 4: Sew sleeves into armholes using mattress stitch or whip stitch with Color A yarn.
Step 5: Fold the assembled bodice so front and back side edges align. Pin and sew side seams from armhole base down to waist edge on both sides. Leave the waist edge open for skirt attachment.
Step 6: Sew 3 buttons evenly spaced down the center front of the bodice. Bottom button approximately 0.5 inch from waist, top button approximately 0.5 inch below neckline, middle button centered between them.
Your assembled bodice should measure approximately 2.75 inches in length and 4.5 inches wide laid flat.
Neckline Edging
With RS facing, join Color A at back left shoulder seam.
Round 1: Ch 1, work sc evenly around entire neckline opening. Work approximately 1 sc per row along sides, 1 sc in each stitch across front and back neck openings. Sl st to first sc to join. Adjust total count so it is a multiple of 6. Target 36 sc around neckline.
Round 2: Ch 1, sc in each st around. Sl st to join. (36 sc)
Round 3 (Scallop): Sl st in first st, ch 1, sc in same st, [sk 2 sts, 5 dc in next st, sk 2 sts, sc in next st] 6 times. Sl st to first sc to join. Fasten off. (6 shells)
Weave in ends.
Skirt Tier 1 (Cream)
This tier attaches at the waist and creates the topmost ruffle layer.
Attaching Tier 1
With RS of bodice facing and bodice held upside down (waist edge up), join Color A at the center back waist seam.
Round 1: Ch 1, work 78 sc evenly around the entire waist edge of the bodice, placing 39 sc along front waist and 39 sc along back waist. Sl st to first sc to join. (78 sc)
Tier 1 Body
Round 2: Ch 3 (counts as first dc), dc in each st around. Sl st to top of ch-3 to join. (78 dc)
Round 3: Ch 3 (counts as first dc), dc in same st, 2 dc in each st around. Sl st to top of ch-3 to join. (156 dc)
This doubling creates the gathered ruffle effect. The tier now has twice the fabric of the waist, causing it to flare and layer.
Rounds 4 through 6: Ch 1, sc in each st around. Sl st to join. (156 sc each round)
Tier 1 Scallop Edging
Round 7 (Scallop): Ch 1, sc in first st, [sk 2 sts, 5 dc in next st, sk 2 sts, sc in next st] 26 times. Sl st to first sc to join. Fasten off. (26 shells)
Weave in all Color A ends for this tier.
Skirt Tier 2 (Peach)
This tier sits below Tier 1 and peeks out below the cream ruffle.
Attaching Tier 2
With RS facing, join Color B in any stitch of Round 2 of Tier 1 (the dc round).
Round 1: Ch 1, work 78 sc around Round 2 of Tier 1, inserting hook under each dc stitch of that round. Sl st to first sc to join. (78 sc)
Tier 2 Body
Round 2: Ch 3 (counts as first dc), dc in same st, 2 dc in each st around. Sl st to top of ch-3 to join. (156 dc)
Rounds 3 through 6: Ch 1, sc in each st around. Sl st to join. (156 sc each round)
Tier 2 Scallop Edging
Round 7 (Scallop): Ch 1, sc in first st, [sk 2 sts, 5 dc in next st, sk 2 sts, sc in next st] 26 times. Sl st to first sc to join. Fasten off Color B. (26 shells)
Weave in all Color B ends.
Skirt Tier 3 (Tan)
This tier is the largest and outermost layer.
Attaching Tier 3
With RS facing, join Color C two rounds below where Tier 2 is attached, working into the bodice fabric just below the waist pickup round.
Round 1: Ch 1, work 90 sc evenly around the attachment row. Sl st to first sc to join. (90 sc)
Tier 3 uses 90 sts rather than 78 to create additional width for the bottom tier, which is the widest and longest layer.
Tier 3 Body
Round 2: Ch 3 (counts as first dc), dc in same st, 2 dc in each st around. Sl st to top of ch-3 to join. (180 dc)
Rounds 3 through 8: Ch 1, sc in each st around. Sl st to join. (180 sc each round)
Tier 3 Scallop Edging
Round 9 (Scallop): Ch 1, sc in first st, [sk 2 sts, 5 dc in next st, sk 2 sts, sc in next st] 30 times. Sl st to first sc to join. Fasten off Color C. (30 shells)
Weave in all Color C ends.
Finishing and Blocking Your Doll Dress
Step 1: Weave in all remaining yarn tails securely using your tapestry needle. Bury ends on the wrong side of the fabric.
Step 2: Wet block by submerging the dress in cool water with a drop of wool wash for 10 minutes. Gently press out excess water without wringing. Roll in a clean towel to remove remaining moisture.
Step 3: Pin the dress flat on a blocking mat. Spread each scalloped tier edge gently with your fingers, fanning out each shell point evenly. Pin the scallop points so they stay open while drying.
Step 4: Allow to dry completely flat, which may take 12 to 24 hours.
Step 5: Remove pins. The scalloped edges should hold their beautiful fan shape.
Size Customization Tips
For smaller dolls (6 to 7 inch): Reduce the starting chain from 43 to 31 (30 sc). Use a US 10 / 1.30 mm steel hook with fingering weight or thread weight yarn.
For larger dolls (14 to 16 inch): Increase the starting chain to 55 (54 sc). Increase waist pickup to 96 sts. Add 2 to 3 additional plain sc rounds in each tier. Use a US D-3 / 3.25 mm hook with worsted weight yarn.
For a longer bodice: Add rows between Rows 2 and 10 before beginning armhole shaping. Each additional 2 rows adds approximately 0.25 inch of length.
Care Instructions
Machine wash cold on gentle cycle or hand wash in cool water. Do not wring. Lay flat to dry. Avoid tumble drying as heat can shrink cotton yarn. Light ironing on a cool setting is acceptable if needed, but use a pressing cloth between the iron and the crochet fabric.
Thank you so much for choosing this layered ruffle doll dress crochet pattern for your project! I hope you have as much fun making it as I did designing it. There is something really satisfying about creating miniature garments with this level of detail.
If you make this dress, I would absolutely love to see your finished creation! Tag me on Instagram or share a photo in my Facebook group. Seeing your color combinations and creative variations is the best part of sharing patterns.
Do not forget to save this pattern to your Pinterest boards so you can find it easily when you are ready to start. And if you have any questions or want to share your finished dress, drop a comment below. I read every single one and love hearing from you!
