
I call this one "The Midsummer Dress." It started as a quick sketch in my notebook about three years ago, sitting on my porch during a heat wave and dreaming about the perfect lightweight summer piece. You know those ideas that stick with you? This was one of them.
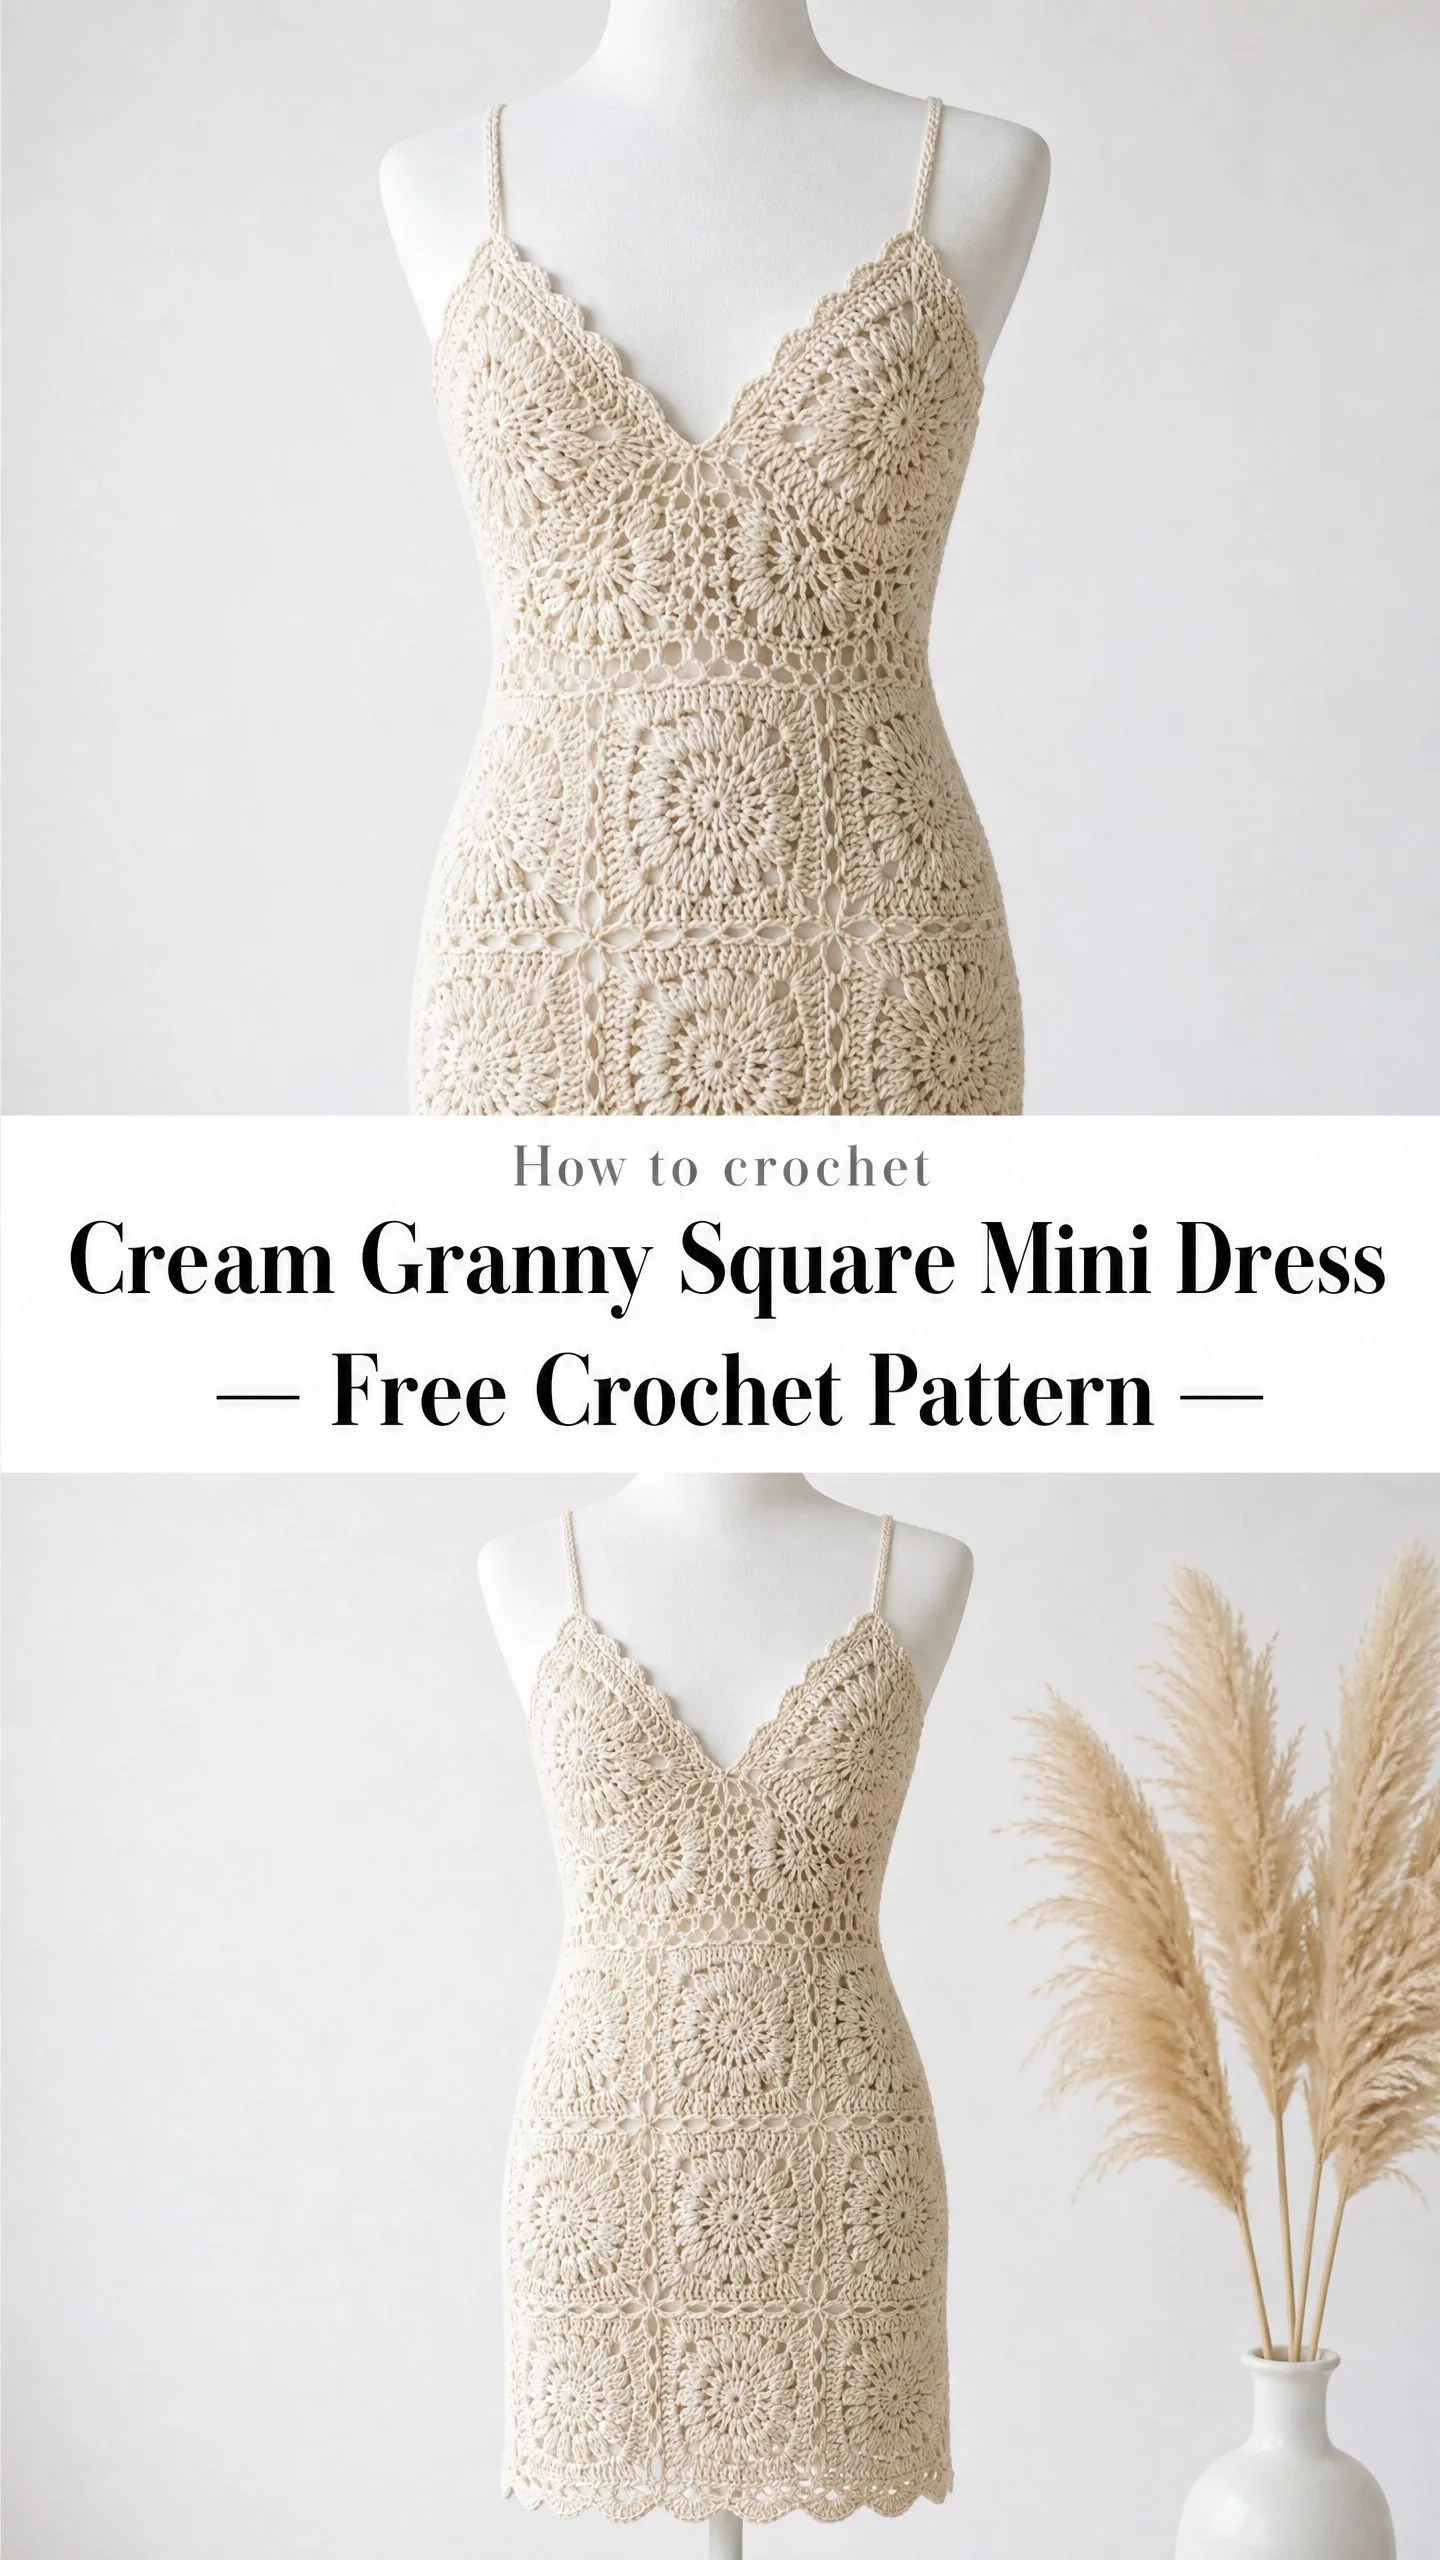
I wanted something romantic but modern. Something that looked like it belonged on a Mediterranean rooftop but could work just as easily for brunch with friends. The circular granny squares reminded me of lace doilies my grandmother kept in her living room, and I kept thinking about how beautiful they would look pieced together into a fitted silhouette.
After countless swatches and several abandoned attempts, this pattern finally came together exactly how I pictured it. Every time I see it on the dress form, I remember why I spent so many hours getting the shaping just right. If you have been looking for a show-stopping summer project that will turn heads, this cream granny square mini dress crochet pattern is the one.
About This Crochet Pattern
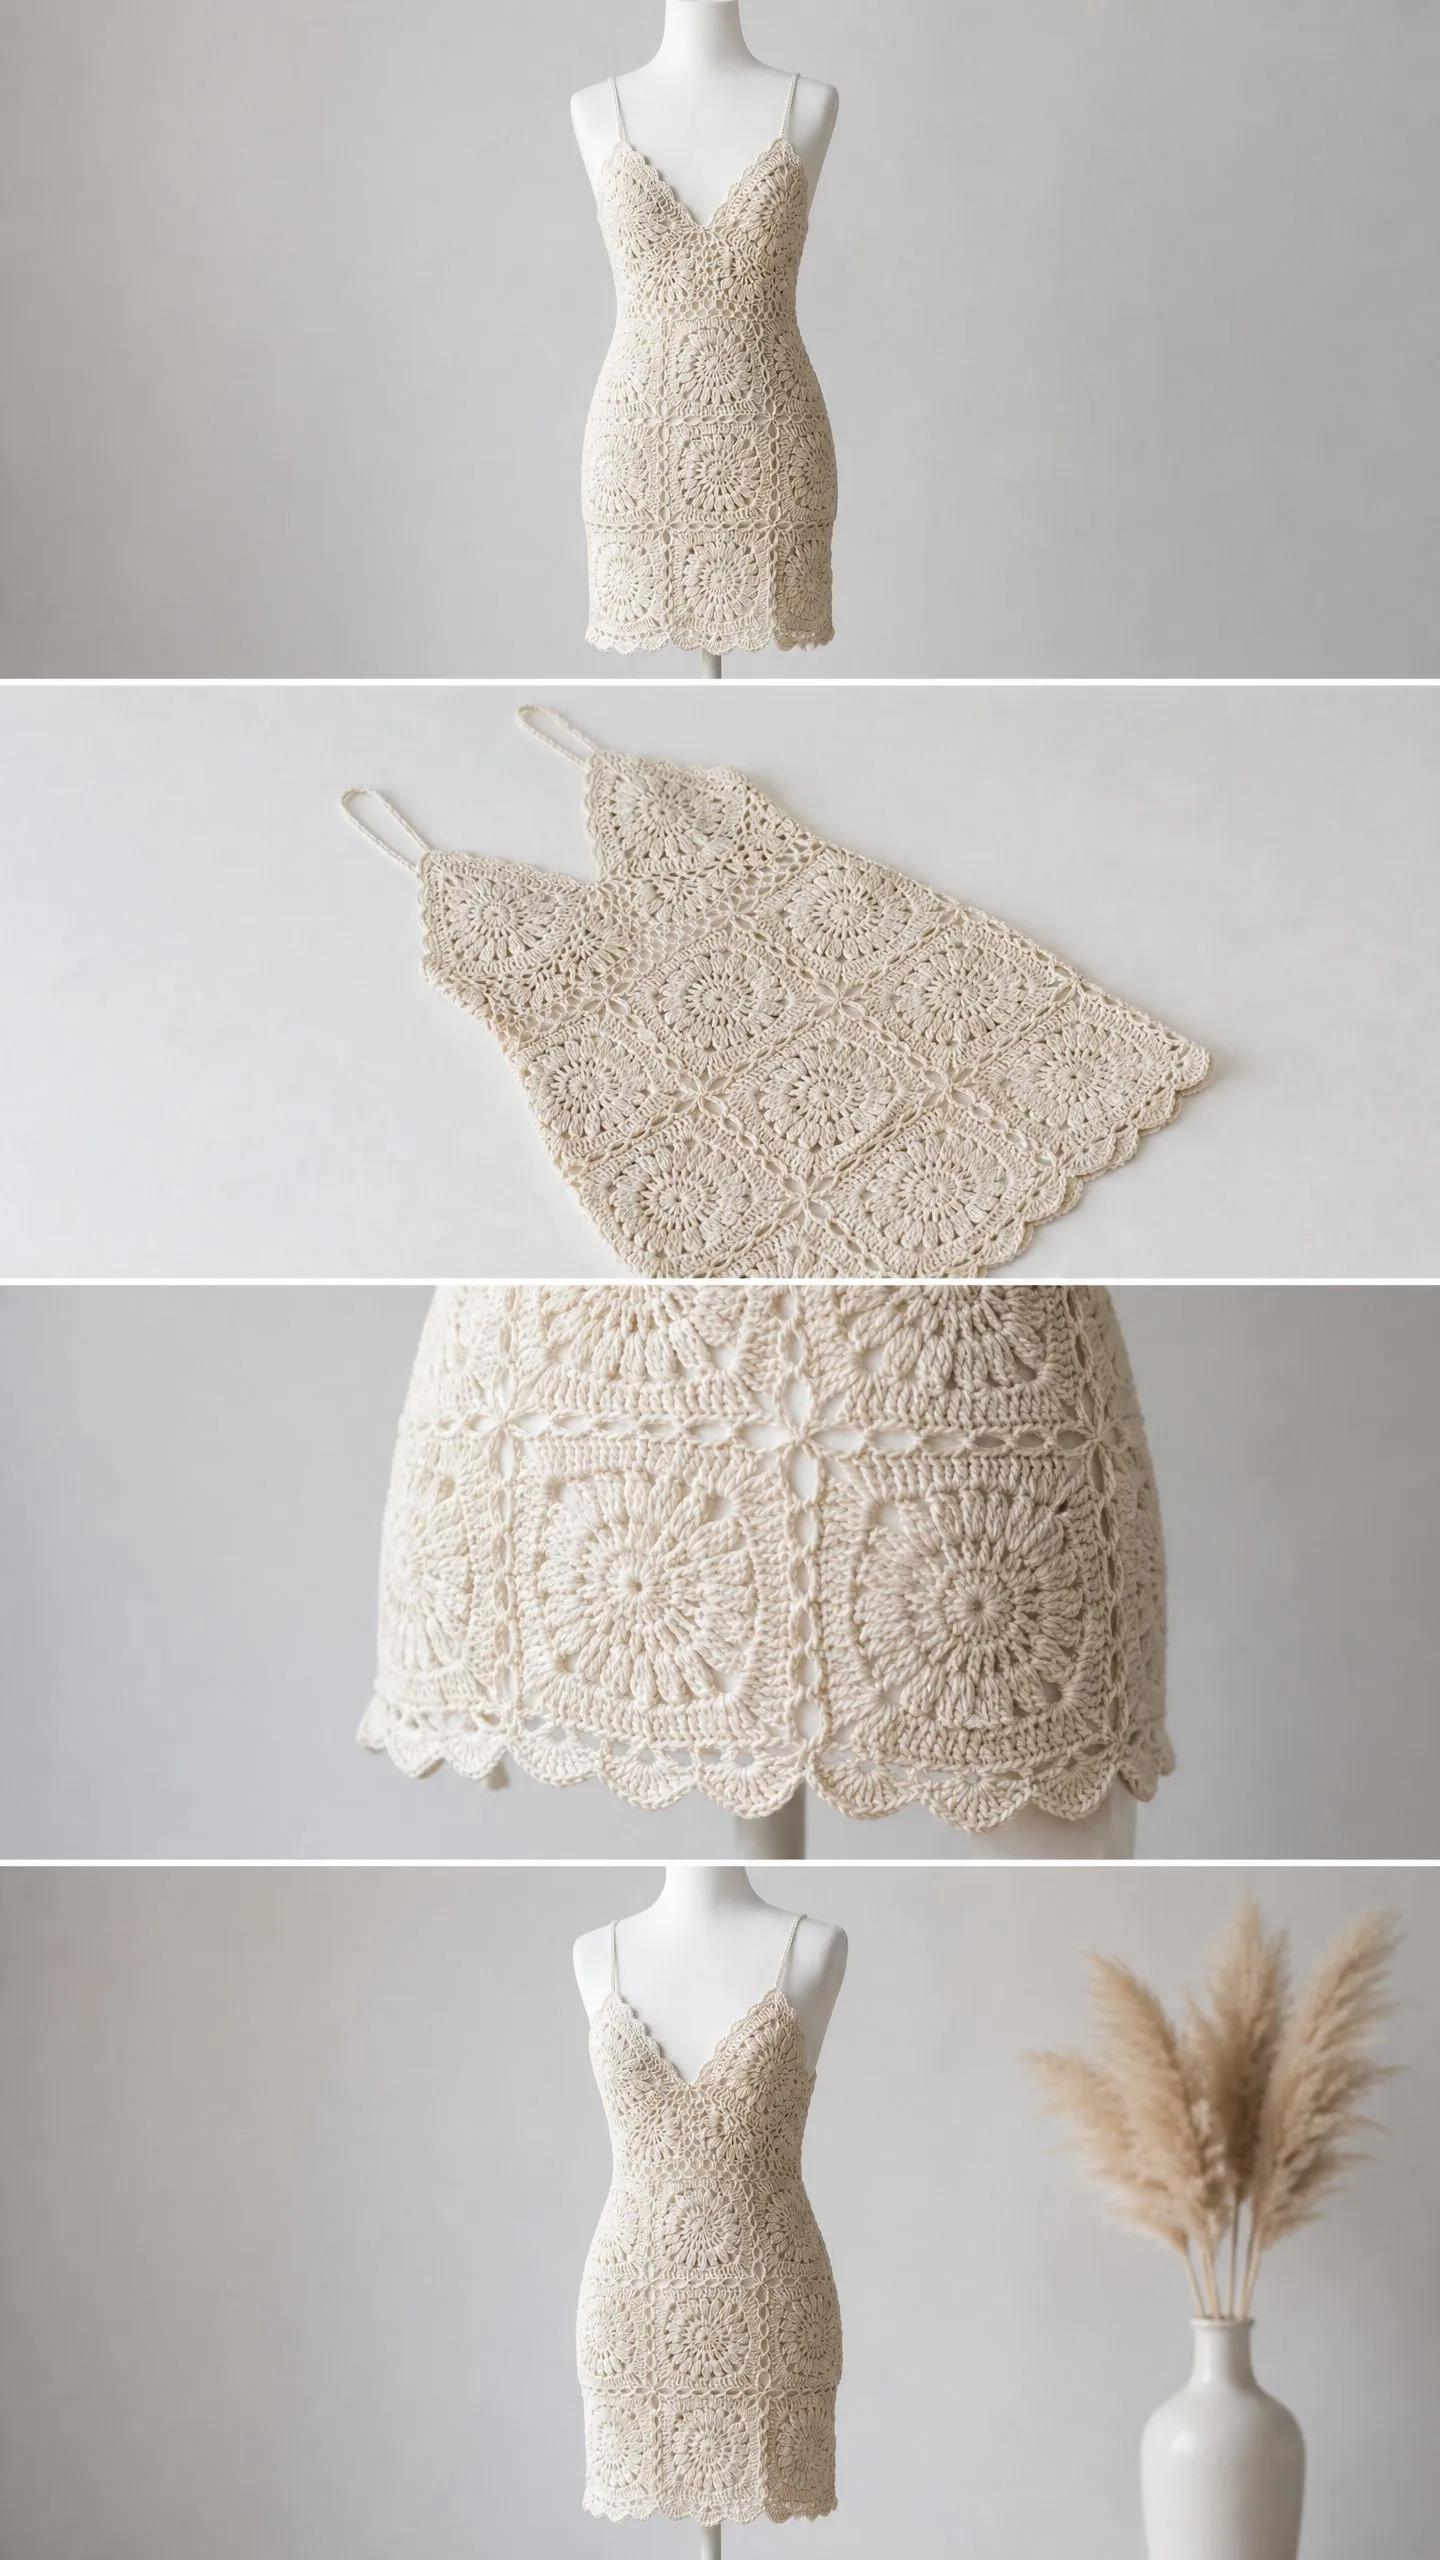
This body-con mini dress is constructed entirely from joined circular granny squares worked in a cream cotton yarn. The squares are arranged in columns and rows to shape the bodice, waist, and skirt sections. A deep V-neckline forms naturally from the diagonal edges of partial-square shaping at the center front. Thin braided shoulder straps connect the front bodice to the open back, creating that gorgeous barely-there look.
The hemline and neckline edges finish with a scallop border inherent to the last round of each square. There is no zipper in this design. It relies on the natural stretch of the cotton lace fabric and a snug fit. I strongly recommend adding a slip lining for modesty and structure.
This is an intermediate to advanced project. You should be comfortable working in the round, joining motifs, shaping a neckline using partial squares, and crocheting a fitted silhouette. Gauge is absolutely critical for fit with this one.
Time estimate? Plan for approximately 40 to 60 hours depending on your experience level. This is a labor of love, but the result is absolutely worth every stitch.
Finished Measurements
This pattern is written for size Small (US 4 to 6):
Materials Needed
Yarn: Approximately 1,000 to 1,200 yards / 915 to 1,095 meters of DK weight (light 3) 100% cotton yarn in cream or natural ecru.
Specific Yarn Suggestions:
1. Paintbox Yarns Simply DK Cotton in "Champagne White" (100% cotton, 142 yards per 50g skein). Purchase 8 skeins.
2. Lion Brand 24/7 Cotton in "Ecru" (100% cotton, 186 yards per 100g skein). Purchase 6 skeins.
3. Drops Safran in "Off White" (100% cotton, 175 yards per 50g skein). Purchase 7 skeins.
Substitution Note: Use any DK weight 100% cotton or cotton-blend yarn. Avoid acrylic blends for this garment as they will not block flat and will lose shape with wear and washing. Check that your gauge swatch matches before purchasing full yardage.
Hook: US Size E-4 (3.5 mm) for squares and edging. Adjust hook size up or down to achieve gauge.
Notions:
Gauge
One finished and blocked circular granny square = 4 in / 10 cm measured point to point (corner to corner diagonally) and 4 in / 10 cm measured side to side.
Or: 20 dc = 4 in / 10 cm in rows of double crochet fabric.
Check your gauge. Because this is a fitted garment, even a 0.25 in / 0.5 cm discrepancy per square will add up to several inches over the width of the dress. Work a full square swatch, block it, and measure before proceeding. I cannot stress this enough!
Abbreviations (US Terms)
Special Stitches
Granny Square Cluster (3-dc cluster):
Yo, insert hook into ch-sp, yo and pull up a loop, yo and draw through 2 loops (2 loops on hook). Yo, insert hook into same ch-sp, yo and pull up a loop, yo and draw through 2 loops (3 loops on hook). Yo, insert hook into same ch-sp, yo and pull up a loop, yo and draw through 2 loops (4 loops on hook). Yo and draw through all 4 loops on hook. One 3-dc cluster complete.
Corner Shell:
Work (3-dc cluster, ch 2, 3-dc cluster) all into the same corner ch-2 sp. This creates a corner with a ch-2 turning space.
Scallop Edging:
(sc, hdc, 3 dc, hdc, sc) all into one ch-sp or group of stitches. Each scallop uses 5 stitches total into one space.
Braided Strap:
Cut 6 strands of yarn each measuring 3 times the desired strap length plus 6 in for knotting. Divide into 3 groups of 2 strands. Braid tightly. Knot ends securely and trim.
Pattern Notes Before You Begin
The dress is assembled from 54 full squares (27 for the front panel, 27 for the back panel) plus 4 half-motif triangles for V-neck shaping. All squares are worked in the round beginning with a magic ring.
Squares are joined using a flat slip-stitch seam on the wrong side, OR joined-as-you-go on the final round using a sl st through corresponding ch-2 corner spaces and side spaces. Both methods work beautifully. The slip-stitch flat seam creates a slightly more structured result.
The construction order is: work all individual granny squares, join squares into flat panels (front and back), seam the side seams, add partial squares for V-neck shaping, work the scallop edging at hem and neckline, then crochet the braided straps.
Individual Granny Square Instructions
Make 58 total (this includes 4 extra for any mistakes and partial modification).
Foundation: Make a magic ring.
Round 1: Ch 3 (counts as first dc here and throughout), work 2 dc into ring, ch 2, (3 dc into ring, ch 2) 3 times, sl st to top of beg ch-3 to join. (4 clusters of 3 dc, 4 ch-2 corner spaces)
Pull magic ring tight.
Round 2: Sl st to move to first ch-2 corner sp. Ch 3, work (2 dc, ch 2, 3 dc) into same corner sp (first corner shell made), ch 1, (3 dc, ch 2, 3 dc) into next corner sp, ch 1) rep around all 4 corners, sl st to top of beg ch-3 to join. (8 clusters of 3 dc, 4 ch-2 corner spaces, 4 ch-1 side spaces)
Round 3: Sl st to move to first ch-2 corner sp. Ch 3, work (2 dc, ch 2, 3 dc) into same corner sp, ch 1, 3 dc into ch-1 side sp, ch 1, (work corner shell into next ch-2 corner sp, ch 1, 3 dc into ch-1 side sp, ch 1) rep around all 4 corners, sl st to top of beg ch-3 to join. (12 clusters of 3 dc, 4 ch-2 corner spaces, 8 ch-1 side spaces)
Round 4: Sl st to move to first ch-2 corner sp. Ch 3, work (2 dc, ch 2, 3 dc) into same corner sp, (ch 1, 3 dc into next ch-1 side sp) twice, ch 1, (work corner shell into next ch-2 corner sp, (ch 1, 3 dc into next ch-1 side sp) twice, ch 1) rep around all 4 corners, sl st to top of beg ch-3 to join. (16 clusters of 3 dc, 4 ch-2 corner spaces, 12 ch-1 side spaces)
Fasten off and weave in ends. Block each square to 4 in x 4 in before assembly.
Stitch count checkpoint: After Round 4, each side of the square has 3 cluster groups between corners (not counting the corner clusters themselves). Each square has 16 clusters total and 4 corner ch-2 spaces. This is your full square.
Half-Triangle Motifs for Waist Shaping and V-Neck
Make 8 total. These are worked in rows, not rounds, to create right-triangle fill-in pieces.
Foundation: Ch 14.
Row 1 (RS): Dc into 4th ch from hook (counts as dc), dc across. Turn. (12 dc)
Row 2: Ch 3, dc into next st, (dc2tog over next 2 sts) across to last 2 sts, dc2tog. Turn. (6 dc)
Row 3: Ch 3, dc2tog twice, dc into last st. Turn. (4 dc)
Row 4: Ch 3, dc2tog, dc into last st. Turn. (3 dc)
Row 5: Ch 3, dc2tog. (2 dc)
Fasten off. This triangle fills a half-square gap along a side edge where the layout steps in. Block to fit a 4 in x 2 in right triangle.
Dress Panel Layout
The dress has two panels: Front and Back. Each panel is approximately 12 in / 30 cm wide at the bust and waist, and 12 in / 30 cm wide at the hip, then shaped by the join arrangement.
Back Panel Layout (rows from hem upward):
Hem Row (Row A): 6 squares wide. Squares 1 through 6 joined side by side horizontally. Width = 24 in / 61 cm.
Row B: 6 squares wide. Squares 7 through 12 joined and attached to top of Row A. Width = 24 in / 61 cm.
Waist Row C (narrowed): 5 squares wide centered. Squares 13 through 17. Place one half-triangle fill piece at each side edge to create a tapered side seam effect. Width at center = 20 in / 51 cm.
Row D: 5 squares wide. Squares 18 through 22. Width = 20 in / 51 cm.
Bust Row E: 5 squares wide. Squares 23 through 27. Width = 20 in / 51 cm.
Back Open Row F: No squares. Back above Row E is open. Straps attach here.
Total back panel squares: 27 full squares plus 2 half triangles.
Front Panel Layout (rows from hem upward):
Hem Row (Row A): 6 squares wide. Squares 1 through 6. Width = 24 in.
Row B: 6 squares wide. Squares 7 through 12. Width = 24 in.
Waist Row C: 5 squares wide centered. Squares 13 through 17. Half triangles at each side. Width = 20 in.
Row D: 5 squares wide. Squares 18 through 22. Width = 20 in.
Bust Row E (V-neck begins): 5 squares wide but center top is split for V. Squares 23 and 24 on left side, 25 and 26 on right side, square 27 is a partial square. Width = 20 in.
V-Neck Row F: Left side has 2 squares (28, 29) stepping inward one square, right side mirrors with squares 30, 31. The center is open forming the V shape.
Joining the Squares
Method: Flat slip-stitch seam on WS.
Hold two squares with wrong sides facing each other. Insert hook through the ch-1 side space of both squares simultaneously. Yo and pull up a loop, ch 1 to secure. Sl st through each corresponding ch-1 side space and ch-2 corner space across the entire shared edge. Fasten off.
Join squares in rows first (horizontal strips), then join horizontal strips to each other (vertical seaming).
When joining rows of different widths (at waist), center the narrower row over the wider row and attach a half-triangle piece at each side edge to fill the gap. The triangle hypotenuse aligns with the side edge of the wider row.
V-Neck Shaping
The V-neckline is formed by not working squares in the center top of the front panel and instead finishing the diagonal raw edge with a simple sc edging.
After completing Front Row F, work a single crochet edging along each diagonal neckline edge:
With RS facing, attach yarn at the lowest point of the V (center bottom of neckline opening). Sc evenly up the left diagonal edge of the left V panel, working approximately 1 sc per dc row end and 1 sc per ch-1 sp. Work 3 sc into the corner of the shoulder square. Continue across the shoulder top edge. Do not fasten off. Continue to add strap attachment point.
Repeat for right side, working from shoulder down to center V point.
Scallop Hem Edging
With RS facing, attach yarn to bottom right corner ch-2 sp of the hem row.
Round 1 (foundation): Sc evenly around entire hem edge, working 1 sc into each ch-1 side sp and 3 sc into each ch-2 corner sp of the bottom edge squares. Join with sl st to first sc. Count and note total sts.
Round 2 (scallops): (Sk 2 sc, work scallop stitch (sc, hdc, 3 dc, hdc, sc) all into next sc, sk 2 sc, sl st into next sc) rep around. The scallop repeat uses 6 stitches of the foundation round.
Fasten off and weave in end.
Side Seams
With WS of front and back panels facing each other, align side edges. Pin carefully.
Sl st seam from hem upward along each side, matching ch-1 spaces and ch-2 corners row by row. Leave the top 8 in / 20 cm of the back panel open (above the bust rows) for the open back design.
After seaming both sides, the dress forms a tube.
Straps
Make 2 braided straps.
Cut 6 strands of yarn each 36 in / 91 cm long. Divide into 3 pairs of 2 strands. Braid tightly for approximately 12 in / 30 cm or desired length. Knot at each end and trim to 0.5 in / 1.5 cm tails.
Attach one end of each strap to the top corner ch-2 sp of each front shoulder square using the yarn needle, knotting securely and weaving in the tail.
Try the dress on over lining and mark the back strap placement point at the back top edge. Attach back end of each strap to the corresponding position.
Pattern Checkpoints
Checkpoint 1: After completing and joining all squares into panels, each panel should measure approximately 24 in / 61 cm wide at the hem, 20 in / 51 cm wide at the waist, and approximately 14 in / 36 cm tall before the neckline shaping.
Checkpoint 2: After side seaming, the dress circumference at the hip should measure approximately 44 to 46 in / 112 to 117 cm. At the waist the circumference should be approximately 38 to 40 in / 97 to 102 cm.
Checkpoint 3: After all edging, the total length from top front center (V point) to hem scallop tip should be approximately 26 to 28 in / 66 to 71 cm.
Size Customization Tips
To go up one size (Medium, bust 34 to 36 in): Add one square to the width of each panel at the hip and waist rows. This adds approximately 12 extra squares. Add 200 yards of yarn.
To go up two sizes (Large, bust 36 to 38 in): Add two squares to the width of each panel. Approximately 24 extra squares. Add 400 yards.
To lengthen the dress: Each additional row of squares adds 4 in / 10 cm to the length. Add approximately 12 squares and 200 yards per row added.
To shorten: Remove the top hip row (Row B) for a shorter dress. This will remove 4 in from the total length.
Finishing and Blocking
Block all squares individually before assembly. Wet-block by soaking each square in lukewarm water for 15 minutes, gently squeezing out excess water (do not wring), pinning to blocking mats to 4 x 4 in, and allowing to dry fully. This step is non-negotiable for an even join.
After assembly and seaming, wet-block the completed dress on a dress form or flat surface. Mist with water, ease into shape matching the finished dimensions, and allow to dry fully pinned.
Lining: Cut lining fabric to match the dress silhouette with 0.5 in seam allowance. Sew lining with a sewing machine or by hand using a straight stitch. Attach lining inside the dress at the top edge using a whip stitch with sewing thread. The lining should be 1 in shorter than the crochet hem to allow the scallop edging to show.
Care Instructions
Machine wash on a gentle/delicate cycle in a mesh laundry bag using cold water and a gentle detergent formulated for delicates. Do not use bleach. Lay flat to dry. Do not put in the dryer as heat will shrink cotton yarn and distort the motifs. Do not hang to dry as the weight of wet cotton will cause stretching. Iron on low heat if needed using a pressing cloth between the iron and the crochet.
Final Thoughts on This Cream Granny Square Mini Dress Crochet Pattern
This dress is truly a statement piece. The combination of classic granny square technique with modern bodycon styling creates something timeless yet fresh. I know it takes patience and careful attention to gauge, but when you slip it on for the first time, you will understand why every single square was worth the effort.
Thank you so much for choosing this pattern! I would absolutely love to see your finished dress. Tag me on Instagram or share your photos in my Facebook group so I can celebrate your beautiful work with you.
If you loved this cream granny square mini dress crochet pattern, go ahead and save it to your Pinterest boards so you can find it when you are ready to start. And please drop a comment below if you make it. I read every single one and they truly make my day!
