
I have been dreaming about designing a sweater that feels like wearable art for ages. Something cozy but eye-catching. Something that tells a story. When I started sketching this woodland owl design, I knew I wanted it to work across multiple sizes, feature that gorgeous honeycomb mesh texture I love, and include an applique scene that would make people stop and say "wait, you MADE that?"
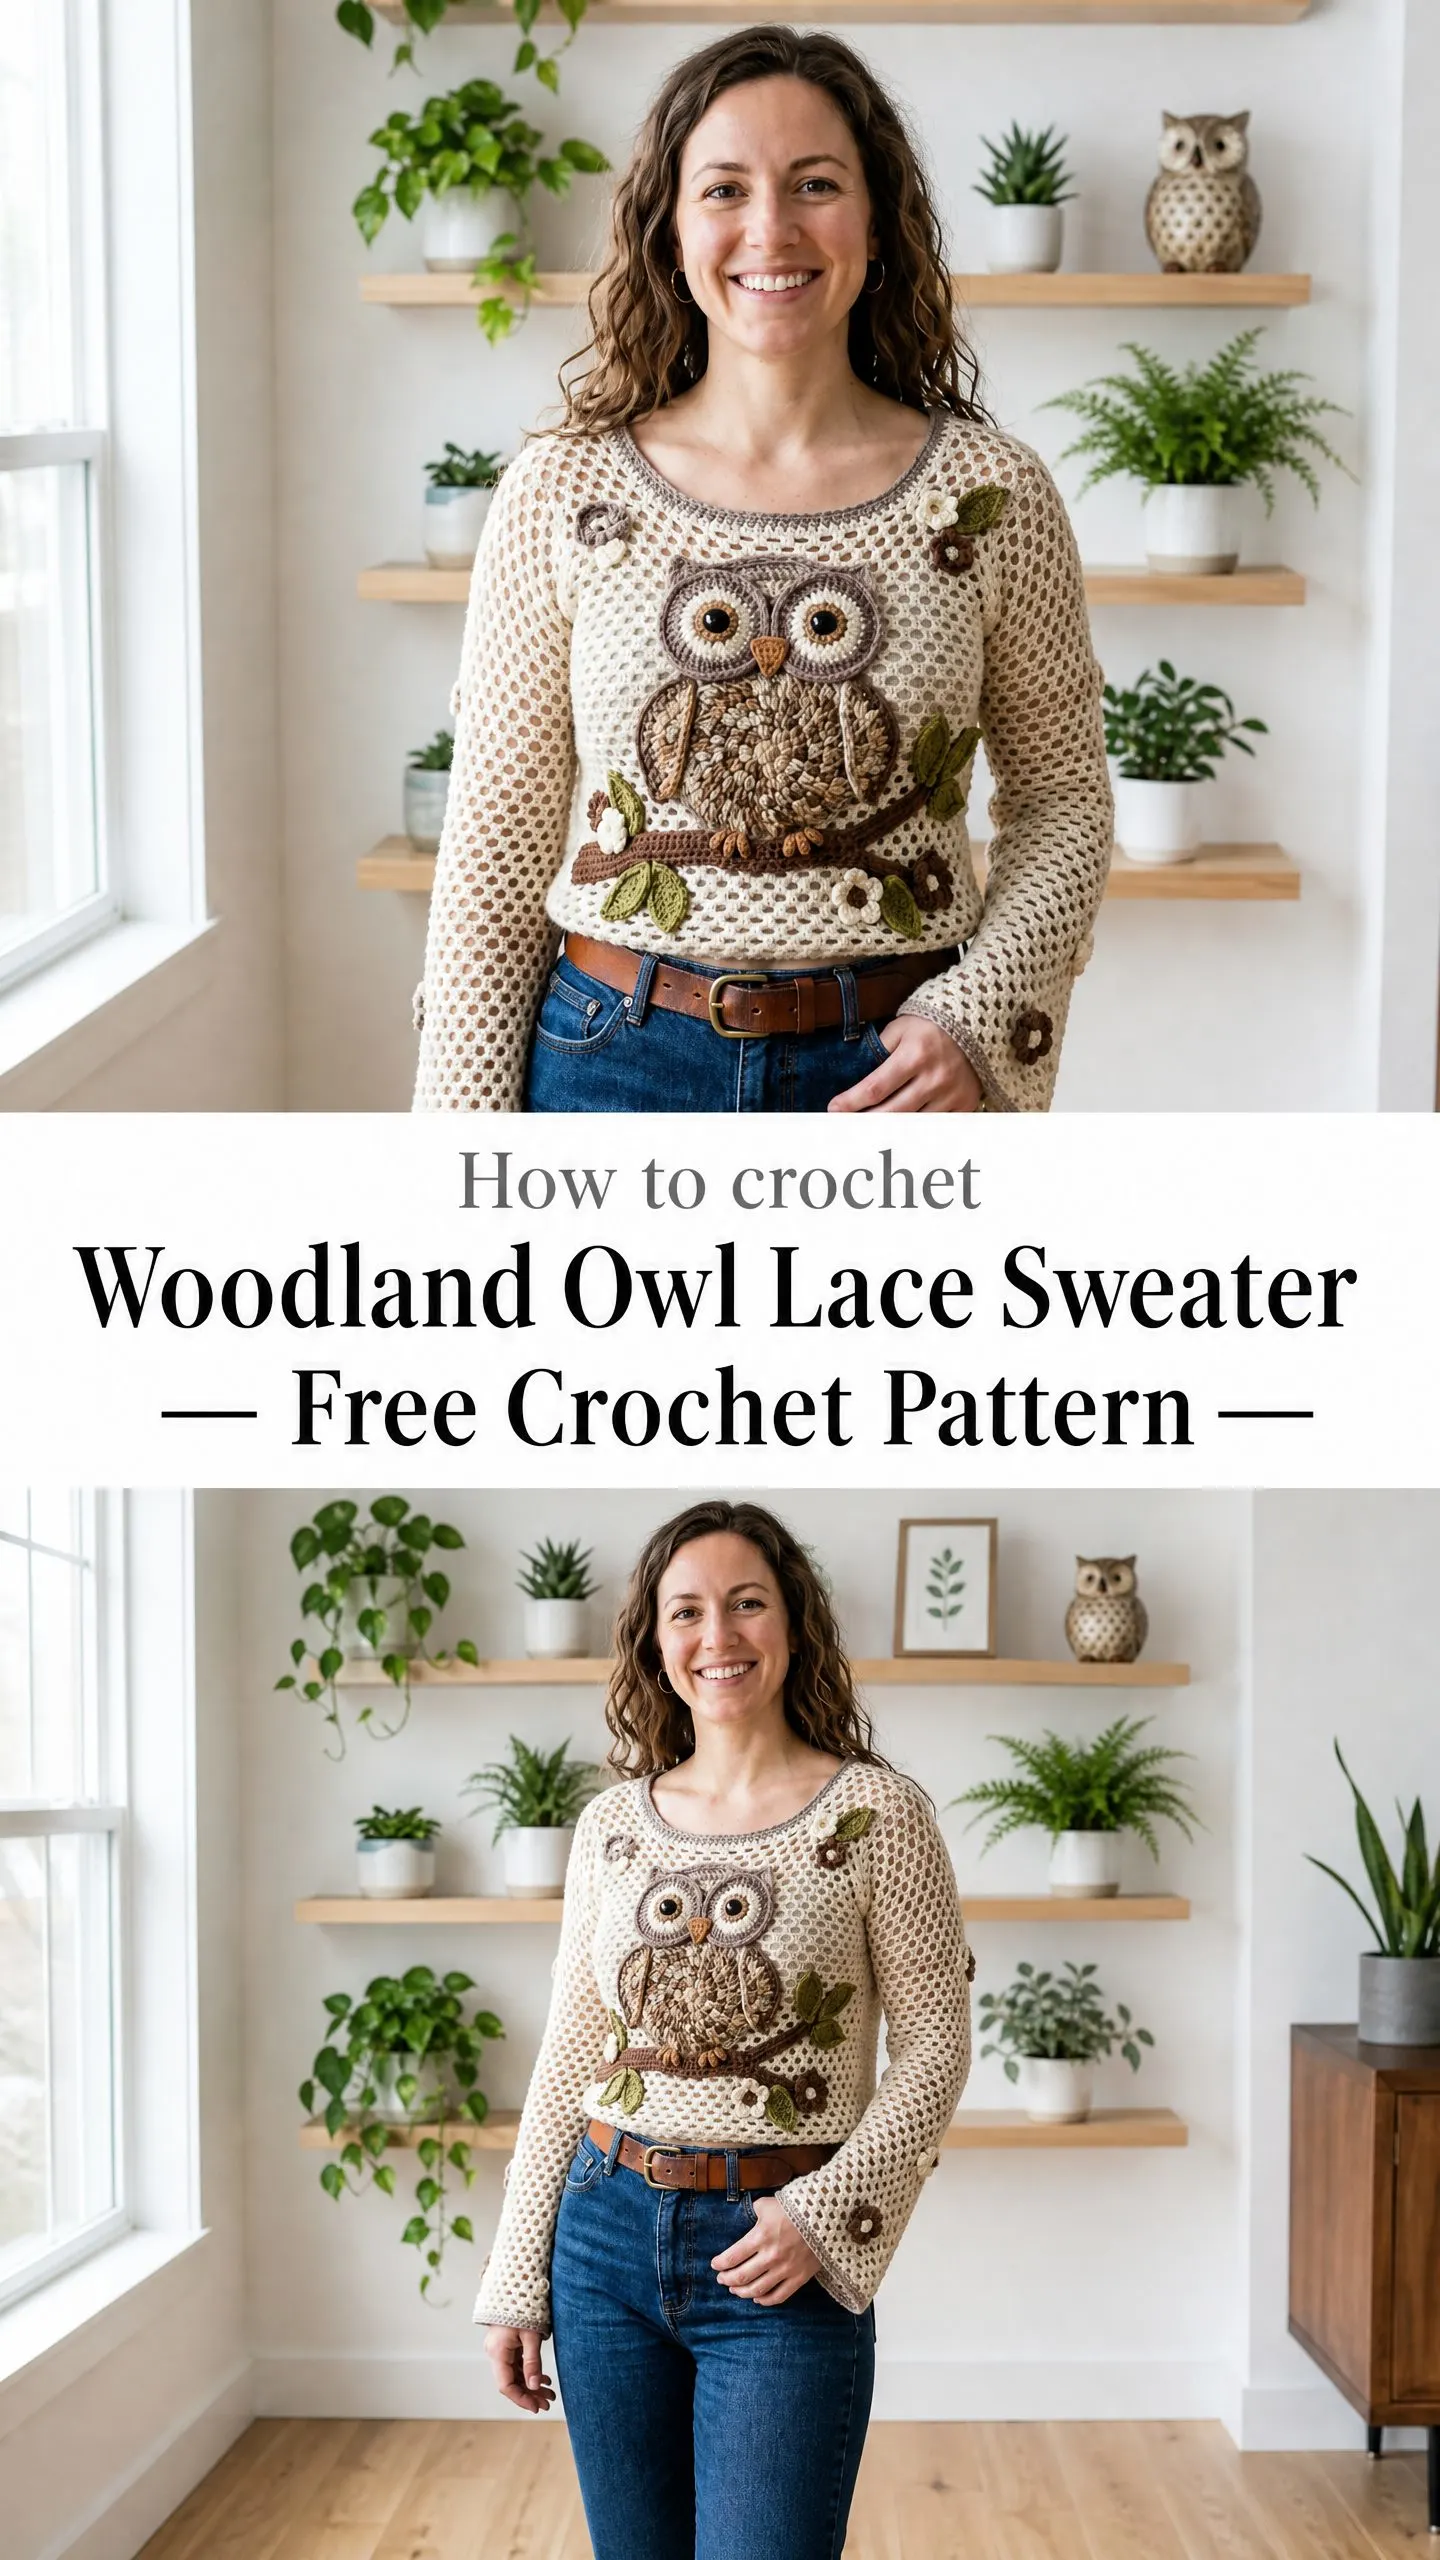
The construction needed to be approachable too. Flat pieces, simple seaming, and all the decorative elements worked separately so you can take your time without feeling overwhelmed. I wanted the owl to look dimensional and alive, perched on a branch with scattered flowers around it.
I am SO pleased with how this turned out. The mesh body has the most beautiful drape, the applique owl has real personality, and the whole thing comes together into something genuinely special. Let me walk you through every single step.
About This Woodland Owl Lace Sweater Crochet Pattern
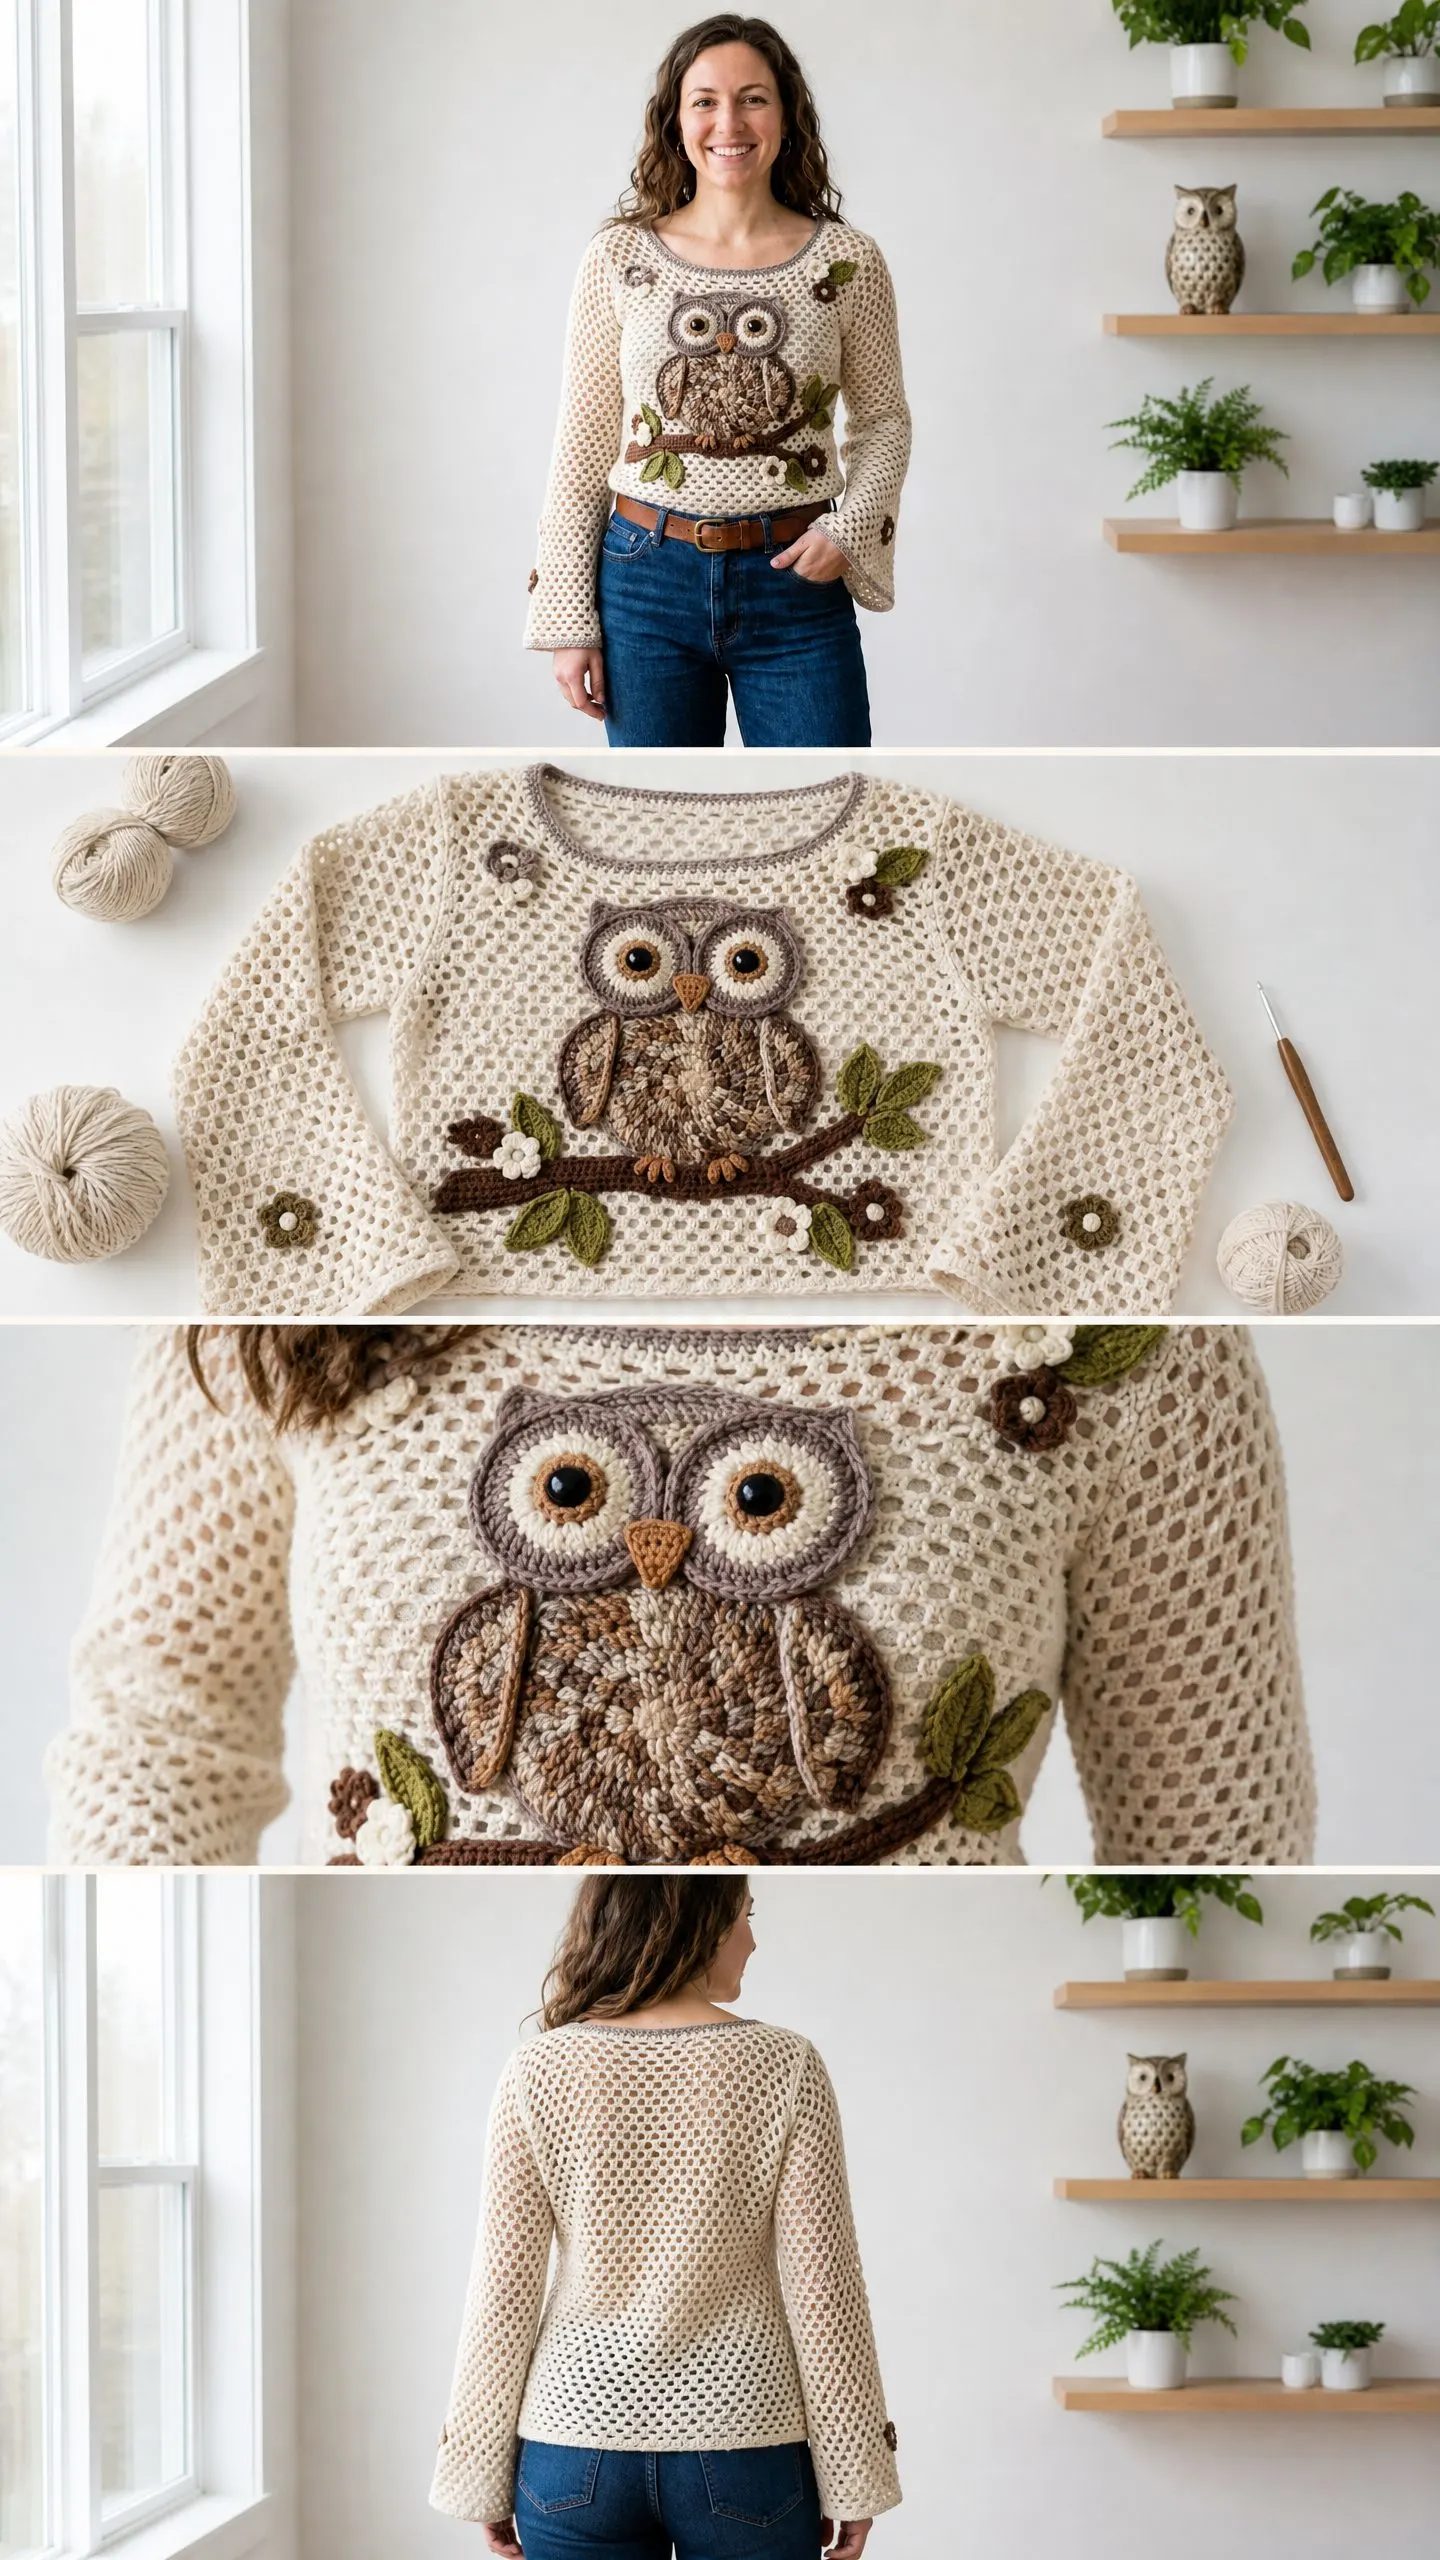
This pullover sweater features an all-over honeycomb mesh body worked in a warm cream yarn, with a stunning dimensional owl applique scene on the front. You will work the sweater in flat pieces, then seam everything together before adding the decorative elements. The back stays plain, which keeps the project manageable and lets that front panel really shine.
The finished look reads as cozy cottagecore meets nature-inspired folk art. Think autumn walks, cups of tea, and compliments from strangers asking where you bought your sweater.
Skill level: Intermediate to Advanced. The mesh stitch itself is straightforward once you get the rhythm. The challenge comes from the applique work, which involves tight spirals, dimensional layering, and precise placement. If you have made amigurumi or worked surface crochet before, you will feel right at home.
Time estimate: Plan for approximately 30 to 45 hours total for a size Medium. That breaks down to 18 to 25 hours for the body and sleeves, 8 to 12 hours for all the applique pieces, and 4 to 8 hours for seaming and finishing.
Finished Sizes
This pattern is written for size Small with changes for Medium, Large, and Extra Large in parentheses throughout.
Size Small: Bust 36 in / 91 cm, Length 22 in / 56 cm, Sleeve length 24 in / 61 cm
Size Medium: Bust 40 in / 102 cm, Length 22.5 in / 57 cm, Sleeve length 24.5 in / 62 cm
Size Large: Bust 44 in / 112 cm, Length 23 in / 58 cm, Sleeve length 25 in / 63.5 cm
Size Extra Large: Bust 48 in / 122 cm, Length 23.5 in / 60 cm, Sleeve length 25.5 in / 65 cm
These measurements include 2 to 4 inches of positive ease at the bust for a relaxed but not oversized fit.
Materials Needed
Yarn for Main Color (MC) Cream:
Yarn for Contrast Color A (CCA) Taupe-Gray:
Yarn for Contrast Color B (CCB) Medium Brown:
Yarn for Contrast Color C (CCC) Dark Brown:
Yarn for Contrast Color D (CCD) Tan / Light Brown:
Yarn for Contrast Color E (CCE) Olive Green:
Yarn for Contrast Color F (CCF) Cream / Off White:
Hooks:
Additional Materials:
Yarn Suggestions
Lion Brand Heartland works beautifully for this project. It is 100 percent acrylic with excellent stitch definition for the mesh pattern. The warm natural tones suit the palette perfectly, and it washes well while holding its shape.
Paintbox Yarns Simply Worsted is another great option. Available in a wide range of naturals and earthy tones, this yarn is affordable for a multi-color project and consistently smooth for seaming.
Cascade 220 produces a slightly fluffier, warmer fabric that is ideal for the applique owl feather texture. Use the wet blocking method for best drape. Note that this yarn is not machine washable.
When substituting yarn, choose any worsted weight (category 4) with a gauge of 14 to 16 stitches per 4 inches in single crochet. Avoid highly textured or bouclé yarns for the body mesh since they will obscure the stitch pattern.
Gauge
Main mesh body using J-10 / 6.0 mm hook:
14 hdc x 10 rows = 4 in / 10 cm in honeycomb mesh stitch pattern, blocked.
Please check your gauge before beginning. The mesh pattern has a naturally open structure. Blocking with steam or wet spray is required to open the mesh evenly and reach the stated dimensions.
For the applique, gauge is not critical, but the owl body worked in the round should measure approximately 4.5 in / 11.5 cm across at its widest point.
Abbreviations
Let me explain each abbreviation you will encounter in this pattern:
ch (chain): The foundation stitch. Yarn over, pull through loop on hook.
hdc (half double crochet): Yarn over, insert hook in stitch, yarn over, pull up a loop (3 loops on hook), yarn over, pull through all 3 loops.
BLO (back loop only): Work into just the back loop of the stitch instead of both loops. This creates the honeycomb texture.
sc (single crochet): Insert hook in stitch, yarn over, pull up a loop (2 loops on hook), yarn over, pull through both loops.
sl st (slip stitch): Insert hook in stitch, yarn over, pull through both the stitch and the loop on hook in one motion.
hdc2tog (half double crochet two together): A decrease stitch. Yarn over, insert hook in next stitch, yarn over, pull up a loop. Yarn over, insert hook in following stitch, yarn over, pull up a loop (5 loops on hook). Yarn over, draw through all 5 loops. One stitch decreased.
sc2tog (single crochet two together): Insert hook in next stitch, pull up a loop. Insert hook in following stitch, pull up a loop (3 loops on hook). Yarn over, draw through all 3 loops. One stitch decreased.
t-ch (turning chain): The chain(s) worked at the beginning of a row that count as a stitch.
RS (right side): The front of your work, the side that faces out when worn.
WS (wrong side): The back of your work, the side that faces your body when worn.
yo (yarn over): Wrap the yarn over your hook from back to front.
Special Stitches
Honeycomb Mesh Stitch (HMS)
This stitch creates the all-over textured lace body of the sweater. It is worked over a multiple of 2 stitches plus 2 for the foundation chain.
Row 1 (RS): Ch to required length. Hdc in 3rd ch from hook (counts as hdc), hdc in each ch across. Turn.
Row 2 (WS): Ch 2 (counts as hdc here and throughout), skip first st, hdc in BLO of next st, hdc in BLO of each st across to turning ch, hdc in top of t-ch. Turn.
Row 3 (RS): Ch 2, skip first st, hdc in BLO of next st, hdc in BLO of each st across to turning ch, hdc in top of t-ch. Turn.
The honeycomb visual effect develops from consistently working into the back loop only. The offset of the loops creates the dimpled lattice texture you see in the finished sweater. Maintain consistent tension throughout.
Puff Stitch
Used in the owl body center for feather texture. Yarn over, insert hook in stitch, yarn over, pull up a loop to height of hdc. Repeat 2 more times in same stitch (7 loops on hook). Yarn over, draw through all 7 loops. Ch 1 to close.
Pattern Notes Before You Begin
1. The sweater is worked in flat pieces: front, back, and two sleeves. All pieces are wet blocked before seaming to ensure even mesh texture.
2. Turning chains count as a stitch throughout unless noted otherwise.
3. At the end of each row, work the final hdc into the top of the previous row’s turning ch-2.
4. Stitch counts listed at the end of each row reflect TOTAL working stitches including the turning chain.
5. All shaping is worked by slip-stitching over stitches at row beginnings and working to a designated stitch count at row ends.
6. The applique elements are all worked separately and attached after the garment is blocked and seamed.
7. The back of the sweater is entirely plain HMS with no applique.
Back Panel Instructions
Foundation:
Ch 66 (74, 82, 90).
Row 1 (RS): Hdc in 3rd ch from hook, hdc in each ch across. Turn. [65 (73, 81, 89) hdc]
Rows 2 through 50 (52, 54, 56): Work in HMS (ch 2, hdc BLO across to t-ch, hdc in top of t-ch). Turn.
Each row maintains the same stitch count: [65 (73, 81, 89) hdc]
After Row 50 (52, 54, 56), the back body should measure approximately 20 (20.5, 21, 21.5) in / 51 (52, 53.5, 54.5) cm from foundation. Do not fasten off.
Checkpoint: Back body panel should measure 18.5 in / 47 cm wide (Small) unblocked and approximately 20 in tall.
Armhole Shaping
Row 51 (53, 55, 57): Sl st across first 5 (5, 7, 7) sts, ch 2 (counts as hdc), hdc BLO across until 5 (5, 7, 7) sts remain, leave last sts unworked. Turn. [55 (63, 67, 75) hdc]
Row 52 (54, 56, 58): Ch 2, hdc2tog, hdc BLO across until 2 sts rem before t-ch, hdc2tog, hdc in top of t-ch. Turn. [53 (61, 65, 73) hdc]
Row 53 (55, 57, 59): Rep Row 52 decrease row. Turn. [51 (59, 63, 71) hdc]
Row 54 (56, 58, 60): Rep Row 52 decrease row. Turn. [49 (57, 61, 69) hdc]
Rows 55 through 62 (57 through 64, 59 through 66, 61 through 68): Work even in HMS, no shaping. [49 (57, 61, 69) hdc]
Checkpoint: Armhole depth from first armhole row should measure approximately 5 in / 12.5 cm after these 12 rows.
Back Neckline Shaping
Row 63 (65, 67, 69): Work 15 (18, 20, 23) hdc. Fasten off. Skip center 19 (21, 21, 23) sts. Rejoin yarn in next st. Work 15 (18, 20, 23) hdc. Fasten off.
Each shoulder section: [15 (18, 20, 23) hdc]
Front Panel Instructions
Foundation:
Ch 66 (74, 82, 90).
Row 1 (RS): Hdc in 3rd ch from hook, hdc in each ch across. Turn. [65 (73, 81, 89) hdc]
Rows 2 through 50 (52, 54, 56): Work in HMS throughout. [65 (73, 81, 89) hdc]
Checkpoint: Front body panel matches back panel exactly at this stage.
Armhole Shaping
Row 51 (53, 55, 57): Sl st across first 5 (5, 7, 7) sts, ch 2, hdc BLO across until 5 (5, 7, 7) sts rem, leave unworked. Turn. [55 (63, 67, 75) hdc]
Row 52 (54, 56, 58): Ch 2, hdc2tog, hdc BLO across until 2 sts rem before t-ch, hdc2tog, hdc in top of t-ch. Turn. [53 (61, 65, 73) hdc]
Row 53 (55, 57, 59): Rep decrease row. Turn. [51 (59, 63, 71) hdc]
Row 54 (56, 58, 60): Rep decrease row. Turn. [49 (57, 61, 69) hdc]
Rows 55 through 58 (57 through 60, 59 through 62, 61 through 64): Work even. [49 (57, 61, 69) hdc]
Front Neckline Shaping
Row 59 (61, 63, 65): Work 18 (21, 23, 26) hdc. Fasten off. Skip center 13 (15, 15, 17) sts. Rejoin yarn. Work 18 (21, 23, 26) hdc. Turn.
Each side of neck is worked separately from this point.
Right Shoulder (as worn):
Row 60 (62, 64, 66): Work in HMS to last 2 hdc before neck edge, hdc2tog. Turn. [17 (20, 22, 25) hdc]
Row 61 (63, 65, 67): Rep neck decrease row. Turn. [16 (19, 21, 24) hdc]
Row 62 (64, 66, 68): Rep neck decrease row. Turn. [15 (18, 20, 23) hdc]
Row 63 (65, 67, 69): Work even. Fasten off. [15 (18, 20, 23) hdc]
Left Shoulder (as worn):
Rejoin yarn at neck edge of left shoulder section.
Row 60 (62, 64, 66): Hdc2tog, work in HMS to end. Turn. [17 (20, 22, 25) hdc]
Row 61 (63, 65, 67): Rep. Turn. [16 (19, 21, 24) hdc]
Row 62 (64, 66, 68): Rep. Turn. [15 (18, 20, 23) hdc]
Row 63 (65, 67, 69): Work even. Fasten off. [15 (18, 20, 23) hdc]
Sleeves (Make 2)
The sleeves are worked from cuff up to sleeve cap with a slight bell sleeve silhouette.
Foundation (cuff edge):
Ch 44 (46, 48, 50).
Row 1 (RS): Hdc in 3rd ch from hook, hdc in each ch across. Turn. [43 (45, 47, 49) hdc]
Rows 2 through 6: Work even in HMS. [43 (45, 47, 49) hdc]
Row 7: Ch 2, hdc2tog, hdc BLO across until 2 sts rem before t-ch, hdc2tog, hdc in top of t-ch. Turn. [41 (43, 45, 47) hdc]
Rows 8 through 10: Work even. [41 (43, 45, 47) hdc]
Row 11: Decrease row as Row 7. Turn. [39 (41, 43, 45) hdc]
Rows 12 through 14: Work even. [39 (41, 43, 45) hdc]
Row 15: Decrease row. Turn. [37 (39, 41, 43) hdc]
Rows 16 through 20: Work even. [37 (39, 41, 43) hdc]
Now begin sleeve width increases:
Row 21: Ch 2, 2 hdc in next st (inc made), hdc BLO across to last st before t-ch, 2 hdc in that st, hdc in top of t-ch. Turn. [39 (41, 43, 45) hdc]
Rows 22 through 24: Work even. [39 (41, 43, 45) hdc]
Row 25: Inc row as Row 21. Turn. [41 (43, 45, 47) hdc]
Rows 26 through 28: Work even. [41 (43, 45, 47) hdc]
Row 29: Inc row. Turn. [43 (45, 47, 49) hdc]
Rows 30 through 32: Work even. [43 (45, 47, 49) hdc]
Row 33: Inc row. Turn. [45 (47, 49, 51) hdc]
Rows 34 through 36: Work even. [45 (47, 49, 51) hdc]
Row 37: Inc row. Turn. [47 (49, 51, 53) hdc]
Rows 38 through 40: Work even. [47 (49, 51, 53) hdc]
Row 41: Inc row. Turn. [49 (51, 53, 55) hdc]
Rows 42 through 50 (52, 54, 56): Work even. [49 (51, 53, 55) hdc]
Sleeve Cap Shaping
Row 51 (53, 55, 57): Sl st across first 5 (5, 7, 7) sts, ch 2, hdc BLO across until 5 (5, 7, 7) sts rem, leave unworked. Turn. [39 (41, 39, 41) hdc]
Row 52 (54, 56, 58): Ch 2, hdc2tog, hdc BLO across until 2 sts rem before t-ch, hdc2tog, hdc in t-ch. Turn. [37 (39, 37, 39) hdc]
Rep decrease row every row 8 (9, 8, 9) more times. [21 (21, 21, 21) hdc]
Work 2 rows even on remaining 21 stitches for all sizes. [21 hdc]
Fasten off leaving a long tail for seaming.
Assembly Instructions
Block all pieces flat before seaming. Pin to measurements, mist with water, and allow to dry completely. This step is essential because the mesh opens significantly during blocking.
Using MC and your tapestry needle, seam in the following order:
1. Join front to back at both shoulder seams, matching stitch counts exactly.
2. Set in sleeves by matching the center top of sleeve cap to the shoulder seam, pinning cap evenly around the armhole opening, and seaming.
3. Close side seams from hem to armhole on both sides.
4. Close sleeve seams from cuff to underarm.
Edgings
Neckline Edging
With CCA and I-9 / 5.5 mm hook, join yarn at left shoulder seam with sl st.
Rnd 1: Work sc evenly around entire neckline opening, placing sc in each stitch along the bound-off shoulder edges and approximately 1 sc per row along the vertical neck shaping edges. Join with sl st to first sc. Do not turn.
Rnd 2: Ch 1, sl st in BLO of each sc around. Join with sl st. Fasten off. [Approximately 56 (60, 62, 66) sts]
Hem Edging
With CCA and I-9 / 5.5 mm hook, join yarn at one side seam at lower edge with sl st.
Rnd 1: Work sc evenly across lower edge of front and back. Join with sl st. [130 (146, 162, 178) sc]
Rnd 2: Ch 1, sl st in BLO of each sc around. Join with sl st. Fasten off.
Cuff Edgings (make 2)
With CCA and I-9 / 5.5 mm hook, join yarn at sleeve seam at cuff edge.
Rnd 1: Sc evenly around cuff opening. Join with sl st. [43 (45, 47, 49) sc]
Rnd 2: Sl st in BLO of each sc around. Join with sl st. Fasten off.
Applique Elements
All applique pieces are worked separately, blocked lightly, and sewn to the assembled sweater front. Pin all pieces in place before sewing to confirm your composition.
Placement reference: The owl and branch scene is centered horizontally on the front panel, positioned between approximately 4 in above the hem edge and 10 in above the hem edge.
Owl Body
Use CCB and G-6 / 4.0 mm hook. Magic ring.
Rnd 1: 6 sc in ring. [6 sc]
Rnd 2: 2 sc in each sc around. [12 sc]
Rnd 3: (Sc in next st, 2 sc in next st) 6 times. [18 sc]
Rnd 4: (Sc in next 2 sts, 2 sc in next st) 6 times. [24 sc]
Rnd 5: (Sc in next 3 sts, 2 sc in next st) 6 times. [30 sc]
Rnd 6: (Sc in next 4 sts, 2 sc in next st) 6 times. [36 sc]
Rnd 7: (Sc in next 5 sts, 2 sc in next st) 6 times. [42 sc]
Rnd 8: Work even. [42 sc]
Rnd 9: Work even. [42 sc]
Rnd 10: (Sc in next 5 sts, sc2tog) 6 times. [36 sc]
Rnd 11: (Sc in next 4 sts, sc2tog) 6 times. [30 sc]
Fasten off, leaving tail. Body should measure approximately 4.5 in across. Lightly stuff with fiberfill for a dimensional effect, or leave flat.
Owl Head
Use CCD and G-6 / 4.0 mm hook. Magic ring.
Rnd 1: 6 sc in ring. [6 sc]
Rnd 2: 2 sc in each st around. [12 sc]
Rnd 3: (Sc in next st, 2 sc in next st) 6 times. [18 sc]
Rnd 4: (Sc in next 2 sts, 2 sc in next st) 6 times. [24 sc]
Rnd 5: (Sc in next 3 sts, 2 sc in next st) 6 times. [30 sc]
Rnd 6: Work even. [30 sc]
Fasten off. Head should measure approximately 3.5 in across.
Ear Tufts (make 2):
Ch 7 in CCD. Sc in 2nd ch from hook, hdc in next 2, dc in next 2, sl st in last. Fasten off.
Owl Eyes (make 2)
Outer eye ring: Use CCA and G-6 hook. Magic ring.
Rnd 1: 8 sc in ring. [8 sc]
Rnd 2: 2 sc in each st around. [16 sc]
Rnd 3: (Sc in next st, 2 sc in next st) 8 times. [24 sc]
Sl st to join. Fasten off.
Inner eye: Use CCF and G-6 hook. Magic ring.
Rnd 1: 6 sc in ring. [6 sc]
Rnd 2: 2 sc in each st. [12 sc]
Sl st to join. Fasten off.
Attach safety eye or black button to center of white circle, then layer white inside gray ring and sew together.
Owl Beak
Ch 4 in CCD. Sc in 2nd ch from hook, hdc in next ch, sl st in last ch. Fasten off.
Owl Wings (make 2)
Use CCB and I-9 / 5.5 mm hook. Ch 10.
Row 1: Sc in 2nd ch from hook, sc in each ch across. Turn. [9 sc]
Row 2: Ch 1, sc2tog, sc across. Turn. [8 sc]
Row 3: Ch 1, sc across to last 2, sc2tog. Turn. [7 sc]
Row 4: Ch 1, sc2tog, sc across. Turn. [6 sc]
Row 5: Ch 1, sc across to last 2, sc2tog. Turn. [5 sc]
Row 6: Ch 1, sc2tog, sc2tog, sc. Turn. [3 sc]
Row 7: Ch 1, sc3tog. Fasten off. [1 st]
Work surface sc around the outer curved edge using CCC to add feather detail.
Branch
Using CCB and I-9 / 5.5 mm hook. Ch 72.
Sl st in 2nd ch from hook and each ch across. [71 sl st length, approximately 11 in]
Side branches (make 2):
Ch 30. Sl st back across. [29 sl st length]
Leaves (make 8 to 10)
Using CCE and I-9 / 5.5 mm hook.
Ch 10. Sc in 2nd ch from hook, hdc in next, dc in next 3, hdc in next, sc in next, sl st in last ch. Working back along opposite side of foundation chain: sc in next, hdc in next, dc in next 3, hdc in next, sc in next, sl st in last. Join. Fasten off.
Make leaves in two sizes: larger (ch 12 base) and smaller (ch 8 base) for variety.
Small Flowers (make 6 to 8)
Using CCF for petals. Magic ring.
Rnd 1: Ch 3, (yo, insert hook in ring, yo, pull up loop, yo, draw through 2 loops) 2 times, yo, draw through all 3 loops (cluster made), ch 3, sl st in ring. Rep 4 more times for 5 petals total. Join. Pull ring closed. Fasten off.
For center: join CCC with sl st in ring center and work 1 sc through center ring. Fasten off.
Final Assembly Tips
Take your time arranging all the applique pieces before you commit to sewing anything down. I like to snap a photo of my layout so I can reference it as I work. Start with the branch, then position the owl body and head, add the wings, and scatter the leaves and flowers last.
The small flowers can wrap slightly around to the sides of the sweater body for a more organic look. A few flowers on the cuffs add a lovely finishing touch that ties the whole design together.
You Did It!
Thank you so much for choosing to make this woodland owl sweater crochet pattern. I know it is a big project with a lot of pieces, but I promise the finished result is absolutely worth every stitch. This is the kind of sweater that becomes an heirloom, something you will reach for again and again.
If you loved making this, I would be so happy if you saved it to your Pinterest boards so you can find it later and share it with fellow crochet lovers. And please, leave a comment below if you make one! I would absolutely love to see your finished owl sweaters and hear which color combinations you chose.
