
I’ve been searching for the perfect statement piece to add to my crochet wardrobe collection, and this asymmetrical floral embroidered set stopped me in my tracks. The combination of that dramatic one-shoulder silhouette with delicate golden botanical embroidery is exactly the kind of elevated crochet fashion I love to create.
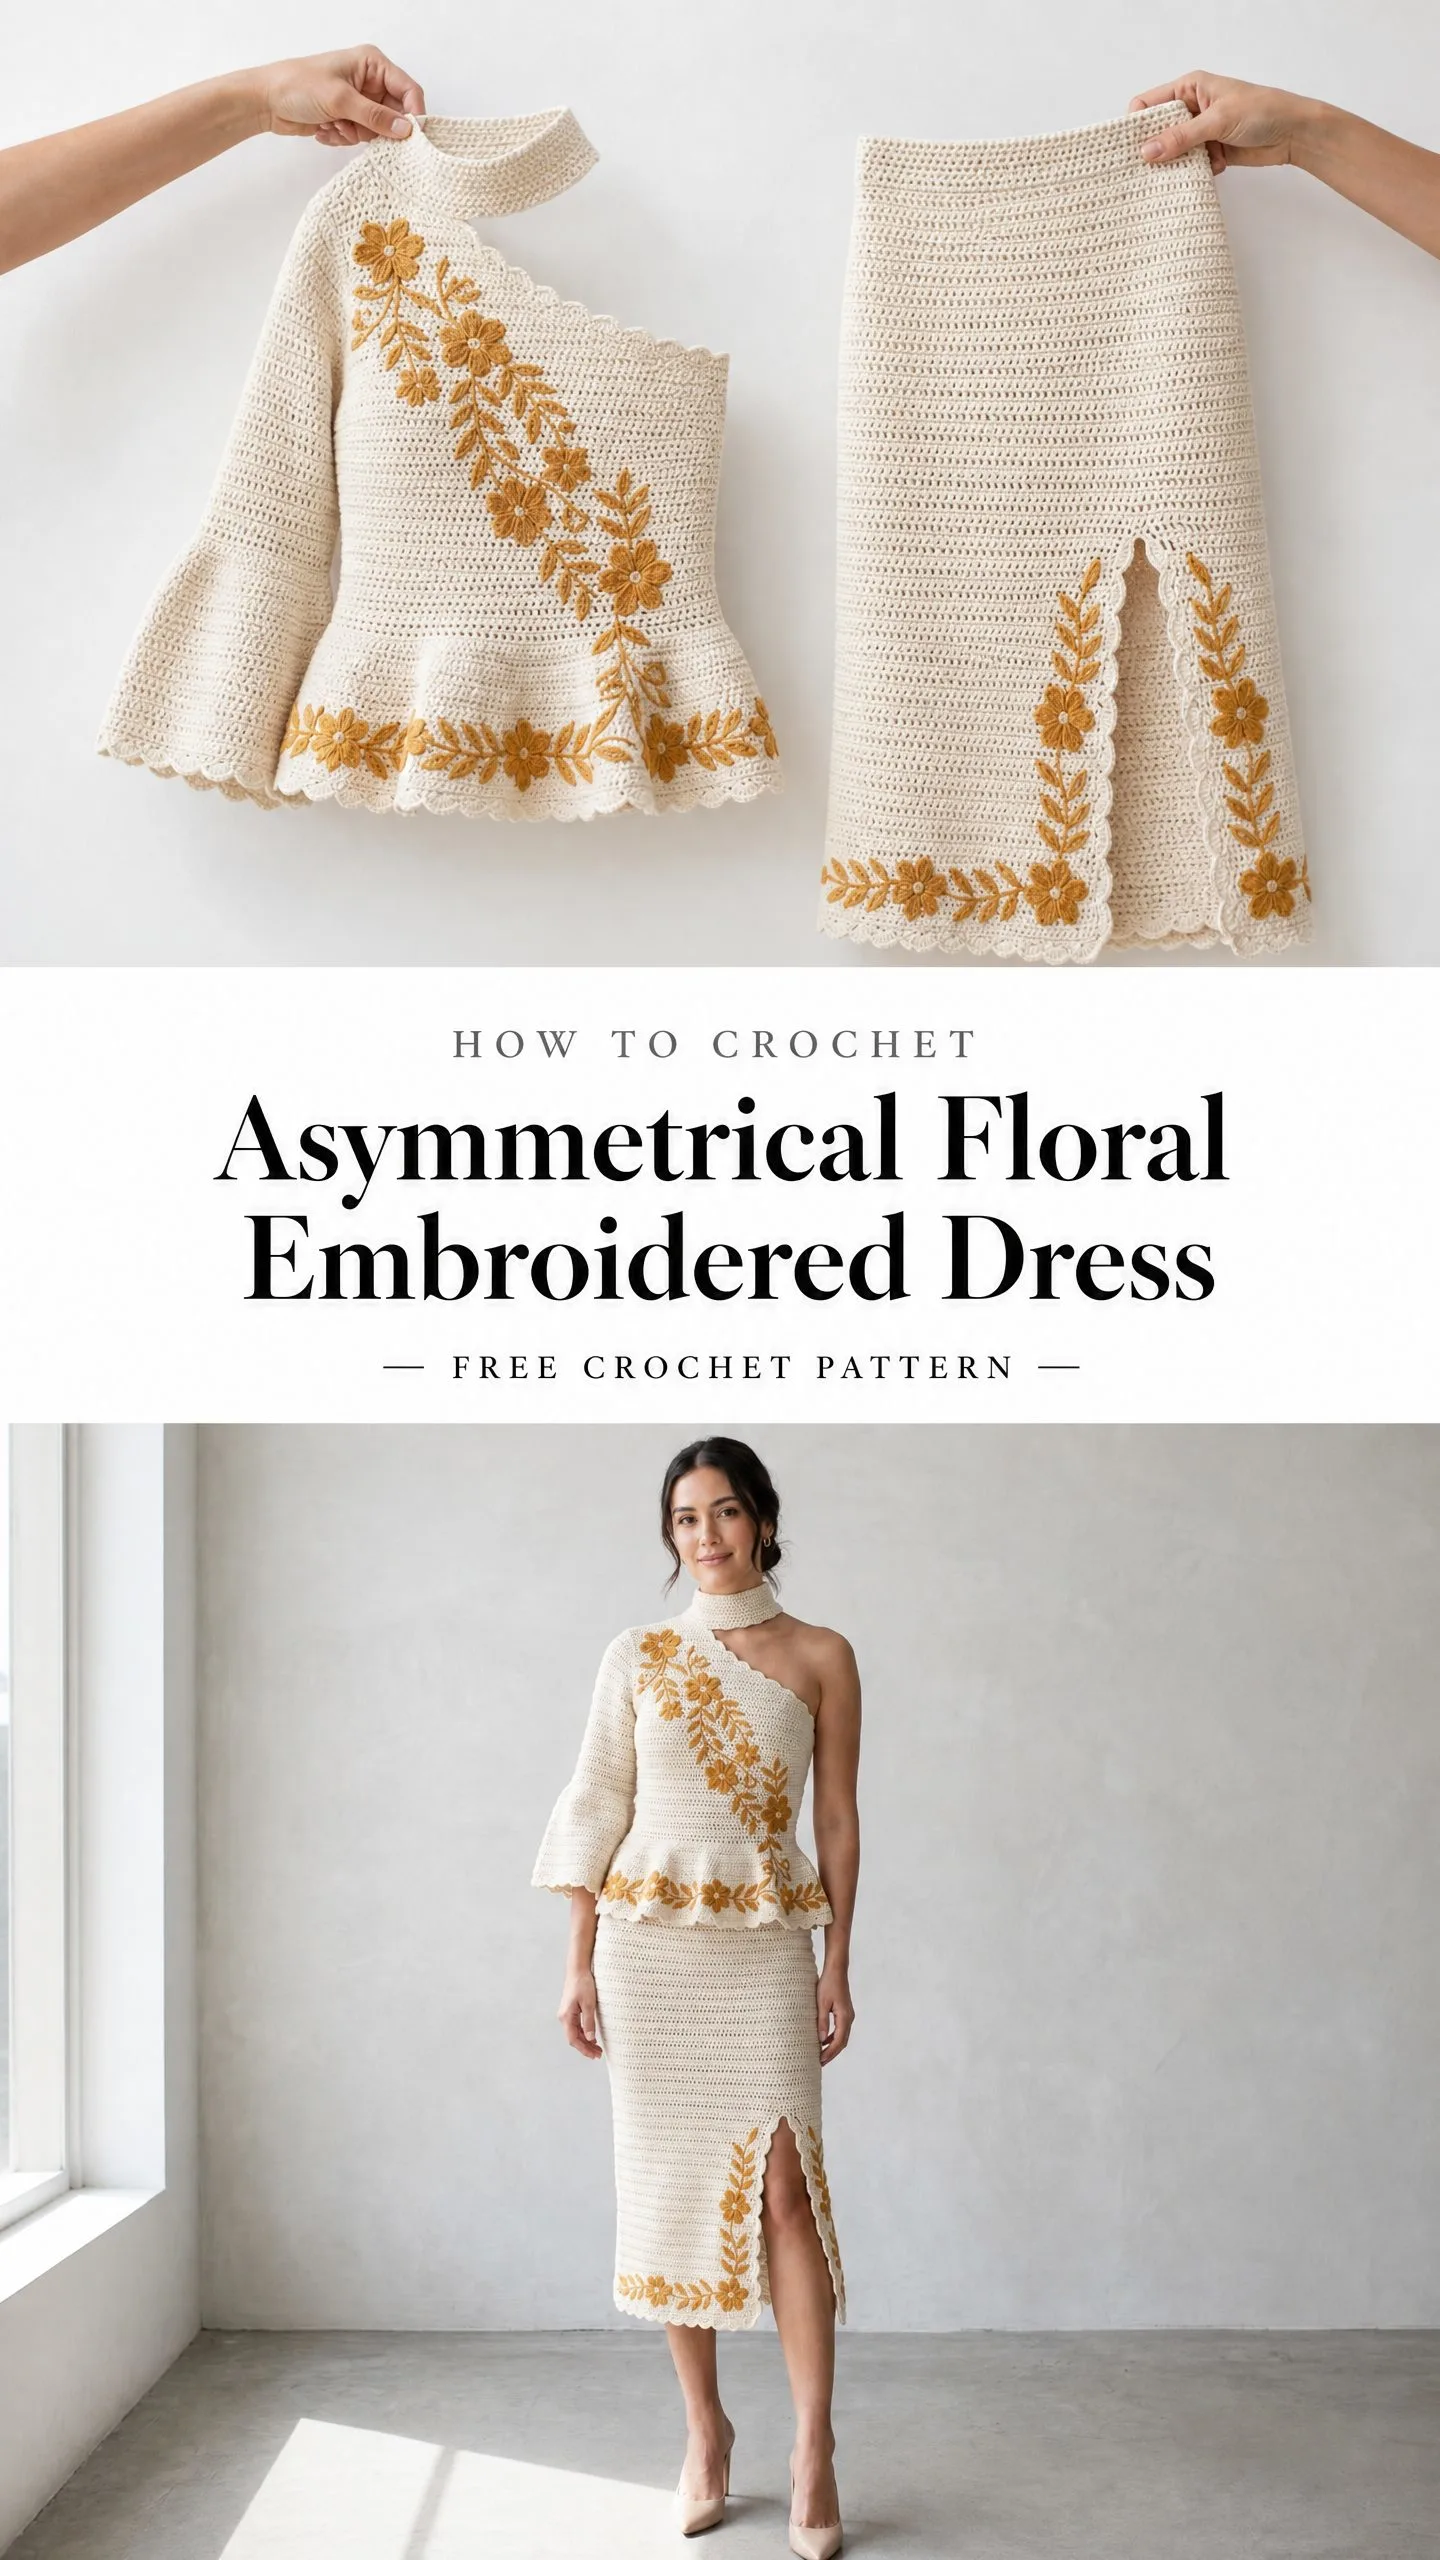
This two-piece set features a fitted peplum top with a choker neckband and a sleek midi pencil skirt with a front slit. Both pieces showcase surface-embroidered flowers and trailing vines in warm golden mustard against a creamy ivory base. The result is sophisticated, wearable art that proves crochet belongs on the runway.
Fair warning: this is an advanced project requiring around 82 to 113 hours of work. But if you’ve been wanting to challenge yourself with a truly showstopping garment, this pattern delivers.
About This Asymmetrical Crochet Set
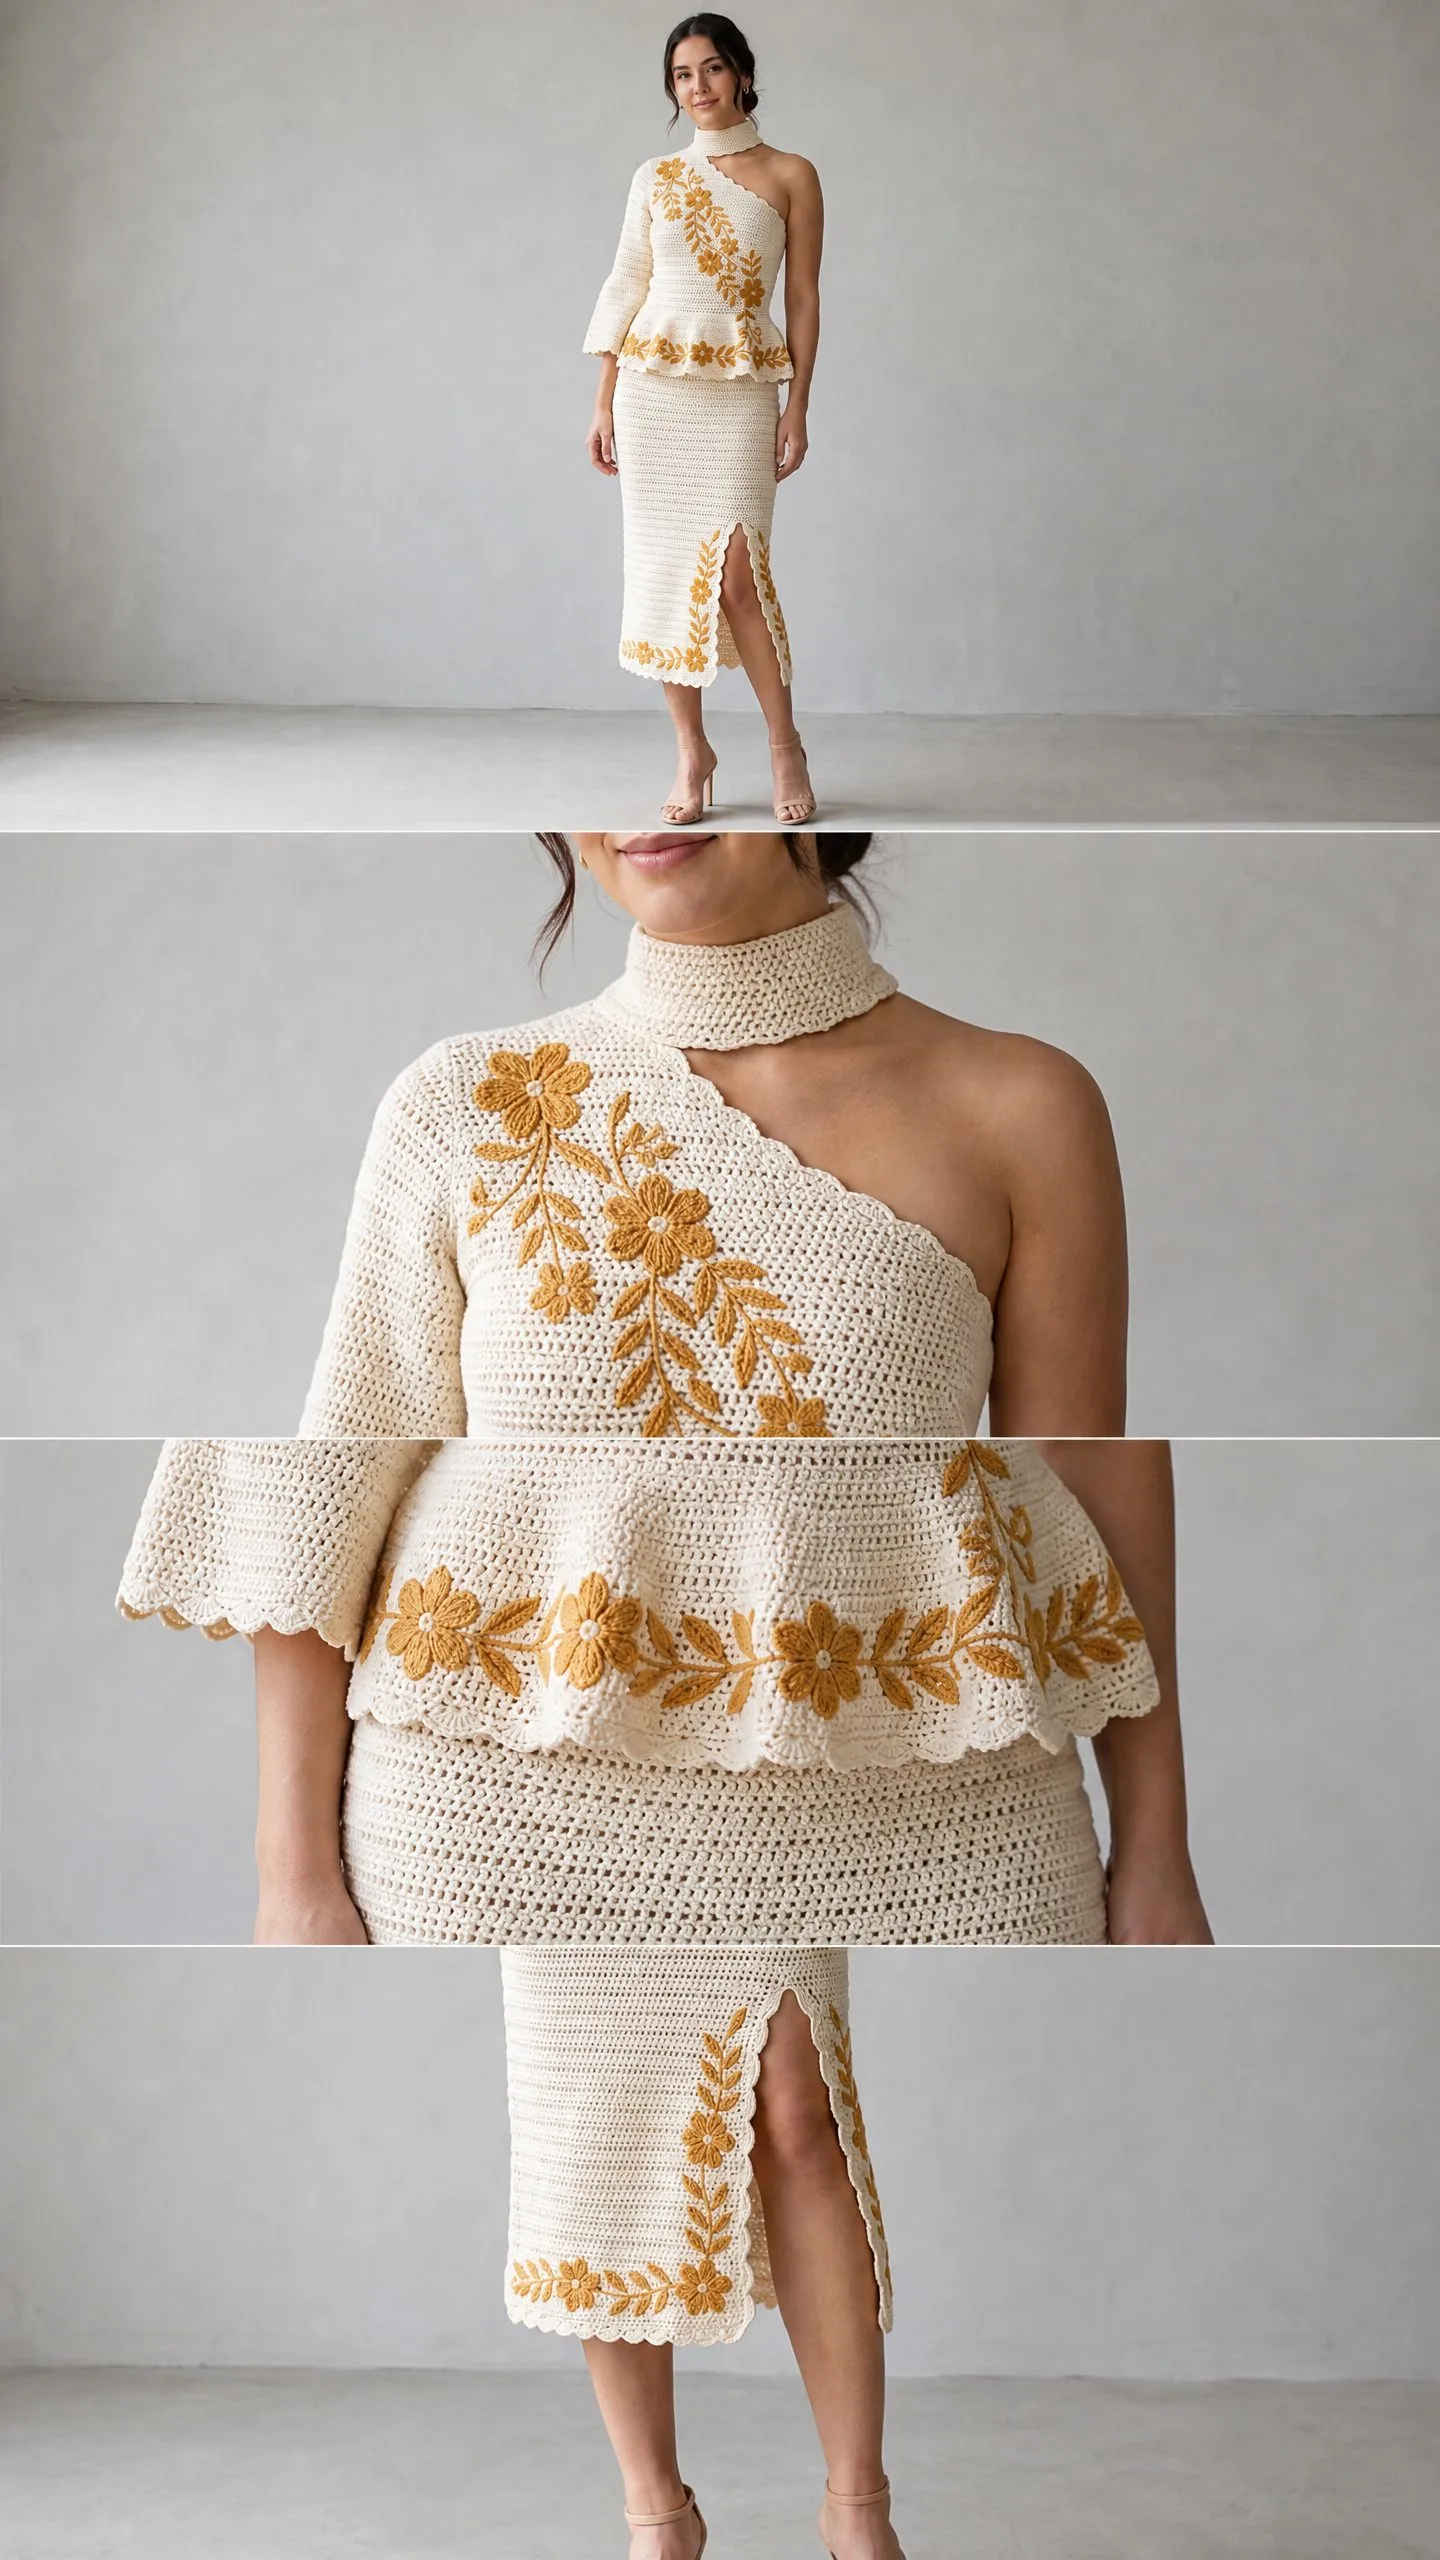
This coordinating ensemble consists of two pieces that work together beautifully or can be styled separately. The top features an asymmetrical construction with one bare shoulder, a three-quarter bell sleeve, and a flared peplum hem. A sleek choker neckband connects at the neck, creating that modern, fashion-forward silhouette you see in the reference images.
The skirt is a classic fitted pencil shape with a front center slit and scalloped hem edge. Both pieces are worked in dense single crochet (sc) for a structured, fabric-like hand that holds its shape beautifully.
The magic happens with the surface embroidery. All those gorgeous floral motifs and trailing leaves are worked after the main fabric is complete using surface slip stitch and chain embroidery techniques. This means you build the base garment first, then add the decorative elements on top.
Skill Level and Time Investment
Let me be honest with you. This is an advanced pattern. You should feel confident with shaping in single crochet, set-in sleeve construction, understanding garment ease and fitting, and surface embroidery techniques. The asymmetrical neckline construction and peplum shaping add extra complexity.
If you’ve completed two or three fitted garment projects before, you’re ready for this challenge.
Estimated time breakdown:
Yes, it’s a commitment. But the finished set is absolutely worth every stitch.
Finished Measurements
This pattern is written for size Small/Medium (US size 4/6).
Top measurements:
Skirt measurements:
Size customization tips appear at the end of the instructions.
Materials Needed
Yarn:
Hooks:
Notions:
Recommended Yarn Options
Option 1: Paintbox Yarns Simply DK (100% cotton, 137 yards / 125 m per 50 g skein). This yarn gives excellent stitch definition for surface embroidery and blocks beautifully. You will need approximately 14 skeins of shade Champagne White (MC) and 4 skeins of shade Buttercup Yellow (CC).
Option 2: Drops Safran (100% cotton, 175 yards / 160 m per 50 g skein). A slightly finer DK with mercerized sheen that mimics the polished look of the pictured set. You will need approximately 11 skeins of off-white (MC) and 3 skeins of golden yellow (CC).
Option 3: Lion Brand 24/7 Cotton DK (100% cotton, 180 yards / 165 m per 100 g skein). A widely available option with strong color saturation. You will need approximately 10 skeins of Ecru (MC) and 3 skeins of Goldenrod (CC).
Substitution note: Avoid yarns with significant stretch or halo. These will blur stitch definition and make surface embroidery difficult. Always check gauge before beginning.
Gauge
22 stitches and 26 rows = 4 in / 10 cm in single crochet using MC and US size E-4 / 3.5 mm hook, after blocking.
Gauge is mandatory for this garment. A difference of even one stitch per inch will significantly alter the finished bust and waist measurements. Adjust hook size as needed to match gauge exactly.
Abbreviations (US Terms)
Special Stitches and Techniques
Scallop Edge
This decorative wave appears at all hem, peplum, and slit borders.
1. Join yarn to the first stitch with a slip stitch.
2. Chain 1, work 1 sc in the same stitch.
3. Skip 2 stitches, work 5 dc in the next stitch (this forms one scallop shell).
4. Skip 2 stitches, work 1 sc in the next stitch.
5. Repeat steps 3 and 4 across the edge.
Note: The stitch count before edging must be a multiple of 6 for this scallop to work evenly. Adjustments are noted at each application point.
Surface Slip Stitch Embroidery
This technique creates stems, vines, and outlines of the floral motifs.
1. Thread a length of CC yarn onto a large-eyed yarn needle.
2. Hold the CC yarn behind the fabric (on the WS).
3. Insert your D-3 hook from the RS through a stitch, catch the CC yarn, and pull up a loop to the RS.
4. Insert the hook into the next adjacent stitch in the direction of your design, catch the CC yarn again, and pull it through the loop on your hook. That’s one surface slip stitch complete.
5. Continue following your embroidery placement guide, working one surface sl st per stitch or row as needed.
6. To finish, pull the final loop to the WS and weave in securely.
Surface Chain Embroidery (For Petal and Leaf Fills)
1. Anchor CC yarn to the WS and pull a loop to the RS as above.
2. Insert the hook back into the same stitch where the loop emerged and catch the CC yarn again, pulling up a second loop through the first.
3. Continue working loose surface chain stitches across the area to fill.
4. For individual petals (five per flower), work 4 to 5 surface chain stitches in a teardrop arc from the petal base outward and back, anchoring at the tip with a single sl st.
5. For leaf shapes, work a central stem line in surface sl st first, then fill each side with angled surface chain stitches radiating from the stem.
SC2TOG (Single Crochet Two Together)
This is your decrease stitch.
1. Insert hook into next stitch, pull up a loop. (2 loops on hook)
2. Insert hook into following stitch, pull up a loop. (3 loops on hook)
3. Yarn over and pull through all 3 loops. One decrease complete.
Important Pattern Notes
Before you begin, please read through these notes carefully.
1. The top back uses one-shoulder construction. The left side rises to the shoulder normally, while the right side ends at the underarm. Only the choker neckband bridges the neck area.
2. Turning chains do not count as stitches throughout this pattern unless specifically noted. Always chain 1 to turn and work the first stitch into the first stitch of the previous row.
3. When working the peplum, stitches are picked up along the lower edge of the completed bodice and worked downward from there.
4. The sleeve cap is shaped with decrease rows to create a curve that fits the armhole. Match the armhole and sleeve cap stitch counts before seaming.
5. Work all embroidery after blocking the main pieces and before final seaming where possible. Embroidery that crosses seam lines is worked last.
6. The choker neckband hooks at center back with a small hook-and-eye closure.
7. All stitch counts appear in parentheses at the end of every row or round.
8. RS is always facing you when seaming with a slip stitch seam unless noted otherwise.
Step-by-Step Crochet Pattern Instructions
Section 1: Choker Neckband
With MC and E-4 hook, chain 68.
Row 1 (RS): Sc in 2nd ch from hook, sc in each ch across, ch 1, turn. (67 sc)
Row 2: Sc in each st across, ch 1, turn. (67 sc)
Row 3: Sc in each st across, ch 1, turn. (67 sc)
Row 4: Sc in each st across, ch 1, turn. (67 sc)
Row 5: Sc in each st across. Fasten off, leaving a long tail for seaming. (67 sc)
The neckband should measure approximately 12 in / 30.5 cm long and 0.75 in / 2 cm tall. Fold in half lengthwise and whipstitch long edges together to create a double-thick band. Attach hook and eye to short ends.
Checkpoint: Your choker neckband should be a firm, narrow strip measuring approximately 12 in / 30.5 cm by 0.75 in / 2 cm.
Section 2: Bodice Front
The front bodice is a shaped rectangular panel covering the left chest and shoulder area. It narrows through the waist, and the right shoulder is entirely open.
Bust Section (Worked Bottom Up)
With MC and E-4 hook, chain 95.
Row 1 (RS): Sc in 2nd ch from hook, sc in each ch across, ch 1, turn. (94 sc)
Rows 2 through 20: Sc in each st across, ch 1, turn. (94 sc each row)
After Row 20, the piece measures approximately 3 in / 7.6 cm tall.
Waist Shaping (Decrease Section)
Row 21: Sc2tog over first 2 sts, sc to last 2 sts, sc2tog, ch 1, turn. (92 sc)
Row 22: Sc in each st across, ch 1, turn. (92 sc)
Row 23: Sc2tog, sc to last 2 sts, sc2tog, ch 1, turn. (90 sc)
Row 24: Sc in each st across, ch 1, turn. (90 sc)
Row 25: Sc2tog, sc to last 2 sts, sc2tog, ch 1, turn. (88 sc)
Row 26: Sc in each st across, ch 1, turn. (88 sc)
Row 27: Sc2tog, sc to last 2 sts, sc2tog, ch 1, turn. (86 sc)
Row 28: Sc in each st across, ch 1, turn. (86 sc)
Row 29: Sc2tog, sc to last 2 sts, sc2tog, ch 1, turn. (84 sc)
Row 30: Sc in each st across, ch 1, turn. (84 sc)
Row 31: Sc2tog, sc to last 2 sts, sc2tog, ch 1, turn. (82 sc)
Row 32: Sc in each st across, ch 1, turn. (82 sc)
Row 33: Sc2tog, sc to last 2 sts, sc2tog, ch 1, turn. (80 sc)
Row 34: Sc in each st across, ch 1, turn. (80 sc)
Row 35: Sc2tog, sc to last 2 sts, sc2tog, ch 1, turn. (78 sc)
Row 36: Sc in each st across. (78 sc) This is the narrowest waist row.
Checkpoint: After Row 36, the piece should measure approximately 5.5 in / 14 cm tall and 14.2 in / 36 cm wide at the waist.
Above-Waist Shaping (Slight Increase to Underbust)
Row 37: Inc in first st, sc to last st, inc in last st, ch 1, turn. (80 sc)
Row 38: Sc in each st across, ch 1, turn. (80 sc)
Row 39: Inc in first st, sc to last st, inc in last st, ch 1, turn. (82 sc)
Row 40: Sc in each st across, ch 1, turn. (82 sc)
Row 41: Inc in first st, sc to last st, inc in last st, ch 1, turn. (84 sc)
Row 42: Sc in each st across, ch 1, turn. (84 sc)
Asymmetrical Neckline and Shoulder Shaping
At Row 43, the front begins shaping for the asymmetrical neckline. The right side drops away, leaving only the left shoulder section active.
Row 43: Sc in first 52 sts, ch 1, turn, leaving rem 32 sts unworked. (52 sc, left bodice section)
Left shoulder section continues:
Row 44: Sc in each st across, ch 1, turn. (52 sc)
Row 45: Sc in first 50 sts, sc2tog, ch 1, turn. (51 sc)
Row 46: Sc in each st across, ch 1, turn. (51 sc)
Row 47: Sc in first 49 sts, sc2tog, ch 1, turn. (50 sc)
Row 48: Sc in each st across, ch 1, turn. (50 sc)
Row 49: Sc in first 48 sts, sc2tog, ch 1, turn. (49 sc)
Row 50: Sc in each st across, ch 1, turn. (49 sc)
Row 51: Sc in first 47 sts, sc2tog, ch 1, turn. (48 sc)
Row 52: Sc in each st across, ch 1, turn. (48 sc)
Row 53: Sc in first 46 sts, sc2tog, ch 1, turn. (47 sc)
Row 54: Sc in each st across, ch 1, turn. (47 sc)
Row 55: Sc in first 45 sts, sc2tog, ch 1, turn. (46 sc)
Row 56: Sc in each st across, ch 1, turn. (46 sc)
Shoulder Strap Extension
Row 57: Sc in first 14 sts only, ch 1, turn. (14 sc)
Rows 58 through 72: Sc in each st across, ch 1, turn. (14 sc each row)
Row 72 is the final row of the shoulder strap. Fasten off. This strap will attach to the choker neckband.
Return to the 32 sts left unworked at Row 43. Join MC to the first of these sts.
Right Upper Bodice Front (Scalloped Neckline Edge Only)
Row 43b: Ch 1, sc2tog, sc in each st to end, ch 1, turn. (31 sc)
Row 44b: Sc in each st, ch 1, turn. (31 sc)
Row 45b: Sc2tog, sc in each st to end, ch 1, turn. (30 sc)
Row 46b: Sc in each st, ch 1, turn. (30 sc)
Row 47b: Sc2tog, sc in each st to end. (29 sc)
Fasten off. This creates the curved right edge of the diagonal neckline opening.
Checkpoint: The complete front bodice should measure approximately 10 in / 25.4 cm tall at center, with the diagonal cutaway opening at the upper right clearly visible.
Section 3: Bodice Back
The back is worked as two panels: a wider left panel (supporting the sleeve) and a narrower right panel (the open-back side).
Back Left Panel (Sleeve Side)
With MC and E-4 hook, chain 53.
Row 1 (RS): Sc in 2nd ch from hook, sc in each ch across, ch 1, turn. (52 sc)
Rows 2 through 20: Sc in each st across, ch 1, turn. (52 sc)
Waist Shaping
Row 21: Sc in each st to last 2 sts, sc2tog, ch 1, turn. (51 sc)
Row 22: Sc in each st across, ch 1, turn. (51 sc)
Row 23: Sc in each st to last 2 sts, sc2tog, ch 1, turn. (50 sc)
Row 24: Sc in each st across, ch 1, turn. (50 sc)
Row 25: Sc in each st to last 2 sts, sc2tog, ch 1, turn. (49 sc)
Row 26: Sc in each st across, ch 1, turn. (49 sc)
Row 27: Sc in each st to last 2 sts, sc2tog, ch 1, turn. (48 sc)
Row 28: Sc in each st across, ch 1, turn. (48 sc)
Row 29: Sc in each st to last 2 sts, sc2tog, ch 1, turn. (47 sc)
Row 30: Sc in each st across, ch 1, turn. (47 sc)
Row 31: Sc in each st to last 2 sts, sc2tog, ch 1, turn. (46 sc)
Row 32: Sc in each st across, ch 1, turn. (46 sc)
Above-Waist
Rows 33 through 36: Sc in each st across, ch 1, turn. (46 sc)
Upper Back Left With Armhole
Row 37: Sc in each st across, ch 1, turn. (46 sc)
Row 38: Ch 1, sc in first 38 sts, ch 1, turn, leaving last 8 sts unworked (armhole shaping begins). (38 sc)
Row 39: Sc2tog, sc in each st across, ch 1, turn. (37 sc)
Row 40: Sc in each st to last 2 sts, sc2tog, ch 1, turn. (36 sc)
Row 41: Sc2tog, sc in each st across, ch 1, turn. (35 sc)
Row 42: Sc in each st to last 2 sts, sc2tog, ch 1, turn. (34 sc)
Row 43: Sc2tog, sc in each st across, ch 1, turn. (33 sc)
Row 44: Sc in each st across, ch 1, turn. (33 sc)
Rows 45 through 56: Sc in each st across, ch 1, turn. (33 sc)
Row 56 is the shoulder row. Fasten off.
Back Right Panel (Open Back Side)
With MC and E-4 hook, chain 43.
Row 1 (RS): Sc in 2nd ch from hook, sc in each ch across, ch 1, turn. (42 sc)
Rows 2 through 20: Sc in each st across, ch 1, turn. (42 sc)
Waist Shaping
Row 21: Sc2tog, sc in each st across, ch 1, turn. (41 sc)
Row 22: Sc in each st across, ch 1, turn. (41 sc)
Row 23: Sc2tog, sc in each st across, ch 1, turn. (40 sc)
Row 24: Sc in each st across, ch 1, turn. (40 sc)
Row 25: Sc2tog, sc in each st across, ch 1, turn. (39 sc)
Row 26: Sc in each st across, ch 1, turn. (39 sc)
Row 27: Sc2tog, sc in each st across, ch 1, turn. (38 sc)
Row 28: Sc in each st across, ch 1, turn. (38 sc)
Row 29: Sc2tog, sc in each st across, ch 1, turn. (37 sc)
Row 30: Sc in each st across, ch 1, turn. (37 sc)
Row 31: Sc2tog, sc in each st across, ch 1, turn. (36 sc)
Row 32: Sc in each st across, ch 1, turn. (36 sc)
Above-Waist
Rows 33 through 37: Sc in each st across, ch 1, turn. (36 sc)
Upper Back Right With Armhole
Row 38: Sc in each st across, ch 1, turn. (36 sc)
Row 39: Sc2tog, sc in each st across, ch 1, turn. (35 sc)
Row 40: Sc2tog, sc in each st across, ch 1, turn. (34 sc)
Row 41: Sc2tog, sc in each st across, ch 1, turn. (33 sc)
Row 42: Sc in each st across, ch 1, turn. (33 sc)
Row 43: Sc in each st across. (33 sc)
Fasten off. The top edge of the right back panel is left open to create the exposed back effect.
Section 4: Peplum
The peplum is worked by picking up stitches along the bottom of the joined front and back bodice (after side seams are joined, before hem edging).
The combined lower edge measures approximately 188 sts around.
Join MC to one side seam at the lower bodice edge.
Round 1 (RS, joined): Ch 1, sc in each st around. (188 sc) Join with sl st to first sc.
Round 2: Ch 1, sc in each st around. Join. (188 sc)
Round 3 (increase round): Ch 1, (sc in next 2 sts, inc in next st) 62 times, sc in rem 2 sts. Join. (250 sc)
Round 4: Ch 1, sc in each st around. Join. (250 sc)
Round 5: Ch 1, (sc in next 3 sts, inc in next st) 62 times, sc in rem 2 sts. Join. (312 sc)
Rounds 6 through 10: Ch 1, sc in each st around. Join. (312 sc)
Fasten off. The peplum should measure approximately 3 in / 7.6 cm deep before edging.
Peplum Hem Scallop Edging
The peplum hem has 312 sts, which is divisible by 6 (312 / 6 = 52 repeats). Apply scallop edge as written in Special Stitches. Fasten off and weave in ends.
Section 5: Three-Quarter Flare Sleeve
The sleeve is worked flat from the shoulder cap down to the cuff.
With MC and E-4 hook, chain 78.
Row 1 (RS): Sc in 2nd ch from hook, sc in each ch across, ch 1, turn. (77 sc)
Sleeve Cap Shaping
Row 2: Sl st in first 4 sts, ch 1, sc in same st as last sl st, sc in next 69 sts, leave last 4 sts unworked, ch 1, turn. (70 sc)
Row 3: Sc2tog, sc to last 2 sts, sc2tog, ch 1, turn. (68 sc)
Row 4: Sc2tog, sc to last 2 sts, sc2tog, ch 1, turn. (66 sc)
Row 5: Sc2tog, sc to last 2 sts, sc2tog, ch 1, turn. (64 sc)
Row 6: Sc2tog, sc to last 2 sts, sc2tog, ch 1, turn. (62 sc)
Row 7: Sc2tog, sc to last 2 sts, sc2tog, ch 1, turn. (60 sc)
Row 8: Sc2tog, sc to last 2 sts, sc2tog, ch 1, turn. (58 sc)
Row 9: Sc2tog, sc to last 2 sts, sc2tog, ch 1, turn. (56 sc)
Row 10: Sc2tog, sc to last 2 sts, sc2tog, ch 1, turn. (54 sc)
Row 11: Sc2tog, sc to last 2 sts, sc2tog, ch 1, turn. (52 sc)
Fasten off the sleeve cap section.
Sleeve Body (Worked From Cap Base Down)
With MC and E-4 hook, with RS facing, join yarn to the right end of the foundation chain at Row 1.
Row 1 (sleeve body): Ch 1, sc in each st along the lower edge = 77 sc, ch 1, turn. (77 sc)
Rows 2 through 10: Sc in each st across, ch 1, turn. (77 sc each row)
Sleeve Flare
Row 11: Inc in first st, sc to last st, inc in last st, ch 1, turn. (79 sc)
Row 12: Sc in each st across, ch 1, turn. (79 sc)
Row 13: Inc in first st, sc to last st, inc in last st, ch 1, turn. (81 sc)
Row 14: Sc in each st across, ch 1, turn. (81 sc)
Row 15: Inc in first st, sc to last st, inc in last st, ch 1, turn. (83 sc)
Row 16: Sc in each st across, ch 1, turn. (83 sc)
Row 17: Inc in first st, sc to last st, inc in last st, ch 1, turn. (85 sc)
Row 18: Sc in each st across, ch 1, turn. (85 sc)
Row 19: Inc in first st, sc to last st, inc in last st, ch 1, turn. (87 sc)
Row 20: Sc in each st across, ch 1, turn. (87 sc)
Row 21: Inc in first st, sc to last st, inc in last st, ch 1, turn. (89 sc)
Row 22: Sc in each st across, ch 1, turn. (89 sc)
Row 23: Inc in first st, sc to last st, inc in last st, ch 1, turn. (91 sc)
Row 24: Sc in each st across. (91 sc)
Fasten off. The sleeve body measures approximately 14 in / 35.5 cm from cap to cuff edge.
Sleeve Cuff Scallop
91 is not divisible by 6. Work adjustments: sc in first 45 sts, work 2 sc2tog evenly distributed to reach 90 sc. 90 / 6 = 15 repeats. Apply scallop edge across 90 sts. Fasten off.
Section 6: Skirt
The skirt is worked in the round from the waist down.
Skirt Waistband
With MC and E-4 hook, chain 155. Join with sl st to form a ring, being careful not to twist.
Round 1: Ch 1, sc in each ch around. Join. (155 sc)
Rounds 2 through 6: Ch 1, sc in each st around. Join. (155 sc each round)
Skirt Hip Shaping
Round 7: Ch 1, (sc in next 30 sts, inc in next st) 5 times. Join. (160 sc)
Continue following the hip shaping increases as established, adding increases evenly every few rounds until reaching the desired hip measurement of 37 in / 94 cm. Work even until the skirt measures 16 in / 40.6 cm from waist.
Front Slit Opening
At 16 in from waist, divide for front slit. Work the skirt flat in two sections, continuing for remaining 10 in / 25.4 cm to hem.
Skirt Hem and Slit Scallop Edging
Apply scallop edging to the bottom hem and both sides of the front slit. Adjust stitch counts to multiples of 6 before applying edging.
Embroidery Placement Guide
The floral motifs cascade from the shoulder area diagonally across the bodice front. Work large five-petal flowers (approximately 2 in / 5 cm diameter) with surface chain embroidery. Connect flowers with trailing vine stems using surface slip stitch.
On the skirt, work a border of flowers and leaves around the hem and along both edges of the front slit. The botanical motifs should mirror each other on either side of the slit.
Block all pieces before embroidery for best results.
Assembly Instructions
1. Seam bodice front to back at side seams.
2. Attach shoulder strap to choker neckband.
3. Set sleeve into armhole, matching cap shaping to armhole
