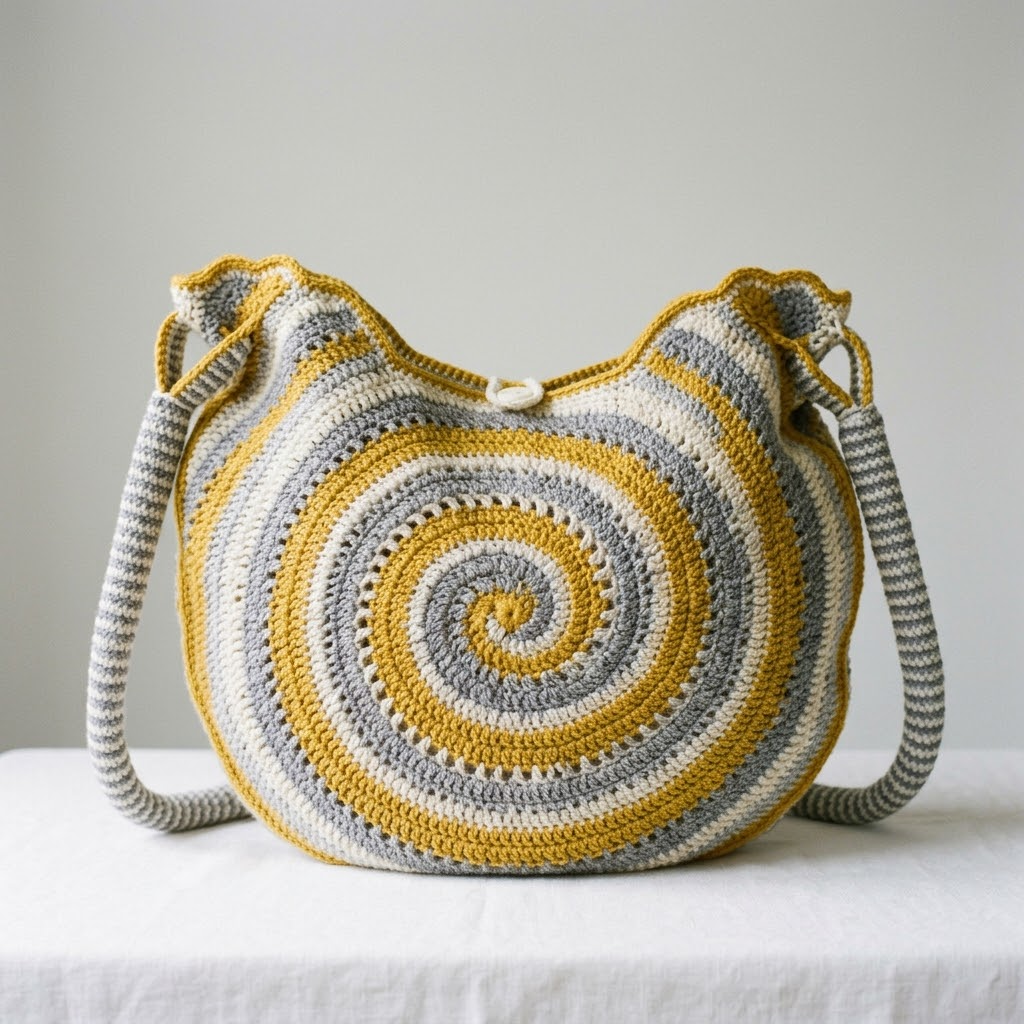
This gorgeous spiral hobo bag is about to become your favorite everyday accessory. I fell completely in love with the hypnotic swirl pattern the moment I finished the first panel. And here is the best part. If you can crochet in the round and work basic stitches, you can absolutely make this bag.
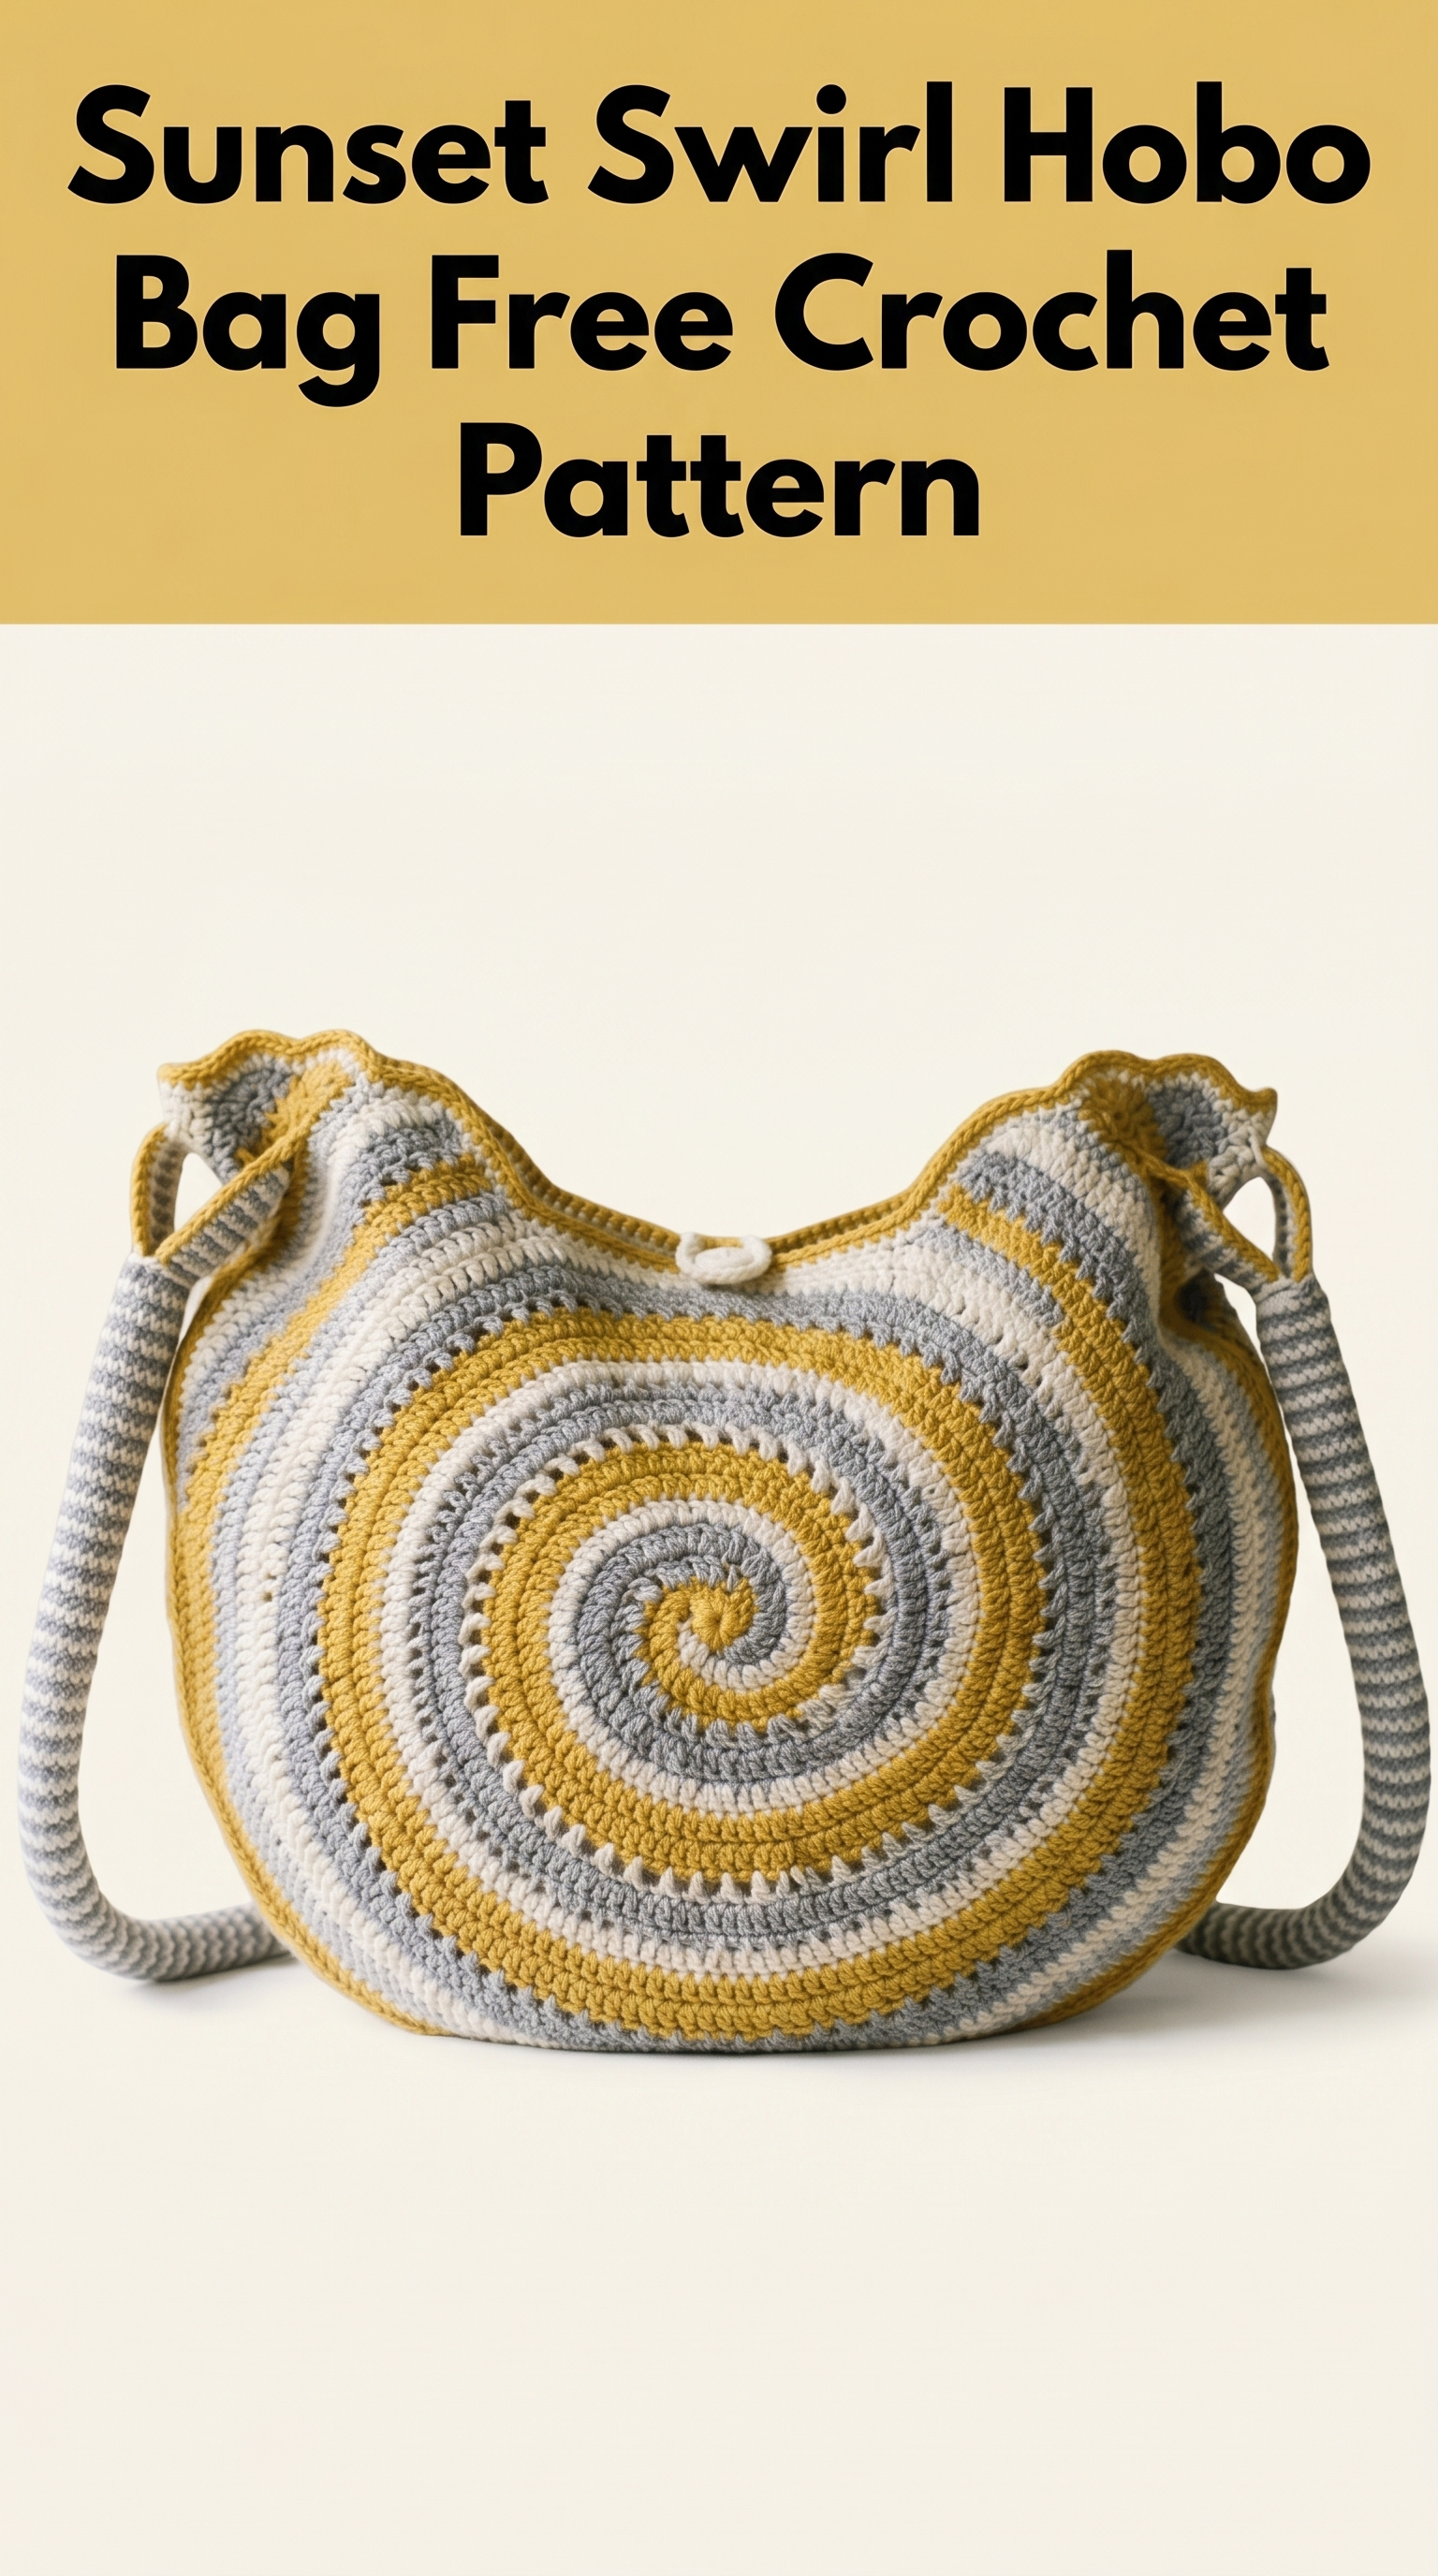
The Sunset Swirl Hobo Bag crochet pattern creates a roomy, slouchy purse with a stunning three-color spiral design. The construction is simpler than it looks. You will make two identical circular panels, join them together, and add a comfortable striped strap. The whole project works up surprisingly quickly once you get the rhythm of the color changes.
Let me walk you through every single step to recreate this beauty from scratch.
Why You Will Love This Crochet Bag Pattern
This hobo bag hits all the right notes. The spiral technique looks incredibly impressive but uses only basic stitches. The finished size is perfect for daily essentials without being bulky. And those soft neutrals with the warm mustard accent? Chef’s kiss.
The bag measures approximately 12 inches wide by 11 inches tall when finished, not counting the strap. The crossbody strap gives you about 45 inches of comfortable length. Adjust that however you prefer.
I designed the color sequence to create that mesmerizing swirl effect using three colors worked continuously. No cutting yarn between rounds. No complicated colorwork charts. Just simple color rotation that builds into something magical.
Materials You Will Need
Gather these supplies before you start. Having everything ready makes the process so much smoother.
Yarn:
Use a worsted weight yarn (weight 4) for this project. I recommend 100% cotton or a cotton blend for structure and durability. Acrylic works too but may stretch more over time. Look for yarn with good stitch definition so that beautiful spiral really pops.
Hook:
Notions:
Gauge
Gauge matters for this bag. Check yours before diving in.
Work 14 stitches and 16 rows in single crochet to get a 4 inch square.
If your square is too big, go down a hook size. Too small? Go up a hook size. Taking five minutes to check gauge saves hours of frustration later. Trust me on this one.
Abbreviations and Stitch Definitions
Let me break down every stitch you will use. I want zero confusion as you work through this pattern.
ch = chain: Yarn over, pull through loop on hook. This creates your foundation.
sl st = slip stitch: Insert hook, yarn over, pull through both the stitch and the loop on your hook in one motion. Used for joining rounds.
sc = single crochet: Insert hook into stitch, yarn over and pull up a loop (2 loops on hook), yarn over and pull through both loops. Your workhorse stitch for this entire bag.
inc = increase: Work 2 single crochet stitches into the same stitch. This is how your circle grows.
2sc = two single crochet in one stitch: Same as increase. I use both terms depending on context.
Special Technique: Continuous Spiral Color Changes
Here is the magic behind this step by step crochet tutorial. Instead of joining rounds and cutting colors, you work all three colors continuously in a spiral.
Think of it like three snakes chasing each other around and around. Each color has its own starting point, and they never catch up to each other.
You will carry the unused colors along the inside of your work, crocheting over them as you go. This hides them completely and keeps everything neat.
Do not panic. I will explain exactly when and how to switch colors as we go.
Bag Panel Pattern (Make 2)
You will create two identical circular panels. These become the front and back of your hobo bag.
Setting Up Your Three Color Spiral
Magic Ring Setup:
With Color A, create a magic ring (also called magic circle or adjustable ring).
Round 1 is a little different because you are establishing all three color sections.
Round 1:
You now have 6 stitches total arranged in three color sections. Place a stitch marker at the beginning of each color section. These markers are your best friends. Move them up every round.
(6 sc total: 2 in each color)
Working the Continuous Spiral
From here on, you will work continuously without joining rounds. Pick up each color where you left it, work across its section, then drop it and pick up the next color.
Round 2:
(12 sc total)
Round 3:
(18 sc total)
Round 4:
(24 sc total)
Round 5:
(30 sc total)
Continuing the Circle Pattern
You see the pattern emerging now, right? Each round adds 6 total stitches (2 per color section). The number of single crochets between increases grows by one each round.
Continue in this established pattern:
Round 6: [4 sc, inc] around each section. (36 sc)
Round 7: [5 sc, inc] around each section. (42 sc)
Round 8: [6 sc, inc] around each section. (48 sc)
Round 9: [7 sc, inc] around each section. (54 sc)
Round 10: [8 sc, inc] around each section. (60 sc)
Round 11: [9 sc, inc] around each section. (66 sc)
Round 12: [10 sc, inc] around each section. (72 sc)
Round 13: [11 sc, inc] around each section. (78 sc)
Round 14: [12 sc, inc] around each section. (84 sc)
Round 15: [13 sc, inc] around each section. (90 sc)
Round 16: [14 sc, inc] around each section. (96 sc)
Round 17: [15 sc, inc] around each section. (102 sc)
Round 18: [16 sc, inc] around each section. (108 sc)
Round 19: [17 sc, inc] around each section. (114 sc)
Round 20: [18 sc, inc] around each section. (120 sc)
Your circle should now measure approximately 12 inches across. If you want a larger bag, continue the pattern for additional rounds.
Finishing the Panel:
Sl st to the next stitch to even out the spiral. Fasten off all three colors, leaving 6 inch tails for weaving.
Make a second identical panel.
Decorative Ruffle Edging
That beautiful wavy edge along the top of the bag? It is a simple ruffle created during the joining process. I will explain that in the assembly section.
Strap Pattern
The striped strap adds such a polished touch to this beginner friendly crochet pattern. You will alternate between gray and cream for a classic look.
Foundation:
With Color B (gray), ch 6.
Row 1: Sc in 2nd ch from hook and in each ch across. Ch 1, turn. (5 sc)
Row 2: Sc in each st across. Ch 1, turn. (5 sc)
Rows 3-4: Repeat Row 2.
Color Change:
At the end of Row 4, switch to Color A (cream) on the last yarn over. Do not cut Color B.
Rows 5-8: With Color A, sc in each st across. Ch 1, turn. (5 sc)
Switch to Color B at end of Row 8.
Continue alternating 4 rows of gray and 4 rows of cream until strap measures approximately 45 inches or your desired length.
Tip: Carry the unused color loosely along the edge. This saves you from weaving dozens of ends later.
Fasten off. Weave in ends.
Assembly Instructions
Now comes the satisfying part. Bringing all your pieces together.
Step 1: Position Your Panels
Lay both spiral panels with the right sides facing out. The spirals should mirror each other when the bag is held up. Line up the edges carefully.
Step 2: Join the Bottom and Sides
You will join approximately three-quarters of the circumference, leaving the top open.
Hold panels together with wrong sides touching. Join Color C (mustard) in any stitch along what will be the bottom center of your bag.
Working through both panels at once, sc evenly around the edge. Work about 90 stitches total, stopping when you have joined roughly three-quarters of the circle.
This creates the bottom and sides of your hobo bag while leaving a generous opening at the top.
Fasten off. Weave in ends.
Step 3: Create the Ruffle Edge
The top edge gets that gorgeous wavy detail.
Join Color C at one side of the opening. Working through both layers at the top edge corners, then through single layers across the opening:
Ruffle Round:
Work 3 sc in every other stitch around the entire opening. This creates the natural ruffle effect.
Fasten off.
Step 4: Attach the Strap
Position strap ends at the side corners of your bag opening. The strap should attach at the points where the front and back panels meet at the top.
Using matching yarn and your yarn needle, whip stitch the strap ends securely to the inside of the bag. Go over these stitches multiple times for strength. This strap will hold the weight of your belongings, so secure attachment matters.
Step 5: Add the Button Loop Closure
See that small loop at the center top of the bag? Here is how to make it.
With Color A, ch 15. Sl st to first ch to form a loop. Fasten off, leaving a long tail.
Sew the loop securely to the center back of the bag opening.
Attach a decorative button to the center front, positioned to catch the loop.
Optional Lining
Want to take your bag to the next level? Adding a fabric lining protects the inside and gives extra structure.
Cut two circles of cotton fabric slightly smaller than your crocheted panels. Sew them together along the bottom and sides, matching your crochet seam. Fold the top edge under and hand stitch the lining inside your bag.
This step is completely optional but makes the bag feel more finished.
Helpful Tips for Success
Consistent tension: Keep your stitches even throughout. The spiral pattern shows every stitch, so consistency really shines here.
Blocking: Lightly steam block your finished panels before joining. This evens out any wonky stitches and helps the spirals lay flat.
Color placement: The cream, gray, and mustard combination is gorgeous, but feel free to choose your own palette. Any three colors with good contrast will create that striking spiral effect.
Yarn ends: Weave ends as you go rather than saving them all for the end. Future you will be grateful.
Skill Level
I would call this pattern intermediate beginner level. If you understand how to crochet in the round and can handle working with multiple colors, you have got this.
The spiral technique sounds intimidating but truly is not. Once you complete the first few rounds, the rhythm clicks into place. Promise.
Final Thoughts on the Sunset Swirl Hobo Bag Crochet Pattern
You made it to the end, and I hope you are excited to start this project. The Sunset Swirl Hobo Bag is one of those patterns that looks far more complicated than it actually is. That is my favorite kind.
Every time I carry mine, someone asks about it. The spiral catches the eye in the best way. And knowing you made something this beautiful with your own two hands? Nothing beats that feeling.
Thank you so much for choosing this pattern. Your time and creativity mean the world to me.
I would absolutely love to see your finished bag. Snap a photo and share it on Instagram or Facebook. Tag me so I can celebrate your gorgeous work. Seeing your creations truly makes my day.
Happy hooking, friend. You have got this.
