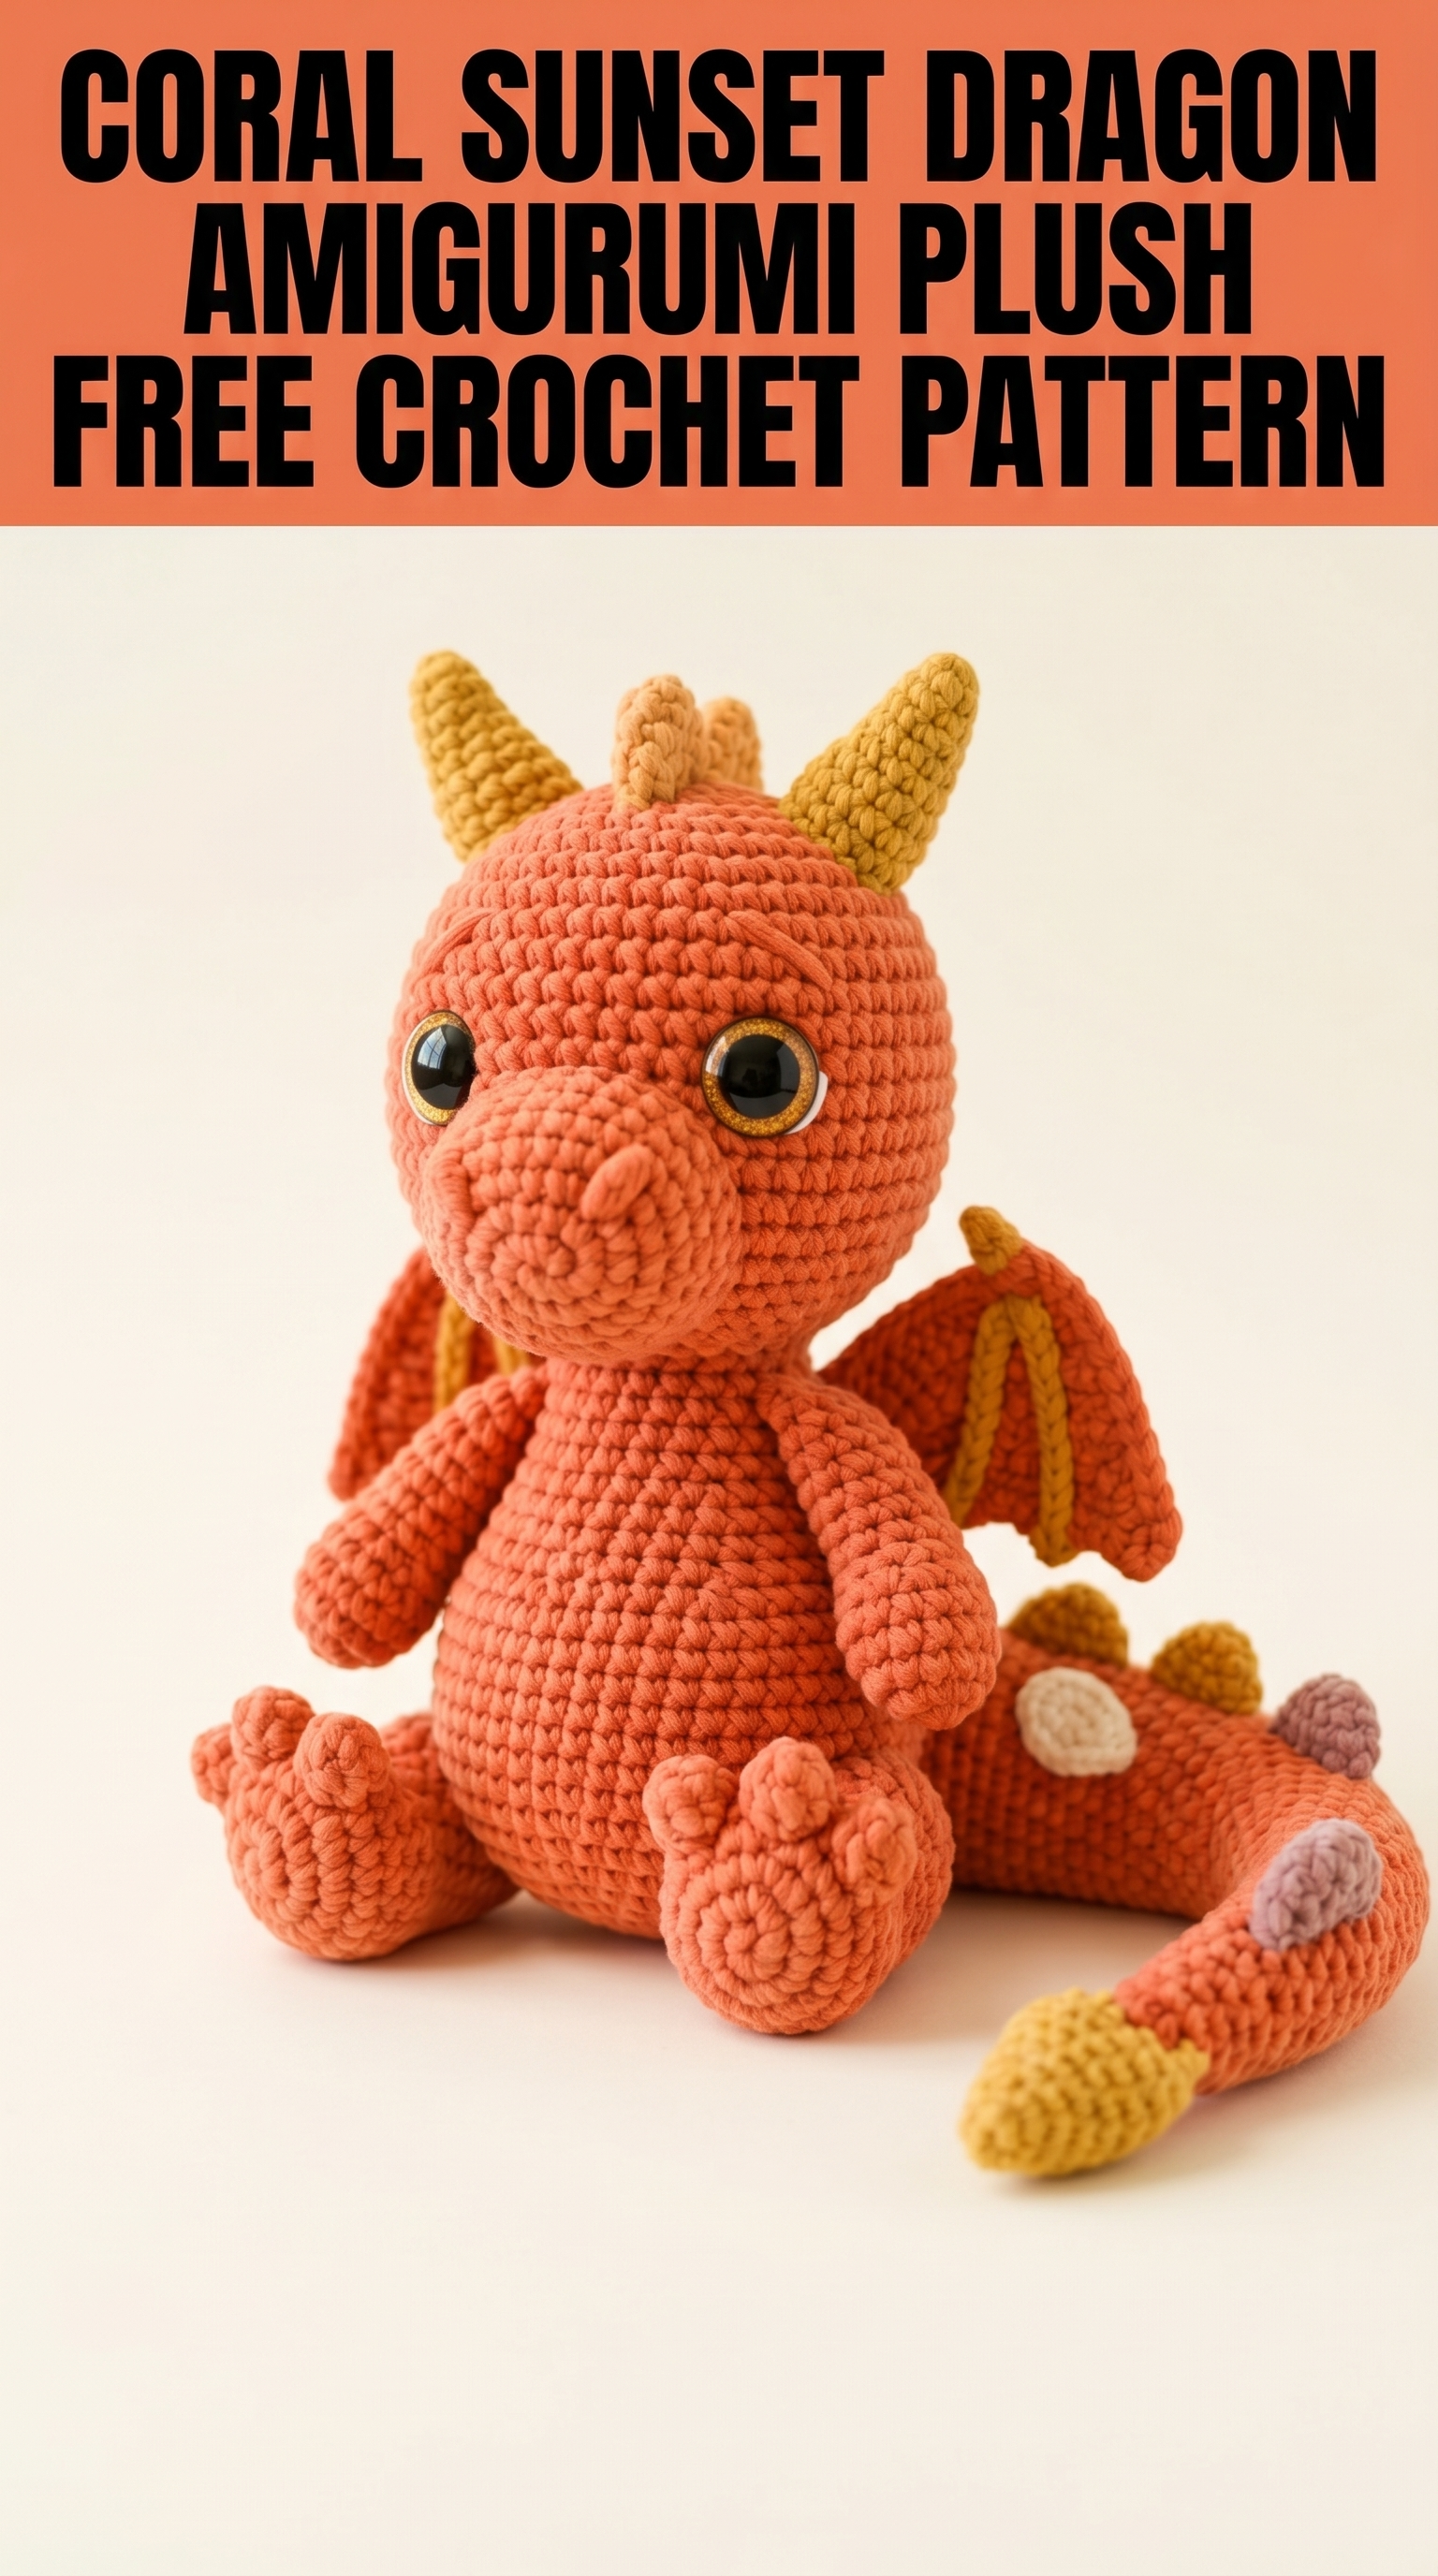
Let me introduce you to the most huggable dragon you will ever crochet. This Coral Sunset Dragon Amigurumi sits about 12 inches tall with the sweetest expression, complete with golden horns, textured wings, and an adorable spade-tipped tail. If you have basic amigurumi experience and want to level up your skills, this crochet pattern is perfect for you.
I designed this little guy to look impressive while still being approachable. Yes, there are multiple pieces to assemble. Yes, you will need to pay attention to shaping. But I promise each component uses familiar stitches, and I will walk you through every step. By the end, you will have a shelf-worthy dragon that looks like it took months to create.
Why You Will Love This Dragon Amigurumi Pattern
This coral sunset dragon stands out because of thoughtful details that bring personality without overwhelming complexity. The safety eyes with golden rings give an expressive face. The contrasting gold accents on the horns, wing membranes, and tail tip create visual interest. Those cute little toes and the sculpted snout add dimension without requiring advanced techniques.
The construction method breaks down into manageable pieces. You will crochet the head, body, arms, legs, wings, horns, ears, snout, tail, and toes separately. Then everything comes together during assembly. Working in pieces means you can finish one component in a sitting and feel accomplished along the way.
Materials You Will Need
Before you begin this crochet tutorial, gather these supplies:
Yarn
Hook
Notions
Gauge: Gauge is less critical for amigurumi than fit items. Work tightly enough that stuffing does not show through stitches. If you see white peeking through your coral fabric, size down your hook.
Skill Level and Techniques
I would call this an intermediate amigurumi pattern. You should feel comfortable with:
If you have made a basic amigurumi ball or simple animal before, you are ready for this dragon. The construction uses the same foundational skills, just with more pieces and shaping details.
Abbreviations and Stitch Definitions
Let me define every stitch you will use in this step by step crochet pattern:
MR – Magic Ring: An adjustable loop that closes completely, creating a tight center with no hole. You wrap yarn around your fingers, pull through a loop, and work your first round into that ring.
ch – Chain: Wrap yarn over hook, pull through loop on hook. Creates foundation stitches or adds height.
sc – Single Crochet: Insert hook into stitch, yarn over, pull up a loop (two loops on hook), yarn over, pull through both loops. This is your primary stitch throughout.
inc – Invisible Increase: Work 2 single crochet stitches into the same stitch. For example, if you have 6 stitches and work an increase in each, you end with 12 stitches.
dec – Invisible Decrease: Insert hook through front loops only of the next 2 stitches, yarn over, pull through both front loops, yarn over, pull through both loops on hook. Creates a neater decrease than standard method.
sl st – Slip Stitch: Insert hook, yarn over, pull through stitch and loop on hook in one motion. Used for joining or creating flat details.
FO – Fasten Off: Cut yarn, pull tail through final loop, tighten.
BLO – Back Loop Only: Work into only the back loop of the stitch, leaving the front loop unworked. Creates a ridge.
The Complete Crochet Pattern
Head (Make 1 in Coral)
The head works from the top down in continuous rounds. Place a stitch marker at the start of each round and move it up as you go.
Round 1: MR, 6 sc into ring. (6 sts)
Round 2: Inc in each st around. (12 sts)
Round 3: *Sc 1, inc* repeat around. (18 sts)
Round 4: *Sc 2, inc* repeat around. (24 sts)
Round 5: *Sc 3, inc* repeat around. (30 sts)
Round 6: *Sc 4, inc* repeat around. (36 sts)
Round 7: *Sc 5, inc* repeat around. (42 sts)
Round 8: *Sc 6, inc* repeat around. (48 sts)
Rounds 9 to 16: Sc in each st around. (48 sts) – Work 8 rounds even.
Round 17: *Sc 6, dec* repeat around. (42 sts)
Round 18: *Sc 5, dec* repeat around. (36 sts)
Insert safety eyes between rounds 12 and 13, approximately 8 stitches apart. The gold rings should face outward.
Round 19: *Sc 4, dec* repeat around. (30 sts)
Round 20: *Sc 3, dec* repeat around. (24 sts)
Begin stuffing the head firmly. Shape as you go, pushing stuffing into the forehead area.
Round 21: *Sc 2, dec* repeat around. (18 sts)
Round 22: *Sc 1, dec* repeat around. (12 sts)
Add more stuffing. Leave opening for neck attachment. FO, leaving a long tail for sewing.
Snout (Make 1 in Coral)
The snout creates that adorable rounded muzzle.
Round 1: MR, 6 sc into ring. (6 sts)
Round 2: Inc in each st around. (12 sts)
Round 3: *Sc 1, inc* repeat around. (18 sts)
Rounds 4 to 6: Sc in each st around. (18 sts)
Round 7: *Sc 1, dec* repeat around. (12 sts)
Stuff lightly. FO, leaving a long tail. Position on front of face below eyes and sew in place, sculpting slightly as you attach.
Nostrils (Make 2 in Coral)
Round 1: MR, 5 sc into ring. (5 sts)
Round 2: Inc in each st around. (10 sts)
FO, leaving tail for sewing. Attach to top of snout about 4 stitches apart.
Body (Make 1 in Coral)
Round 1: MR, 6 sc into ring. (6 sts)
Round 2: Inc in each st around. (12 sts)
Round 3: *Sc 1, inc* repeat around. (18 sts)
Round 4: *Sc 2, inc* repeat around. (24 sts)
Round 5: *Sc 3, inc* repeat around. (30 sts)
Round 6: *Sc 4, inc* repeat around. (36 sts)
Round 7: *Sc 5, inc* repeat around. (42 sts)
Rounds 8 to 18: Sc in each st around. (42 sts) – Work 11 rounds even for the belly area.
Round 19: *Sc 5, dec* repeat around. (36 sts)
Rounds 20 to 22: Sc in each st around. (36 sts)
Round 23: *Sc 4, dec* repeat around. (30 sts)
Rounds 24 to 26: Sc in each st around. (30 sts)
Round 27: *Sc 3, dec* repeat around. (24 sts)
Stuff body firmly, especially the bottom so it sits upright.
Round 28: *Sc 2, dec* repeat around. (18 sts)
Leave opening for attaching head. FO with long tail.
Arms (Make 2 in Coral)
Round 1: MR, 6 sc into ring. (6 sts)
Round 2: Inc in each st around. (12 sts)
Rounds 3 to 5: Sc in each st around. (12 sts)
Round 6: Dec 2 times, sc 8. (10 sts)
Rounds 7 to 16: Sc in each st around. (10 sts) – Work 10 rounds for arm length.
Stuff hand area lightly, leave arm mostly unstuffed for floppy posability. FO with long tail.
Fingers (Make 6 in Coral)
These tiny pieces create the three fingers on each hand.
Round 1: MR, 4 sc into ring. (4 sts)
Round 2: Sc in each st around. (4 sts)
FO, leaving tail. Sew three fingers to the hand portion of each arm.
Legs (Make 2 in Coral)
Round 1: MR, 6 sc into ring. (6 sts)
Round 2: Inc in each st around. (12 sts)
Round 3: *Sc 1, inc* repeat around. (18 sts)
Rounds 4 to 7: Sc in each st around. (18 sts) – Creates foot pad.
Round 8: Dec 3 times, sc 12. (15 sts)
Rounds 9 to 14: Sc in each st around. (15 sts)
Stuff foot firmly, leg portion lightly. FO with long tail.
Toes (Make 6 in Coral)
Round 1: MR, 5 sc into ring. (5 sts)
Round 2: Inc in each st around. (10 sts)
Round 3: Sc in each st around. (10 sts)
FO with tail. Sew three toes to front of each foot.
Horns (Make 2 in Gold)
Round 1: MR, 4 sc into ring. (4 sts)
Round 2: *Sc 1, inc* repeat around. (6 sts)
Round 3: Sc in each st around. (6 sts)
Round 4: *Sc 2, inc* repeat around. (8 sts)
Round 5: Sc in each st around. (8 sts)
Round 6: *Sc 3, inc* repeat around. (10 sts)
Rounds 7 to 8: Sc in each st around. (10 sts)
Stuff lightly to hold shape. FO with long tail. Sew to top of head, curving slightly backward.
Ears (Make 2 in Gold)
Row 1: Ch 6, sc in second ch from hook, sc 4. (5 sts)
Row 2: Ch 1, turn, dec, sc 1, dec. (3 sts)
Row 3: Ch 1, turn, dec, sc 1. (2 sts)
FO with tail. Position between horns on sides of head.
Wings (Make 2)
Wing Membrane (Coral)
Work in rows:
Row 1: Ch 12, sc in second ch from hook, sc 10. (11 sts)
Row 2: Ch 1, turn, sc 11. (11 sts)
Rows 3 to 8: Repeat row 2.
Row 9: Ch 1, turn, dec, sc 7, dec. (9 sts)
Row 10: Ch 1, turn, dec, sc 5, dec. (7 sts)
FO.
Wing Bones (Gold) – Make 3 per wing
Ch 15, sl st in second ch from hook, sl st to end. FO.
Sew wing bones across membrane radiating from one corner. Attach completed wings to upper back of body.
Tail (Make 1 in Coral)
Round 1: MR, 6 sc into ring. (6 sts)
Rounds 2 to 4: Sc in each st around. (6 sts)
Round 5: *Sc 2, inc* repeat around. (8 sts)
Rounds 6 to 10: Sc in each st around. (8 sts)
Round 11: *Sc 3, inc* repeat around. (10 sts)
Rounds 12 to 20: Sc in each st around. (10 sts)
Switch to gold for final 3 rounds to create tail tip.
Rounds 21 to 23: Sc in each st around. (10 sts)
FO. Stuff lightly.
Tail Spots (Make 3 in Cream/Mauve mix)
Round 1: MR, 6 sc into ring. (6 sts)
Round 2: Inc in each st around. (12 sts)
FO. Sew spots along tail in graduating sizes.
Assembly Instructions
Now comes the satisfying part of this how to crochet dragon tutorial. Lay out all your pieces and grab your yarn needle.
1. Attach head to body. Align the neck opening of the head with the top of the body. Whip stitch around the entire opening, adding extra stuffing into the neck area for stability.
2. Position and sew snout and nostrils. Center the snout below the eyes. Sew nostrils to top of snout.
3. Attach horns. Sew to top of head, angling slightly backward.
4. Add ears. Position between and slightly below horns on each side.
5. Attach arms. Sew to upper sides of body, about 2 rounds below head attachment.
6. Position legs. Sew to bottom sides of body so dragon sits upright with feet facing forward.
7. Attach tail. Sew to lower back of body, curving around one side.
8. Add wings. Position on upper back, just below where arms attach.
Take your time with assembly. This step makes or breaks your finished dragon.
Helpful Tips for Success
Stuffing matters. Use high quality polyester fiberfill and stuff firmly in the head and body. Understuffed amigurumi looks lumpy and sad. You want that plump, huggable shape.
Count your stitches. Every single round. Mark round 1 and count at the end of each round. Catching a mistake early saves heartbreak later.
Weave in ends as you go. With this many pieces, you will have many ends. Weave each one before moving to assembly.
Take progress photos. Lay out your pieces and photograph before assembly. This helps you visualize placement and troubleshoot any sizing issues.
Customization Ideas
Once you master this beginner friendly construction method, try these variations:
Final Thoughts on Your Dragon Amigurumi
You now have everything you need to crochet this adorable coral sunset dragon from start to finish. The combination of simple stitches, thoughtful shaping, and strategic color placement creates a truly impressive finished piece.
I hope this crochet pattern brings you hours of happy hooking. There is something magical about watching these pieces come together into a complete dragon with personality and charm.
Thank you so much for choosing this pattern. I genuinely appreciate you trusting me to guide you through the process.
When you finish your dragon, I would absolutely love to see it. Tag me on Instagram or share in my Facebook group. Seeing your creations brings me so much joy, and it helps other crafters feel confident tackling this project too.
Happy crocheting, friend. You have got this.
