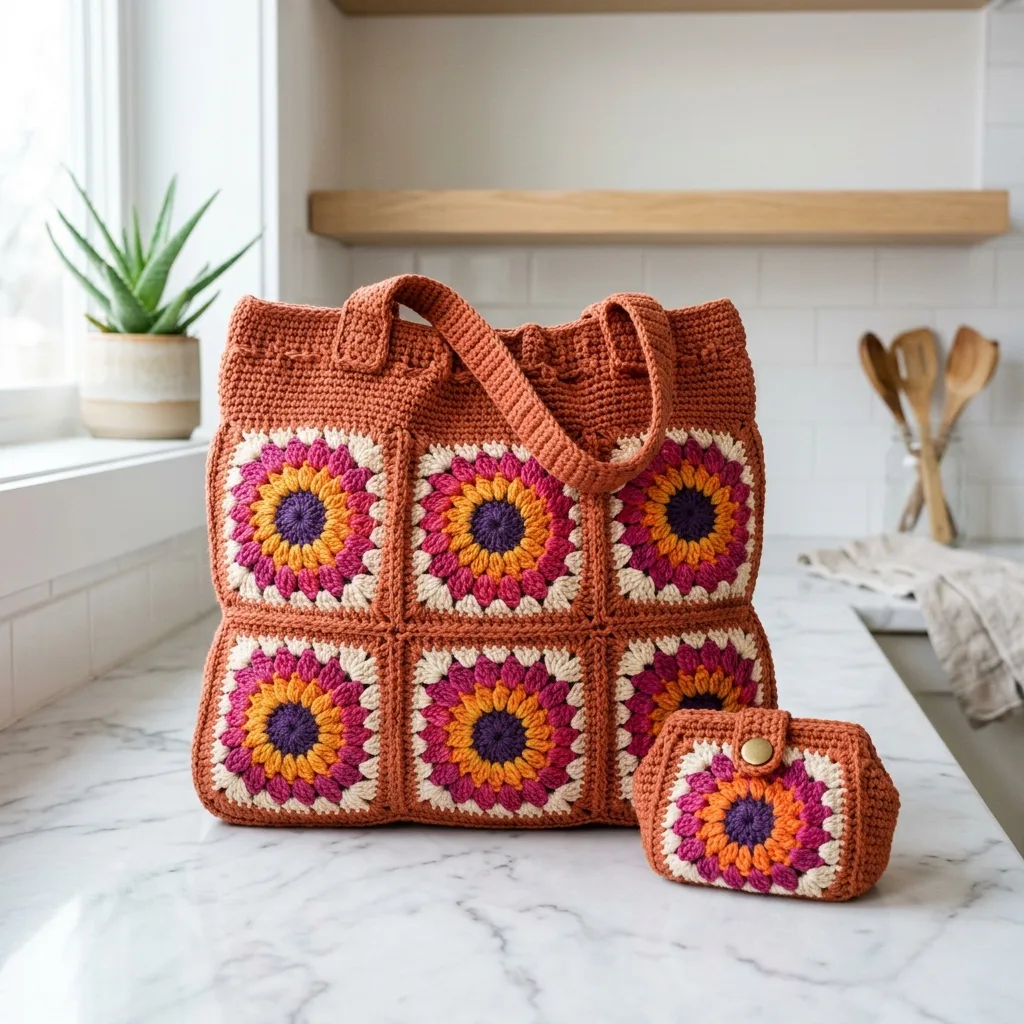
I don’t know about you, but I’ve been searching for a tote bag pattern that actually looks as good as store-bought bags while still having that handmade charm. Something roomy enough for farmers market hauls, sturdy enough to hold its shape, and colorful enough to make me smile every time I grab it. This Bohemian Sunset Granny Square Tote checks every single box, and the sunflower-style motifs give it that perfect boho vibe without being overly complicated.
Get the Ad-Free PDF Pattern
You can find the free pattern below, or you can purchase the ad-free printable PDF from my shop.
Get the Printable PDF →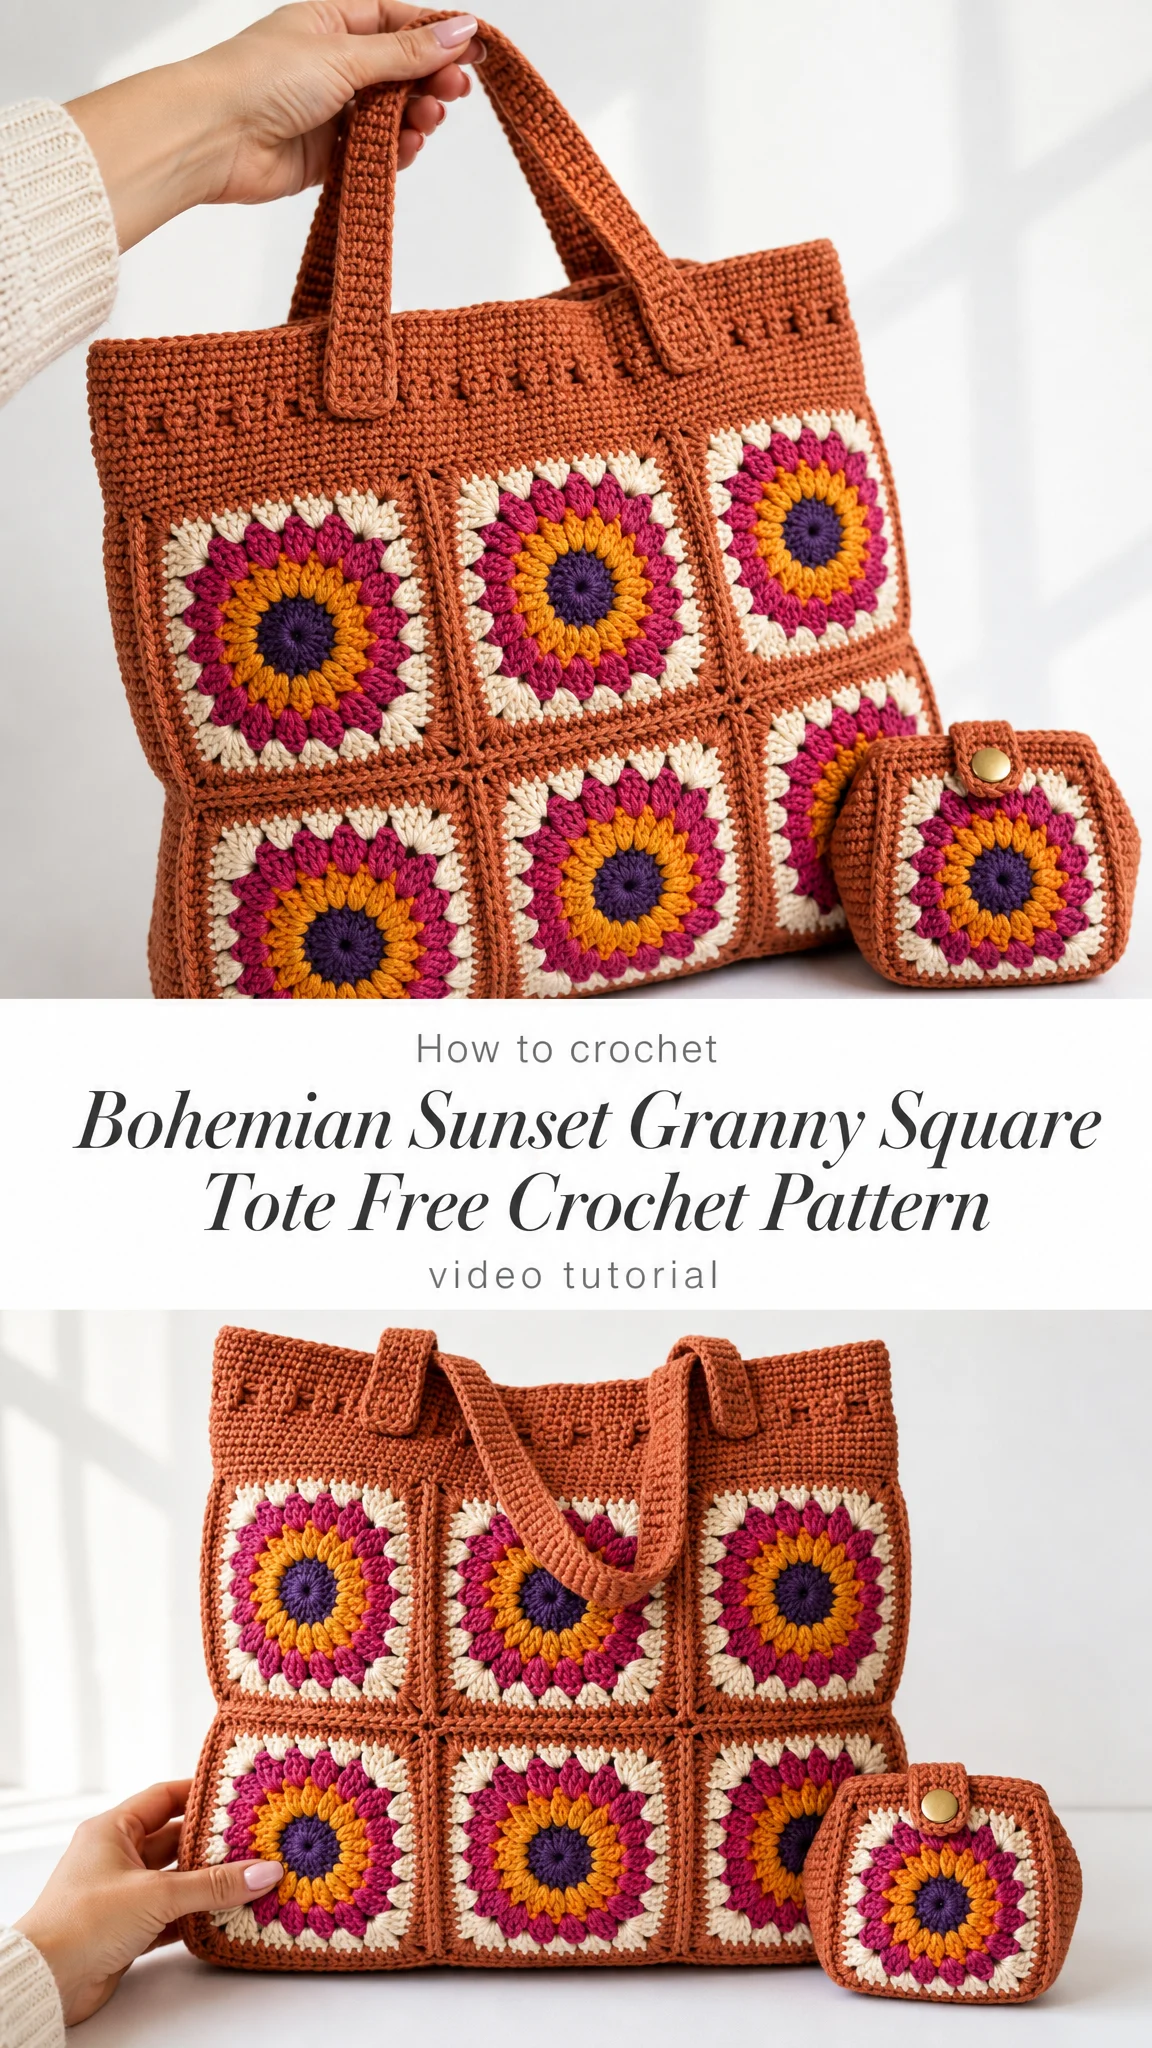
This gorgeous tote combines classic granny squares with a modern, structured design. The warm rust framing creates a cohesive look that pulls everything together beautifully. Plus, there’s a bonus coordinating pouch included, so you’ll have a matching set that looks intentionally designed.
About This Crochet Tote Bag Pattern
This pattern comes from 11Crochet.com and is designed for confident beginners to intermediate crocheters. You’ll work in the round for the motifs, change colors between rounds, seam your squares together, crochet flat panels for the gussets and base, and finish with clean edging and handle placement.
The finished tote measures approximately 14 inches wide by 12 inches high by 3 inches deep (35.5 x 30.5 x 7.5 cm). The handle drop is about 11 inches (28 cm), which is perfect for carrying over your shoulder or in hand.
Time estimate: Plan for 10 to 14 relaxed hours for the tote, plus 1 to 2 hours for the bonus pouch. This is a wonderful project to work on over a week or two of evening crafting sessions.
Materials You’ll Need
Yarn: Worsted weight cotton or cotton blend, approximately 650 to 760 yards (595 to 695 meters) total.
Color breakdown:
If your tension tends to run loose, add about 10% extra yarn to be safe.
Suggested yarn brands:
Any smooth worsted cotton that creates a firm fabric will work beautifully. I’d avoid very stretchy acrylics for the main tote unless you plan to add a lining, as cotton holds its shape much better for bags.
Hook: US G/6 (4.0 mm), or whatever size you need to match gauge.
Notions:
Gauge
Getting your gauge right is important for this project since all the pieces need to fit together properly.
Motif gauge: One completed 5-round square with border should measure 4.5 inches (11.5 cm) square after blocking.
Panel gauge: 16 single crochet (sc) stitches and 16 rows equals 4 inches (10 cm) in single crochet.
Take time to make a test square before diving in. If your square is too big, try a smaller hook. Too small? Go up a hook size.
Abbreviations and Stitch Definitions
Let me walk you through all the abbreviations you’ll encounter. If you’re newer to crochet patterns, bookmark this section.
UK crocheters note: US single crochet equals UK double crochet. US double crochet equals UK treble.
Special Stitches
Granny cluster: Work 3 double crochet stitches into the same space. This creates that signature "petal" look of granny squares.
Corner: Work 3 double crochet, chain 2, then 3 more double crochet all into the same corner space. This builds the square shape.
Invisible join: Cut your yarn, pull the tail through your last stitch, thread it onto your yarn needle, insert the needle under both loops of the first stitch of the round, then back through the top of the last stitch. This creates a seamless finish that’s nearly invisible.
Pattern Notes Before You Begin
A few things to keep in mind as you work:
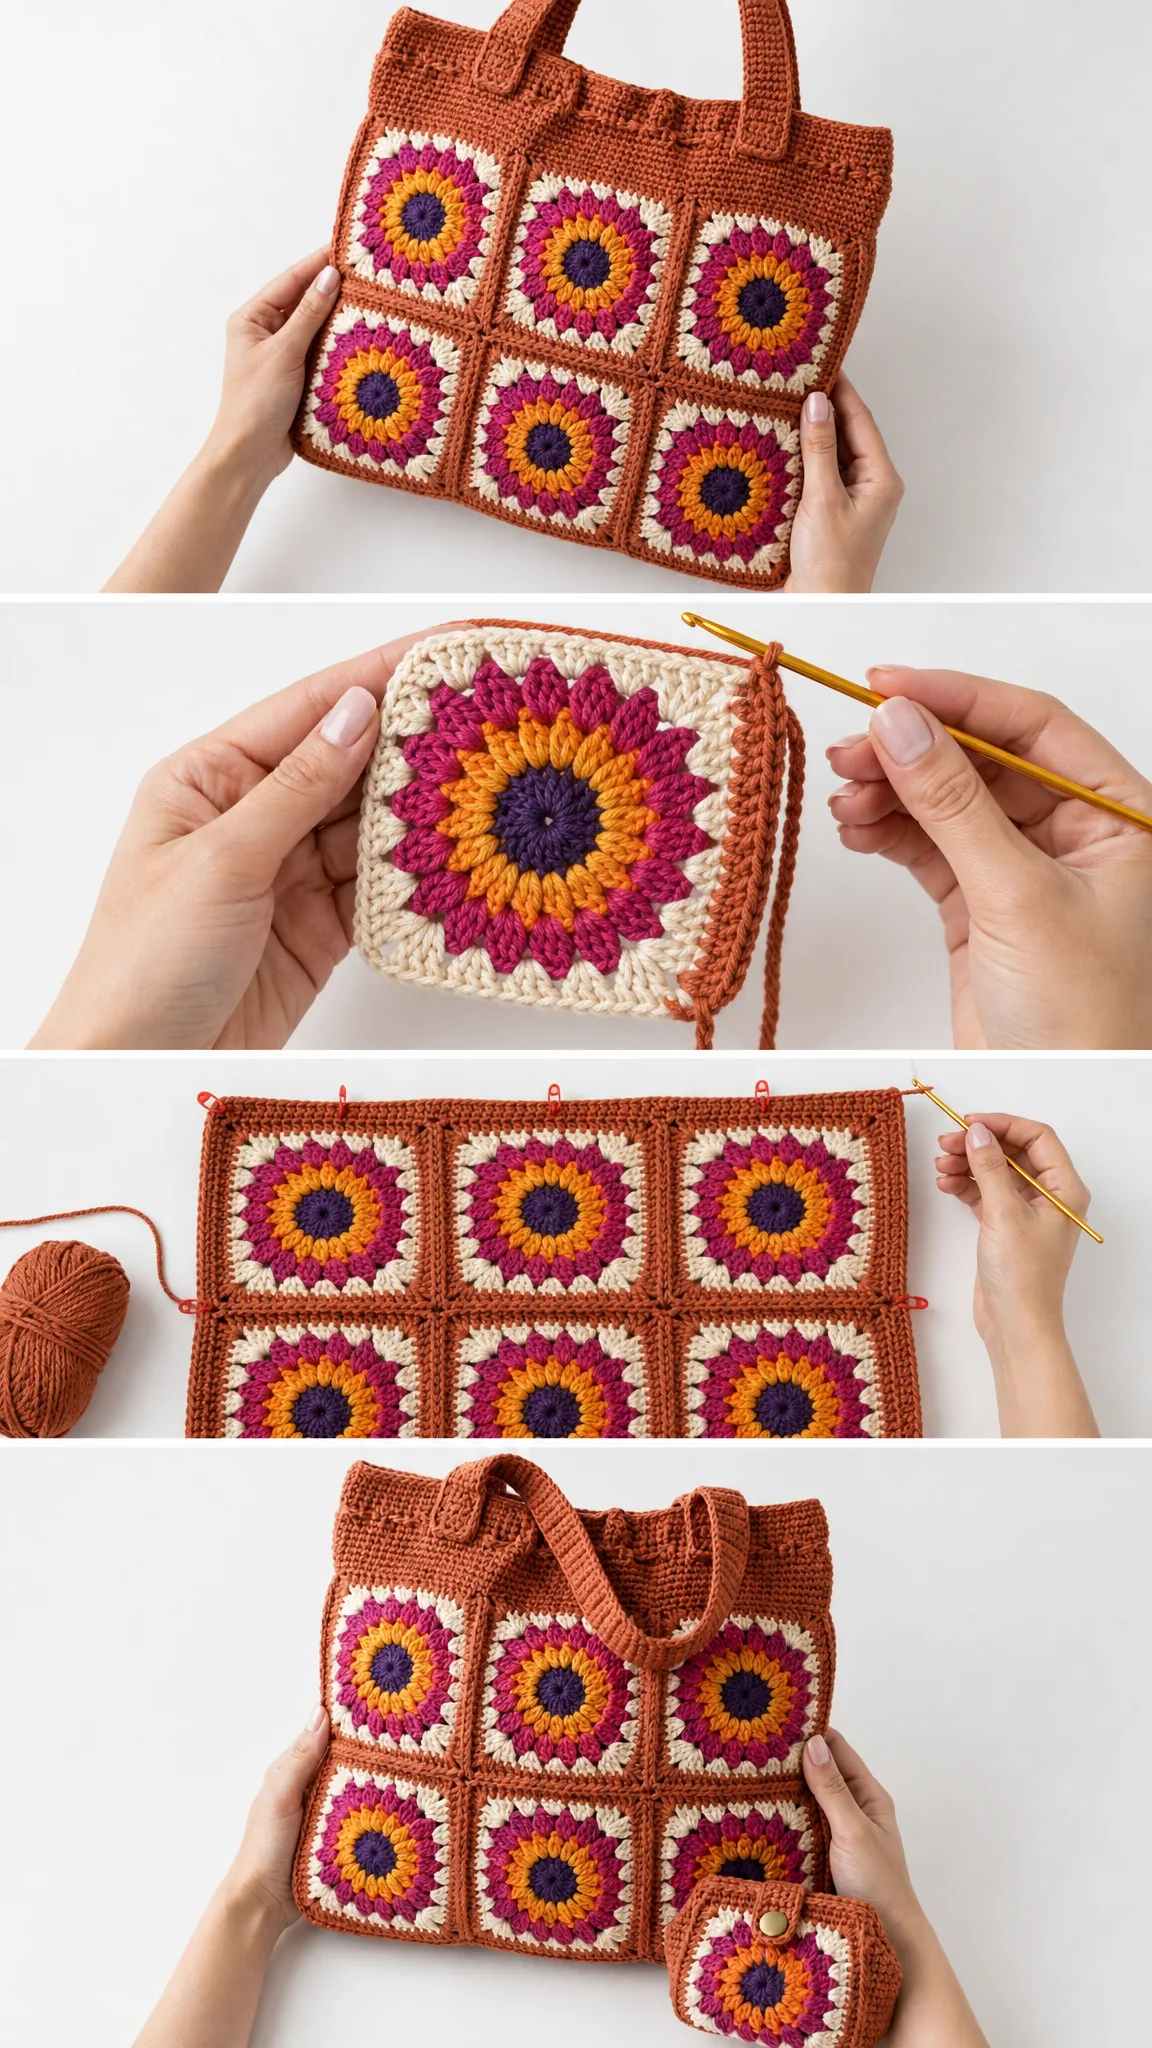
How to Make the Granny Square Motifs
You’ll make 12 identical granny squares for this tote. The color order creates that beautiful sunflower or sunset effect.
Color Order for Each Motif
| Round | Color |
|---|---|
| Round 1 | Plum (center) |
| Round 2 | Gold |
| Round 3 | Berry |
| Round 4 | Cream |
| Round 5 + border | Rust |
Granny Square Instructions (Make 12)
Round 1: With plum, make a magic ring. Chain 3, work 2 dc in ring, chain 2, then work [3 dc in ring, chain 2] three more times. Join to top of chain 3. Fasten off. (12 dc; 4 corner ch-2 spaces)
Round 2: Join gold in any corner. Chain 3, 2 dc, chain 2, 3 dc in same corner, chain 1. *Work corner in next ch-2 space, chain 1.* Repeat from * two more times. Join. Fasten off. (24 dc; 4 corner ch-2 spaces; 4 side ch-1 spaces)
Round 3: Join berry in any corner. Work corner, chain 1, 3 dc in next side ch-1 space, chain 1. *Work corner in next corner, chain 1, 3 dc in next side ch-1 space, chain 1.* Repeat from * two more times. Join. Fasten off. (36 dc; 4 corner ch-2 spaces; 8 side ch-1 spaces)
Round 4: Join cream in any corner. Work corner, [chain 1, 3 dc in next side ch-1 space] twice, chain 1. *Work corner in next corner, [chain 1, 3 dc in next side ch-1 space] twice, chain 1.* Repeat from * two more times. Join. Fasten off. (48 dc; 4 corner ch-2 spaces; 12 side ch-1 spaces)
Round 5: Join rust in any corner. Work corner, [chain 1, 3 dc in next side ch-1 space] three times, chain 1. *Work corner in next corner, [chain 1, 3 dc in next side ch-1 space] three times, chain 1.* Repeat from * two more times. Join. (60 dc; 4 corner ch-2 spaces; 16 side ch-1 spaces)
Border: Chain 1. In same corner space work sc, chain 2, sc. Single crochet in each dc and side ch-1 space across to next corner. *Work sc, chain 2, sc in corner space, then sc in each dc and side ch-1 space across.* Repeat from * two more times. Join invisibly. Fasten off. (84 sc total; 21 sc per side including corner sc)
Checkpoint: Each finished square should measure 4.5 inches (11.5 cm) after blocking.
Construction and Assembly
Layout
Arrange 6 squares for the front panel in a 3 across by 2 high grid. Repeat for the back panel. Make sure all centers face the same direction for a cohesive look.
| Component | Arrangement |
|---|---|
| Front panel | 3 squares wide x 2 squares tall |
| Back panel | 3 squares wide x 2 squares tall |
| Side gussets | 2 plain rust rectangles |
| Base | 1 plain rust rectangle |
| Top band | Worked around upper edge after assembly |
Joining the Squares
With right sides facing, whipstitch your squares into rows using rust yarn. Work through the outer loops for a raised, framed appearance. Keep your seams snug but not puckered.
Once rows are complete, seam the rows together. Repeat for both front and back panels. Steam or wet block lightly so each finished panel measures approximately 13.5 inches wide by 9 inches high (34.5 x 23 cm).
Side Gussets (Make 2)
With rust, chain 13.
Row 1: Sc in 2nd chain from hook and each chain across, turn. (12 sc)
Rows 2 through 46: Chain 1, sc in each stitch across, turn. (12 sc)
Each gusset measures approximately 3 inches by 11.5 inches (7.5 x 29 cm).
Base Panel (Make 1)
With rust, chain 55.
Row 1: Sc in 2nd chain from hook and each chain across, turn. (54 sc)
Rows 2 through 12: Chain 1, sc in each stitch across, turn. (54 sc)
Base measures approximately 13.5 inches by 3 inches (34.5 x 7.5 cm).
Body Assembly
Now comes the satisfying part where everything comes together:
1. Pin one gusset to each short side of the front panel and seam with rust yarn
2. Seam the back panel to the remaining long edges of the gussets
3. Pin the base to the lower opening, easing corners neatly, and seam all around
4. Turn right side out
Your body should now stand softly with a 3 inch (7.5 cm) depth.
Top Band
Setup round: Join rust at a side seam. Work 132 sc evenly around the top edge: 54 sc across front, 12 sc across side, 54 sc across back, 12 sc across side. Join. (132 sc)
Rounds 1 through 4: Chain 1, sc in each stitch around. Join. (132 sc)
Round 5 (eyelet round): Chain 1, [sc in next 5 stitches, chain 1, skip 1 stitch] 22 times. Join. (110 sc + 22 ch-1 spaces)
Round 6: Chain 1, [sc in next 5 sc, sc in next ch-1 space] 22 times. Join. (132 sc)
Rounds 7 through 10: Chain 1, sc in each stitch around. Join. Fasten off on final round. (132 sc)
Handles (Make 2)
With rust, chain 105.
Row 1: Sc in 2nd chain from hook and each chain across, turn. (104 sc)
Rows 2 through 8: Chain 1, sc in each stitch across, turn. (104 sc)
Edging: Chain 1, sc evenly around all four edges, placing 3 sc in each corner. Join and fasten off.
Attachment: Place each handle end 2.5 inches (6.5 cm) in from the side seam on both front and back. Sew a 1.5 inch (4 cm) square of stitching at each handle end for maximum strength.
Bonus Coordinating Pouch
This adorable little pouch makes a perfect companion to your tote.
Motif: Make one 4-round granny square using Rounds 1 through 4 of the main motif instructions, then add the rust border. Target size is 3.5 inches (9 cm) square.
Back rectangle: With rust, chain 19.
Row 1: Sc in 2nd chain from hook and each chain across, turn. (18 sc)
Rows 2 through 14: Chain 1, sc across, turn. (18 sc)
Flap:
Rows 15 through 18: Chain 1, sc across, turn. (18 sc)
Row 19 (buttonhole): Sc in next 8, chain 2, skip 2, sc in next 8. (16 sc + buttonhole)
Rows 20 through 21: Chain 1, sc across, working 2 sc in ch-2 space on Row 20. (18 sc)
Assembly: Place the motif over the lower 14 rows of the back rectangle. Seam sides and bottom. Fold flap to front and sew on your button.
Optional draw cord: Chain 160 with rust, slip stitch in each chain. Weave through the eyelets on the tote and knot the ends.
Quick Stitch Count Checkpoints
Use this handy reference to make sure you’re on track:
| Piece | Checkpoint |
|---|---|
| Motif Round 1 | 12 dc; 4 corner ch-2 spaces |
| Motif Round 2 | 24 dc; 4 corner ch-2 spaces; 4 side ch-1 spaces |
| Motif Round 3 | 36 dc; 8 side ch-1 spaces |
| Motif Round 4 | 48 dc; 12 side ch-1 spaces |
| Motif Round 5 | 60 dc; 16 side ch-1 spaces |
| Motif border | 84 sc total; 21 sc per side |
| Gusset | 12 sc for 46 rows |
| Base | 54 sc for 12 rows |
| Top setup | 132 sc around |
| Handle | 104 sc for 8 rows |
Size Customization Options
Want a bigger or smaller tote? Here’s how to adjust:
Wider tote: Add one motif to each row on front and back. Add 18 sc per extra motif to the top setup count.
Taller tote: Add another row of three motifs and lengthen each side gusset by 23 rows.
Deeper tote: Make gussets and base wider. Add 4 sc to the top setup count for each extra 1 inch (2.5 cm) of depth on each side.
Longer handles: Add 4 chains for each extra 1 inch (2.5 cm) of strap length.
Finishing Tips
Care Instructions
Hand wash or machine wash cold on gentle if your yarn label allows. Reshape while damp and dry flat. If you’ve added a lining, follow care instructions for both yarn and fabric. Avoid hanging the wet tote, as cotton can stretch under weight.
Troubleshooting Common Issues
Squares differ in size: Block again. If they’re more than 1/4 inch (6 mm) off, change your hook size for that motif.
Top band ripples: Pick up fewer stitches across each panel or switch to a smaller hook for the band.
Bag feels floppy: Add lining, use tighter tension, or add a second base layer.
Handles stretch: Sew fabric tape to the wrong side of each handle or make the handles two rows shorter.
You Did It!
I hope you love making this Bohemian Sunset Granny Square Tote as much as I loved putting this pattern together for you. The combination of those vibrant sunset colors with the structured design creates something truly special. Thank you so much for choosing this pattern for your next project!
If you make this tote, I would absolutely love to see it! Share your finished bag on Instagram or Facebook and tag the photos so I can admire your work. Seeing your creations honestly makes my whole day.
Don’t forget to save this crochet tote bag pattern to your Pinterest boards so you can find it easily when you’re ready to start. And if you have any questions or want to share how yours turned out, drop a comment below. Happy crocheting!
Want a Quick & Easy Printable Version?
Get a clean, beautifully formatted PDF of this pattern — easy to follow step by step, ready to print or save on any device. No scrolling, no distractions, just the pattern.
Get the Printable PDF →