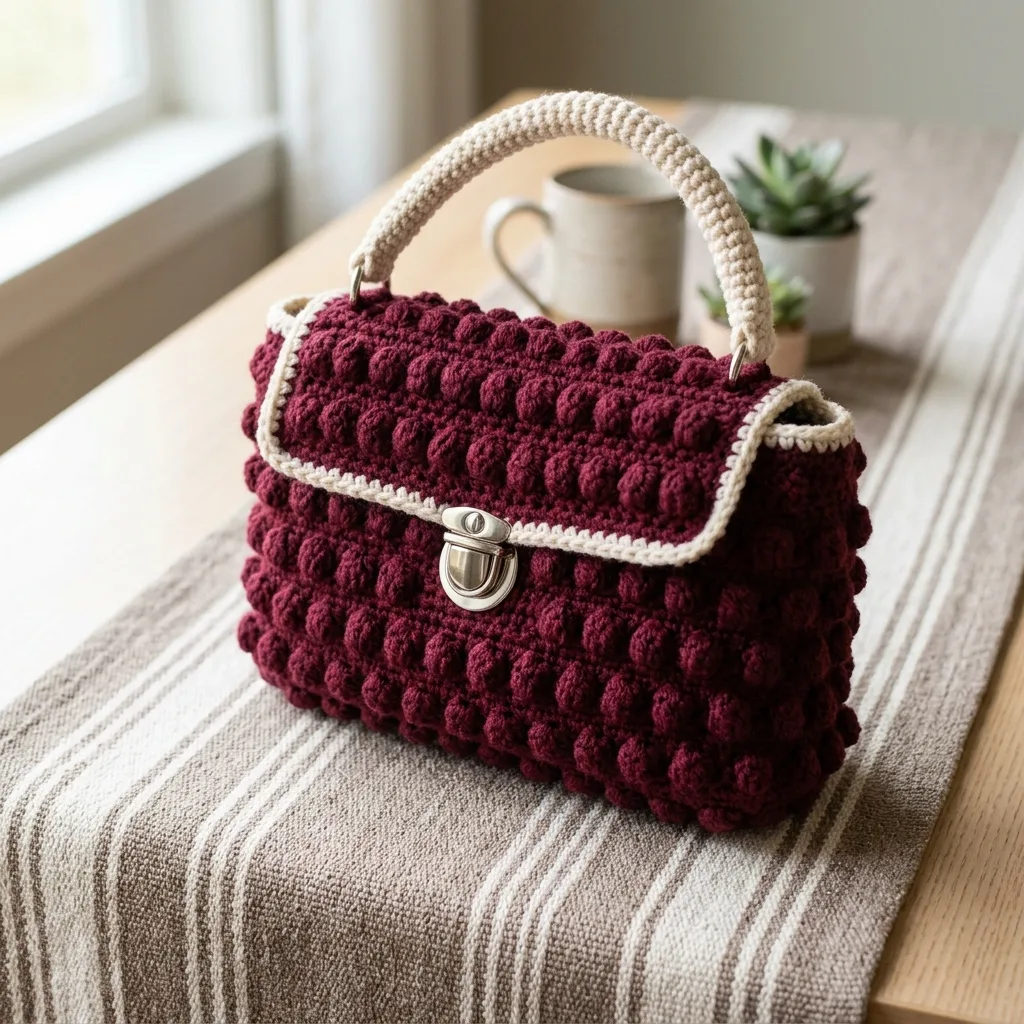
I’ve been looking for a handbag pattern that feels high-end but is actually achievable for intermediate crocheters, and this one is my favourite find. The burgundy bobble stitch handbag has that luxurious boutique look with the textured bobbles, cream piping, and hardware details that make it look like something you’d pay serious money for. When I came across this design, I knew I had to share it with you because it ticks all the boxes: gorgeous texture, practical size, and that satisfying challenge that keeps your hands busy without making your brain hurt.
Get the Ad-Free PDF Pattern
You can find the free pattern below, or you can purchase the ad-free printable PDF from my shop.
Get the Printable PDF →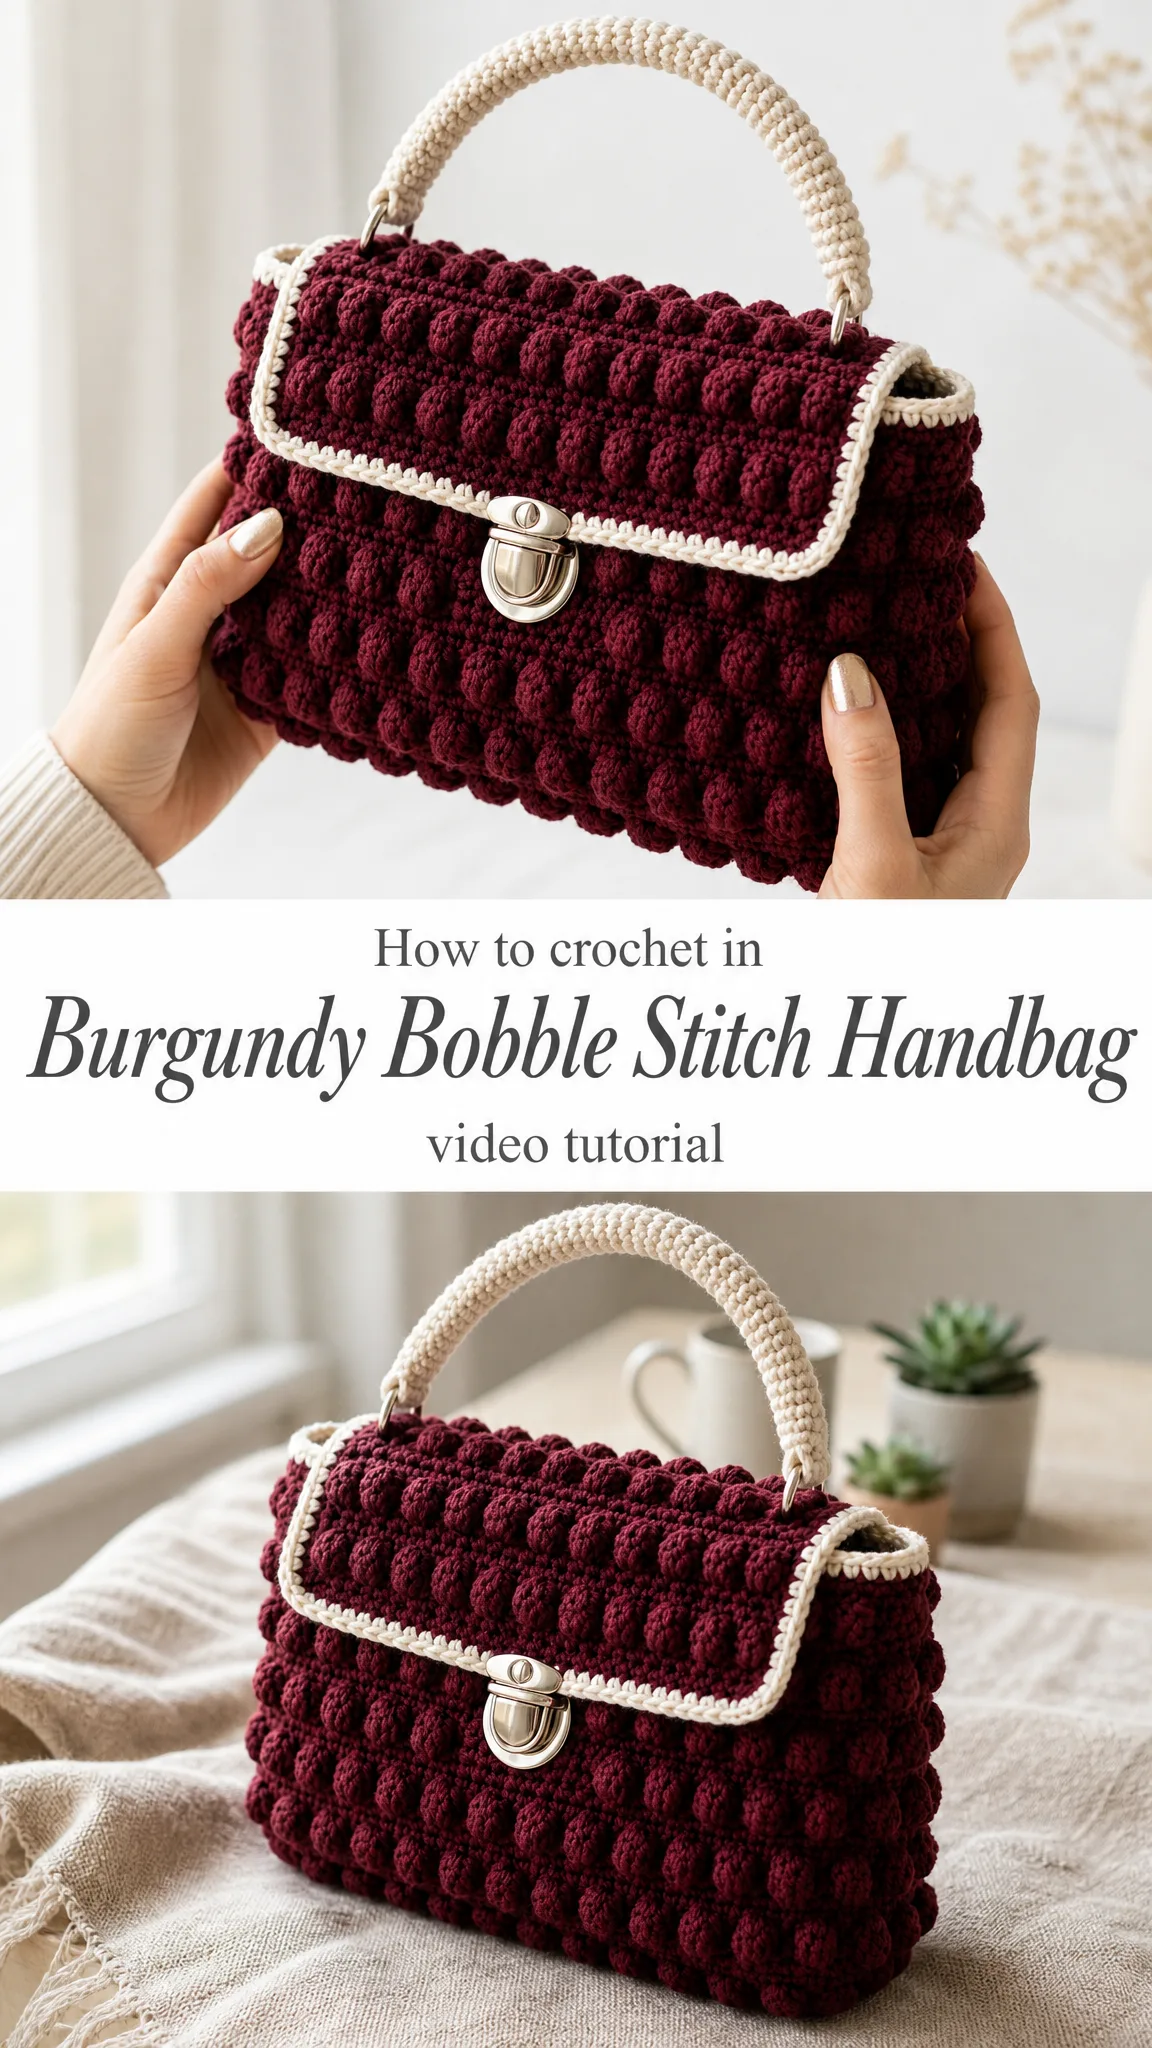
This handbag pattern takes about 8 to 12 hours to complete, which makes it perfect for a weekend project or a few evenings of focused stitching. The bobble stitch creates those beautiful raised bumps you see across the body and flap, and the contrast cream edging gives it such a polished, professional finish. Trust me, people will ask you where you bought it.
About This Burgundy Bobble Stitch Handbag Pattern
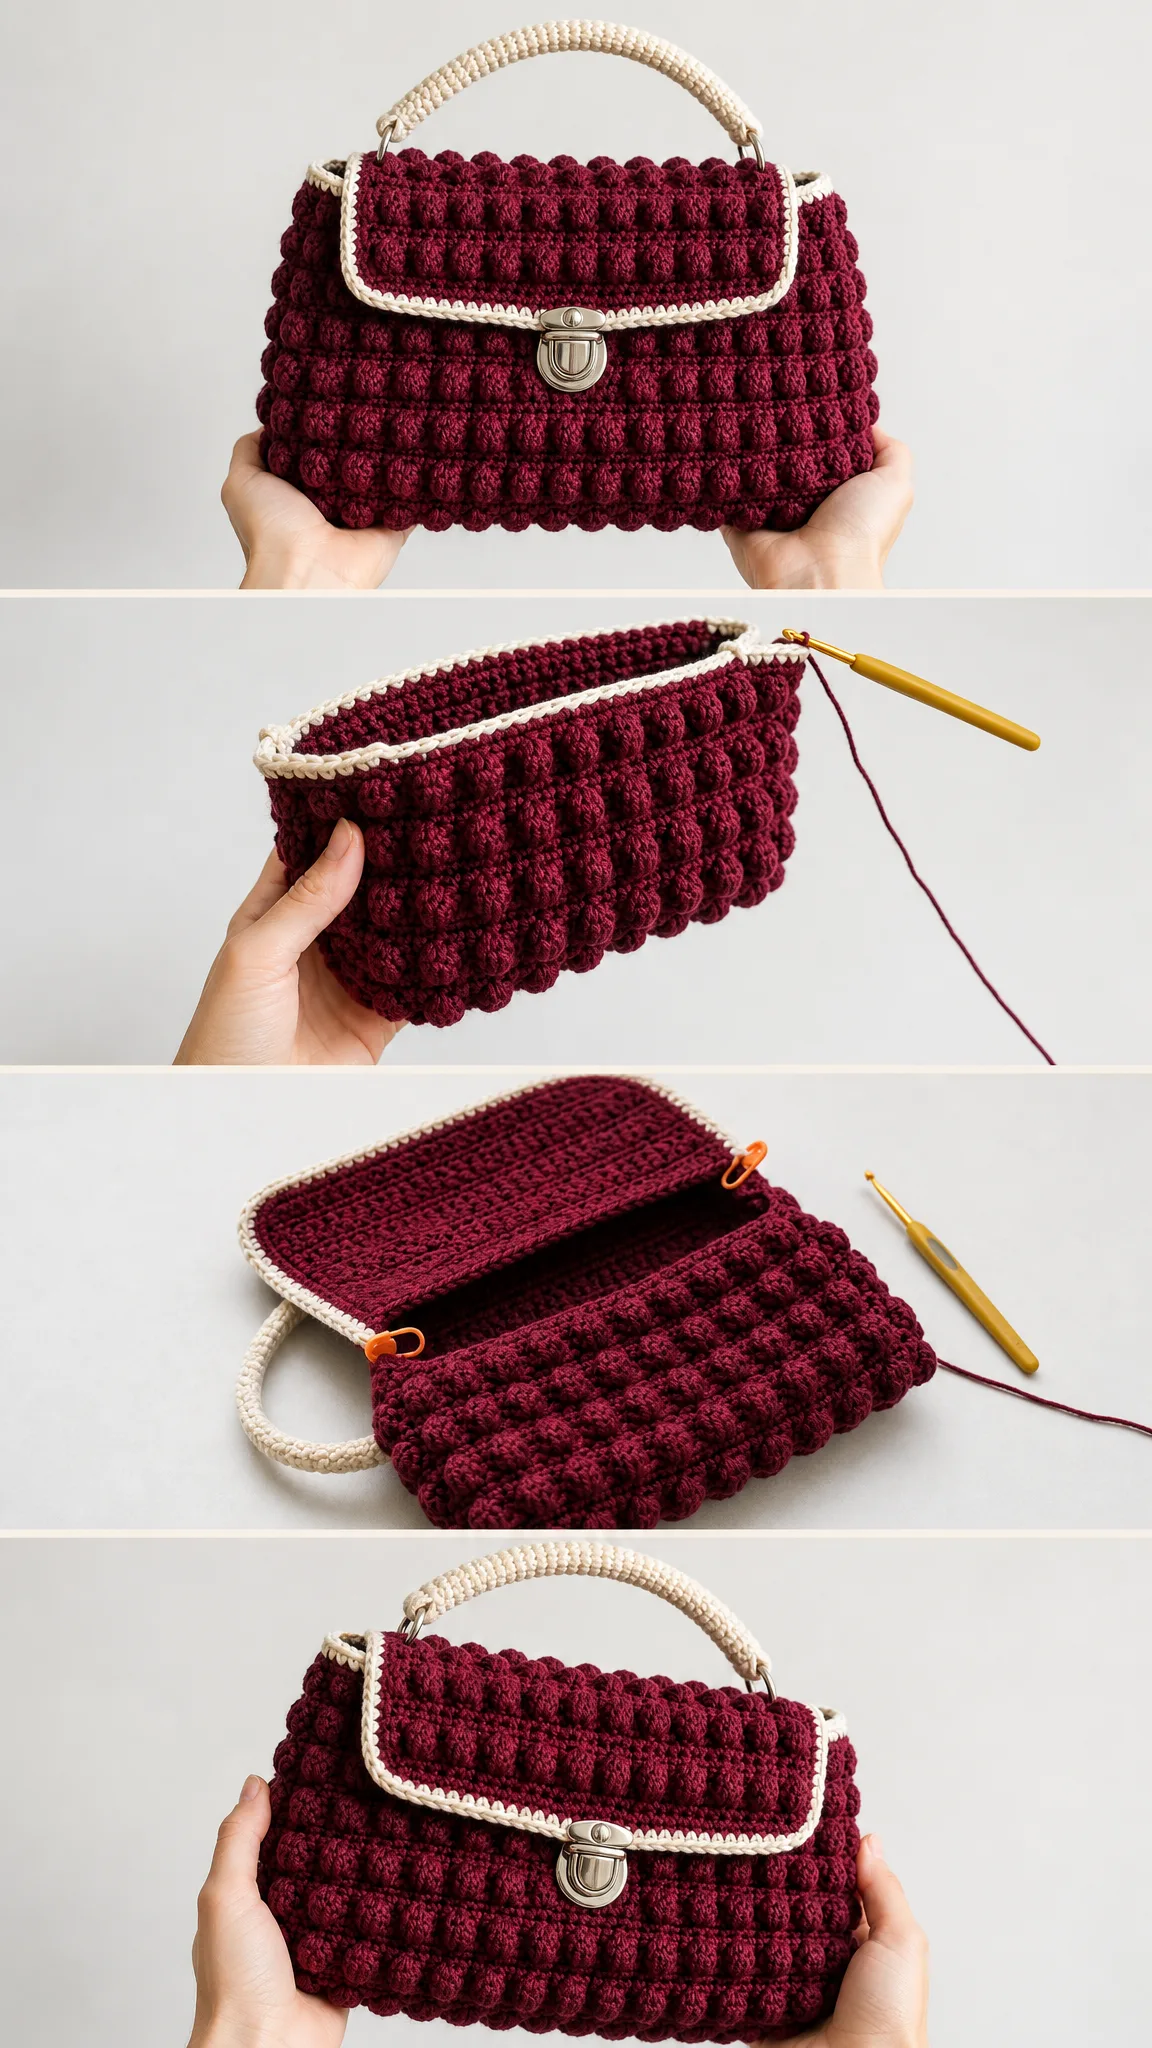
This intermediate level pattern creates a structured handbag measuring approximately 22 cm wide, 16 cm tall, and 8 cm deep. The construction method is clever but straightforward once you understand the flow. You start with an oval base, build up the body in continuous rounds using alternating bobble and plain rounds, then create the flap separately before edging it in that gorgeous cream trim.
The finished bag features metal O-rings connecting a padded crocheted handle, plus a turn-lock clasp on the front for secure closure. These hardware details really elevate the whole piece from homemade to handmade luxury.
Skill Level: Intermediate
Estimated Time: 8 to 12 hours
Materials You’ll Need
Getting your materials sorted before you start will make this crochet tutorial so much smoother. Here’s everything you need to recreate this burgundy bobble stitch handbag from scratch.
Yarn
Main Color (Burgundy): 220 to 260 yards (200 to 238 meters) of worsted weight yarn
Contrast Color (Cream): 40 to 55 yards (37 to 50 meters) of worsted weight yarn
Suggested Yarns:
You can substitute with any worsted or aran weight yarn that has good stitch definition. Cotton and cotton blend yarns work particularly well for bags because they hold their shape better than pure wool and give those bobbles crisp definition.
Tools and Notions
Stitch Abbreviations and Definitions
Before we dive into the step by step instructions, let’s make sure you’re comfortable with all the stitches used in this pattern. Even if you’ve crocheted for years, a quick refresher never hurts.
Ch – Chain: Yarn over, pull through the loop on your hook. This creates the foundation for most crochet work.
Sc – Single crochet: Insert hook into stitch, yarn over and pull up a loop (2 loops on hook), yarn over and pull through both loops. For example, "sc 10" means you’ll work a single crochet into each of the next 10 stitches.
Sl st – Slip stitch: Insert hook into stitch, yarn over and pull through both the stitch and the loop on your hook in one motion. Used for joining rounds and creating invisible seams.
Bobble – Bobble stitch: This creates those gorgeous raised bumps you see all over the bag. Work 5 double crochets into the same stitch but stop each one before the final yarn over, leaving all loops on your hook. You’ll have 6 loops total. Yarn over and pull through all 6 loops at once to close the bobble. Push the bobble to the right side of your work as you complete it.
Inc – Increase: Work 2 stitches into the same stitch to add width.
Gauge
While exact gauge isn’t critical for a bag (unlike a garment), you’ll want to be in the right ballpark for the bag to turn out the correct size. Work a small swatch in single crochet to check your tension.
If your work is much looser than expected, go down a hook size. If it’s very tight, go up a hook size. For bags, slightly tighter tension actually works in your favour because it creates a sturdier fabric.
Pattern Instructions
Now for the fun part. This crochet pattern is worked in five main sections: base, body, flap, handle, and assembly. I’ll walk you through each one step by step.
Part 1: Crocheting the Oval Base
The base of your burgundy bobble stitch handbag is worked in continuous rounds, creating an oval shape that gives the bag its structured bottom.
Foundation: With burgundy yarn and 5.0 mm hook, ch 25.
Round 1: Sc in 2nd ch from hook and in each ch across to last ch. Work 3 sc in the last ch to turn the corner. Now work along the opposite side of the foundation chain, sc in each ch across. Work 2 sc in the last ch to turn the corner. Do not join. (50 sts)
Round 2: Sc in each st around, working 2 sc in each corner stitch (the center stitch of each 3-sc group and each end stitch). (54 sts)
Round 3: Sc in each st around, continuing to increase at corners. (58 sts)
Continue working rounds in this manner, increasing at the corners until your oval base measures approximately 22 cm long and 8 cm wide. Place a stitch marker at the beginning of each round to keep track of your progress.
Part 2: Building the Body
This is where the magic happens. The body is worked in continuous rounds, alternating between bobble rounds and plain single crochet rounds. This creates that stunning textured pattern you see in the reference images.
Setup Round: After completing the base, sc in each st around without increasing. This creates the transition from the flat base to the vertical walls.
Bobble Pattern:
Round 1 (Plain): Sc in each st around.
Round 2 (Bobble): *Sc in next st, bobble in next st* repeat around.
Round 3 (Plain): Sc in each st around.
Round 4 (Bobble): *Bobble in next st, sc in next st* repeat around.
Note how the bobbles are offset on rounds 2 and 4. This creates the staggered bubble effect you see on the finished bag.
Continue alternating between plain rounds and bobble rounds, keeping the stagger pattern, until your body measures approximately 16 cm tall from the base.
Important tip: The bobbles should always push to the outside (right side) of your work. If they’re popping inward, turn your work so the bobbles face outward.
Part 3: Creating the Flap
The flap is worked flat and separately, then attached to the back panel of the bag body.
Foundation: With burgundy yarn, ch 45.
Row 1: Sc in 2nd ch from hook and in each ch across. Turn. (44 sts)
Row 2: Ch 1, sc in each st across. Turn.
Row 3: Ch 1, *sc in next st, bobble in next st* repeat across. Turn.
Continue working rows in the established bobble pattern, maintaining the staggered placement. Work until the flap measures approximately 10 cm deep.
Shaping the curve: For the last few rows, decrease at each end to create the gentle curve you see on the reference image. Work sc2tog at the beginning and end of each row until you achieve the desired shape.
Part 4: Adding the Cream Edging
This detail really makes the bag look professional. Switch to your cream contrast yarn.
Flap edging: With right side facing, join cream yarn at one corner of the flap. Work a round of single crochet evenly around the entire outer edge of the flap, working 3 sc in each corner to keep it flat. Join with sl st. Fasten off.
The edging should be neat and even. Take your time here because this detail is very visible in the finished piece.
Part 5: Crocheting the Padded Handle
The handle is worked in cream and creates that elegant rope-like appearance.
Foundation: Ch 6. Join with sl st to form a ring.
Round 1: Sc in each ch around. Do not join. (6 sts)
Continue working sc in a spiral around the tube. The stitches will naturally create a tubular shape.
Work until your handle measures approximately 30 to 35 cm long, or your desired length.
Tip: For extra padding, you can insert a piece of cotton cord or stuffing inside the tube as you work. This gives the handle more structure and a luxurious feel.
Part 6: Assembly and Finishing
Now it’s time to bring all the pieces together.
Step 1: Attach the flap to the back panel of the bag body. With the bobble side facing outward, sew or single crochet the straight edge of the flap to the inside of the back wall, about 1 cm down from the top edge.
Step 2: Attach the O-rings. Position one O-ring on each side of the bag, at the top corners where the front and back panels meet. Secure them by crocheting or sewing a small loop through the ring and attaching it firmly to the bag body.
Step 3: Attach the handle. Thread each end of the handle through an O-ring and sew the ends securely to themselves, creating a loop. Make sure both sides are even.
Step 4: Install the turn-lock clasp. Position the base of the clasp on the front of the bag body, centered below where the flap will close. Mark the position, then carefully cut small holes if needed and attach according to your hardware’s instructions. Attach the corresponding turn piece to the underside of the flap, making sure it aligns perfectly when the bag is closed.
Step 5: Weave in all ends securely. For a bag that will see regular use, I recommend weaving ends through at least 2 to 3 inches of stitches and trimming close.
Tips for Success
Blocking: While not strictly necessary, lightly blocking your finished bag can help even out any tension inconsistencies. Steam blocking works well for cotton yarn.
Lining (optional): For added durability and to prevent items from poking through the stitches, consider adding a fabric lining. Cut fabric to match the interior dimensions and hand sew it in place.
Stitch consistency: The bobble stitches use more yarn than single crochets. If you notice your work pulling or puckering, try loosening your tension slightly on the bobble rounds.
Hardware placement: Before cutting any holes for the clasp, close the flap and mark the exact position with pins. Nothing is worse than installing hardware crookedly.
Customization Ideas
While burgundy with cream is absolutely stunning, this pattern works beautifully in other color combinations too. Consider:
You can also adjust the size by adding or removing stitches from the base chain and working more or fewer rounds on the body.
Final Thoughts on This Burgundy Bobble Stitch Crochet Pattern
This burgundy bobble stitch handbag is one of those projects that looks incredibly impressive but is totally achievable if you take it one step at a time. The bobble stitch might seem intimidating if you’ve never tried it, but once you get into the rhythm, it becomes almost meditative. And the payoff is absolutely worth it.
I hope you love making this bag as much as I enjoyed sharing this pattern with you. Whether you’re making it for yourself or as a gift, it’s guaranteed to turn heads.
If you make this handbag, I would absolutely love to see it! Share your photos on Instagram or Facebook and tag me so I can admire your work. Save this pattern to your Pinterest boards so you can find it easily when you’re ready to start stitching, and drop a comment below if you have any questions or just want to share your excitement about your finished bag. Happy crocheting!
Want a Quick & Easy Printable Version?
Get a clean, beautifully formatted PDF of this pattern — easy to follow step by step, ready to print or save on any device. No scrolling, no distractions, just the pattern.
Get the Printable PDF →