This is HANDS DOWN one of the most stunning pieces of crochet jewelry you will ever make! I’m talking about a gorgeous charm bracelet loaded with tiny crocheted berries, delicate roses, and sweet little leaves that looks like it belongs in a fancy boutique. The best part? Each individual charm works up in about 15 to 20 minutes, and the whole bracelet can be finished in an afternoon. This makes an INCREDIBLE gift for the special people in your life, and trust me, everyone will ask where you bought it!
About This Crochet Charm Bracelet Pattern
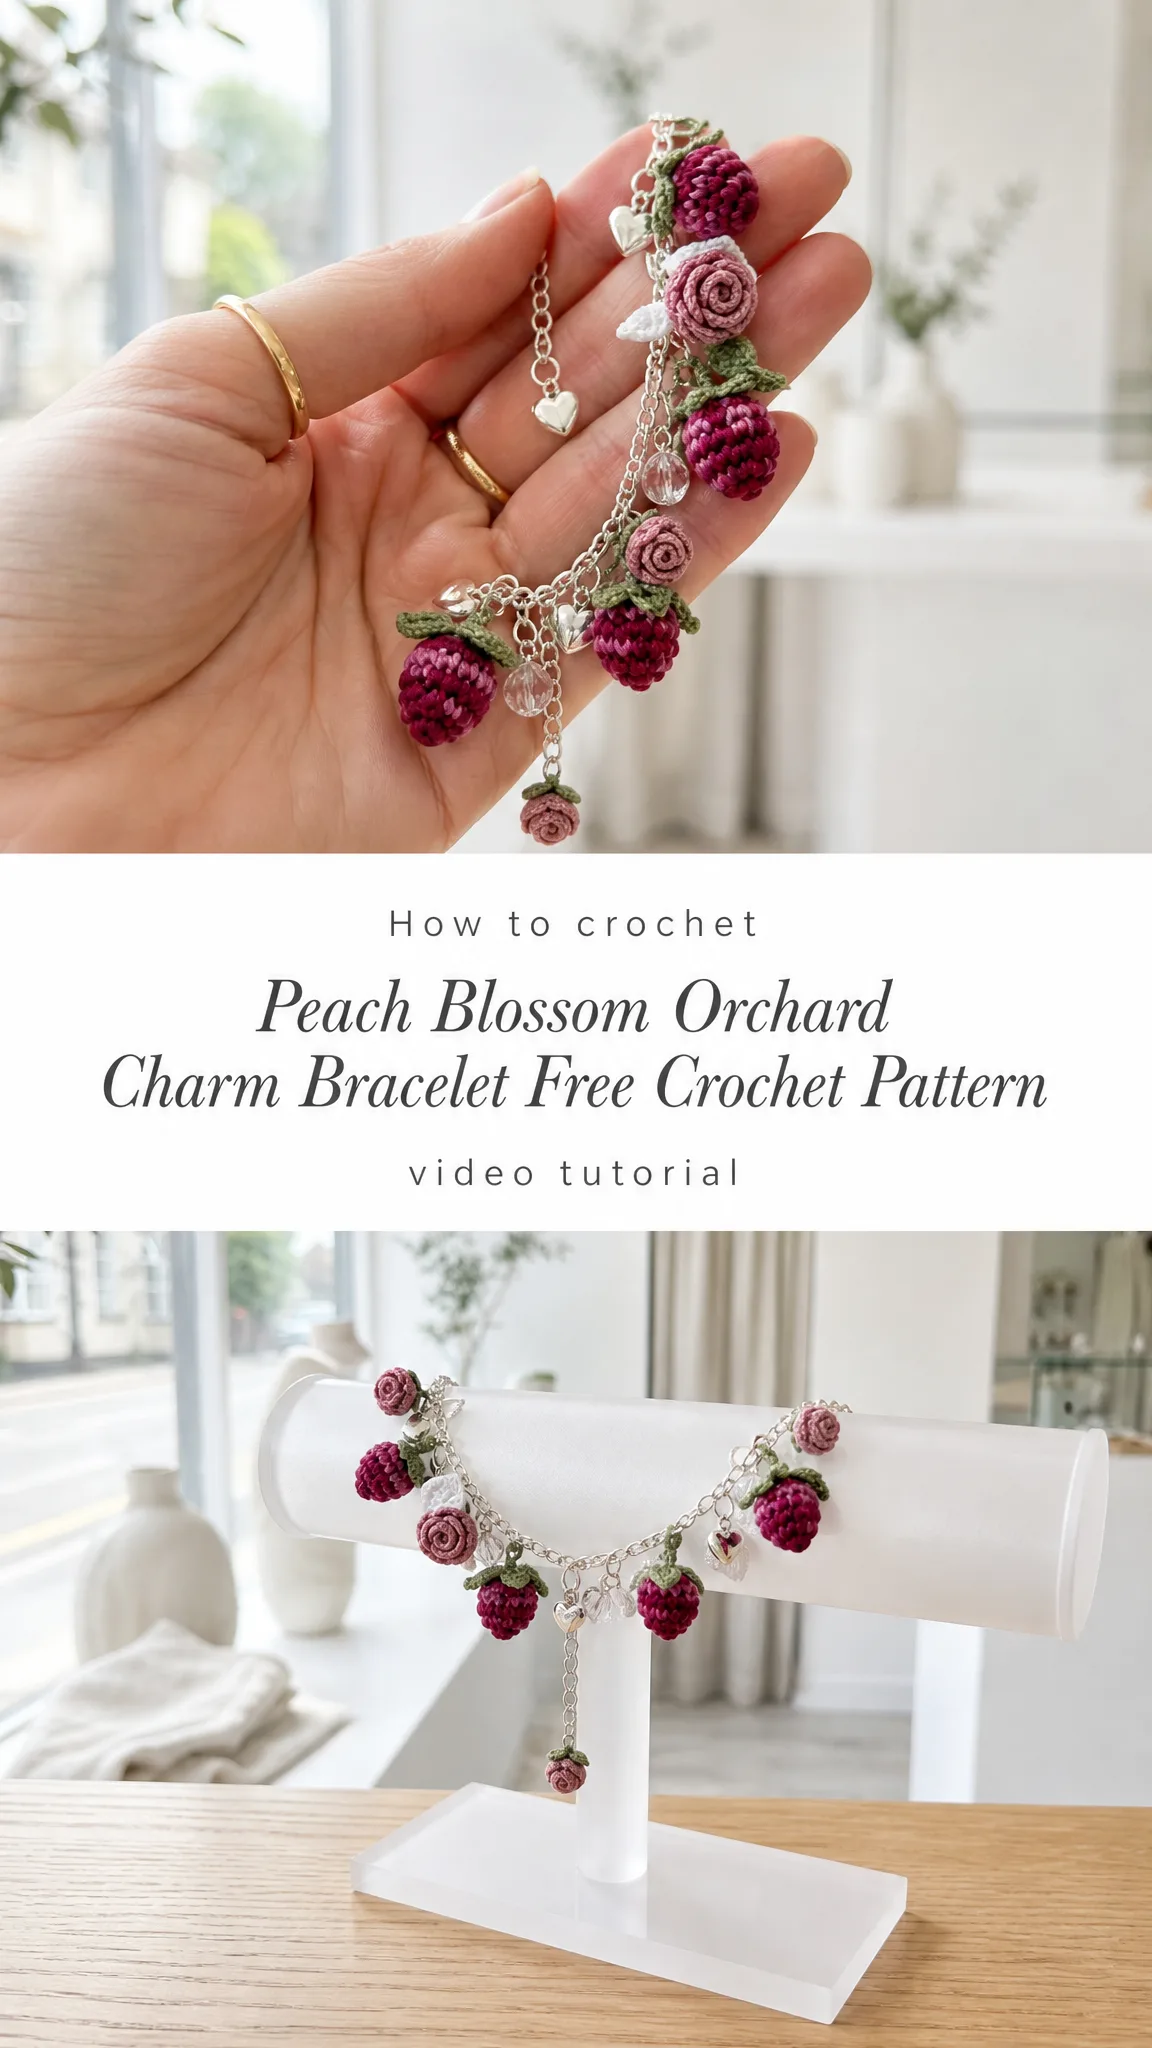
This beautiful charm bracelet combines miniature crochet elements with jewelry findings to create a wearable piece of art. Looking at this design, I see a silver chain base adorned with crocheted berries in deep magenta and dusty rose, spiral roses in soft mauve pink, textured leaves in sage green and crisp white, plus a few crystal beads and metal heart charms for extra sparkle.
The construction uses thread crochet techniques, which means you’ll be working with very fine cotton thread and a tiny steel hook. Don’t let that intimidate you! Each motif uses basic stitches worked in tiny continuous rounds. If you can single crochet and count to six, you can absolutely make this bracelet.
Skill Level: Intermediate. While the stitches are simple, working with fine thread requires patience and good lighting. The small scale takes some getting used to, but once you complete your first berry, you’ll feel confident.
Finished Measurements: Each berry measures approximately 1 cm (about 3/8 inch) in diameter. Roses measure roughly 1.5 cm (about 5/8 inch) across. Leaves are about 2 cm (3/4 inch) long. Total bracelet length is adjustable with the extender chain, fitting wrists from approximately 16 to 20 cm (6.5 to 8 inches).
Materials Needed
Thread:
I recommend mercerized cotton thread for its smooth finish and lovely sheen. Brands like DMC Petra, Aunt Lydia’s Classic, or Lizbeth work beautifully for this project.
Hook:
Jewelry Supplies:
Other Tools:
Stitch Abbreviations and Definitions
Let me walk you through every stitch you’ll need. Even if you know these already, working at this tiny scale can feel different, so a quick refresher helps.
ch = chain. Wrap yarn over hook, pull through loop on hook. This creates one chain stitch.
sl st = slip stitch. Insert hook into stitch, yarn over, pull through both the stitch and the loop on your hook in one motion. This is used for joining and moving across stitches without adding height.
sc = single crochet. Insert hook into stitch, yarn over, pull up a loop (two loops on hook), yarn over, pull through both loops. This is your main stitch for the berries.
hdc = half double crochet. Yarn over, insert hook into stitch, yarn over, pull up a loop (three loops on hook), yarn over, pull through all three loops at once.
dc = double crochet. Yarn over, insert hook into stitch, yarn over, pull up a loop (three loops on hook), yarn over, pull through two loops, yarn over, pull through remaining two loops. This adds more height than single crochet.
inc = increase. Work two stitches into the same stitch. For example, "sc inc" means work two single crochets in one stitch.
dec = decrease (invisible decrease preferred). Insert hook through front loops only of the next two stitches, yarn over, pull through both front loops, yarn over, pull through both loops on hook.
Magic ring = also called magic circle or adjustable ring. This technique lets you start working in the round with a completely closed center. If you’ve never done this, look up a quick video tutorial. It’s a game changer for amigurumi and small motifs.
Pattern Notes Before You Begin
This bracelet is worked in continuous rounds without joining, except where noted. Use a stitch marker to track the beginning of each round. I like using a small piece of contrasting thread as a marker since plastic markers can be too bulky for this scale.
Gauge isn’t critical for jewelry, but your tension should be fairly tight so the stuffing doesn’t show through on the berries.
Work all pieces with the right side facing outward as you go. The berries and roses are not turned.
Crocheted Berry Pattern (Make 6 to 8)
These adorable little berries resemble raspberries or wild berries. Make some in deep magenta and some in dusty rose for variety.
Round 1: Make a magic ring. Work 6 sc into the ring. Pull ring closed tightly. Do not join. (6 sts)
Round 2: Work 2 sc in each st around. (12 sts)
Round 3: *Sc in next st, 2 sc in next st* repeat around. (18 sts)
Rounds 4 to 5: Sc in each st around. (18 sts)
At this point, begin stuffing with a tiny amount of fiberfill. Just a wisp is enough. You want the berry to hold its shape without being rock hard.
Round 6: *Sc in next st, sc dec over next 2 sts* repeat around. (12 sts)
Add more stuffing if needed.
Round 7: *Sc dec* around. (6 sts)
Finishing: Cut thread leaving a 6 inch tail. Thread tail through remaining stitches, pull tight to close. Do not cut tail yet.
Adding the Berry Cap: With green thread, join to the top center of the berry. Ch 3, sl st in same space. *Ch 3, sl st in next visible stitch around the top* repeat 4 to 5 times to create small leaf-like points around the top. Fasten off and weave in end.
Use the remaining tail from the berry to create a small loop for attaching to the jump ring, or sew directly through the top to create an attachment point.
Spiral Rose Pattern (Make 2 to 3)
These beautiful roses are made flat and then rolled into shape. They look incredibly impressive but are surprisingly simple.
Foundation: With dusty rose thread, ch 25.
Row 1: Sc in 2nd ch from hook. *3 dc in next ch, sc in next ch* repeat across to end. Fasten off leaving a 10 inch tail.
You should have a wavy strip that naturally wants to curl.
Shaping the Rose: Starting from the foundation chain end (the beginning of your work), begin rolling the strip tightly. The scalloped edge will form the outer petals. Roll until you reach the end.
Securing: Use the long tail to stitch through the base of the rose several times, catching all the layers. Make sure your stitches are hidden underneath. Create a small loop at the back for attaching to the bracelet chain.
Textured Leaf Pattern (Make 8 to 10)
Make leaves in both sage green and white to add variety and visual interest.
Foundation: Ch 10.
Row 1: Sc in 2nd ch from hook, hdc in next ch, dc in next 2 ch, hdc in next 2 ch, sc in next 2 ch, 3 sc in last ch.
Now continue working along the opposite side of the foundation chain.
Sc in next 2 ch, hdc in next 2 ch, dc in next 2 ch, hdc in next ch, sl st in last ch. Fasten off leaving a 4 inch tail.
This creates a pointed leaf shape with a slight curve. The 3 sc at the tip creates the rounded point.
Optional vein detail: With a tapestry needle and matching thread, create a single line of backstitch down the center of each leaf for a realistic vein effect.
Mini Strawberry Variation (Optional, Make 1 to 2)
I can see at least one strawberry charm in the photos! Here’s how to make it.
Rounds 1 to 5: Follow the berry pattern above using dusty rose or coral pink thread.
Round 6: Continue with decreases as in berry pattern, but before closing, use green thread to create the strawberry calyx (the leafy top).
Calyx: Join green at top. *Ch 5, sl st in 2nd ch from hook, sc in next ch, hdc in next ch, sc in next ch, sl st to top of strawberry* repeat 4 to 5 times around the top. Fasten off.
Seeds: Using white or pale yellow thread and a tapestry needle, add tiny straight stitches randomly across the berry surface to mimic strawberry seeds.
Assembling Your Charm Bracelet
Now for the fun part! Gather all your finished charms and your jewelry supplies.
Step 1: Lay out your bracelet chain on a flat surface. Arrange your crocheted pieces alongside it to plan your design. Alternate colors and shapes for visual balance. Place larger roses near the center and smaller berries toward the clasp ends.
Step 2: Open a jump ring using your jewelry pliers. Always twist jump rings open sideways rather than pulling the ends apart. This maintains the ring’s shape.
Step 3: Thread the jump ring through the attachment loop on your crocheted charm, then through a link in the bracelet chain. Close the jump ring securely.
Step 4: Continue adding charms, spacing them approximately 1 to 1.5 cm apart. Mix in crystal beads and metal heart charms between the crocheted elements for extra sparkle and dimension.
Step 5: Step back and check the overall balance. Add or remove pieces until you’re happy with the fullness and arrangement.
Care Instructions
This delicate bracelet should be handled with care. Store flat or hanging to prevent crushing the dimensional pieces. Avoid getting the thread wet, as cotton can shrink or lose its shape. If needed, spot clean gently with a damp cloth and allow to air dry completely before wearing.
Tips for Success with This Crochet Tutorial
Lighting matters. Work near a window during the day or invest in a good craft lamp. Trying to crochet tiny stitches in dim light leads to eye strain and mistakes.
Take breaks. Your hands will thank you. Thread crochet requires a tighter grip than regular yarn, and small movements can cause fatigue.
Make extras. You might decide you want more berries or leaves once you see how beautiful they look together. Having spare charms also means you can switch out pieces for different occasions.
Customize freely. Change the colors to match a specific outfit, use gold chain instead of silver, or add different bead accents. This pattern is a jumping-off point for your creativity.
Final Thoughts on This Charm Bracelet Crochet Pattern
I absolutely love how this Peach Blossom Orchard Charm Bracelet combines traditional crochet skills with jewelry making. It’s the perfect project for using up small amounts of thread from your stash, and the finished bracelet looks far more expensive and complicated than it actually is.
Whether you make this as a gift for someone special or as a treat for yourself, I hope you enjoy every tiny stitch. The satisfaction of wearing handmade jewelry that YOU created is truly unmatched.
Thank you so much for choosing this step by step crochet pattern! I would absolutely love to see your finished bracelets. Tag me on Instagram or share a photo in my Facebook group so I can celebrate your beautiful work with you.
If this charm bracelet pattern made you smile, go ahead and pin it to your favorite Pinterest board so you can find it whenever you’re ready to start stitching. And please drop a comment below if you make one! I read every single comment and love hearing which color combinations you choose. Happy crocheting, friend!
