THIS is the cardigan you’ve been waiting to make. I’m talking SUPER impressive, absolutely stunning, and the kind of project that makes everyone ask "wait, you MADE that?" The classic granny square gets a gorgeous upgrade here, and honestly, once you get your rhythm going, these squares work up faster than you’d think. If you’ve been dreaming of a cozy, boho, vintage-inspired cardigan that looks like it belongs in a boutique window, this is your sign to grab your hook and get started.
About This Burgundy Granny Square Patchwork Cardigan Pattern
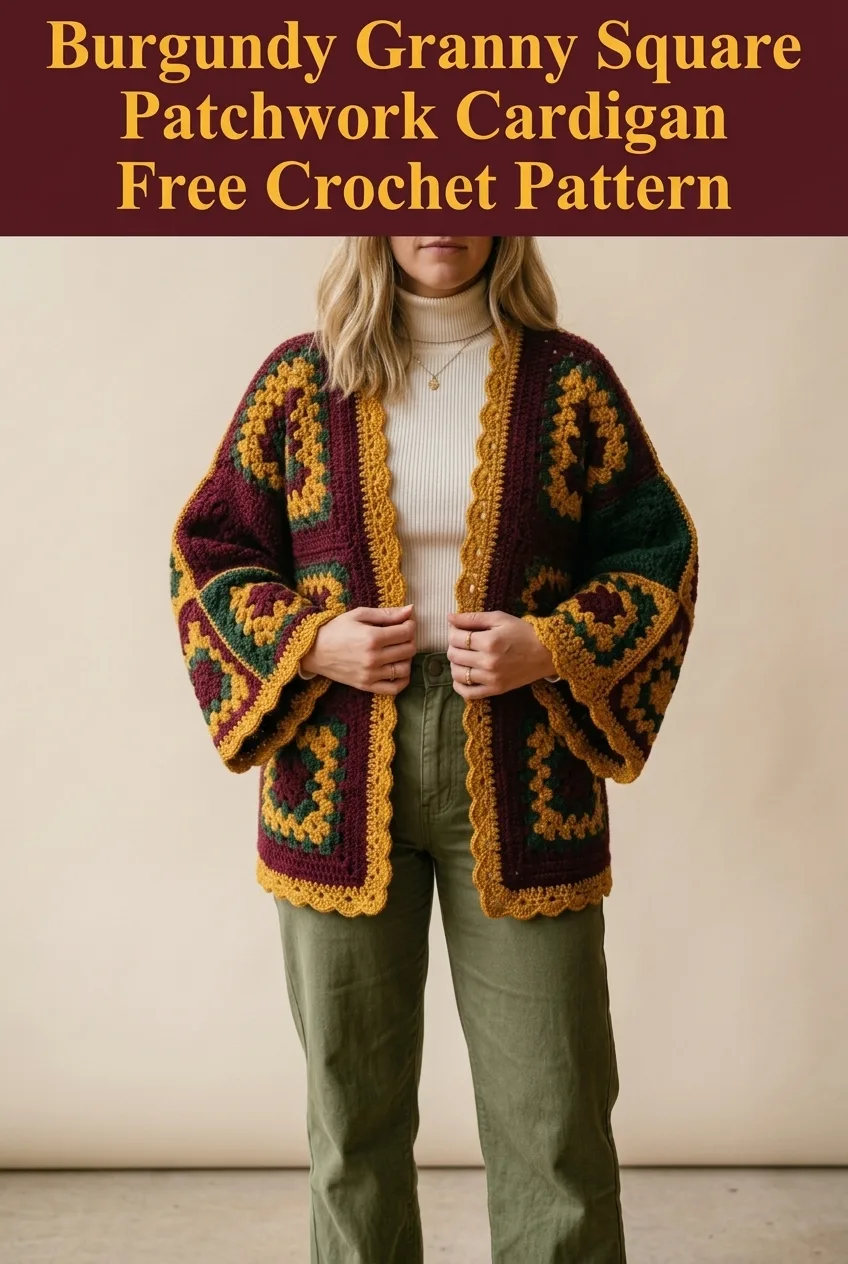
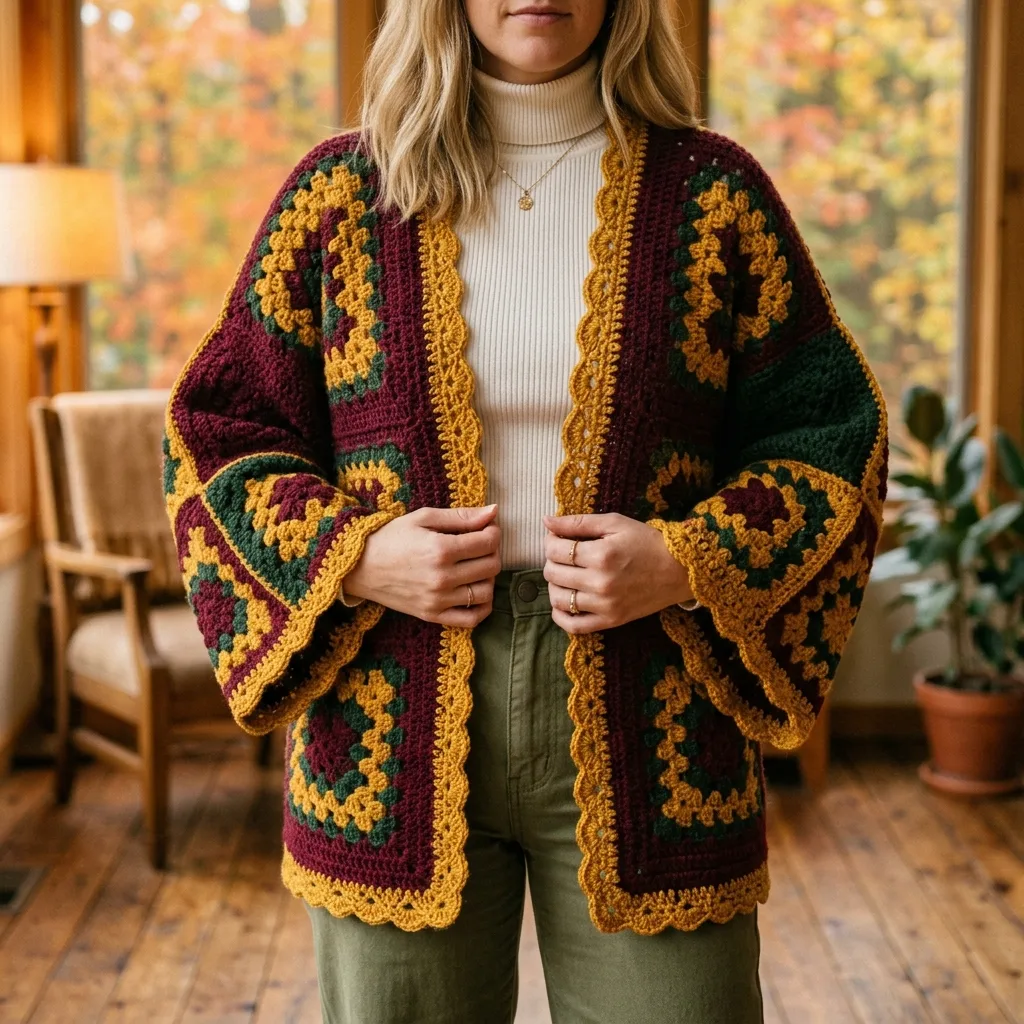
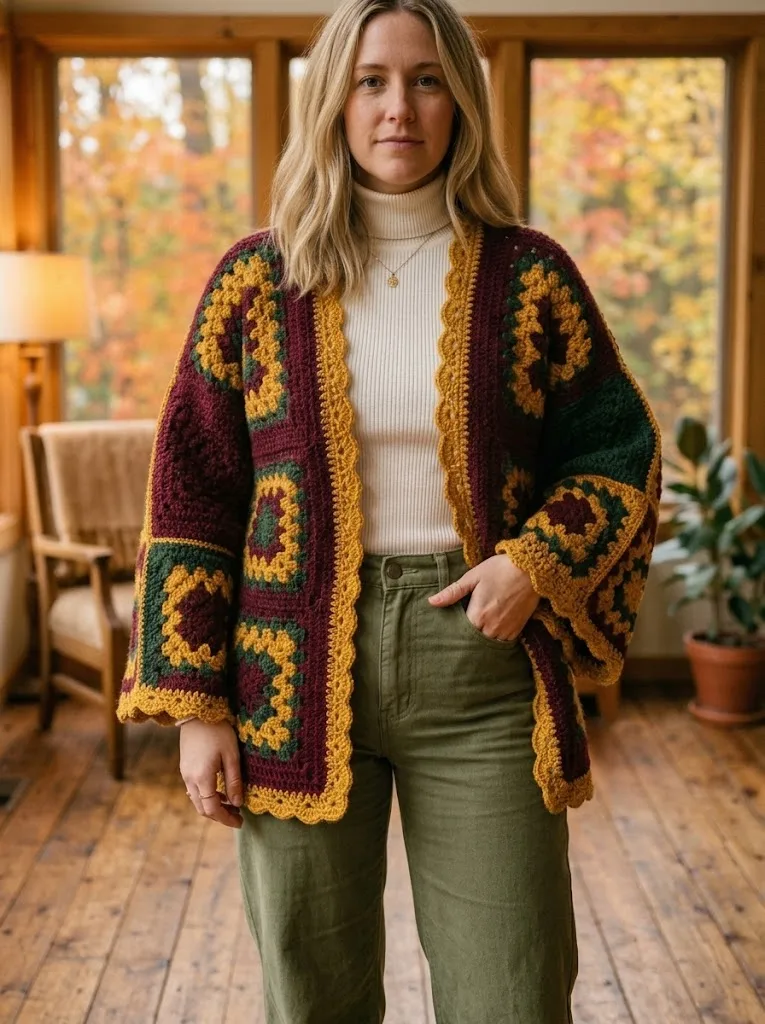
This beautiful cardigan combines traditional granny squares with modern construction techniques to create a wearable piece of art. The rich color palette features deep burgundy, forest green, and warm mustard gold, perfect for fall and winter layering.
The cardigan features an open front design with no closures, wide bell sleeves, and a decorative scalloped border running along the entire front opening and hem. Each granny square is worked separately and then joined together, which means you can take this project anywhere and work on it piece by piece.
Skill Level: Intermediate
While granny squares are beginner friendly on their own, this pattern requires assembling multiple pieces, working border stitches evenly, and understanding basic garment construction. If you’ve made a few granny square blankets or simple garments before, you’re absolutely ready for this.
Materials Needed
Yarn:
I recommend using 100% acrylic or an acrylic wool blend for this project. The acrylic gives you easy care and durability, while a wool blend adds extra warmth and drape. Look for a yarn with good stitch definition so your granny clusters really pop.
Hook:
Notions:
Gauge
One completed granny square should measure approximately 6 inches x 6 inches (15cm x 15cm) after blocking.
Gauge matters here because it affects the final fit of your cardigan. If your squares are too small, your cardigan will be tight. Too large, and it will be oversized. Make a test square first and adjust your hook size if needed.
Abbreviations and Stitch Definitions
Let me walk you through every stitch you’ll need for this pattern:
Classic Granny Square Pattern
This is the foundation of your entire cardigan. You’ll need to make 20 squares total for a size medium cardigan. Adjust the number of squares for different sizes.
Square Breakdown:
Round 1 (Color C, Mustard)
Make a magic ring, or ch 4 and sl st to first ch to form a ring.
Ch 3 (counts as first dc throughout), 2 dc into ring, ch 2, *3 dc into ring, ch 2* repeat 3 more times. Sl st to top of beginning ch-3 to join.
You should have 4 clusters of 3 dc with a ch-2 corner space between each cluster.
Fasten off Color C.
Round 2 (Color B, Forest Green)
Join Color B in any ch-2 corner space with a sl st.
Ch 3, 2 dc in same corner space, ch 1, 3 dc in same corner space (this creates your first corner). *Ch 1, in next ch-2 corner space work (3 dc, ch 2, 3 dc), repeat from * around. Ch 1, sl st to top of beginning ch-3.
You now have 8 clusters total, two on each side with a ch-2 space in each corner.
Fasten off Color B.
Round 3 (Color A, Burgundy)
Join Color A in any ch-2 corner space.
Ch 3, 2 dc in same corner space, ch 2, 3 dc in same corner space. *Ch 1, 3 dc in next ch-1 space, ch 1, in corner ch-2 space work (3 dc, ch 2, 3 dc), repeat from * around. End with ch 1, 3 dc in last ch-1 space, ch 1, sl st to join.
Each side now has 3 clusters with a corner cluster at each end. (12 clusters total)
Fasten off Color A.
Round 4 (Color C, Mustard)
Join Color C in any corner ch-2 space.
Ch 3, 2 dc in same space, ch 2, 3 dc in same space. *Ch 1, (3 dc in next ch-1 space, ch 1) across side to next corner, in corner work (3 dc, ch 2, 3 dc), repeat from * around. Sl st to join.
Each side now has 4 clusters plus corner clusters. (16 clusters total)
Fasten off and weave in ends.
Your completed square should measure approximately 6 inches. Make all 20 squares following this pattern.
Blocking Your Squares
I know blocking feels like an extra step, but trust me on this one. Blocking makes your squares uniform in size, which makes assembly SO much easier.
Wet each square with cool water, gently squeeze out excess moisture (don’t wring!), and pin to blocking mats. Let dry completely before assembling.
Cardigan Assembly
Now comes the fun part, putting it all together!
Back Panel
Arrange 6 squares in a rectangle, 2 squares wide and 3 squares tall. Using Color C and your yarn needle, whip stitch or mattress stitch the squares together through the back loops only. This creates a neat, flat seam.
Front Panels (Make 2)
Each front panel uses 3 squares arranged vertically, 1 square wide and 3 squares tall. Join the squares using the same method as the back.
Sleeves (Make 2)
Arrange 4 squares in a 2×2 configuration. Join all four squares together. Then fold the joined piece in half and seam the side edges together to form a tube. This creates your bell sleeve shape.
Joining Body Pieces
1. Lay the back panel flat.
2. Position front panels on each side, aligning the top edges.
3. Seam the shoulder seams, joining the top outer squares of each front panel to the corresponding back panel squares. Leave the center back square unjoined for the neck opening.
Attaching Sleeves
1. Find the center point of each sleeve opening (the top edge of the sleeve tube).
2. Align this center point with the shoulder seam.
3. Pin the sleeve to the armhole opening, easing to fit.
4. Whip stitch around the entire armhole, attaching the sleeve securely.
Side Seams
Seam the sides of the cardigan from the bottom of the sleeve attachment down to the hem. Leave approximately 2-3 inches at the bottom unjoined for a small side vent if desired.
Border Pattern
The beautiful scalloped border is what really makes this cardigan special. It runs along both front edges and around the entire bottom hem.
Border Round 1 (Color C, Mustard)
Starting at the bottom right corner of the cardigan with the right side facing:
Join Color C with a sl st.
Ch 1, work sc evenly around the entire front opening, across the bottom hem, up the other front, around the neckline, and back to starting point. Work approximately 3 sc per dc or cluster, and 2 sc in each corner space. Aim for an even number of stitches.
Sl st to first sc to join. Do not turn.
Border Round 2 (Color C, Mustard)
Ch 1, sc in each sc around. Sl st to join.
Border Round 3, Scallop Edge (Color C, Mustard)
*Skip 2 sc, work 5 dc in next sc (this creates a shell or scallop), skip 2 sc, sl st in next sc, repeat from * around entire border.
Fasten off and weave in all ends.
Sleeve Cuffs
Work the same scallop border around the bottom edge of each sleeve:
Round 1: Join Color C at sleeve seam. Ch 1, sc evenly around cuff edge (approximately 48-54 sc). Sl st to join.
Round 2: Ch 1, sc in each sc around. Sl st to join.
Round 3: Work scallop pattern: *skip 2 sc, 5 dc in next sc, skip 2 sc, sl st in next sc, repeat from * around.
Fasten off and weave in ends.
Size Adjustments
For a smaller size (XS/S): Make your granny squares with only 3 rounds instead of 4. This creates approximately 4.5-inch squares and a more fitted cardigan.
For a larger size (L/XL): Add a fifth round to each granny square using Color A (burgundy). Work the same pattern of clusters and corner increases. This creates approximately 7.5-inch squares.
For extra length: Add one more row of squares to the body (back panel becomes 2×4, front panels become 1×4).
Care Instructions
Machine wash cold on gentle cycle, or hand wash for best results. Lay flat to dry to maintain shape. Avoid hanging while wet, as the weight can stretch the granny squares.
Tips for Success
Keep your tension consistent. Granny squares are forgiving, but wildly different tension between squares makes assembly tricky.
Count your clusters on each round. It’s easy to accidentally skip a chain space or add an extra cluster.
Weave in ends as you go. With color changes on every round, you’ll have lots of ends. Weaving them in after each square keeps the final finishing manageable.
Don’t rush the seaming. Taking your time with neat, even seams makes the difference between a handmade look and a homemade look.
This Burgundy Granny Square Patchwork Cardigan crochet pattern creates a stunning statement piece that you’ll reach for again and again. The combination of classic granny square technique with thoughtful color placement and elegant finishing details results in a cardigan that looks far more complicated than it actually is.
Whether you’re making this for yourself or gifting it to someone special, this step by step crochet tutorial gives you everything you need to create a beautiful, wearable piece of fiber art. The beginner friendly granny squares combined with straightforward assembly make this an achievable project for crocheters ready to try their first garment.
I really hope you love making this cardigan as much as I loved designing it! If you give this pattern a try, I’d absolutely love to see your finished project. Save this to your Pinterest boards so you can find it when you’re ready to cast on, and please drop a comment below to let me know how yours turns out!
