The Charlotte Bag Story
I call this one the Charlotte Bag. I named it after my grandmother, who kept a dusty rose cardigan in her closet for as long as I can remember. She said that color went with everything, and she was absolutely right. I sketched this design in an old notebook about two years ago, during a weekend when I was obsessed with the idea of making a bag that looked expensive but cost almost nothing to create. The notebook sat in a drawer until last month, when I finally pulled it out, grabbed some t-shirt yarn, and brought Charlotte to life. I think my grandmother would have loved carrying this one.
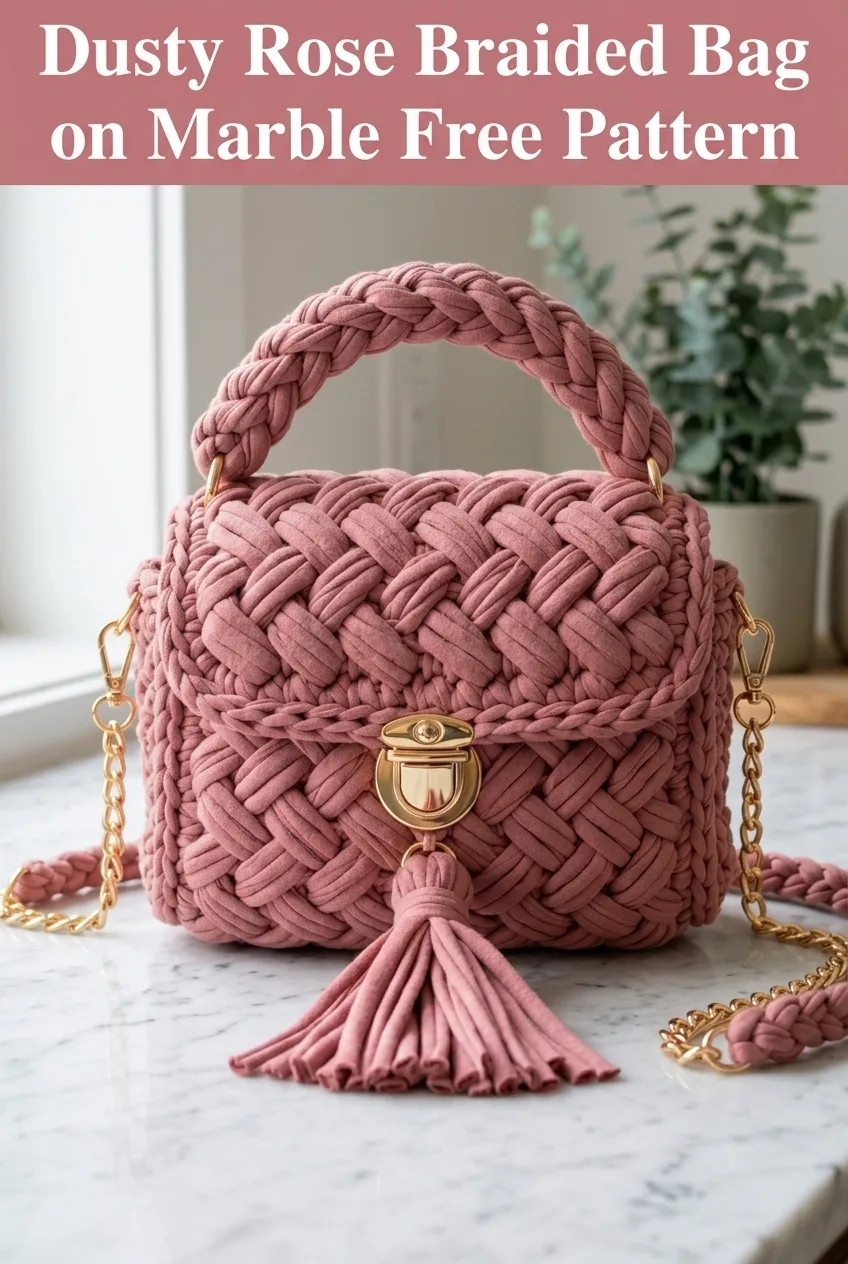
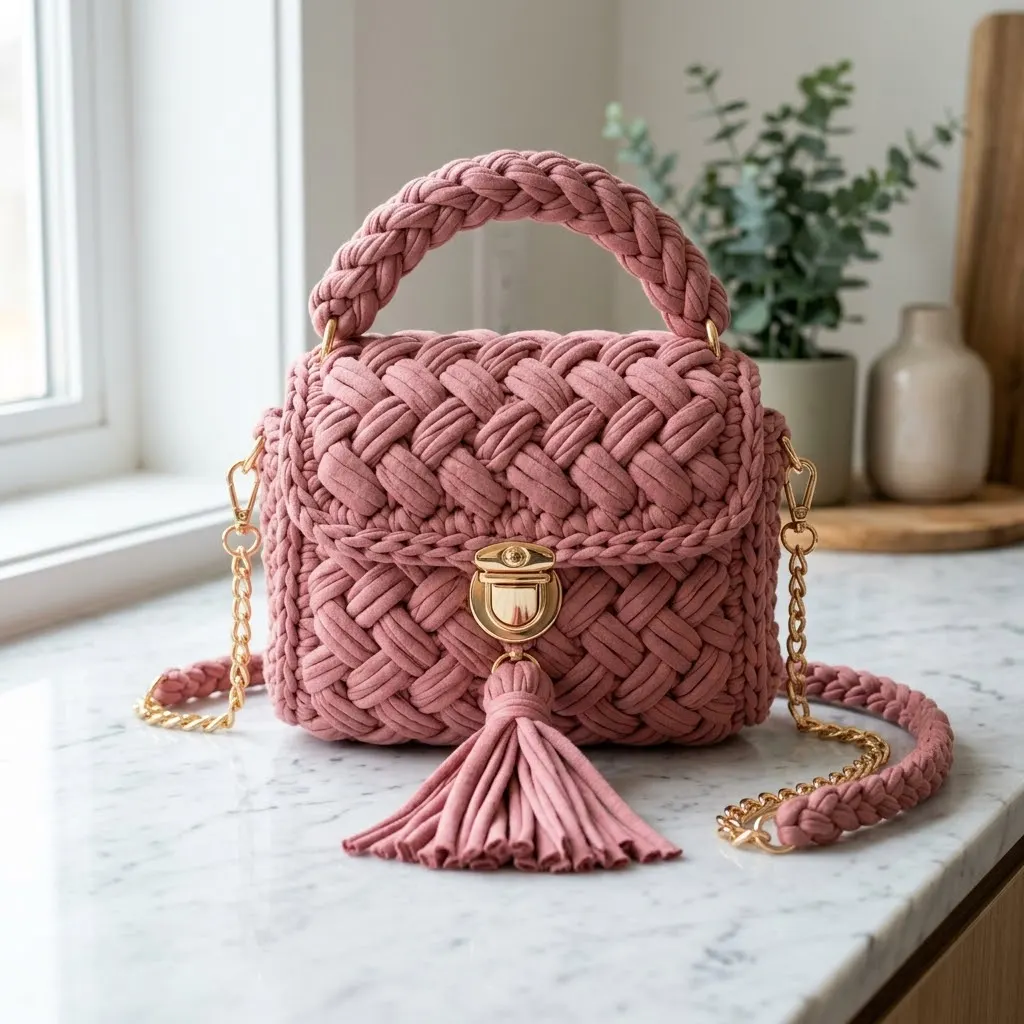
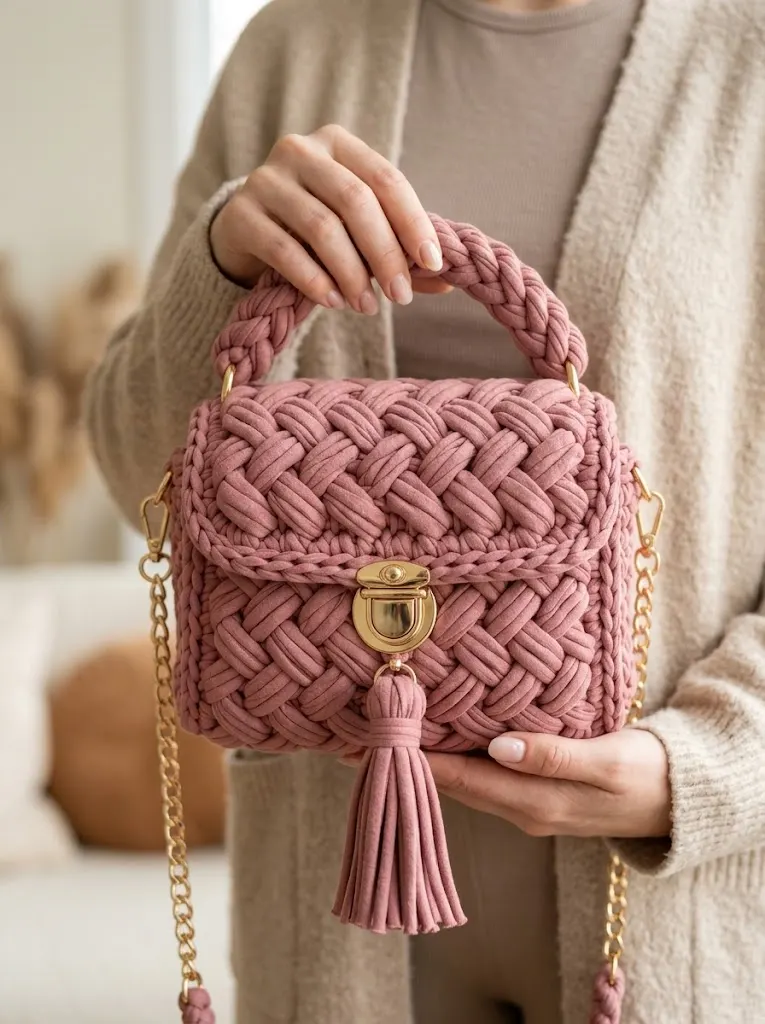
This crochet bag pattern combines a gorgeous diagonal basketweave texture with braided details that give it a designer look. The structured shape, gold hardware, and elegant tassel make it perfect for everyday wear or special occasions. If you have been wanting to try t-shirt yarn but did not know where to start, this project is an ideal introduction.
About This Crochet Bag Pattern
The Charlotte Bag uses a stunning diagonal stitch pattern that creates a woven, basketweave effect. This technique looks incredibly complex, but I promise you it is more approachable than it appears. You will work with basic stitches arranged in a specific way to create that beautiful interlocking diagonal texture.
The finished bag measures approximately 8 inches wide by 6 inches tall, not including the handle. The braided top handle adds another 5 inches of height, and the chain strap gives you crossbody versatility.
Skill Level: Intermediate
This pattern works up surprisingly quickly because t-shirt yarn is thick and covers ground fast. Most crafters can complete this bag in a weekend. The diagonal stitch section requires attention to placement, but once you establish the pattern, it becomes rhythmic and almost meditative.
Materials You Will Need
Before you begin, gather all your supplies. Having everything ready makes the process so much smoother.
Yarn:
Hook:
Notions:
Optional:
Stitches and Abbreviations
Let me walk you through every stitch you will use. Even if you know these already, a quick refresher never hurts.
Chain (ch): The foundation of most crochet. Yarn over, pull through the loop on your hook. This creates one chain.
Slip Stitch (sl st): Insert hook into stitch, yarn over, pull through both loops on hook in one motion. Used for joining rounds and creating a flat seam.
Single Crochet (sc): Insert hook into stitch, yarn over, pull up a loop so you have 2 loops on hook. Yarn over again, pull through both loops. You now have one single crochet. This creates a short, tight stitch.
Half Double Crochet (hdc): Yarn over first, then insert hook into stitch. Yarn over, pull up a loop so you have 3 loops on hook. Yarn over, pull through all 3 loops at once. This stitch is taller than single crochet but shorter than double crochet.
Double Crochet (dc): Yarn over, insert hook into stitch, yarn over and pull up a loop. You have 3 loops. Yarn over, pull through 2 loops. You have 2 loops left. Yarn over, pull through remaining 2 loops. One double crochet complete.
Front Post Double Crochet (FPdc): This is where the magic happens for our texture. Instead of working into the top of a stitch, you will work around the post, which is the vertical body of the stitch below. Yarn over, insert your hook from front to back to front again, going around the post. Complete the stitch like a regular double crochet. This pushes the stitch forward and creates dimension.
Back Post Double Crochet (BPdc): Same concept, but insert your hook from back to front to back. This pushes the stitch backward. The combination of front and back post stitches creates our woven look.
Pattern Notes Before You Begin
Read through these tips before starting. They will save you confusion later.
T-shirt yarn can be inconsistent in thickness. If your yarn has thick and thin spots, try to place the thicker sections where they will be less visible, like the bottom of the bag.
This bag is worked in several pieces and then assembled. You will make the front panel, back panel, side gusset, bottom panel, braided handle, and flap. Do not worry, each piece is manageable on its own.
Keep your tension consistent but not too tight. T-shirt yarn has some stretch, and you want the finished bag to have structure without being stiff.
When counting stitches in the diagonal pattern, count the tops of your stitches, not the posts. It can get confusing with all those front and back posts.
The Pattern Instructions
Bottom Panel
The bottom provides structure and shape for your bag.
Foundation: Ch 17.
Row 1: Sc in 2nd ch from hook and in each ch across. (16 sts)
Rows 2 through 8: Ch 1, turn. Sc in each st across. (16 sts)
Fasten off, leaving a long tail for seaming later. Your bottom panel should measure approximately 8 inches by 4 inches.
Front and Back Panels (Make 2)
These panels feature the beautiful diagonal basketweave texture. The pattern looks complicated, but you are just alternating between front post and back post stitches in a specific sequence.
Foundation: Ch 21.
Row 1 (Wrong Side): Dc in 3rd ch from hook and in each ch across. (19 dc, the turning chain does not count as a stitch)
Row 2 (Right Side): Ch 2, turn. Skip first st. *FPdc around next 2 sts, BPdc around next 2 sts.* Repeat from * across, ending with FPdc around last 3 sts. (19 sts)
Row 3: Ch 2, turn. Skip first st. *BPdc around next 2 sts, FPdc around next 2 sts.* Repeat from * across, ending with BPdc around last 3 sts. (19 sts)
Row 4: Ch 2, turn. Skip first st. BPdc around next st. *FPdc around next 2 sts, BPdc around next 2 sts.* Repeat from * across, ending with FPdc around last 2 sts. (19 sts)
Row 5: Ch 2, turn. Skip first st. FPdc around next st. *BPdc around next 2 sts, FPdc around next 2 sts.* Repeat from * across, ending with BPdc around last 2 sts. (19 sts)
Rows 6 through 13: Repeat Rows 2 through 5 twice more.
Row 14: Repeat Row 2.
Fasten off, leaving a long tail on the second panel for seaming. Each panel should measure approximately 8 inches wide by 6 inches tall.
Side Gusset
This strip connects the front, back, and bottom, giving your bag depth and structure.
Foundation: Ch 7.
Row 1: Sc in 2nd ch from hook and in each ch across. (6 sts)
Rows 2 through 50: Ch 1, turn. Sc in each st across. (6 sts)
The gusset should measure approximately 3 inches wide by 26 inches long. This length wraps around three sides of your bag. If it seems too short or too long, adjust by adding or removing rows. Fasten off.
Flap
The flap folds over the front of your bag and holds the clasp.
Foundation: Ch 21.
Row 1: Sc in 2nd ch from hook and in each ch across. (20 sts)
Rows 2 through 3: Ch 1, turn. Sc in each st across. (20 sts)
Row 4: Ch 1, turn. Sc2tog, which means insert hook in first st, pull up loop, insert hook in second st, pull up loop, yarn over and pull through all 3 loops. Sc in each st until 2 sts remain. Sc2tog. (18 sts)
Rows 5 through 6: Ch 1, turn. Sc in each st across. (18 sts)
Row 7: Ch 1, turn. Sc2tog. Sc across to last 2 sts. Sc2tog. (16 sts)
Rows 8 through 9: Ch 1, turn. Sc in each st across. (16 sts)
Row 10: Ch 1, turn. Sc2tog. Sc across to last 2 sts. Sc2tog. (14 sts)
Row 11: Ch 1, turn. Sc in each st across. (14 sts)
Fasten off, leaving a long tail.
Braided Handle
This handle gives your bag that luxurious designer look. You will make three strands and braid them together.
Make 3 strands:
Using your larger 12mm hook, ch 45. Fasten off, leaving a 6 inch tail on each end.
To braid, hold all three strands together at one end. Secure them with a slip knot or a piece of yarn tied loosely. Braid the three chains together just like you would braid hair. Keep the tension even but not too tight. When you reach the end, secure with another loose tie.
Wrap each end of the braid with a small piece of t-shirt yarn to create a clean finished look. These wrapped ends will attach to your D-rings.
Finishing Braid Edging
Create a braided border along the top edge of your bag for a polished look.
Attach yarn to one corner of the assembled bag opening. Work a row of sl st evenly around the entire top edge. This creates a stable base for your edging and adds another braided texture element.
Assembly Instructions
Now comes the satisfying part. You get to see your bag take shape.
Step 1: Attach the Gusset to the Bottom
Lay your bottom panel flat. Position the gusset strip along one short edge of the bottom, then continue along the long edge, around the second short edge, and along the remaining long edge. The gusset forms a continuous wall around three sides.
Using your tapestry needle and a long tail from the gusset or bottom, whip stitch the pieces together. Keep your stitches close and even.
Step 2: Attach the Front and Back Panels
With the gusset standing upright around your bottom panel, position the front panel against one side. The wrong side of the diagonal pattern should face inward. Whip stitch around three edges, attaching the front to the gusset and bottom.
Repeat with the back panel on the opposite side.
Step 3: Attach the Flap
Center the flap along the top edge of the back panel. The wider end attaches to the bag. Whip stitch securely, as this seam will bear some stress when opening and closing the bag.
Step 4: Install the Hardware
Mark the center of your flap where the push lock closure will go. Install the top portion of the clasp through the flap. Most push locks have prongs that you bend flat on the inside.
Close the flap and mark where the bottom portion of the clasp should go on the front panel. Install that piece.
Attach D-rings to each side of the bag opening. You can either crochet small loops to hold them or sew them directly to the gusset.
Step 5: Attach the Handle and Chain
Thread each end of your braided handle through a D-ring. Fold the end back and secure with tight stitches.
Attach lobster claw clasps to each end of your chain strap. Clip the clasps to the D-rings alongside the braided handle.
Step 6: Create the Tassel
Cut 12 to 15 strips of t-shirt yarn, each approximately 8 inches long. Bundle them together and fold in half. Wrap a separate piece of yarn tightly around the bundle about half an inch from the fold. This creates the tassel head.
Attach the tassel to the bottom of your push lock clasp using a slip knot or by threading yarn through the clasp loop.
Optional Lining
A fabric lining protects your belongings and gives your bag a professional interior finish. Cut fabric to match each panel, adding half an inch seam allowance. Sew or glue the lining pieces together, then attach the assembled lining inside your bag using fabric glue or hand stitching.
Styling Your Charlotte Bag
This bag transitions beautifully from casual to dressy. Wear it with the chain strap crossbody for hands free convenience while shopping. Carry it by the braided handle for an elegant evening look. The dusty rose color pairs wonderfully with neutrals, denim, navy, forest green, and even bold jewel tones.
Tips for Success
Work slowly through the first few rows of the diagonal pattern. Once you understand the rhythm, it becomes second nature.
Block your panels before assembly if they curl or seem uneven. Wet blocking works well with t-shirt yarn, just soak, squeeze out water, and pin flat to dry.
If your push lock clasp feels loose, add a small piece of felt or interfacing behind it for stability.
Choose hardware that matches, as mixing gold and silver tones can look unintentional. All gold hardware, as shown in this design, creates a cohesive luxury appearance.
Wrapping Up This Crochet Bag Pattern
The Charlotte Bag combines beginner friendly stitches with an eye catching construction method. That diagonal basketweave texture stops people in their tracks, and the braided details add polish that looks professionally designed. I love that this crochet tutorial lets you create something truly special using just a couple skeins of t-shirt yarn and some basic hardware.
Whether you make this for yourself or as a gift, the Charlotte Bag will become a favorite. The structured shape holds up beautifully over time, and the step by step instructions make even the trickiest parts manageable.
Thank you so much for choosing this pattern. I genuinely hope you enjoy making your own Charlotte Bag as much as I enjoyed designing it. If you create one, please share your photos with me on Instagram or in my Facebook group. I love seeing your color choices and personal touches.
Save this crochet bag pattern to your Pinterest boards so you can find it whenever you are ready to start. And please drop a comment below if you make one, as I would love to hear how it turned out for you.
