I call these my "Wanderer Boots," and they’ve been sitting in my design notebook for almost three years now. I originally sketched them out for my sister who wanted something cozy enough for lounging around the house but stylish enough that she wouldn’t feel embarrassed grabbing the mail. She’s a sage green fanatic, so naturally that became the signature color. I finally pulled out that old notebook last month, worked through the construction challenges I’d scribbled in the margins, and honestly? These turned out even better than I imagined back then.
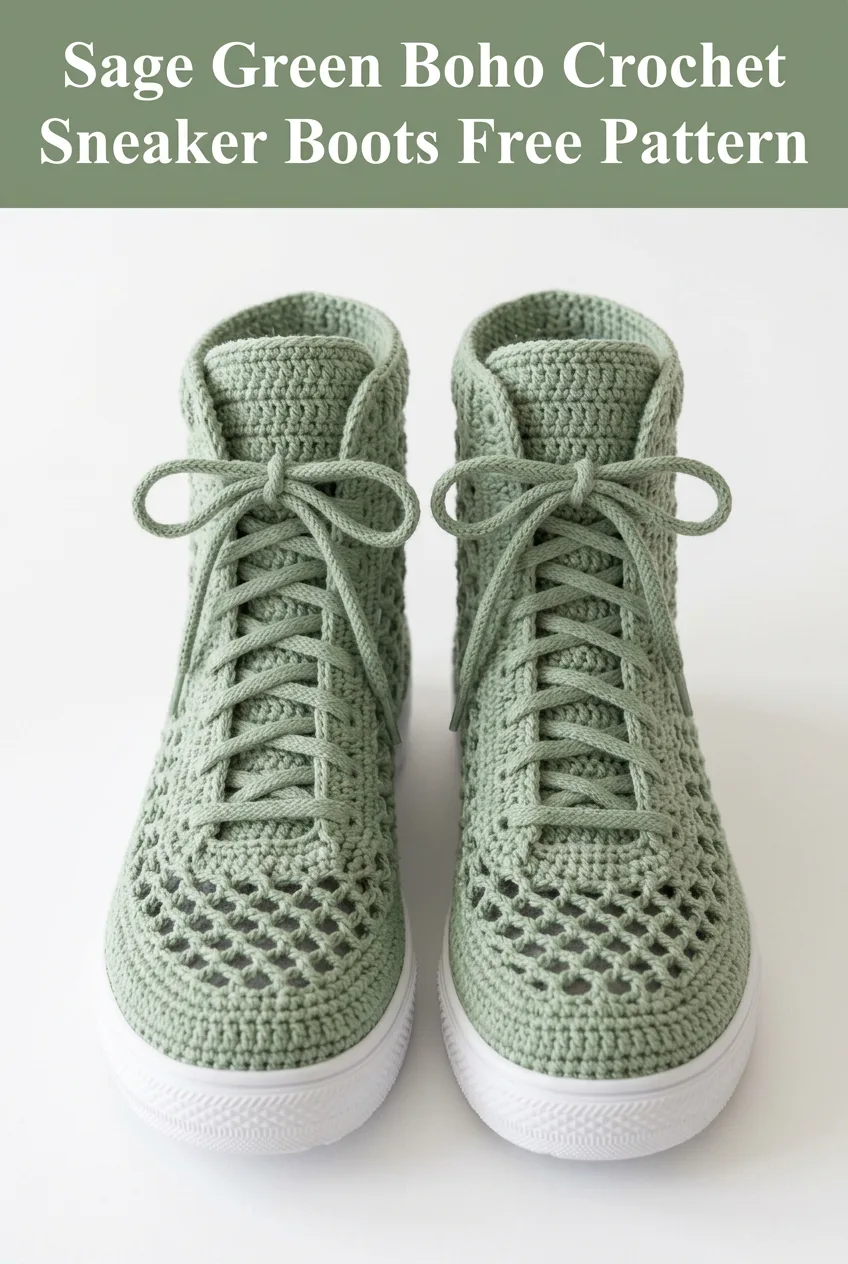
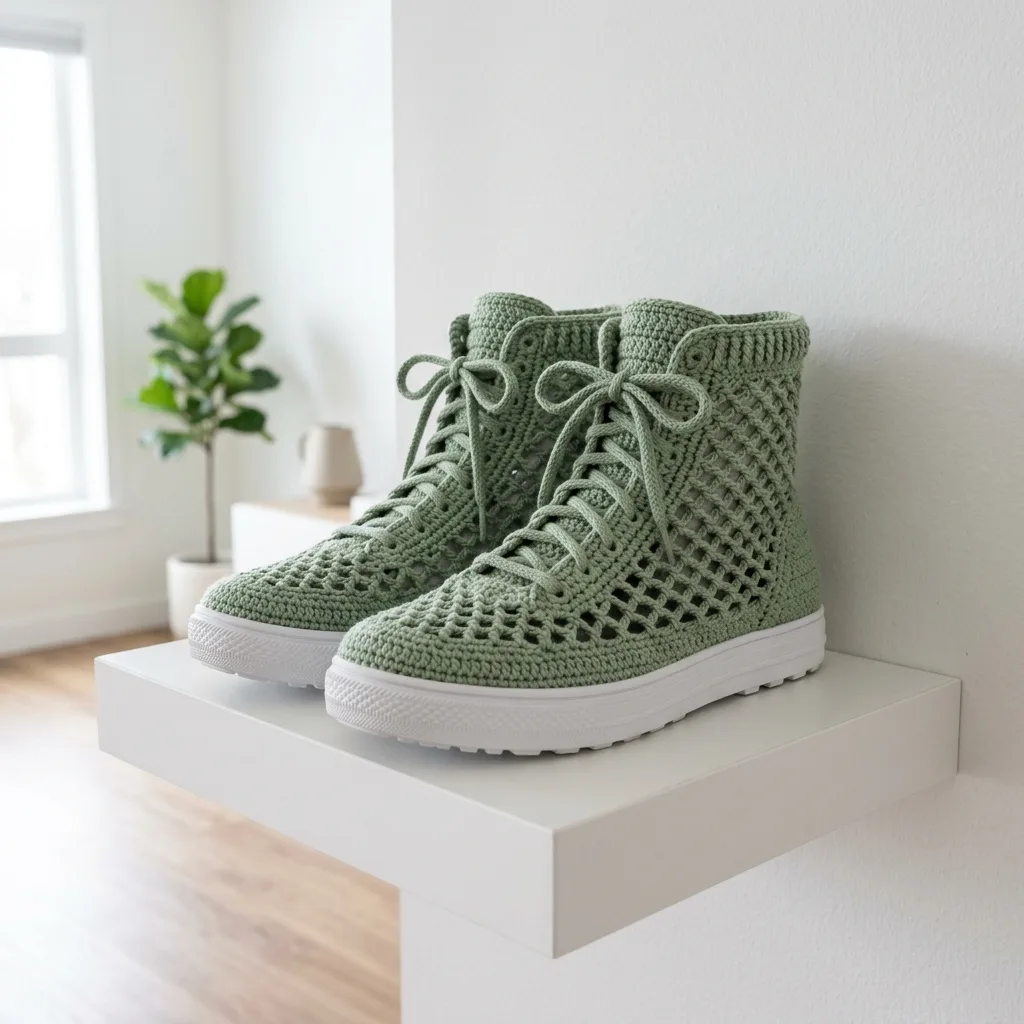
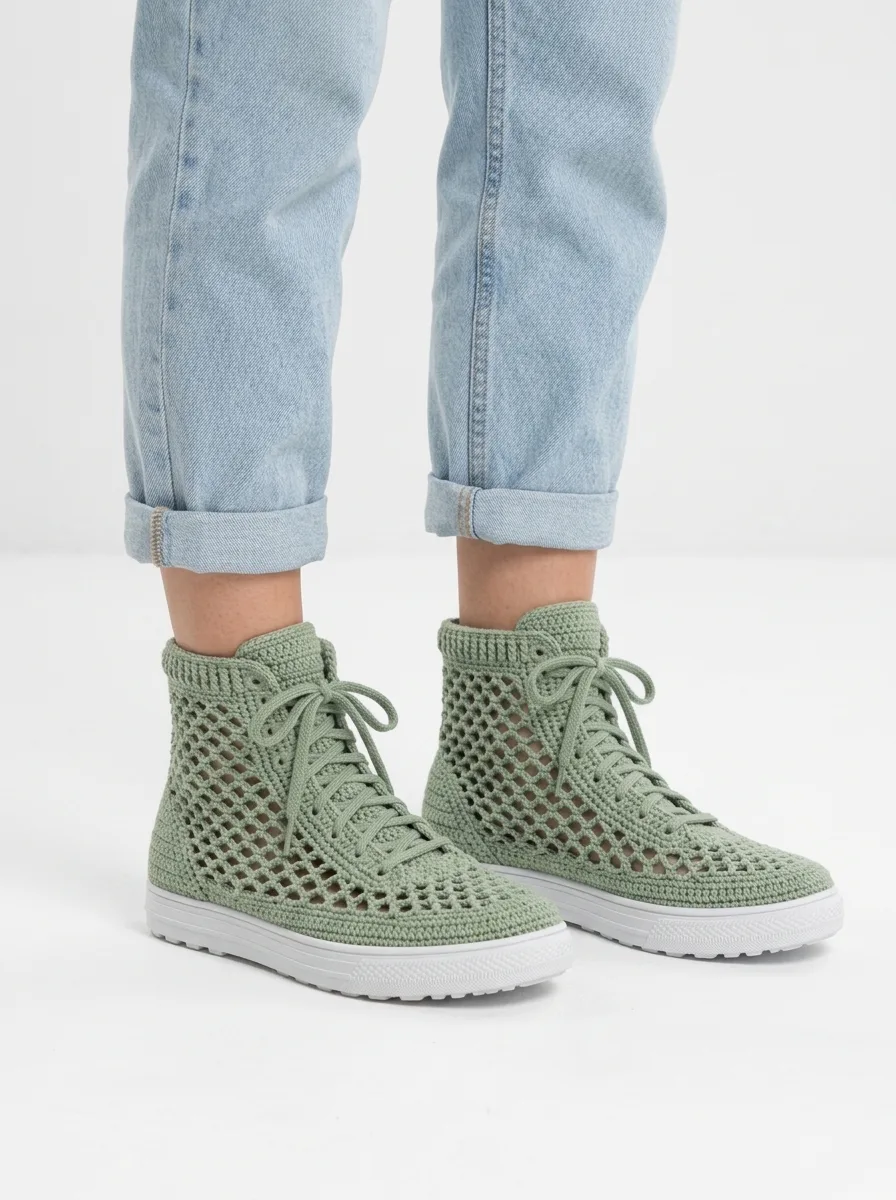
These crochet sneaker boots combine the airy, breathable look of mesh sides with a sturdy, structured sole attachment that makes them surprisingly practical. They’re giving major boho vibes while still feeling modern and wearable. If you’ve ever wanted to crochet your own shoes but felt intimidated by the process, I think you’ll find this pattern more approachable than you’d expect.
Why You’ll Love This Crochet Sneaker Boot Pattern
Let me tell you what makes this crochet pattern special. The construction breaks down into manageable sections, so you’re never overwhelmed by complicated shaping all at once. You’ll work the sole, sides, tongue, and ankle cuff as separate or connected components, then bring everything together at the end.
The mesh stitch pattern on the sides creates that gorgeous lattice effect you see in the photos. It looks intricate but is actually just a simple combination of chain stitches (ch) and single crochet (sc) worked in a repeating pattern. Once you get the rhythm, your hook practically flies.
I designed these to attach to a rubber sneaker sole, which gives them real structure and durability. You can find these soles online or at craft stores. They transform your crochet work from slipper territory into actual wearable footwear.
Skill Level
I’d call this an intermediate crochet pattern. If you’re comfortable with basic stitches and have made at least a few projects that required shaping, you can absolutely do this. The mesh section might look fancy, but I promise it’s beginner friendly once you understand the repeat.
That said, if you’re brand new to crochet, I’d suggest making a dishcloth or simple hat first just to get comfortable with tension and stitch placement. Then come back to these beauties.
Materials You’ll Need
Gather these supplies before you start. Having everything ready makes the process so much smoother.
Yarn:
Hook:
Additional Supplies:
Gauge
Gauge matters for footwear. Seriously, don’t skip this.
Work 16 sc and 18 rows = 4 inches in single crochet.
If your gauge is off, your boots won’t fit properly. Too loose and they’ll be floppy. Too tight and they’ll be uncomfortable. Adjust your hook size up or down until you match.
Size Information
This pattern is written for women’s US size 7/8 (EU 38/39). I’ll include notes throughout for adjusting up or down.
Finished Measurements:
Abbreviations and Stitch Definitions
Let me break down every stitch you’ll need. Even if you know these by heart, a quick refresher never hurts.
ch = chain: Yarn over, pull through the loop on your hook. This creates foundation stitches and spaces in your work.
sl st = slip stitch: Insert hook into stitch, yarn over, pull through both the stitch and the loop on your hook in one motion. Used for joining and moving across stitches without adding height.
sc = single crochet: Insert hook into stitch, yarn over and pull up a loop (two loops on hook), yarn over and pull through both loops. The shortest and most basic stitch.
hdc = half double crochet: Yarn over, insert hook into stitch, yarn over and pull up a loop (three loops on hook), yarn over and pull through all three loops. Slightly taller than single crochet.
dc = double crochet: Yarn over, insert hook into stitch, yarn over and pull up a loop (three loops on hook), yarn over and pull through two loops, yarn over and pull through remaining two loops. Creates a taller, more open fabric.
BLO = back loop only: Work into only the back loop of the stitch instead of both loops. Creates a ribbed texture.
sk = skip: Pass over the indicated stitch without working into it.
inc = increase: Work two stitches into one stitch.
st(s) = stitch(es)
Step by Step Crochet Pattern Instructions
Here we go. Take a breath, grab your hook, and let’s make some gorgeous boots.
Part 1: The Crocheted Sole
You’ll make two of these, one for each boot.
Row 1: Ch 28. Sc in 2nd ch from hook and in each ch across. (27 sts)
Row 2: Ch 1, turn. 2 sc in first st (increase made), sc in each st across to last st, 2 sc in last st. (29 sts)
Row 3: Ch 1, turn. Sc in each st across. (29 sts)
Row 4: Ch 1, turn. 2 sc in first st, sc in each st across to last st, 2 sc in last st. (31 sts)
Rows 5-8: Ch 1, turn. Sc in each st across. (31 sts)
Row 9: Ch 1, turn. Sc2tog over first 2 sts, sc in each st across to last 2 sts, sc2tog. (29 sts)
Row 10: Ch 1, turn. Sc in each st across. (29 sts)
Row 11: Ch 1, turn. Sc2tog, sc across to last 2 sts, sc2tog. (27 sts)
Rows 12-18: Ch 1, turn. Sc in each st across. (27 sts)
This creates the foot bed portion of your sole.
Toe Shaping:
Row 19: Ch 1, turn. Sc2tog, sc in each st across to last 2 sts, sc2tog. (25 sts)
Row 20: Ch 1, turn. Sc2tog, sc across to last 2 sts, sc2tog. (23 sts)
Row 21: Ch 1, turn. Sc2tog, sc across to last 2 sts, sc2tog. (21 sts)
Row 22: Ch 1, turn. Sc2tog, sc across to last 2 sts, sc2tog. (19 sts)
Row 23: Ch 1, turn. Sc2tog, sc across to last 2 sts, sc2tog. (17 sts)
Fasten off, leaving a long tail for seaming later.
Quick note: If you need a larger size, add 2 chains to your foundation and work 2 additional straight rows in the middle section. For smaller sizes, subtract 2 chains and remove 2 straight rows.
Part 2: Sole Edging and Side Foundation
Pick up your completed sole. You’ll now work around the entire perimeter to create a foundation for the boot sides.
Round 1: Join yarn at center back of sole. Ch 1, work sc evenly around entire sole, placing 3 sc in each corner for smooth turning. Aim for approximately 80-90 sc total depending on your sole size. Sl st to first sc to join. (approximately 84 sts)
Round 2: Ch 1, sc in each st around, working 2 sc in corner stitches. Sl st to join. (approximately 88 sts)
Round 3: Ch 1, sc in BLO of each st around. Sl st to join. (88 sts)
This BLO round creates that nice ridge you see at the base of the boot sides. It separates the sole visually from the upper portion.
Part 3: Mesh Side Panels
This is where the magic happens. The mesh creates that beautiful open lattice pattern.
Round 4: Ch 3 (counts as dc), sk next st, dc in next st, *ch 1, sk 1 st, dc in next st*. Repeat from * around. Sl st to top of ch-3 to join.
Round 5: Ch 3, dc in first ch-1 space, *ch 1, dc in next ch-1 space*. Repeat from * around. Sl st to join.
Rounds 6-10: Repeat Round 5.
By now your mesh should be about 2.5 to 3 inches tall. You can see in the finished boots how the lattice creates an airy, breathable side panel.
Designer tip: If your mesh looks uneven, don’t panic. Block it later and those stitches will settle into place beautifully.
Part 4: Transition to Solid Upper
Now we’ll shift from mesh to solid crochet for structure around the ankle and lacing area.
Round 11: Ch 1, sc in each dc and each ch-1 space around. This fills in the mesh and creates a solid round. Sl st to join. (approximately 88 sts)
Round 12: Ch 1, sc in each st around. Sl st to join. (88 sts)
Round 13: Ch 1, sc in each st around. Sl st to join. (88 sts)
Part 5: Creating the Front Lacing Panel
Here’s where the construction gets interesting. You’ll work back and forth to create the front opening where the tongue and laces go.
Identify the center front of your boot (should be at the toe end). Place stitch markers 12 stitches to the left and 12 stitches to the right of center front. This 24-stitch section becomes your lacing panel opening.
Row 14: Starting at right marker, ch 1, sc in each st around to left marker, leaving the 24 center front stitches unworked. Turn. (64 sts)
Row 15: Ch 1, sc in each st across. Turn. (64 sts)
Rows 16-20: Repeat Row 15.
At this point, you’re building up the back and sides of the ankle portion.
Part 6: Eyelet Row for Laces
Row 21: Ch 1, sc in first 2 sts, *ch 2, sk 2 sts, sc in next 4 sts*. Repeat from * across, ending with sc in last 2 sts. Turn.
Row 22: Ch 1, sc in each sc and 2 sc in each ch-2 space across. Turn. (64 sts)
Part 7: Ribbed Ankle Cuff
Switch to your smaller hook if desired for a tighter cuff.
Row 23: Ch 1, sc in BLO of each st across. Turn. (64 sts)
Rows 24-30: Repeat Row 23.
The BLO creates that stretchy ribbed texture you see at the top of the boots in the photo. It hugs the ankle nicely.
Fasten off, leaving a long tail for finishing.
Part 8: Tongue
The tongue sits under your laces and covers the top of your foot.
Row 1: Ch 14. Sc in 2nd ch from hook and in each ch across. (13 sts)
Rows 2-22: Ch 1, turn. Sc in each st across. (13 sts)
Shaping the Top:
Row 23: Ch 1, turn. Sc2tog, sc across to last 2 sts, sc2tog. (11 sts)
Row 24: Ch 1, turn. Sc in each st across. (11 sts)
Row 25: Ch 1, turn. Sc2tog, sc across to last 2 sts, sc2tog. (9 sts)
Row 26: Ch 1, turn. Sc in each st across. (9 sts)
Fasten off, leaving a long tail.
Part 9: Crocheted Laces
These simple laces complete the look.
Ch 120 or desired length. Sl st in 2nd ch from hook and in each ch across. Fasten off and weave in ends.
Make two laces total.
Assembly Instructions
Time to bring everything together.
1. Attach the sole: Position your crocheted sole piece on top of your rubber sole. Using a leather punch, create holes around the perimeter of the rubber sole about 1/4 inch from the edge and spaced about 1/2 inch apart. Whip stitch your crocheted sole to the rubber sole through these holes. Alternatively, use a strong craft glue or hot glue for attachment.
2. Sew the tongue: Position the tongue at the center front opening. Whip stitch the bottom edge of the tongue to the base of the front opening, right where the mesh meets the solid rounds.
3. Thread the laces: Weave your crocheted laces through the eyelet holes in a crisscross pattern, just like regular sneakers.
4. Weave in all ends: Take your time here. Nothing ruins beautiful crochet faster than loose ends popping out.
Finishing and Care Tips
Blocking: Lightly wet your completed boots and stuff them with plastic bags or tissue paper to hold their shape while drying. This evens out your stitches and sets the final shape.
Washing: Hand wash in cool water with mild detergent. Never machine wash or the rubber sole attachment may loosen.
Storage: Store stuffed with tissue paper to maintain shape between wears.
Making These Your Own
Feel free to customize this crochet tutorial to match your style. Try a variegated yarn for visual interest. Add a contrast color cuff. Skip the mesh section entirely for a solid boot that’s warmer for winter. These Wanderer Boots are your canvas.
I hope this step by step crochet pattern brings you as much joy to make as it did for me to design. My sister still wears her original pair constantly, and honestly, I made myself a second pair in cream last week.
If you love this pattern, I’d be so grateful if you’d save it to your Pinterest boards so you can find it later and so other makers can discover it too. And please, if you make your own Wanderer Boots, drop a comment below or tag me on social media. Seeing your finished projects is genuinely the best part of sharing patterns. Happy hooking!
